Introduction
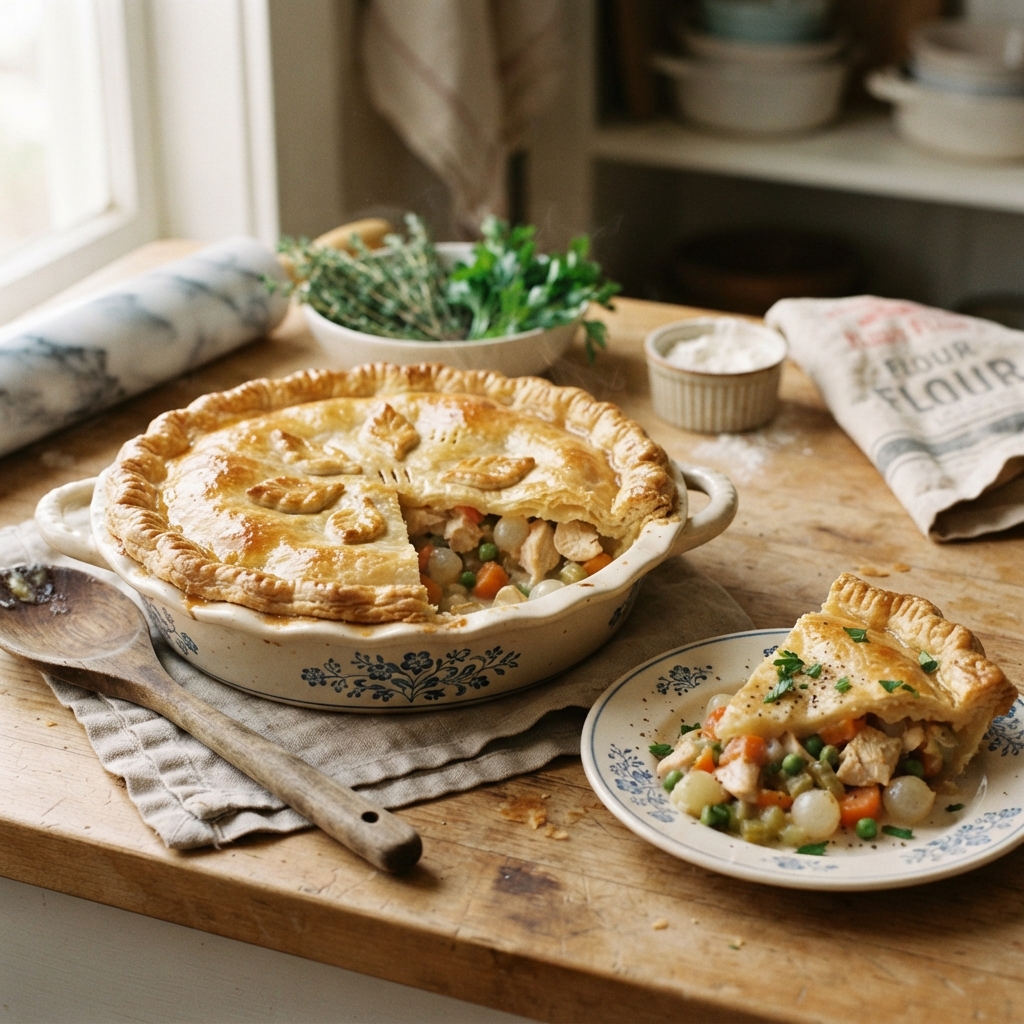
There is perhaps no dish in the culinary canon that embodies the essence of comfort quite like the chicken pot pie. It is a meal that transcends generations, regions, and occasions, serving as a warm embrace on a cold evening, a centerpiece for family gatherings, and a testament to the art of home cooking. When we speak of The Best Chicken Pot Pie Recipe In The World, we are not merely talking about a combination of chicken, vegetables, and pastry. We are talking about a symphony of textures and flavors, where a flaky, golden crust gives way to a creamy, savory filling loaded with tender poultry and crisp-tender vegetables. This recipe has been meticulously refined over years of testing, tasting, and perfecting to ensure that every bite delivers the ultimate satisfaction.
Whether you are a seasoned chef looking to elevate your repertoire or a beginner cook seeking to master a classic dish, this guide will walk you through every nuance of creating a pot pie that stands above the rest. From the science of the roux to the secrets of the perfect crust, we leave no stone unturned. Prepare yourself for a culinary journey that will result in a dish worthy of being passed down as a family heirloom.
The History
To truly appreciate the chicken pot pie, one must understand its storied past. The origins of the pot pie can be traced back to Medieval England, where it was known as a “coffyn.” These early iterations were not necessarily meant to be eaten; rather, the thick crust served as a durable container to preserve the meat filling during long baking periods. The pastry was often hard and inedible, acting merely as a vessel. However, as culinary techniques evolved through the Renaissance and into the Victorian era, the crust became softer, richer, and intended for consumption.
When immigrants brought these recipes to the Americas, the dish underwent a significant transformation. The abundance of poultry in the New World made chicken the protein of choice, replacing the beef or game meats common in Europe. During the Great Depression, pot pies became a staple because they were economical; they allowed cooks to stretch small amounts of meat with plentiful vegetables and gravy. In the mid-20th century, the invention of frozen pot pies democratized the dish, making it a quick dinner option for busy families. However, nothing compares to the homemade version, which retains the soulful history of the dish while utilizing modern ingredients to achieve unparalleled flavor.
Ingredients Breakdown
Creating the best chicken pot pie requires a deep understanding of each component. It is not enough to simply throw ingredients into a pan; each element plays a specific role in the structural integrity and flavor profile of the pie.
The Protein
We recommend using a combination of dark and white meat. While breast meat is lean, thigh meat offers a richer flavor and remains moist during the baking process. Using a rotisserie chicken can save time, but poaching fresh chicken thighs in a seasoned broth yields superior texture and allows you to create a custom stock for the filling.
The Vegetables
The classic mirepoix of onions, carrots, and celery is non-negotiable for the base flavor. However, adding peas, corn, or even mushrooms adds sweetness and umami. The key is to blanch or sauté these vegetables before adding them to the sauce to ensure they are cooked through without becoming mushy in the oven.
The Sauce
The heart of the pot pie is the gravy. A traditional roux made from butter and flour provides the thickening power, but the liquid component is where the magic happens. A combination of chicken stock and heavy cream creates a velvety texture that milk alone cannot achieve. Seasoning this sauce with thyme, parsley, and a touch of white wine elevates it from standard to gourmet.
The Crust
You have two options: homemade or store-bought. A homemade butter crust offers the best flavor and flakiness, achieved by keeping the fat cold and handling the dough minimally. However, a high-quality puff pastry or refrigerated pie crust can yield excellent results with less effort. The goal is a golden brown, shattering crispness that contrasts with the creamy filling.
Step-by-Step Recipe
This narrative walkthrough is designed to guide you through the process with confidence, explaining the why behind every action to ensure success.
Phase 1: Preparation and Poaching
Begin by preparing your chicken. If using raw chicken, place thighs and breasts in a large pot and cover with chicken broth, adding a bay leaf, peppercorns, and a quartered onion. Simmer gently until the internal temperature reaches 165°F. Remove the chicken and let it rest before shredding. Reserve the broth, as this will be the liquid base for your sauce, infused with natural chicken flavor. If using rotisserie chicken, simply shred the meat and discard the skin.
Phase 2: Building the Flavor Base
In a large Dutch oven or heavy-bottomed skillet, melt your butter over medium heat. Add diced onions, carrots, and celery. Sauté these vegetables slowly; you do not want to brown them aggressively, but rather sweat them until they are translucent and fragrant. This process releases their essential oils and sugars. Add minced garlic towards the end to prevent burning. Once aromatic, sprinkle your flour over the vegetables and stir constantly for two minutes. This cooks out the raw flour taste and creates the roux.
Phase 3: Creating the Velouté
Gradually whisk in your reserved chicken broth. It is crucial to add the liquid slowly while whisking vigorously to prevent lumps from forming. As the mixture heats, it will begin to thicken. Once it simmers, reduce the heat and stir in the heavy cream. Add your seasonings now: salt, black pepper, dried thyme, and a pinch of nutmeg. The nutmeg is a secret weapon that adds warmth without being identifiable. Let the sauce simmer until it coats the back of a spoon.
Phase 4: Assembly
Remove the sauce from the heat and fold in the shredded chicken and any additional vegetables like peas or corn. Taste the filling at this stage; it should be slightly saltier than you think necessary, as the crust will absorb some seasoning during baking. Pour the filling into your pie dish. If you are using a bottom crust, line the dish now. If using only a top crust, pour the filling directly into the ceramic dish. Lay your top crust over the filling, crimp the edges to seal, and cut several slits in the top to allow steam to escape. Brush with an egg wash for a glossy finish.
Phase 5: The Bake
Bake in a preheated oven at 400°F. The high heat ensures the crust puffs up quickly before the fat melts out. Bake until the crust is deep golden brown and the filling is bubbling vigorously through the vents. This bubbling is essential as it indicates the filling has reached a safe temperature and the starches have fully activated.
Tips
To guarantee your pot pie achieves legendary status, consider these professional tips and tricks:
- Prevent Soggy Bottoms: If using a bottom crust, brush it with a thin layer of egg white before adding the filling. This creates a barrier that prevents the sauce from soaking into the dough.
- Cool the Filling: Allow your filling to cool slightly before adding the top crust. If the filling is boiling hot, it will melt the fat in the crust prematurely, leading to a dense rather than flaky texture.
- Ventilation is Key: Do not skip cutting slits in the top crust. Steam needs to escape; otherwise, it will make the crust soggy or cause it to slide off the filling.
- Egg Wash Secret: For the deepest golden color, use an egg yolk mixed with a teaspoon of water rather than a whole egg. This provides a richer shine.
- Rest Before Serving: Let the pie rest for at least 15 minutes after removing it from the oven. This allows the gravy to set slightly, making it easier to slice without running everywhere.
- Freezing: You can assemble the pie entirely and freeze it before baking. Add an extra 20-30 minutes to the baking time if cooking from frozen.
Variations and Customizations
While the classic recipe is perfection, the pot pie is a versatile canvas for customization based on dietary needs or flavor preferences.
Gluten-Free Adaptation
To make this recipe gluten-free, substitute the all-purpose flour in the roux with a 1:1 gluten-free baking flour blend. Ensure your pie crust is also certified gluten-free. Cornstarch can also be used as a thickener, though it creates a glossier finish than flour.
Dairy-Free Option
Replace the butter with a high-quality vegan butter or olive oil. Substitute the heavy cream with full-fat coconut milk or a creamy cashew blend. The flavor profile will shift slightly, but the richness will remain.
Protein Swaps
Chicken is traditional, but turkey pot pie is excellent for using holiday leftovers. For a seafood twist, use firm white fish or shrimp and add a splash of white wine to the sauce. Vegetarians can substitute the chicken with chickpeas, white beans, or extra firm tofu.
Vegetable Enhancements
Feel free to incorporate seasonal vegetables. In the autumn, add diced butternut squash or sweet potatoes. In the spring, try asparagus cuts or leeks. Mushrooms, particularly cremini or shiitake, add a deep earthy umami flavor that complements the cream sauce beautifully.
Health Considerations and Nutritional Value
Chicken pot pie is a hearty meal, and understanding its nutritional profile helps in enjoying it mindfully. A standard serving contains a significant amount of calories, primarily due to the crust and the cream-based sauce. However, it is also rich in protein from the chicken and provides essential vitamins from the vegetables.
Calories: Approximately 450-600 calories per serving, depending on crust thickness and cream content.
Protein: High protein content (25-30g) supports muscle repair and satiety.
Carbohydrates: Moderate to high, mostly from the pastry and flour thickener.
Fats: Contains saturated fats from butter and cream; consider using lower-fat milk to reduce this.
To make the dish healthier, consider using a whole wheat crust for added fiber, reducing the amount of butter in the roux, or increasing the ratio of vegetables to chicken. Portion control is also effective; serving the pot pie alongside a large green salad can balance the meal nutritionally.
Ingredients
For the Filling:
- 3 cups cooked chicken, shredded (rotisserie or poached)
- 4 tablespoons unsalted butter
- 1 medium onion, diced
- 2 carrots, peeled and diced
- 2 celery stalks, diced
- 3 cloves garlic, minced
- 1/3 cup all-purpose flour
- 2 cups chicken broth (preferably homemade or low-sodium)
- 1 cup heavy cream
- 1 cup frozen peas and carrots
- 1 teaspoon dried thyme
- 1/2 teaspoon dried parsley
- 1/4 teaspoon nutmeg
- Salt and black pepper to taste
For the Crust:
- 1 package double-crust pie dough (homemade or store-bought)
- 1 egg, beaten (for egg wash)
- 1 tablespoon water
Directions
- Preheat your oven to 400°F (200°C).
- In a large skillet, melt butter over medium heat. Add onion, carrots, and celery. Cook until softened, about 5-7 minutes.
- Add garlic and cook for 1 minute until fragrant.
- Sprinkle flour over the vegetables and stir continuously for 2 minutes to cook the raw flour taste.
- Gradually whisk in chicken broth and heavy cream. Bring to a simmer and cook until thickened, about 5 minutes.
- Stir in thyme, parsley, nutmeg, salt, and pepper.
- Remove from heat and fold in the shredded chicken and frozen peas.
- Roll out one piece of pie crust and place it into a 9-inch pie dish. Pour the filling into the crust.
- Roll out the second piece of crust and place it over the filling. Crimp the edges to seal and cut slits in the top.
- Mix the beaten egg with water and brush over the top crust.
- Bake for 30-40 minutes until the crust is golden brown and the filling is bubbling.
- Let cool for 15 minutes before serving.
FAQ
Can I make chicken pot pie ahead of time?
Yes, you can assemble the pie completely and refrigerate it for up to 24 hours before baking. You may need to add a few extra minutes to the baking time if the pie is cold from the fridge.
Why is my filling too runny?
This usually happens if the roux wasn’t cooked long enough or if the pie wasn’t allowed to rest after baking. The filling continues to thicken as it cools.
Can I use milk instead of heavy cream?
Yes, but the sauce will be thinner and less rich. To compensate, you can increase the flour in the roux slightly or simmer the sauce longer to reduce it.
How do I store leftovers?
Store leftovers in an airtight container in the refrigerator for up to 3 days. Reheat in the oven to maintain crust crispiness, though microwaving is acceptable for speed.
Is it possible to make this in individual portions?
Absolutely. Use ramekins instead of a large pie dish. Reduce the baking time to approximately 20-25 minutes for individual pot pies.
Summary (in two lines)
This ultimate chicken pot pie combines a creamy, savory filling with a flaky golden crust for the perfect comfort food experience.
Follow our detailed guide to master the techniques needed to create a legendary dish that will become a family favorite.