Zuccotto is an elegant, dome-shaped Italian dessert that brings together the richness of chocolate, the boldness of coffee, and the lightness of sponge cake in a stunning and delicious presentation. Perfect for special occasions or when you want to impress guests with a refined yet indulgent treat, this dessert is inspired by the architecture of Florence and is traditionally filled with sweetened ricotta or cream-based mixtures. In this version, layers of coffee-soaked sponge cake encase a luxurious filling of chocolate and coffee cream, resulting in a heavenly combination of textures and flavors that’s simultaneously creamy, fluffy, rich, and aromatic.
The History of Zuccotto
Zuccotto dates back to the Renaissance period and is believed to have been created in Florence, Italy. It’s said that the dessert’s distinctive dome shape was inspired by the city’s iconic Duomo cathedral, particularly Brunelleschi’s dome. The name “zuccotto” derives from the Italian word “zucca,” which means “pumpkin” or “gourd,” referencing the dessert’s rounded, molded form. Originally made with ricotta, citrus, and almonds, and sometimes soaked in Alchermes liqueur, the recipe evolved over time with regional variations incorporating sponge cake, chocolate, nuts, and liqueur-soaked layers. The modern take on zuccotto often features rich fillings like whipped cream, mascarpone, and flavored additions such as cocoa, coffee, or liqueurs. Our chocolate and coffee cream version is a nod to the classic while offering a more decadent and contemporary flavor experience.
Ingredients Breakdown
For the Cake Shell: 1 large sponge cake (homemade or store-bought), sliced into thin, even pieces. ½ cup strong brewed coffee or espresso, cooled. Optional: 2 tablespoons coffee liqueur or dark rum.
For the Filling: 1 cup heavy cream. ½ cup mascarpone cheese. ¼ cup powdered sugar. 2 tablespoons cocoa powder. 2 teaspoons instant espresso powder or finely ground coffee. 1 teaspoon vanilla extract. ½ cup finely chopped dark or semi-sweet chocolate or mini chocolate chips.
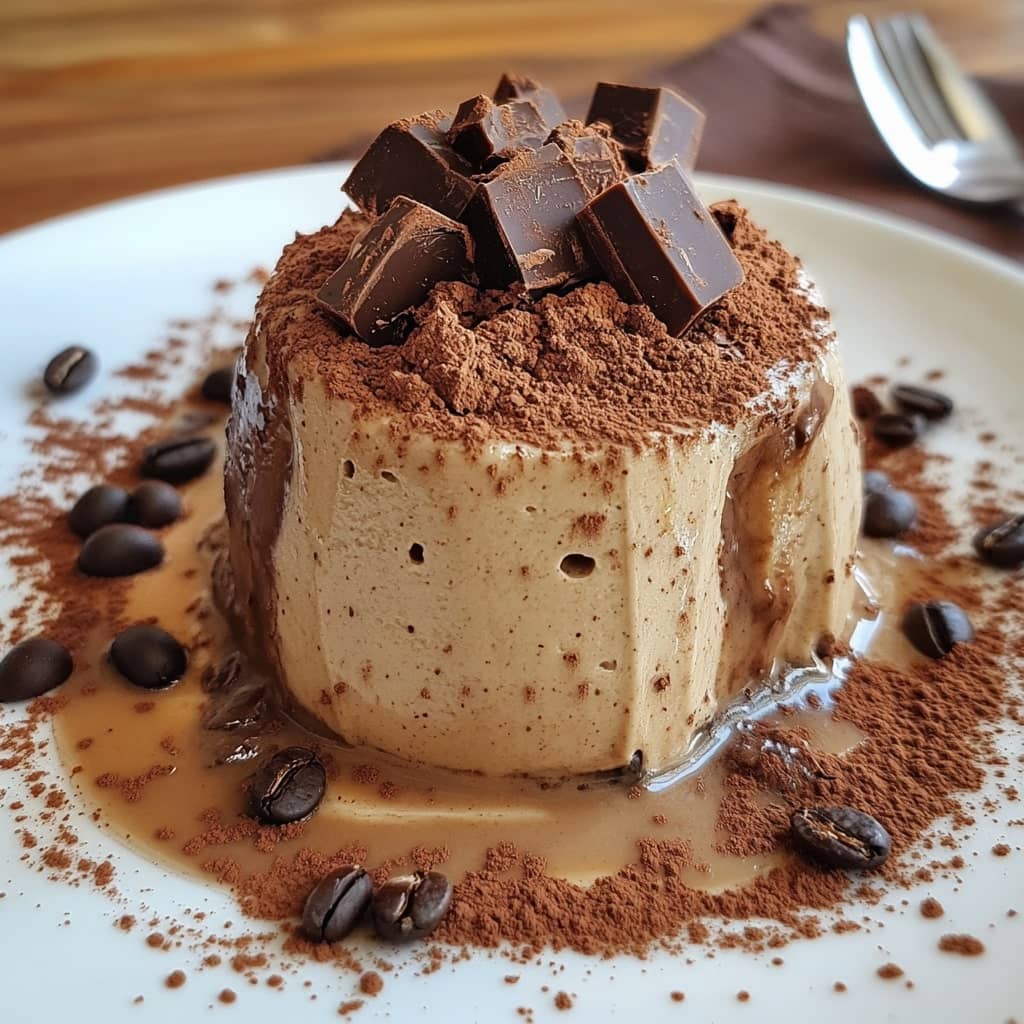
For Decoration: Cocoa powder or grated chocolate for dusting. Optional: whipped cream, chocolate curls, or chocolate-covered espresso beans.
Step-by-Step Recipe
Step 1: Line a round bowl (about 1.5 to 2-quart capacity) with plastic wrap, allowing excess to hang over the edges for easy unmolding.
Step 2: Lightly dip each slice of sponge cake into the cooled coffee (mixed with liqueur if using) and press them into the bowl to line the entire interior, overlapping slightly and ensuring no gaps. Reserve some slices for the top layer, which will later become the base.
Step 3: In a large mixing bowl, beat the heavy cream, mascarpone, powdered sugar, cocoa powder, espresso powder, and vanilla extract until smooth and thick but fluffy. Fold in the chopped chocolate.
Step 4: Spoon the filling into the cake-lined bowl, smoothing it out evenly. Cover the top with the reserved cake slices, pressing lightly to seal the filling.
Step 5: Fold the excess plastic wrap over the top and gently press down to compress slightly. Refrigerate the zuccotto for at least 4–6 hours, preferably overnight, to allow it to set fully.
Step 6: To serve, carefully unmold the zuccotto onto a serving plate and peel away the plastic wrap. Dust with cocoa powder or decorate as desired with chocolate curls, whipped cream, or espresso beans. Slice and enjoy.
Tips for the Perfect Zuccotto
Use a light, airy sponge cake to ensure the dome holds its shape without becoming too dense. Dipping the cake slices quickly into the coffee prevents them from becoming soggy while still adding flavor. If using liqueur, balance it carefully so it complements the dessert without overpowering the coffee and chocolate notes. Chill the bowl before assembling to help keep the filling firm during preparation. For the creamiest texture, make sure the mascarpone and cream are cold before whipping. If desired, freeze the zuccotto slightly before unmolding for cleaner slices and a firmer structure. When dusting with cocoa powder, use a fine sieve for an even, elegant finish. You can also drizzle with a touch of chocolate sauce or coffee syrup for extra flair.
Variations and Customizations
Swap the coffee and cocoa filling for fruit-based ones, such as raspberry cream or lemon mascarpone. Add chopped toasted nuts like hazelnuts or almonds for added crunch and depth of flavor. For a tiramisu-inspired twist, use ladyfingers instead of sponge cake and layer with a mascarpone-coffee cream. If you prefer a non-dairy option, use coconut cream and dairy-free chocolate, along with plant-based sponge cake. Incorporate flavor liqueurs like Kahlúa, Amaretto, or Irish cream into the coffee soak or cream filling. Add a swirl of Nutella or chocolate ganache in the center for a molten core surprise. Use white chocolate in place of dark chocolate for a sweeter, creamier flavor. For a festive version, decorate with holiday sprinkles, edible gold dust, or crystallized ginger. You can also make individual mini zuccottos using ramekins or small bowls for personal servings.
Health Considerations and Nutritional Value
Zuccotto with chocolate and coffee cream is a rich dessert meant for occasional indulgence. Each serving provides a generous amount of calories, mostly from fat and sugar, especially due to the cream, mascarpone, and chocolate. It also contains caffeine from the coffee and cocoa, which may be a consideration for those sensitive to stimulants. While it does offer some calcium from the dairy and antioxidants from dark chocolate, it’s not a health food and should be enjoyed in moderation. To make it lighter, you can use low-fat cream, reduced sugar, or skip the chocolate chips. Plant-based or dairy-free versions are possible with alternatives like almond milk whipped cream and coconut-based mascarpone. Keep in mind that alcohol content may remain in the finished dessert if the liqueur is not cooked out, so it’s not suitable for all audiences unless you opt for an alcohol-free soak.
FAQ
Can I make zuccotto in advance? Yes, zuccotto is actually best made a day ahead to allow it to set properly in the fridge.
What kind of bowl should I use? Use a round mixing bowl or dome mold that holds about 1.5 to 2 quarts.
Can I freeze zuccotto? Yes, you can freeze it for up to 2 weeks. Thaw in the refrigerator for several hours before serving.
Can I use store-bought cake? Absolutely. Store-bought sponge cake or even pound cake can save time and work just as well.
Can I leave out the coffee or alcohol? Yes, substitute with milk, hot chocolate, or a flavored syrup if you want to skip the coffee or liqueur.
Can I use whipped cream instead of mascarpone? You can, but mascarpone adds richness and structure. A whipped cream-only filling will be lighter and may not hold its shape as well.
Zuccotto dessert with chocolate and coffee cream
Ingredients
- 10 oz unsalted butter high quality and at room temperature (if using salted butter, omit the added salt)
- 1¼ cups baker’s sugar known as caster sugar in the UK
- 6 eggs lightly beaten
- 2 cups self-rising flour sifted (or use all-purpose flour with 2 teaspoons baking powder)
- A pinch of salt
- 6 oz raspberry jam for the filling
- 6 oz heavy whipping cream for the filling
- 1 teaspoon baker’s sugar or confectioners’ sugar for dusting the top of the cake
Instructions
- Special Equipment: Two 8-inch round cake tins, parchment paper, handheld or stand mixer
- Oven Temperature: 350°F (180°C)
- Making the Cake
- Begin by lining the bottoms of both cake tins with parchment paper. Grease the tins thoroughly with butter or non-stick spray, then dust them lightly with flour. Set aside.
- In a large mixing bowl, using either a handheld or stand mixer, cream the butter and sugar together until the mixture is very light, fluffy, and pale in color—this is especially noticeable when using high-quality, rich yellow butter.
- Add about one-third of the beaten eggs and mix on medium speed until fully incorporated. Follow this by adding about a third of the sifted flour. Continue alternating between the eggs and flour in thirds, mixing well after each addition. After the final addition of flour, reduce the mixer to low speed and mix just until everything is combined—be careful not to overmix.
- Use a kitchen scale to divide the batter evenly between the prepared tins. Place the tins on the center rack of the preheated oven and bake for approximately 35 minutes. Keep in mind that oven performance varies, so avoid opening the oven door until the cakes are visibly well-risen and you can smell the aroma through the oven window.
- To check for doneness, insert a cake tester or thin skewer into the center of each cake. If it comes out clean or with just a few crumbs, they’re ready. If underbaked, the cakes may collapse after cooling, so this step is crucial.
- Once baked, remove the cakes from the oven and let them cool in the tins. After a few minutes, place a cooling rack over each cake, invert carefully, then remove the tins and peel off the parchment paper. Allow the cakes to cool completely before proceeding to the filling.
- Filling and Assembling the Victoria Sandwich
- Whip the heavy cream by itself—without adding any sugar or flavoring—until it is thick and firm enough to hold its shape between the cake layers. Avoid overwhipping, as this can cause the cream to turn buttery.
- Using a cake leveler or serrated knife, trim the tops of the cake layers so they’re even and flat. Place one layer, trimmed side up, on a serving plate. Spread a generous layer of raspberry jam over the surface. Don’t worry too much about exact amounts—it may take a little practice to find your preferred quantity, and the flavor will still be delicious either way.
- Next, spread the whipped cream over the jam. Be generous again, but leave a small margin at the edge, as placing the top layer will naturally press the filling outward. Place the second cake layer on top, trimmed side down, to create a smooth surface.
- Finish by sprinkling the top with baker’s sugar or dusting with confectioners’ sugar. Chill the assembled cake in the refrigerator for 1 to 2 hours before serving. This helps the layers set and makes it easier to achieve clean, neat slices when cutting into the Victoria Sandwich.