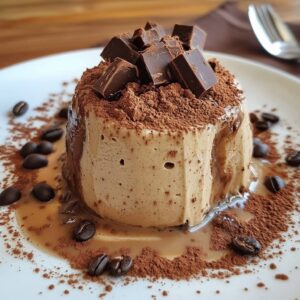
Zuccotto dessert with chocolate and coffee cream
Zuccotto with chocolate and coffee cream is a luxurious, dome-shaped Italian dessert that combines espresso-soaked cake with a rich mascarpone and cocoa filling. Elegant, customizable, and irresistibly flavorful, it’s the perfect make-ahead treat for coffee and chocolate lovers alike.
Ingredients
- 10 oz unsalted butter high quality and at room temperature (if using salted butter, omit the added salt)
- 1¼ cups baker’s sugar known as caster sugar in the UK
- 6 eggs lightly beaten
- 2 cups self-rising flour sifted (or use all-purpose flour with 2 teaspoons baking powder)
- A pinch of salt
- 6 oz raspberry jam for the filling
- 6 oz heavy whipping cream for the filling
- 1 teaspoon baker’s sugar or confectioners' sugar for dusting the top of the cake
Instructions
- Special Equipment: Two 8-inch round cake tins, parchment paper, handheld or stand mixer
- Oven Temperature: 350°F (180°C)
- Making the Cake
- Begin by lining the bottoms of both cake tins with parchment paper. Grease the tins thoroughly with butter or non-stick spray, then dust them lightly with flour. Set aside.
- In a large mixing bowl, using either a handheld or stand mixer, cream the butter and sugar together until the mixture is very light, fluffy, and pale in color—this is especially noticeable when using high-quality, rich yellow butter.
- Add about one-third of the beaten eggs and mix on medium speed until fully incorporated. Follow this by adding about a third of the sifted flour. Continue alternating between the eggs and flour in thirds, mixing well after each addition. After the final addition of flour, reduce the mixer to low speed and mix just until everything is combined—be careful not to overmix.
- Use a kitchen scale to divide the batter evenly between the prepared tins. Place the tins on the center rack of the preheated oven and bake for approximately 35 minutes. Keep in mind that oven performance varies, so avoid opening the oven door until the cakes are visibly well-risen and you can smell the aroma through the oven window.
- To check for doneness, insert a cake tester or thin skewer into the center of each cake. If it comes out clean or with just a few crumbs, they’re ready. If underbaked, the cakes may collapse after cooling, so this step is crucial.
- Once baked, remove the cakes from the oven and let them cool in the tins. After a few minutes, place a cooling rack over each cake, invert carefully, then remove the tins and peel off the parchment paper. Allow the cakes to cool completely before proceeding to the filling.
- Filling and Assembling the Victoria Sandwich
- Whip the heavy cream by itself—without adding any sugar or flavoring—until it is thick and firm enough to hold its shape between the cake layers. Avoid overwhipping, as this can cause the cream to turn buttery.
- Using a cake leveler or serrated knife, trim the tops of the cake layers so they’re even and flat. Place one layer, trimmed side up, on a serving plate. Spread a generous layer of raspberry jam over the surface. Don’t worry too much about exact amounts—it may take a little practice to find your preferred quantity, and the flavor will still be delicious either way.
- Next, spread the whipped cream over the jam. Be generous again, but leave a small margin at the edge, as placing the top layer will naturally press the filling outward. Place the second cake layer on top, trimmed side down, to create a smooth surface.
- Finish by sprinkling the top with baker’s sugar or dusting with confectioners’ sugar. Chill the assembled cake in the refrigerator for 1 to 2 hours before serving. This helps the layers set and makes it easier to achieve clean, neat slices when cutting into the Victoria Sandwich.