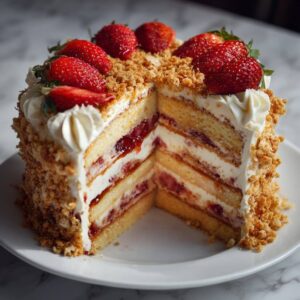
Strawberry Crunch Layer Cake
Strawberry Crunch Layer Cake is a vibrant, nostalgic dessert with layers of strawberry cake, creamy frosting, and a signature crunchy topping that brings back childhood memories. Perfect for parties or just a sweet indulgence, this cake is a celebration of flavor, texture, and joyful creativity.
Ingredients
- Cake Layers
- 1 box Duncan Hines white cake mix
- 1 cup 5 oz all-purpose flour
- 1 cup 7 oz granulated sugar
- ¼ teaspoon salt
- 1 cup 9 oz sour cream, at room temperature
- ½ cup 4 oz unsalted butter, melted
- 1 cup 8 oz milk, at room temperature
- 4 large egg whites at room temperature
- 1 teaspoon vanilla extract
- ¼ cup 2 oz strawberry reduction
- 1 drop red food coloring optional, for a more vibrant strawberry layer
- ½ teaspoon strawberry emulsion optional, enhances strawberry flavor
- Strawberry Reduction
- 5 cups 36 oz fresh or frozen strawberries, thawed if frozen
- ½ cup 4 oz granulated sugar
- 2 teaspoons lemon zest
- 1 tablespoon lemon juice
- 1 pinch of salt
- Strawberry Crunch Topping
- 1 cup 1 oz freeze-dried strawberries
- 2½ cups 8 oz shortbread cookies
- ½ teaspoon strawberry emulsion or extract optional, for extra flavor
- ¼ cup unsalted butter melted
Instructions
Strawberry Reduction Instructions
- Start by defrosting frozen strawberries or chopping fresh ones. Place the strawberries and granulated sugar in a heavy-bottomed saucepan and stir to combine. Cook over medium heat until the strawberries begin to break down and release their juices. Add the lemon zest, lemon juice, strawberry extract (if using), and a pinch of salt, then turn off the heat. Blend the mixture until smooth using an immersion blender. If you don’t have one, carefully transfer the hot mixture to a blender and puree until smooth. Return the blended strawberries to the saucepan over low heat. Simmer gently, stirring occasionally, for 20 to 30 minutes or until the mixture reduces by half and thickens to a tomato sauce-like consistency—avoid a watery texture. Once reduced, let it cool completely before using. Measure out ¼ cup of the reduction to use in the strawberry cake layer. If you're making it in advance, store it covered in the refrigerator for up to one week or freeze for up to three months.
Strawberry Crunch Cake Instructions
- Prepare three 6-inch round cake pans by greasing them with cake goop or lining with parchment paper. In the bowl of a stand mixer fitted with a paddle attachment, combine the white cake mix, flour, sugar, salt, sour cream, melted butter, milk, egg whites, and vanilla extract. Mix on medium speed for 2 minutes until the batter is smooth and well blended. Divide the batter evenly between two of the prepared pans—about 17 ounces (or 3 cups) per pan if using a kitchen scale. Leave the remaining batter in the bowl. To that reserved portion, add ¼ cup of strawberry reduction and (optionally) ½ teaspoon of strawberry emulsion. Mix until fully incorporated, then add a drop of red food coloring to brighten the strawberry hue (optional but helps prevent a purple tint after baking). Pour the strawberry-flavored batter into the third prepared pan. Bake all three layers at 335°F for 30 to 35 minutes, or until a toothpick inserted in the center comes out clean. Note: the strawberry layer may finish baking slightly earlier due to the extra moisture content. Allow the cakes to cool in their pans for about 10 minutes, then gently turn them out onto a cooling rack and let them cool completely. Once cooled, wrap the layers in plastic wrap and flash freeze for up to one hour before assembling the cake to make stacking easier.
Strawberry Crunch Instructions
- Place the shortbread cookies in the bowl of a food processor and pulse until you achieve medium-sized crumbs. If some large pieces remain, break them down by hand—uniformity isn’t necessary. Add the strawberry extract or emulsion (if using) and pulse again until a coarse crumble forms. Transfer the cookie crumbs to a large bowl. Next, add the freeze-dried strawberries to the food processor and pulse until the pieces are about the same size as the shortbread crumbs. Immediately add them to the bowl with the cookies. Pro tip: process freeze-dried strawberries quickly and directly from the package—they absorb moisture from the air and can become sticky or gummy if left out too long. Pour in the melted butter and stir until the crumbs are evenly coated and hold their texture. Set aside while assembling the cake. If not using immediately, store the crumble in an airtight container or zip-top bag. It will stay fresh at room temperature for up to a week or in the freezer for longer storage.
How to Assemble the Strawberry Crunch Cake
- Begin by placing a trimmed white cake layer on a cake board or serving plate. Spread a thin, even layer of buttercream frosting over the top and pipe a dam of buttercream around the edge to hold the filling in place. Spoon about 3 tablespoons of strawberry reduction into the center of the dam and spread it gently. Take the strawberry cake layer and spread a layer of buttercream on the bottom side to prevent the reduction from seeping into the cake, then place it on top of the first layer. Repeat the same process with the next white cake layer: pipe a dam, add reduction, top with cake. Once all layers are stacked, apply a thin crumb coat of buttercream around the entire cake to lock in any loose crumbs. Chill the cake in the refrigerator for 15 minutes to set the crumb coat. After chilling, apply a final, smooth layer of buttercream over the entire cake. While the buttercream is still soft and “tacky,” gently press the strawberry crunch mixture onto the sides of the cake, holding the cake over a sheet pan or large bowl to catch any excess. For the top, use a pastry ring to help control placement of the crumble, especially if you're planning to pipe decorative buttercream around the edges. Sprinkle the crumble in the center of the top, keeping the border clean. Finish by using a fluted piping tip to pipe buttercream dollops around the top edge of the cake and place a halved or sliced strawberry on each dollop for a beautiful finishing touch.
Notes
Important Things to Know Before You Begin
One of the best investments you can make as a beginner baker is a digital kitchen scale. Weighing your ingredients—not just scooping them—dramatically improves the accuracy of your baking and helps prevent cake disasters. It’s simple to use and consistently delivers better results every time you bake.
Practice mise en place, a French culinary principle that means “everything in its place.” Before you begin mixing, measure and prepare all of your ingredients. This keeps the process smooth and minimizes the risk of forgetting a key component in your recipe.
If you're new to baking and decorating, you might find extra guidance helpful. Be sure to check out my “How to Decorate Your First Cake” blog post for beginner-friendly tips and step-by-step instructions.
Another essential tip: ensure all cold ingredients—like butter, eggs, and milk—are at room temperature or slightly warm. This is important because it helps create a smooth emulsion, allowing the ingredients to combine properly for a uniform, well-textured cake.
For foolproof cake release, make your own pan release (also known as cake goop). It’s incredibly effective and a reliable way to prevent sticking.
Always chill your cake layers before filling and frosting. Cold cakes are easier to handle, produce cleaner cuts, and help the frosting stay in place. Once frosted and chilled, this cake can even be covered in fondant or used as part of a tiered cake—it holds up beautifully.
And if you’d rather skip making the strawberry crunch topping from scratch, feel free to use pre-made strawberry shortcake crunch. It’s a convenient shortcut and still gives great results.