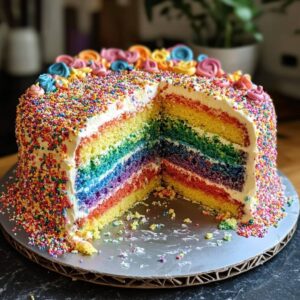
Rainbow Surprise Cake
Rainbow Surprise Cake is a vibrant, joyful dessert with colorful layers and a hidden candy center that brings fun to any celebration. Easy to customize and visually stunning, it’s the ultimate showstopper for birthdays, parties, and festive gatherings.
Ingredients
For the Cake Layers:
- Cooking spray for greasing pans
- 4 1/2 cups cake flour
- 1 1/2 tablespoons baking powder
- 1 teaspoon fine salt
- 3 cups granulated sugar
- 3 sticks 1 1/2 cups unsalted butter, softened to room temperature
- 8 large egg yolks
- 2 cups whole milk
- 1 tablespoon vanilla extract
- 6 teaspoons gel food coloring 1 teaspoon of each of 6 colors; recommended: Cake Craft Coloring Gel Startup Kit
For the American Buttercream (Yields ~6 Cups):
- 1 pound 2 cups unsalted butter, softened to room temperature
- 7 to 8 cups powdered sugar adjust for desired sweetness and consistency
- 2 tablespoons heavy cream or whole milk
- 2 teaspoons vanilla extract
For the Filling and Topping:
- Approximately 2 cups of assorted edible sprinkles or candy-coated chocolates such as:
- Wilton Gold Pearlized Sprinkles Mix
- Wilton Pearlized Sugar Food Decorative Gold (5.25 oz)
- Wilton Edible Glitter Gold Stars
Instructions
Day 1: Baking the Cake Layers
- Start by preparing your cake pans. Line two or three 9-inch round pans with parchment paper rounds, then lightly coat them with cooking spray. Position a rack in the center of your oven and preheat it to 350°F. In a large bowl, whisk together the cake flour, baking powder, and salt until evenly combined. In the bowl of a stand mixer fitted with the paddle attachment, cream the butter and sugar on medium speed for about 5 minutes, or until the mixture is pale and slightly fluffy. Pause to scrape down the sides of the bowl with a rubber spatula. Return the mixer to low speed and add in the egg yolks one at a time, ensuring each is fully incorporated before adding the next. Stop and scrape again. In a measuring cup, mix the milk and vanilla extract together. Now begin alternating between adding the dry ingredients and the milk mixture to the batter: start with one-third of the dry ingredients, mix on low, scrape the bowl, then add half the milk mixture and mix. Repeat with another third of the flour, the remaining milk mixture, and finally the last portion of flour, scraping the bowl between each addition. Once everything is added, thoroughly scrape the bowl—especially the bottom—to ensure even mixing. Beat the batter on medium speed for another 5 minutes until smooth and uniform.
- To portion and color the batter, note that the total weight should be about 4 pounds, 13 ounces. Scoop approximately 12 1/2 ounces (about 2 cups) of batter into a small bowl, add 1 teaspoon of gel food coloring, and mix well with a spatula. Pour this colored batter into a prepared cake pan. Repeat this step for a second and third color if you have three pans. Cover the remaining batter with plastic wrap and keep it at room temperature until ready to use—only portion and color what you need for each batch. Bake the 2 or 3 layers for 15 to 20 minutes, or until they are set, spring back when touched, and slightly pull away from the pan sides. Once done, transfer the cakes to a wire rack and let them cool for about 30 minutes. Remove the cakes from the pans, leaving the parchment on, and wrap each slightly warm cake tightly in plastic wrap. Keep them at room temperature. Wash, dry, and re-line the pans before repeating the dividing, coloring, and baking process until all the batter is used. Cool and wrap the remaining layers as before, and leave them at room temperature until you’re ready to assemble—up to one day.
Day 2: Frosting and Assembling the Cake
- To make the buttercream, beat the softened butter in a stand mixer fitted with a paddle attachment on medium speed until smooth. Reduce the speed to low and gradually add in 7 cups of powdered sugar. Once incorporated, raise the speed to medium-low and continue mixing until well blended. Lower the speed again and add the cream or milk along with the vanilla extract. Mix until combined. Increase the mixer speed to medium and beat until the frosting is smooth and creamy. If a firmer texture is desired, add the remaining 1/2 to 1 cup of powdered sugar and beat again on medium speed until light and fluffy.
- Begin the assembly by organizing your wrapped cake layers in rainbow order, deciding which two will be the center layers with the surprise filling. For instance, use purple and blue for the bottom, green and yellow for the center (with cavities for filling), and orange and red for the top. To start building the base, spread a small amount of frosting in the center of a cake board or serving plate to keep the cake from sliding. Line the edges of the board with four strips of parchment paper to protect it during frosting. Unwrap the purple cake layer, remove the parchment, and level it with a serrated knife if needed. Center it on the plate and top with 3/4 cup of frosting, spreading it evenly. Next, unwrap the blue layer, level it, remove the parchment, and place it on top of the purple layer. Align the layers and frost with another 3/4 cup of buttercream.
- Now prepare the filled layers. Unwrap the green layer, keeping the parchment attached, and level it. Use a 3-inch round cutter to remove the center of the layer. Carefully invert the green layer over the blue one, using the parchment to help guide it into position, then remove the parchment. Frost the green ring with 1/2 cup of buttercream, avoiding the center hole. Repeat the same process with the yellow layer—cut out the center, invert and align it over the green layer, remove the parchment, and frost both the top and inside of the hole with a thin layer of buttercream. Fill the cavity created by the green and yellow layers with a generous amount of sprinkles or candy-coated chocolates. Pack the sprinkles gently but firmly into the bottom and sides of the hole to ensure the center is filled.
- Continue stacking by unwrapping the orange layer, leveling it if necessary, and placing it carefully on top of the yellow layer. Spread 3/4 cup of buttercream on top, smoothing it evenly. Finally, unwrap and level the red layer, invert it on top of the orange layer, and align it neatly. For the crumb coat, use about half of the remaining buttercream to apply a thin layer over the top and sides of the cake. It’s normal if crumbs appear during this step—this layer will be covered later. Chill the crumb-coated cake in the refrigerator for at least 1 hour. Keep the rest of the buttercream covered at room temperature.
- Once the cake has chilled, frost it with the remaining buttercream, smoothing the top and sides for a clean finish. Add decorative sprinkles, edible glitter, or any desired toppings to complete the look. Before slicing, chill the finished cake for at least 1 more hour—or overnight, if preferred—to allow it to set completely. When ready to serve, use a long, sharp knife to slice through the cake. Be prepared for some resistance as the knife cuts through the sprinkle-filled center. The vibrant interior and surprise candy filling will create a stunning reveal that’s sure to impress your guests.