Rainbow Layer Cake
The Rainbow Layer Cake is a colorful, joyful dessert that’s perfect for celebrations, blending stunning visuals with sweet, fluffy flavor. Despite its dazzling look, it’s surprisingly approachable to bake with the right prep and creativity.
Ingredients
Rainbow Cake Ingredients
- 24 oz cake flour
- 24 oz granulated sugar
- 1 teaspoon salt
- 2 tablespoons baking powder
- 1 teaspoon baking soda
- 10 oz egg whites room temperature
- 6 oz vegetable oil
- 18 oz buttermilk room temperature or slightly warm
- 12 oz unsalted butter softened
- 1 tablespoon vanilla extract
Easy Buttercream Frosting Ingredients
- 8 oz pasteurized egg whites
- 32 oz powdered sugar
- 32 oz unsalted butter softened but not melted
- 2 teaspoons vanilla extract
- ½ teaspoon salt
- 1 tiny dot of purple food coloring to neutralize yellow tones and make the buttercream appear white
Gold Drip Decoration
- 5 oz white candy melts
- 1 oz chocolate candy melts
- 1 oz hot water
- 1 teaspoon Truly Mad Plastics Super Gold Dust
- ¼ teaspoon Everclear vodka, or lemon extract (to mix with gold dust for painting or dripping)
Instructions
Important Preparation Note
- It is absolutely essential that all ingredients listed as “room temperature” are genuinely at room temperature and that all components are measured accurately by weight. This ensures that everything incorporates properly and your batter achieves the right consistency.
Baking Instructions
- Preheat your oven to 335ºF (168ºC). Prepare six 8"x2" round cake pans by greasing them with cake goop or your preferred pan release. Line the bottoms with parchment paper to ensure easy removal of the baked cakes.
- In a small bowl, combine 8 oz of buttermilk with the vegetable oil and set aside. In a separate bowl, whisk together the remaining buttermilk, egg whites, and vanilla extract until the eggs are fully broken up; set this mixture aside as well.
- In the bowl of a stand mixer fitted with the paddle attachment, combine the flour, granulated sugar, baking powder, baking soda, and salt. Mix on low for about 10 seconds to evenly distribute the dry ingredients.
- Add the softened butter to the dry ingredients and mix on low speed until the mixture has the consistency of coarse sand, which should take about 30 seconds. Pour in the buttermilk/oil mixture and mix until the dry ingredients are fully moistened. Then increase the speed to medium (setting 4 on a KitchenAid mixer) and continue mixing for 2 full minutes to build the structure of the cake. Skipping this step may result in a collapsed cake.
- Scrape down the sides of the bowl thoroughly, reduce the mixer speed to low, and gradually pour in the egg white/buttermilk/vanilla mixture in three parts, allowing the batter to mix for about 15 seconds between each addition. Scrape the bowl again to ensure everything is fully incorporated.
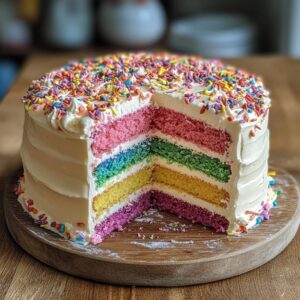
- Divide the finished batter evenly into six bowls, weighing out 15 ounces of batter per bowl for accuracy. Color each batch using electric gel food coloring as follows:
- Pink layer: ½ teaspoon pink
- Orange layer: ¼ teaspoon yellow + ¼ teaspoon orange
- Yellow layer: ½ teaspoon yellow
- Green layer: ¼ teaspoon yellow + ½ teaspoon green
- Blue layer: ½ teaspoon blue
- Purple layer: ¼ teaspoon pink + ½ teaspoon purple
- Transfer the colored batters to the prepared pans and bake for 20–24 minutes, or until the edges of the cakes just begin to pull away from the sides of the pans. Avoid underbaking, as this can cause the centers to collapse.
- Once the cakes are out of the oven, immediately give each pan one firm tap on the countertop to release steam, which helps prevent the cakes from shrinking too much. Let the cakes cool in the pans for about 10 minutes before removing them. Some shrinking is normal as they cool.
- Once cooled, wrap and freeze the cake layers for 30–60 minutes before trimming and assembling. Frost and fill the cake with buttercream frosting, smoothing the exterior as desired. Chill the frosted cake in the refrigerator for 15 minutes before applying the gold drip.
- Wait for the drip to fully set before painting it with gold. Finish decorating with buttercream rosettes, sprinkles, or any additional accents you like.
- Easy Buttercream Instructions
- In the bowl of a stand mixer fitted with the whisk attachment, combine the pasteurized egg whites and powdered sugar. Mix on low until combined, then increase the speed to high. While mixing, gradually add in the softened butter in small chunks. Once all the butter has been incorporated, add in the vanilla extract and salt.
- Continue mixing on high speed until the buttercream is light, fluffy, and no longer has a strong buttery taste. For a whiter buttercream, you can optionally add a very small dot of purple food coloring to neutralize the yellow tint. Switch to the paddle attachment and mix on low speed for 10 minutes to eliminate any air bubbles and create a smooth texture.
- Gold Drip Instructions
- Melt the white and chocolate candy melts together in a microwave-safe bowl using 15-second intervals until nearly melted. Add in the hot water and microwave for an additional 15 seconds. Stir the mixture until it’s completely smooth and glossy. Add yellow food coloring and stir again until evenly blended.
- Transfer the ganache to a piping bag, snip off a small tip, and carefully drip the ganache around the chilled cake’s edge. Once the drip has set, mix the Super Gold Dust with Everclear, vodka, or lemon extract to create an edible gold paint. Use a small brush to paint over the drip for a stunning metallic finish.