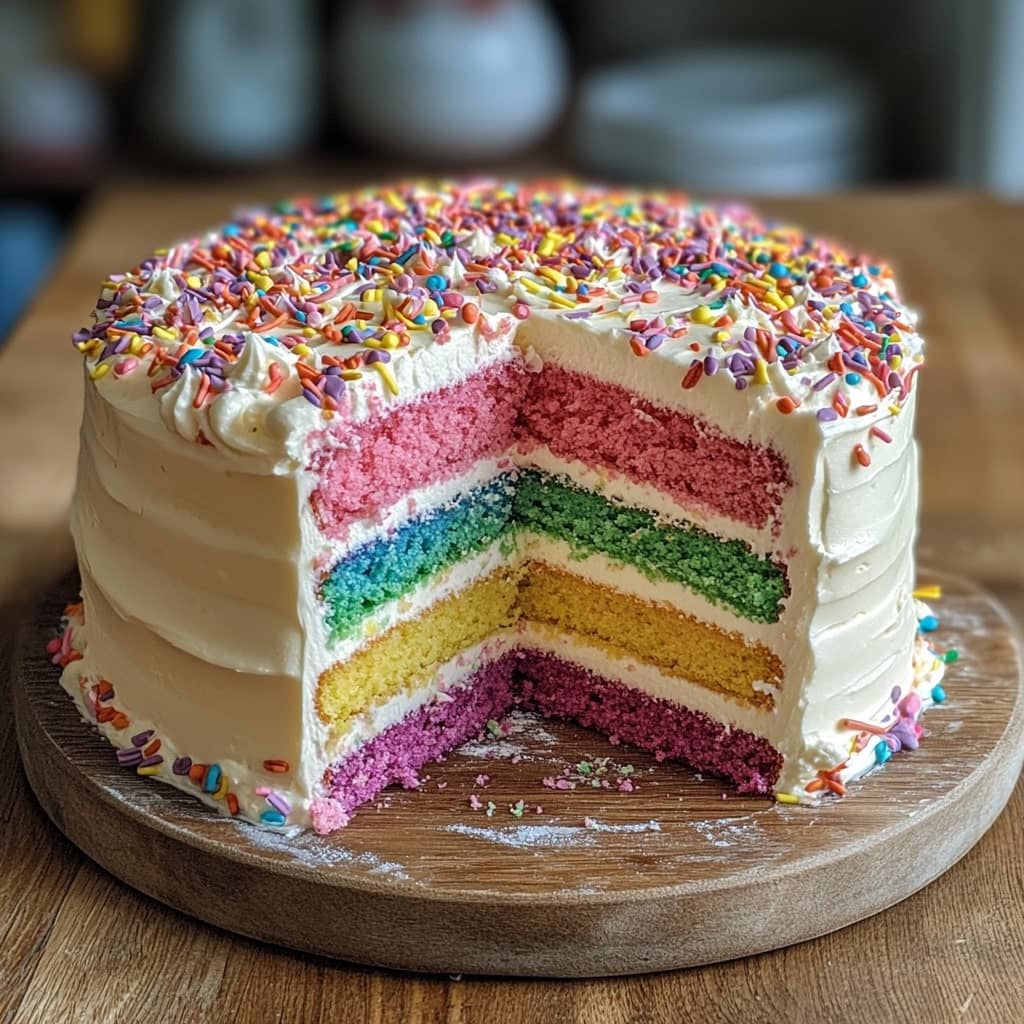
The Rainbow Layer Cake is a vibrant, multi-colored dessert that stands out not only for its visual appeal but also for its celebratory presence at birthdays, weddings, pride events, and other joyful gatherings. Often associated with happiness, unity, and diversity, this cake is as symbolic as it is delicious. Each colorful layer is stacked to create a mesmerizing rainbow effect, filled and frosted with creamy buttercream or cream cheese frosting. While it may look complex, with a bit of preparation and patience, anyone can create this show-stopping centerpiece at home. The cake has grown in popularity due to its Instagram-worthy appearance and has become a favorite for bakers looking to impress both visually and tastefully.
The History of the Rainbow Layer Cake
The origins of the rainbow layer cake can be traced back to the increasing availability and use of food coloring in home baking during the mid-20th century. However, its explosion into mainstream popularity occurred in the 2010s, largely driven by the rise of social media and visual food trends. The rainbow cake also has cultural significance; for instance, it has been used to symbolize LGBTQ+ pride and the spectrum of love and identity. Some trace its popularity to recipes shared by early food bloggers, while others cite its symbolic use at events like Pride parades and progressive celebrations. Over time, the cake evolved from a simple sponge to a multi-tiered masterpiece featuring seven distinct layers—each one dyed a color of the rainbow—interspersed with clouds of white frosting or fillings flavored with vanilla, citrus, or fruit extracts.
Ingredients Breakdown
- Flour (3 cups, all-purpose): Forms the structure of the cake.
- Baking Powder (2 ½ tsp): Helps the cake rise and become fluffy.
- Salt (½ tsp): Balances sweetness and enhances flavor.
- Butter (1 cup, unsalted and softened): Adds richness and moisture.
- Granulated Sugar (2 ½ cups): Sweetens the cake and contributes to its texture.
- Egg Whites (6 large): Helps maintain a white crumb and supports the pastel rainbow colors.
- Whole Milk (1 ½ cups): Provides moisture and helps blend ingredients.
- Vanilla Extract (2 tsp): Adds flavor depth.
- Gel Food Coloring (red, orange, yellow, green, blue, indigo, violet): Essential for creating distinct layers.
- Frosting (6–8 cups of vanilla buttercream or cream cheese frosting): Used between layers and for decoration.
Optional additions include almond extract, lemon zest for brightness, or even fruit preserves between layers for extra flavor.
Step-by-Step Recipe
- Preheat and Prepare Pans: Preheat your oven to 350°F (175°C). Grease and line six or seven 8-inch round cake pans (or bake in batches if you don’t have enough pans).
- Mix Dry Ingredients: In a bowl, whisk together flour, baking powder, and salt. Set aside.
- Cream Butter and Sugar: In a large mixing bowl, cream the softened butter and sugar together until light and fluffy. This usually takes about 4–5 minutes with an electric mixer.
- Add Egg Whites: Gradually add the egg whites while beating, ensuring each addition is fully incorporated before adding more.
- Add Milk and Vanilla: Mix the vanilla extract into the milk. Alternate adding the milk mixture and dry ingredients to the batter, starting and ending with the flour mixture.
- Divide and Color Batter: Evenly divide the batter into six or seven bowls. Add a small amount of gel food coloring to each, mixing thoroughly to achieve vibrant hues.
- Bake Layers: Pour each colored batter into a separate prepared cake pan. Bake for 15–18 minutes, or until a toothpick inserted into the center comes out clean. Let cakes cool in pans for 10 minutes, then remove and allow to cool completely on wire racks.
- Level Cakes (Optional): If any layers are domed, level them with a serrated knife to ensure even stacking.
- Assemble the Cake: Starting with the purple or red layer (depending on preference), spread a thin layer of frosting on top, then stack the next layer. Continue stacking and frosting each layer.
- Crumb Coat: Once all layers are stacked, apply a thin coat of frosting around the cake to seal in crumbs. Chill for 15–30 minutes.
- Final Frosting Layer and Decoration: Apply the final thick coat of frosting and smooth with a spatula. Decorate as desired with rainbow sprinkles, edible glitter, piped rosettes, or candy.
- Chill and Serve: Refrigerate for at least 30 minutes before slicing to make clean cuts.
Tips for the Perfect Rainbow Layer Cake
Use gel-based food coloring for the most vibrant colors without altering the batter’s consistency. Ensure all cake layers are completely cool before assembling to prevent frosting from melting. A turntable helps with even frosting and smoothing edges. If you don’t have multiple pans, bake in batches and wash pans between uses. For evenly thick layers, use a kitchen scale to divide the batter precisely. A serrated knife or cake leveler is helpful for ensuring flat tops, which makes stacking easier. When frosting, start with a crumb coat to lock in loose crumbs and provide a smooth base. Chill the cake between steps for best results. Use parchment paper circles in pans to ensure easy removal of cakes. Let your creativity shine with toppings—mini meringues, colored sugar, or fruit can make your cake even more festive. To enhance flavor, you can tint the layers with fruit-flavored extracts that correspond to their color (e.g., lemon for yellow, raspberry for red).
Variations and Customizations
Instead of traditional vanilla sponge, try chocolate, red velvet, or lemon cake bases for a twist. Use natural colorants like beet juice, spirulina, or turmeric for a dye-free version. Alternate fillings like lemon curd, raspberry jam, or chocolate ganache between layers for added flavor contrast. Create ombré effects by varying the intensity of one color across all layers. For a surprise-inside cake, hollow out the center and fill with sprinkles or candy before adding the top layer. Swap out the frosting for a whipped cream base or marshmallow fluff for a lighter version. Try mini rainbow cakes using smaller pans or even a cupcake version for individual servings. Gluten-free and vegan versions are also possible with appropriate substitutions (like almond flour, aquafaba, or plant-based milk and butter). Add edible flowers, fondant rainbows, or piped buttercream decorations for themed parties.
Health Considerations and Nutritional Value
While a Rainbow Layer Cake is a visual and flavorful treat, it’s important to be mindful of its nutritional impact. A standard slice of this cake can contain around 400–600 calories, primarily from sugar, butter, and refined flour. Food coloring, especially artificial dyes, may be a concern for some individuals—particularly children or those with sensitivities. Opting for natural colorants can help mitigate this. Reducing the sugar in both cake and frosting or using alternative sweeteners like stevia or erythritol may help lower the glycemic index. Vegan versions eliminate cholesterol from animal products, and gluten-free flours make it accessible to those with celiac disease or gluten intolerance. Despite this, the cake is intended for occasional consumption, typically at celebrations, and should be enjoyed in moderation. Pair it with fresh fruit or serve smaller portions if you’re concerned about sugar intake. For those tracking macros, adjusting ingredient ratios (such as using Greek yogurt in place of some butter) can also slightly improve its profile.
FAQ
Q: Can I make the layers in advance?
Yes, the layers can be baked up to two days in advance and stored tightly wrapped at room temperature or refrigerated. They can also be frozen for up to 3 months.
Q: How do I get even cake layers?
Use a kitchen scale to evenly divide batter between pans and level tops after baking.
Q: Can I use liquid food coloring?
Gel food coloring is preferred for vibrant hues without thinning the batter. Liquid colors may work but might require more and alter texture.
Q: Is there a dairy-free or vegan option?
Yes, substitute butter with dairy-free margarine, milk with almond or oat milk, and eggs with flax eggs or applesauce.
Q: Can I make this as cupcakes instead of a full cake?
Absolutely. Divide colored batter among cupcake liners in layers or swirled patterns. Adjust bake time to 12–15 minutes.
Q: How long does the cake last?
Stored in an airtight container, it stays fresh for 3–5 days in the fridge. For best texture, let it sit at room temperature for 30 minutes before serving.

Rainbow Layer Cake
Ingredients
Rainbow Cake Ingredients
- 24 oz cake flour
- 24 oz granulated sugar
- 1 teaspoon salt
- 2 tablespoons baking powder
- 1 teaspoon baking soda
- 10 oz egg whites room temperature
- 6 oz vegetable oil
- 18 oz buttermilk room temperature or slightly warm
- 12 oz unsalted butter softened
- 1 tablespoon vanilla extract
Easy Buttercream Frosting Ingredients
- 8 oz pasteurized egg whites
- 32 oz powdered sugar
- 32 oz unsalted butter softened but not melted
- 2 teaspoons vanilla extract
- ½ teaspoon salt
- 1 tiny dot of purple food coloring to neutralize yellow tones and make the buttercream appear white
Gold Drip Decoration
- 5 oz white candy melts
- 1 oz chocolate candy melts
- 1 oz hot water
- 1 teaspoon Truly Mad Plastics Super Gold Dust
- ¼ teaspoon Everclear vodka, or lemon extract (to mix with gold dust for painting or dripping)
Instructions
Important Preparation Note
- It is absolutely essential that all ingredients listed as “room temperature” are genuinely at room temperature and that all components are measured accurately by weight. This ensures that everything incorporates properly and your batter achieves the right consistency.
Baking Instructions
- Preheat your oven to 335ºF (168ºC). Prepare six 8″x2″ round cake pans by greasing them with cake goop or your preferred pan release. Line the bottoms with parchment paper to ensure easy removal of the baked cakes.
- In a small bowl, combine 8 oz of buttermilk with the vegetable oil and set aside. In a separate bowl, whisk together the remaining buttermilk, egg whites, and vanilla extract until the eggs are fully broken up; set this mixture aside as well.
- In the bowl of a stand mixer fitted with the paddle attachment, combine the flour, granulated sugar, baking powder, baking soda, and salt. Mix on low for about 10 seconds to evenly distribute the dry ingredients.
- Add the softened butter to the dry ingredients and mix on low speed until the mixture has the consistency of coarse sand, which should take about 30 seconds. Pour in the buttermilk/oil mixture and mix until the dry ingredients are fully moistened. Then increase the speed to medium (setting 4 on a KitchenAid mixer) and continue mixing for 2 full minutes to build the structure of the cake. Skipping this step may result in a collapsed cake.
- Scrape down the sides of the bowl thoroughly, reduce the mixer speed to low, and gradually pour in the egg white/buttermilk/vanilla mixture in three parts, allowing the batter to mix for about 15 seconds between each addition. Scrape the bowl again to ensure everything is fully incorporated.
- Divide the finished batter evenly into six bowls, weighing out 15 ounces of batter per bowl for accuracy. Color each batch using electric gel food coloring as follows:
- Pink layer: ½ teaspoon pink
- Orange layer: ¼ teaspoon yellow + ¼ teaspoon orange
- Yellow layer: ½ teaspoon yellow
- Green layer: ¼ teaspoon yellow + ½ teaspoon green
- Blue layer: ½ teaspoon blue
- Purple layer: ¼ teaspoon pink + ½ teaspoon purple
- Transfer the colored batters to the prepared pans and bake for 20–24 minutes, or until the edges of the cakes just begin to pull away from the sides of the pans. Avoid underbaking, as this can cause the centers to collapse.
- Once the cakes are out of the oven, immediately give each pan one firm tap on the countertop to release steam, which helps prevent the cakes from shrinking too much. Let the cakes cool in the pans for about 10 minutes before removing them. Some shrinking is normal as they cool.
- Once cooled, wrap and freeze the cake layers for 30–60 minutes before trimming and assembling. Frost and fill the cake with buttercream frosting, smoothing the exterior as desired. Chill the frosted cake in the refrigerator for 15 minutes before applying the gold drip.
- Wait for the drip to fully set before painting it with gold. Finish decorating with buttercream rosettes, sprinkles, or any additional accents you like.
- Easy Buttercream Instructions
- In the bowl of a stand mixer fitted with the whisk attachment, combine the pasteurized egg whites and powdered sugar. Mix on low until combined, then increase the speed to high. While mixing, gradually add in the softened butter in small chunks. Once all the butter has been incorporated, add in the vanilla extract and salt.
- Continue mixing on high speed until the buttercream is light, fluffy, and no longer has a strong buttery taste. For a whiter buttercream, you can optionally add a very small dot of purple food coloring to neutralize the yellow tint. Switch to the paddle attachment and mix on low speed for 10 minutes to eliminate any air bubbles and create a smooth texture.
- Gold Drip Instructions
- Melt the white and chocolate candy melts together in a microwave-safe bowl using 15-second intervals until nearly melted. Add in the hot water and microwave for an additional 15 seconds. Stir the mixture until it’s completely smooth and glossy. Add yellow food coloring and stir again until evenly blended.
- Transfer the ganache to a piping bag, snip off a small tip, and carefully drip the ganache around the chilled cake’s edge. Once the drip has set, mix the Super Gold Dust with Everclear, vodka, or lemon extract to create an edible gold paint. Use a small brush to paint over the drip for a stunning metallic finish.