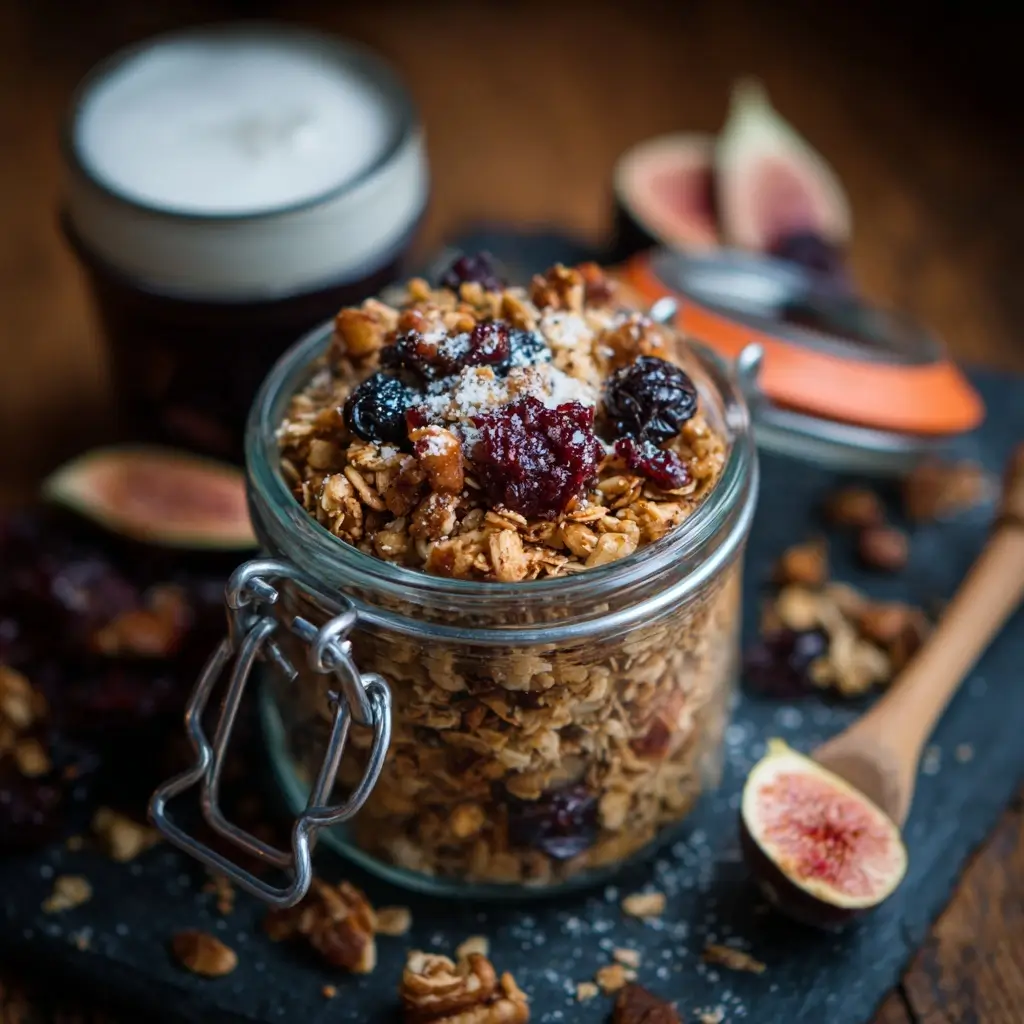
Homemade Granola: A Complete Guide to Crafting Your Perfect Breakfast Staple
There’s something undeniably satisfying about a bowl of homemade granola—crisp, golden clusters of oats toasted to perfection with a hint of sweetness, crunch, and wholesome goodness. Whether you enjoy it with milk, yogurt, or straight from the jar as a snack, making your own granola at home allows you to control every ingredient, tailor flavors to your liking, and avoid unnecessary preservatives and added sugars found in many store-bought versions. In this comprehensive guide, we’ll explore the history, science, ingredients, techniques, variations, health benefits, and everything else you need to know to master the art of crafting delicious homemade granola.
The History of Granola
The story of granola begins in the 19th century, rooted in the health reform movements sweeping across America. Dr. James Caleb Jackson, a physician and anti-alcohol advocate, created a breakfast food called “Granula” in 1863 at his health resort in New York. This early version consisted of graham flour dough baked into hard nuggets that had to be soaked overnight before eating—a far cry from today’s crunchy delight.
A few years later, another health pioneer, Dr. John Harvey Kellogg (of cereal fame), developed a similar product at his Battle Creek Sanitarium. He named it “Granola,” derived from “granule,” to describe the small, chewy bits formed during baking. Over time, granola evolved from a dense, unpalatable health food into a more enjoyable, oven-toasted mixture of rolled oats, nuts, seeds, and sweeteners.
By the 1960s and 70s, granola became a symbol of the counterculture movement, embraced by those seeking natural, whole foods. It gained mainstream popularity in the 1980s and beyond, with countless commercial brands hitting supermarket shelves. However, many mass-produced versions are loaded with sugar, oils, and artificial additives, sparking a renewed interest in homemade alternatives. Today, artisanal and DIY granola is celebrated for its versatility, nutritional value, and rich flavor profile when made from scratch.
Ingredients Breakdown: What Makes Granola Tick?
The beauty of homemade granola lies in its simplicity and balance of core components. Understanding each ingredient’s role helps you customize recipes with confidence and creativity. Here’s a detailed breakdown:
- Base Oats: Rolled oats (old-fashioned oats) are the foundation. They provide fiber, texture, and structure. Quick oats can be used but result in a finer, less textured granola. Steel-cut oats are too dense and don’t toast evenly, so they’re not recommended unless pre-soaked or blended carefully.
- Sweeteners: Honey, maple syrup, agave nectar, brown rice syrup, or coconut nectar bind the mixture and promote browning through caramelization. Liquid sweeteners coat the oats evenly and help form those coveted clumps. Sugar alone won’t achieve the same texture—it lacks moisture and binding properties.
- Fats: Coconut oil, olive oil, avocado oil, or melted butter add richness, aid in even browning, and contribute to crispness. Solid fats like coconut oil also help create clusters as they cool and solidify.
- Nuts & Seeds: Almonds, walnuts, pecans, cashews, pumpkin seeds, sunflower seeds, flaxseeds, chia seeds, and sesame seeds add protein, healthy fats, and crunch. Toasting them lightly before mixing enhances their nutty flavor.
- Dried Fruits: Raisins, cranberries, apricots, dates, figs, cherries, mango, or banana chips introduce natural sweetness and chewiness. These are best added after baking to prevent burning and preserve texture.
- Flavor Enhancers: Vanilla extract, almond extract, citrus zest, cinnamon, nutmeg, cardamom, ginger, or salt amplify taste. A pinch of sea salt balances sweetness and elevates all other flavors.
- Optional Boosters: Protein powder, ground flax, wheat germ, cacao nibs, shredded coconut, or matcha powder can be incorporated for extra nutrition or unique flavor profiles.
Each element plays a crucial role in achieving the perfect balance between crunch, chew, sweetness, and aroma. The key is harmony—too much sweetener leads to stickiness; too little fat results in dryness; overloading dried fruit makes granola soggy over time.
Step-by-Step Recipe: Classic Homemade Granola
This tried-and-true recipe yields approximately 6 cups of golden, aromatic granola with crispy clusters and a balanced sweetness. It’s versatile, beginner-friendly, and endlessly customizable.
Ingredients
- 3 cups old-fashioned rolled oats (gluten-free if needed)
- 1 cup raw mixed nuts (e.g., almonds, walnuts, pecans), roughly chopped
- ½ cup raw seeds (e.g., pumpkin, sunflower, or a blend)
- ¼ cup unsweetened shredded coconut (optional)
- ½ teaspoon fine sea salt
- 1½ teaspoons ground cinnamon
- ⅓ cup pure maple syrup or honey (use honey for a deeper flavor)
- ⅓ cup coconut oil, melted (or olive oil for a lighter taste)
- 1 teaspoon pure vanilla extract
- ¾ cup dried fruit (e.g., raisins, cranberries, chopped apricots)
- ¼ cup cacao nibs or dark chocolate chips (optional, added after baking)
Directions
- Preheat Oven: Set your oven to 300°F (150°C). Line a large rimmed baking sheet with parchment paper or a silicone baking mat for easy cleanup and non-stick results.
- Mix Dry Ingredients: In a large mixing bowl, combine the oats, chopped nuts, seeds, shredded coconut (if using), salt, and cinnamon. Stir until evenly distributed.
- Prepare Wet Mixture: In a separate bowl or measuring cup, whisk together the maple syrup (or honey), melted coconut oil, and vanilla extract until smooth and emulsified.
- Combine: Pour the wet mixture over the dry ingredients. Use a spatula or clean hands to mix thoroughly, ensuring every oat and nut is lightly coated. The mixture should feel slightly sticky but not wet.
- Spread on Baking Sheet: Transfer the mixture to the prepared baking sheet. Spread it into an even layer, pressing down gently with the back of a spoon or spatula. This compaction encourages cluster formation.
- Bake: Place in the center of the oven and bake for 30–40 minutes, rotating the pan halfway through for even browning. Do not stir during baking—that’s key to forming clusters. The granola is done when golden brown around the edges and fragrant. It will still feel soft but will crisp up as it cools.
- Cool Completely: Remove from the oven and let cool completely on the counter—this takes about 1 hour. Resist the urge to break it up! Cooling allows the oils and sweeteners to solidify, creating firm clusters.
- Add Dried Fruit & Extras: Once fully cooled, break the granola into chunks and toss in the dried fruit and any optional add-ins like chocolate chips or cacao nibs.
- Store: Transfer to an airtight container at room temperature. Properly stored, homemade granola lasts 2–3 weeks (longer if refrigerated).
Tips for Perfect Homemade Granola Every Time
- Don’t Overbake: Granola continues to crisp as it cools. If it looks just golden at the edges, it’s ready—even if the center seems soft.
- No Stirring During Baking: To get big, bakery-style clusters, avoid stirring the granola while it bakes. Stirring creates smaller, more uniform pieces.
- Press It Down: Firmly press the mixture into the pan before baking. This helps bind the ingredients and increases surface contact for better browning and clumping.
- Use Parchment Paper: Prevents sticking and makes removal effortless. Avoid greasing the pan—it can cause uneven baking.
- Cool Completely: Skipping the cooling step leads to crumbly granola. Patience pays off in cluster size!
- Customize Sweetness: Start with less sweetener and adjust next time. You can always drizzle extra honey post-bake if desired.
- Low and Slow: Baking at a lower temperature (300°F instead of 350°F+) ensures even toasting without burning the edges.
- Double the Batch: Granola keeps well and is great for gifts. Bake two trays at once (rotate pans halfway) to save time.
- Freeze for Longevity: For storage beyond a month, freeze in sealed bags. Thaw at room temperature before serving.
- Label Your Jars: Include date and ingredients, especially if gifting or storing multiple varieties.
Variations and Customizations
One of the greatest joys of homemade granola is the ability to experiment. Here are some popular and creative twists to inspire your next batch:
1. Tropical Sunrise Granola
Swap cinnamon for a pinch of nutmeg. Add ½ cup dried pineapple, ½ cup dried mango, and ½ cup toasted coconut flakes. Include macadamia nuts for a luxurious touch.
2. Chocolate Peanut Butter Crunch
Replace half the oil with ¼ cup natural peanut butter (melted with coconut oil). Add 2 tablespoons cocoa powder to the dry mix. After cooling, fold in ⅓ cup mini chocolate chips and ¼ cup chopped peanuts.
3. Maple Pecan Crunch
Use pure maple syrup as the sole sweetener. Increase pecans to 1 cup. Add ½ teaspoon maple extract along with vanilla. Optional: sprinkle with a tiny bit of smoked salt after baking.
4. Seeded Superfood Blend
Omit nuts entirely. Use a mix of pumpkin seeds, sunflower seeds, flaxseeds, chia seeds, and hemp seeds (up to 1½ cups total). Add 2 tablespoons ground flax for binding. Ideal for nut allergies and high in omega-3s.
5. Apple Pie Granola
Add 1 teaspoon ground cinnamon, ¼ teaspoon nutmeg, and ¼ teaspoon allspice. Mix in ½ cup finely diced dried apples after baking. Optional: swirl in 1 tablespoon apple butter with the wet ingredients.
6. Savory Herb & Seed Granola
Reduce sweetener to 1 tablespoon maple syrup or omit entirely. Use olive oil and add 1 teaspoon rosemary, 1 teaspoon thyme, ½ teaspoon garlic powder, and black pepper. Great as a salad topping or cheese board accompaniment.
7. High-Protein Power Granola
Incorporate ¼ cup unflavored or vanilla protein powder into the dry mix. Add extra seeds and nuts. Post-bake, mix in ⅓ cup white chocolate chips (they pair surprisingly well with protein powder).
8. Kids’ Favorite “Monster” Mix
Add mini marshmallows, colorful sprinkles (after baking), and fun-shaped cereal post-cooling. Use honey and cinnamon for familiar flavors kids love.
Health Considerations and Nutritional Value
While granola is often marketed as a health food, its nutritional profile varies widely depending on ingredients. Homemade granola gives you full control, allowing you to optimize for wellness goals.
Nutritional Benefits
- Fiber-Rich: Oats and seeds provide soluble and insoluble fiber, supporting digestion and heart health.
- Healthy Fats: Nuts and seeds contain monounsaturated and polyunsaturated fats, which support brain function and reduce inflammation.
- Protein Source: With nuts, seeds, and optional protein boosters, granola can offer 4–7 grams of protein per ½-cup serving.
- Antioxidants: Cinnamon, dark chocolate, and certain dried fruits (like cranberries) are rich in antioxidants.
- Gluten-Free Option: Easily made gluten-free using certified GF oats—ideal for those with sensitivities.
- No Artificial Additives: Homemade means no preservatives, artificial flavors, or hydrogenated oils.
Things to Watch Out For
- Calorie Density: Granola is energy-dense. A typical ½-cup serving ranges from 200–300 calories. Be mindful of portion sizes, especially when trying to manage weight.
- Sugar Content: Even natural sweeteners add up. Limit added sugars to 1–2 tablespoons per cup of oats. Avoid recipes calling for excessive honey, syrups, or chocolate.
- Fat Quantity: While healthy fats are beneficial, too much oil or butter increases calorie load. Stick to ⅓ cup fat per 3 cups of oats.
- Dried Fruit Pitfalls: Some dried fruits are sugar-coated or sulfured. Choose unsweetened, organic options when possible.
- Allergens: Common allergens include nuts, coconut, and seeds. Always label clearly if sharing or gifting.
For Specific Diets
- Vegan: Use maple syrup instead of honey and ensure chocolate is dairy-free.
- Paleo: Replace oats with a mix of nuts, seeds, and coconut flakes. Use almond flour or cassava for binding.
- Keto: Make a low-carb version using crushed pork rinds, nuts, seeds, and erythritol-sweetened syrup substitutes (though it won’t resemble traditional granola).
- Diabetic-Friendly: Reduce sweetener, use low-glycemic options like monk fruit syrup, and increase fiber-rich seeds.
Frequently Asked Questions (FAQ)
Can I make granola without oil?
Yes, though texture will be drier and less clumpy. Try substituting applesauce or mashed banana for part of the oil, but expect a softer, less crunchy result.
Why didn’t my granola form clusters?
Common causes: stirring during baking, insufficient fat or sweetener, not pressing the mixture down, or breaking it up too soon. Follow the no-stir method and cool completely.
Can I use steel-cut oats?
Not recommended. They’re too dense and won’t toast evenly. Stick to rolled oats for best results.
How do I store homemade granola?
In an airtight container at room temperature for 2–3 weeks, in the fridge for up to 1 month, or frozen for 3–6 months.
Can I bake granola at a higher temperature to save time?
Not advised. Higher heat (above 325°F) risks burning the edges before the center toasts. Low and slow is the secret to even browning.
Is granola good for weight loss?
It can be, in moderation. Choose versions with minimal added sugar, focus on whole ingredients, and measure portions (½ cup max). Pair with Greek yogurt or fruit for balanced meals.
Can I make nut-free granola?
Absolutely. Replace nuts with extra seeds, toasted chickpeas, or puffed rice. Sunflower seed butter can replace nut butter in recipes.
What’s the difference between granola, muesli, and granola bars?
Granola is baked and clustered. Muesli is raw, typically served soaked in milk. Granola bars are pressed or baked into solid bars, often with binders like corn syrup.
Can I add protein powder?
Yes, but use unflavored or lightly flavored powders and mix into dry ingredients. Too much can dry out the granola, so start with ¼ cup per batch.
Can I make savory granola?
Definitely! Skip sweeteners, use olive oil, and season with herbs, garlic, onion powder, tamari, or nutritional yeast. Great as a snack or topping.
Summary
Homemade granola is a nutritious, customizable, and deeply satisfying way to elevate your breakfast or snack routine. By controlling ingredients, you create a healthier, tastier alternative to store-bought versions.
With endless variations, simple techniques, and long-term storage potential, a batch of DIY granola is one of the most rewarding kitchen projects you can master—delicious, wholesome, and uniquely yours.