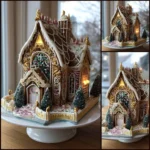
Gingerbread House (Edible) – A Festive, Delicious Holiday Tradition
There’s nothing quite as magical during the holiday season as building your very own edible gingerbread house. Whether you’re crafting it with family, friends, or solo as a joyful baking project, this classic treat combines whimsy, creativity, and irresistible flavor. From its historical roots to the sweet scent of spiced dough filling your kitchen, making a gingerbread house is more than just baking—it’s an experience. In this comprehensive guide, we’ll take you through every aspect of creating a stunning, delicious, and completely edible gingerbread house that’s as tasty as it is beautiful.
The History of the Gingerbread House
The story of the gingerbread house traces back centuries, with origins rooted in European folklore and culinary tradition. While gingerbread itself dates as far back as ancient Greece and Egypt, the concept of shaped gingerbread gained popularity in medieval Europe, particularly in Germany and France. By the 16th century, gingerbread was being molded into elaborate shapes, often depicting religious figures, animals, or royalty, and decorated with gold leaf and icing.
The idea of constructing edible houses came into prominence with the publication of the Brothers Grimm fairy tale Hansel and Gretel in the early 1800s. In the story, two lost children discover a cottage made entirely of sweets and treats—most notably, gingerbread. This enchanted vision captured imaginations and inspired generations to recreate the whimsical confection. German bakers, especially in regions like Nuremberg—a historic hub for spice trade and gingerbread production—began crafting gingerbread homes as seasonal decorations and gifts.
Over time, the tradition spread across Europe and eventually to North America, where it evolved into a beloved Christmas activity. Today, gingerbread houses are not only holiday centerpieces but also competitive creations seen in bakery displays, contests, and even museums. Despite modern variations, the essence remains: a spiced, sturdy cookie structure held together with royal icing and adorned with candies, representing warmth, nostalgia, and festive cheer.
Ingredients Breakdown: What Makes a Perfect Edible Gingerbread House?
Creating a successful gingerbread house requires two essential components: a strong, flavorful gingerbread dough and a reliable adhesive icing. Each ingredient plays a critical role in ensuring the final product is structurally sound, aromatic, and delicious. Let’s break down the key ingredients and their purposes.
Gingerbread Dough Ingredients:
- All-Purpose Flour: Provides the structural foundation. Measured accurately to ensure proper consistency.
- Brown Sugar: Adds moisture, chewiness, and rich molasses flavor. Dark brown sugar enhances depth.
- Unsweetened Cocoa Powder (optional): Deepens color and adds subtle richness without overpowering spices.
- Ground Ginger: The star spice—warming, pungent, and quintessential to gingerbread’s identity.
- Cinnamon: Sweet and woody; complements ginger and balances the flavor profile.
- Cloves and Allspice: Used sparingly for complexity and warmth. Cloves are potent, so a pinch goes a long way.
- Salt: Enhances all other flavors and prevents sweetness from becoming cloying.
- Baking Soda: Leavening agent that helps the dough rise slightly and spread evenly.
- Butter: Cold, unsalted butter ensures flakiness and tenderness while contributing to rich mouthfeel.
- Molasses: The soul of gingerbread. Full-bodied blackstrap molasses offers robust flavor and deep color, though milder versions can be used for a sweeter taste.
- Egg: Binds ingredients and improves texture, helping the dough hold its shape when baked.
- Vanilla Extract: Adds aromatic sweetness and rounds out the spiced notes.
Royal Icing (for Assembly and Decoration):
- Powdered Sugar (Confectioners’ Sugar): Forms the base of the icing, providing sweetness and structure.
- Egg Whites (or Meringue Powder): Acts as a binding agent. Raw egg whites offer superior stiffness and shine; meringue powder is safer and shelf-stable.
- Lemon Juice or Cream of Tartar: Stabilizes the mixture, prevents crystallization, and adds slight acidity for balance.
- Water (as needed): Adjusts consistency for piping versus sealing.
Decorative Elements:
- Assorted Candies: Gummy bears, gumdrops, candy canes, peppermints, jelly beans, licorice, chocolate chips, etc.
- Sprinkles and Nonpareils: Add color, texture, and snow-like effects.
- Shredded Coconut (toasted or white): Simulates snow on rooftops and lawns.
- Colored Frosting (optional): For fine detailing, window panes, or custom designs.
Step-by-Step Recipe: How to Make an Edible Gingerbread House
Follow these detailed steps to build a sturdy, attractive, and fully edible gingerbread house that will impress guests and delight taste buds.
Step 1: Prepare the Gingerbread Dough
- In a large mixing bowl, whisk together 4 cups all-purpose flour, 1 tsp baking soda, ½ tsp salt, 2 tsp ground ginger, 1½ tsp cinnamon, ¼ tsp ground cloves, and ¼ tsp allspice. Optional: add 2 tbsp unsweetened cocoa powder for deeper color.
- In a saucepan over low heat, combine ½ cup (1 stick) unsalted butter, ½ cup dark brown sugar, and ¾ cup molasses. Warm until melted and smooth, stirring frequently. Remove from heat and let cool slightly.
- Beat in 1 large egg and 1 tsp vanilla extract into the warm molasses mixture.
- Gradually add the dry ingredients to the wet mixture, mixing until a soft dough forms.
- Divide the dough into two equal portions, flatten into discs, wrap in plastic, and chill for at least 2 hours (or up to 3 days).
Step 2: Roll and Cut the Pieces
- Preheat oven to 350°F (175°C). Line baking sheets with parchment paper.
- On a floured surface, roll one disc of dough to ¼-inch thickness. Use a gingerbread house template (available online or handmade) to cut out walls, roof panels, and door/window pieces.
- Transfer cut pieces to baking sheets using a spatula. Re-roll scraps as needed.
- Poke decorative window holes with a knife or small cutter if desired.
Step 3: Bake the Gingerbread
- Bake for 12–15 minutes, or until firm and lightly cracked on top.
- Cool on the baking sheet for 5 minutes, then transfer to wire racks to cool completely. Ensure pieces are completely dry and crisp before assembly.
Step 4: Make Royal Icing
- In a stand mixer, beat 3 large egg whites (or 3 tbsp meringue powder + 6 tbsp water) until frothy.
- Gradually add 4 cups powdered sugar and ½ tsp lemon juice. Beat on high for 5–7 minutes until thick, glossy, and stiff peaks form.
- Transfer to a piping bag fitted with a small round tip (e.g., #3 or #5). Keep covered with a damp cloth to prevent drying.
Step 5: Assemble the House
- Pipe a thick line of icing along the bottom edge of one wall piece. Press firmly onto a flat base (cardboard, cake board, or tray lined with foil).
- Support the wall with cans or cups while attaching the adjacent walls with icing seams on both inside and outside corners.
- Allow vertical walls to set for 30–60 minutes before attaching the roof.
- Pipe icing along the top edges of the walls. Carefully place roof panels, pressing gently. Support with cans until stable.
- Fill gaps with extra icing and smooth with a spatula or fingertip (dipped in water).
Step 6: Decorate Creatively
- Once the structure is secure (after 1–2 hours), begin decorating with piped icing details: snow drifts, trim, shingles, icicles.
- Press candies into fresh icing to create windows, doors, wreaths, chimneys, and pathways.
- Sprinkle shredded coconut over the roof for a snowy effect.
- Add gummy trees, peppermint pathstones, or licorice fences for a full winter village scene.
Tips for Success
- Chill the dough thoroughly—this prevents spreading and makes rolling easier.
- Use templates on cardboard for precise, reusable cutting guides.
- Don’t rush assembly—let each section set before adding the next.
- Thicker dough (¼ inch) ensures durability; thinner pieces may crack or collapse.
- Work in a cool, dry room—humidity weakens icing and softens cookies.
- Store leftover royal icing in an airtight container with a damp paper towel; use within 2 days.
- Reinforce tall walls with temporary support (books, jars, or boxes) during setting.
- Use food coloring in icing sparingly—gel colors are best for vibrant hues without thinning.
Variations and Customizations
Your gingerbread house doesn’t have to follow the traditional red-and-white cottage design. Unleash your imagination with these creative twists:
- Theme Houses: Build a haunted gingerbread mansion, a Santa’s workshop, a castle, or even a spaceship!
- Dietary Adaptations: Use gluten-free flour blends or substitute vegan butter, flax eggs, and aquafaba-based royal icing.
- Sugar-Free Version: Replace molasses with date syrup, brown sugar with monk fruit blend, and powdered sugar with erythritol-based confectioners’ sugar (note: texture may vary).
- Mini Gingerbread Villages: Create multiple small houses on one board for a festive display.
- Kid-Friendly Kits: Pre-bake and pre-cut pieces for children to assemble and decorate safely.
- Alcohol-Infused Dough: Add 1–2 tbsp of bourbon, rum, or spiced cider to enhance depth of flavor (alcohol bakes off).
- Savory-Sweet Twist: Incorporate a hint of smoked paprika or black pepper for a complex, warm kick.
- Edible Paint: Mix food-grade luster dust with vodka or lemon extract to paint metallic roofs or stained-glass windows.
Health Considerations and Nutritional Value
While an undeniably indulgent treat, understanding the nutritional content helps you enjoy your gingerbread house responsibly.
Nutritional Profile (Per Serving, Estimated – 1/8 of House):
- Calories: ~350–450 kcal
- Total Fat: 10–15g (mostly from butter)
- Saturated Fat: 6–8g
- Carbohydrates: 70–90g (primarily sugars and starch)
- Sugars: 50–60g (from brown sugar, molasses, icing, candies)
- Protein: 3–5g (from egg and flour)
- Fiber: 1–2g
- Sodium: 150–250mg
Health Notes:
- High Sugar Content: Due to molasses, brown sugar, royal icing, and candies. Ideal for occasional enjoyment.
- Gluten and Allergens: Contains wheat, dairy, eggs, and potential nut traces (depending on candies used).
- Raw Egg Warning: If using raw egg whites in royal icing, consider pasteurized eggs or meringue powder for safety, especially for children, pregnant individuals, or immunocompromised persons.
- Portion Control: Serve small slices alongside tea, coffee, or milk for balanced indulgence.
- Benefits of Spices: Ginger has anti-inflammatory properties; cinnamon may help regulate blood sugar in moderation.
Complete Ingredients List
Gingerbread Dough:
- 4 cups (500g) all-purpose flour, plus extra for dusting
- ½ cup (100g) packed dark brown sugar
- ¾ cup (240g) molasses (preferably blackstrap)
- ½ cup (1 stick / 113g) unsalted butter
- 1 large egg
- 1 tsp vanilla extract
- 2 tsp ground ginger
- 1½ tsp ground cinnamon
- ¼ tsp ground cloves
- ¼ tsp ground allspice
- ½ tsp baking soda
- ½ tsp salt
- Optional: 2 tbsp unsweetened cocoa powder
Royal Icing:
- 4 cups (480g) powdered sugar, sifted
- 3 large egg whites (or 3 tbsp meringue powder + 6 tbsp water)
- ½ tsp lemon juice or cream of tartar
- 1–2 tsp water (if needed for consistency)
Decoration Supplies:
- Assorted candies (gumdrops, peppermints, candy canes, jelly beans, etc.)
- Sprinkles, nonpareils, sanding sugar
- Shredded coconut (white or toasted)
- Licorice laces, chocolate bars, marshmallows
- Food coloring gels (optional)
- Piping bags and tips
- Cardboard base (8×10 inches) covered in foil or festive paper
Directions (Condensed for Reference)
- Whisk dry ingredients for dough; set aside.
- Warm butter, brown sugar, and molasses until melted. Cool slightly.
- Mix in egg and vanilla. Gradually blend in dry ingredients.
- Chill dough 2+ hours.
- Roll to ¼ inch thick; cut using template. Bake at 350°F for 12–15 min. Cool completely.
- Make royal icing: beat egg whites, add sifted sugar and acid. Whip to stiff peaks.
- Assemble walls on base using icing as glue. Support with cans.
- Attach roof after walls set. Seal joints with icing.
- Decorate with piped details and pressed-on candies.
- Let dry overnight before moving or serving.
FAQ (Frequently Asked Questions)
How long does a gingerbread house last?
A well-stored edible gingerbread house can last 2–3 weeks at room temperature in a cool, dry place. Cover loosely with a cake dome to prevent dust. Over time, it will harden but remain safe to eat.
Can I make it ahead of time?
Absolutely! Bake and assemble up to one week in advance. Decorate 1–2 days before display for maximum freshness and visual appeal.
Why did my gingerbread house collapse?
Common causes: dough too thin, underbaked, icing too runny, or rushing assembly. Always allow each section to set before adding the next. Use supports!
Is royal icing safe to eat?
Yes, if made with pasteurized egg whites or meringue powder. Avoid raw, unpasteurized eggs if serving to vulnerable individuals.
Can I freeze gingerbread pieces?
Yes! Baked and cooled pieces can be frozen for up to 3 months in an airtight container. Thaw at room temperature before assembling.
How do I fix broken pieces?
Use royal icing as “glue.” Hold the pieces together until the icing sets. Decorate over cracks with candies or icing details.
Can I make a vegan gingerbread house?
Yes! Substitute butter with vegan margarine, egg with flax egg (1 tbsp ground flax + 3 tbsp water), and use aquafaba (chickpea brine) or meringue powder for royal icing.
What can I use instead of a template?
You can draw your own design on paper, trace onto cardboard, or use household items like books or boxes as guides for symmetrical shapes.
Summary
An edible gingerbread house is a delightful fusion of artistry, tradition, and flavor—perfect for holiday celebrations and family bonding. With the right ingredients, patience, and creativity, you can build a scrumptious masterpiece that’s as fun to make as it is to eat.