Introduction
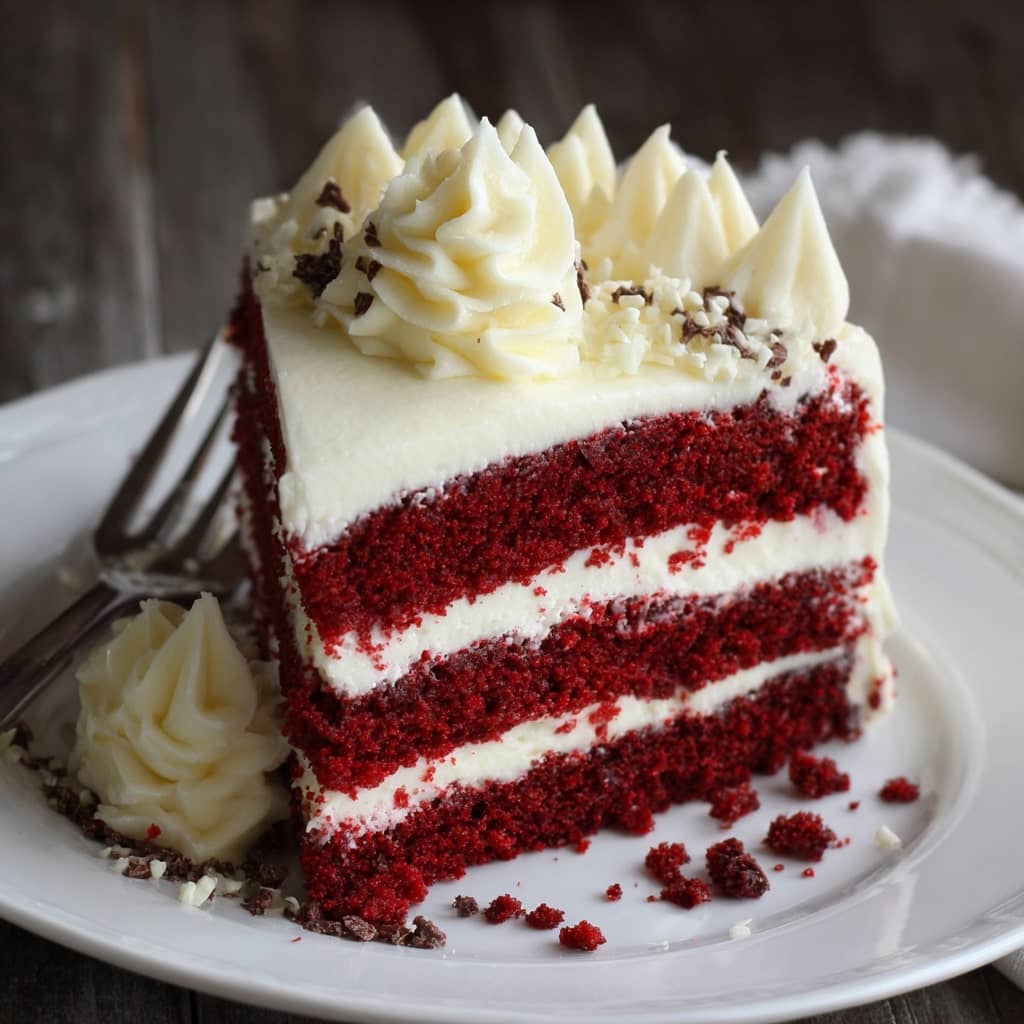
Indulging in a slice of Red Velvet Cheesecake with Cream Cheese Frosting is like experiencing the ultimate dessert fusion—two beloved classics, red velvet cake and cheesecake, brought together in a harmonious, luscious creation. This showstopping dessert isn’t just eye-catching with its bold, crimson hue and creamy white topping, but it also delivers layers of tangy, rich, and slightly cocoa-kissed flavor that melt on the tongue. A celebration-worthy treat, this cheesecake is perfect for birthdays, holidays, romantic evenings, or any moment that calls for a sweet statement. Its velvety texture and bold flavor profile make it a favorite among dessert connoisseurs and casual bakers alike, and its dramatic presentation never fails to impress. Whether you’re an experienced baker or a curious first-timer, this recipe will walk you through each decadent step.
The History of Red Velvet Cheesecake
The origins of red velvet cake date back to the early 1900s in the United States, where the “velvet” cakes were introduced to highlight soft, tender crumb textures in contrast to denser sponge or pound cakes. Originally tinted with beet juice to bring out the reddish hue of cocoa powder, red velvet evolved during the Great Depression, when the Adams Extract Company began marketing red food coloring and a recipe for red velvet cake to boost sales—forever changing its visual identity. Cheesecake, on the other hand, traces its roots back to Ancient Greece, where it was served to athletes during the first Olympic Games in 776 BC. Over time, it evolved into the rich, cream cheese-based dessert we know today, particularly popularized by New York-style cheesecakes. The red velvet cheesecake is a modern hybrid, emerging in American bakeries as a way to combine the tangy, sweet, and colorful appeal of red velvet with the luxurious creaminess of cheesecake. This fusion not only delivers an irresistible taste and texture but also carries the legacy of two dessert traditions brought together to create something spectacular.
Ingredients Breakdown
For the red velvet cake layer:
1 1/4 cups all-purpose flour
1 tbsp unsweetened cocoa powder
1/2 tsp baking soda
1/4 tsp salt
1/2 cup unsalted butter, softened
3/4 cup granulated sugar
1 large egg
1/2 cup buttermilk
1 tbsp red food coloring
1 tsp vanilla extract
1/2 tsp white vinegar
For the cheesecake layer:
16 oz (2 packages) cream cheese, softened
2/3 cup granulated sugar
2 large eggs
1/3 cup sour cream
1 tsp vanilla extract
For the cream cheese frosting:
8 oz cream cheese, softened
1/4 cup unsalted butter, softened
1 1/2 cups powdered sugar
1 tsp vanilla extract
Step-by-Step Recipe:
Preheat your oven to 325°F (163°C). Begin by preparing a springform pan: line the bottom with parchment paper and lightly grease the sides. In a medium bowl, whisk together flour, cocoa powder, baking soda, and salt. In a large bowl, cream butter and sugar until light and fluffy. Beat in the egg, then mix in the buttermilk, red food coloring, vanilla, and vinegar. Gradually add dry ingredients to wet, mixing until just combined. Pour the red velvet batter into the prepared pan and smooth the top. Bake the red velvet cake layer for 20 minutes, or until just set. While it bakes, prepare the cheesecake layer by beating cream cheese until smooth. Add sugar and beat until light and creamy, then add eggs one at a time, followed by sour cream and vanilla extract. Pour cheesecake batter over the cooled red velvet layer and return to the oven. Bake for 40–45 minutes, or until the center is just slightly jiggly. Let it cool completely at room temperature, then refrigerate for at least 4 hours or overnight. For the frosting, beat cream cheese and butter together until creamy, then gradually add powdered sugar and vanilla until smooth. Spread or pipe the frosting on top of the chilled cheesecake. For extra flair, garnish with red velvet cake crumbs, chocolate shavings, or fresh berries.
Tips for the Perfect Red Velvet Cheesecake
Use room temperature ingredients for both the cake and cheesecake layers to ensure smooth, even mixing. Don’t overmix the batter, especially the cheesecake, as too much air can cause cracks during baking. Wrap the outside of your springform pan in foil and bake in a water bath (bain-marie) to promote even cooking and reduce cracking. Always let your cheesecake cool gradually to avoid structural issues—after turning off the oven, leave the cheesecake inside with the door slightly ajar for an hour. Chill the cake thoroughly before frosting to help the layers set and make slicing cleaner.
Variations and Customizations
For a chocolate-forward twist, add chocolate chips or a chocolate ganache drizzle. Swap the red food coloring for natural alternatives like beetroot powder or pomegranate juice for a more wholesome take. Try using a brownie layer instead of traditional red velvet for a denser, fudgy base. You can also experiment with different frostings, like white chocolate cream cheese or mascarpone whipped cream. For individual servings, use cupcake pans or mini springform molds. Want it gluten-free? Substitute the flour with a 1:1 gluten-free baking blend and ensure your other ingredients are certified gluten-free. For a vegan variation, use plant-based cream cheese, butter, dairy-free milk with vinegar in place of buttermilk, and flax eggs.
Health Considerations and Nutritional Value
While red velvet cheesecake is undoubtedly indulgent, there are ways to make it more health-conscious without sacrificing taste. Each slice of traditional red velvet cheesecake with frosting can range from 350–500 calories, depending on portion size and ingredients used. It’s high in saturated fats due to cream cheese and butter, and contains a moderate amount of sugar and carbs. For lighter alternatives, use reduced-fat cream cheese and Greek yogurt instead of sour cream. Cutting back on sugar or using natural sweeteners like stevia or monk fruit can reduce the calorie count. You can also opt for whole wheat or almond flour in the cake layer to increase fiber content. As with any dessert, moderation is key—enjoying a small slice can satisfy your sweet tooth while keeping your health goals intact.
FAQ
Can I make this cheesecake ahead of time? Yes, it’s even better made a day ahead, as it needs time to chill and set properly.
Can I freeze red velvet cheesecake? Absolutely. Wrap it tightly and freeze for up to 2 months. Thaw overnight in the fridge before serving.
What if I don’t have buttermilk? You can make a substitute by mixing 1/2 cup milk with 1/2 tbsp vinegar or lemon juice and letting it sit for 5 minutes.
My cheesecake cracked—what went wrong? Likely overbaking or rapid temperature change. Use a water bath and cool slowly.
Can I use boxed red velvet cake mix? Yes, for convenience. Just bake a thin layer as directed and top with homemade cheesecake filling.
Is red food coloring safe? In moderation, yes. For natural alternatives, try beet juice, hibiscus powder, or annatto.
Can I use a regular cake pan? A springform pan is best for cheesecakes, but you can use a deep cake pan lined with parchment and carefully remove the cheesecake after chilling.

Decadent Red Velvet Cheesecake with Cream Cheese Frosting
Ingredients
For the Cheesecake Layer:
- 16 oz 454 g cream cheese, softened to room temperature
- ½ cup 99 g granulated sugar
- 1 tbsp all-purpose flour
- Pinch of salt
- ¼ cup 60 ml heavy cream
- ½ tsp vanilla extract
- 2 large eggs at room temperature
For the Red Velvet Cake Layer:
- ½ cup 113 g unsalted butter, softened
- 1½ cups 298 g granulated sugar
- 2 large eggs
- ¼ cup 26 g plus 1 tbsp unsweetened cocoa powder
- 6 tbsp liquid red food coloring
- 1 tsp vanilla extract
- 1 cup 240 ml buttermilk
- 2¼ cups 270 g all-purpose flour
- 1 tsp baking soda
- 1 tsp salt
- 1 tbsp distilled white vinegar
For the Cream Cheese Frosting:
- 1 cup 227 g unsalted butter, softened
- 4 cups 454 g powdered sugar
- 2 tsp vanilla extract
- Pinch of salt
- 16 oz 454 g cream cheese, chilled and cut into 16 small pieces
Instructions
Make the Cheesecake:
- Preheat your oven to 350°F (175°C). Lightly spray a 9-inch springform pan with non-stick cooking spray, and line the bottom with a round of parchment paper.
- In a large mixing bowl, use an electric mixer set to medium-low speed to beat the cream cheese, granulated sugar, flour, and salt together until smooth and creamy, about 3 minutes. Scrape down the sides of the bowl, then add the heavy cream and vanilla extract and mix until well combined. Add the eggs one at a time, beating for about 15 seconds between each addition. Once all eggs are incorporated, use a rubber spatula to stir the batter by hand a few times to ensure everything is evenly mixed.
- Pour the cheesecake filling into the prepared springform pan and smooth the top. Bake for 40 to 55 minutes, or until the center is set and no longer jiggles when gently shaken. Remove from the oven and allow to cool on a wire rack for at least 1 hour. Once cooled to room temperature, transfer the cheesecake to the freezer for at least 3 hours or overnight.
Make the Red Velvet Cake:
- Preheat the oven to 350°F (175°C). Grease two 9-inch round cake pans, line the bottoms with parchment rounds, butter the parchment, and dust the pans lightly with flour.
- Using an electric mixer on medium-high speed, cream the butter and sugar together until light and fluffy, about 3 minutes. Increase the speed to high and add the eggs one at a time, mixing for about 1 minute after each addition. Scrape down the sides and bottom of the bowl to ensure the mixture is fully combined.
- In a small bowl, mix the cocoa powder, vanilla extract, and red food coloring together to form a thick, smooth paste. Add this paste to the batter and beat on medium speed until evenly incorporated. Pause to scrape the bowl if needed to ensure the entire batter is tinted evenly.
- Reduce the mixer speed to low. Slowly add half of the buttermilk, followed by half of the flour, and mix just until combined. Scrape down the bowl and repeat with the remaining buttermilk and flour. Beat the mixture on high until smooth.
- Lower the mixer speed again and add the salt, baking soda, and vinegar. Increase speed to high and beat for a couple more minutes until the batter is completely smooth and combined.
- Divide the batter evenly between the prepared cake pans and bake for about 30 minutes, or until a toothpick or skewer inserted into the center comes out clean. Let the cakes cool in the pans for 10 minutes before turning them out onto a wire rack to cool completely.
Make the Cream Cheese Frosting:
- In a large bowl, beat the butter, powdered sugar, vanilla extract, and a pinch of salt on low speed using an electric mixer until smooth and creamy. Scrape down the sides as needed and continue mixing for an additional 2 minutes.
- With the mixer on medium-low speed, add the chilled cream cheese one piece at a time, mixing well after each addition. Once all the cream cheese is incorporated and the mixture is smooth, beat for another 2 minutes until fluffy and well blended.
Assemble the Red Velvet Cheesecake:
- If necessary, use a serrated knife to level the tops of the red velvet cake layers for a flat stacking surface. Place one cake layer on your serving platter. Remove the cheesecake from the freezer and take off the sides of the springform pan. Carefully slide a sharp knife between the parchment paper and the bottom of the cheesecake to detach it, then discard the parchment.
- If the cheesecake layer is slightly wider than the cake, trim the edges gently with a knife until it’s the same diameter. Place the cheesecake layer on top of the first cake layer, then top with the second cake layer, placing it upside-down for a flat top.
- Apply a thin “crumb coat” layer of frosting over the top and sides of the cake. Chill the cake in the refrigerator for 30 minutes to set the frosting. Once chilled, apply a final, generous layer of cream cheese frosting and decorate as desired.
- Keep the assembled cake refrigerated. Before serving, let it sit at room temperature for about 20 minutes for best texture. Store any leftovers covered in the refrigerator for up to 5 days.
Notes
For best results, prepare the cheesecake at least one day before serving. It can also be made up to 3 days in advance. The red velvet cake layers can be baked up to 2 days ahead of time without needing to freeze them—simply bake, let them cool completely, and wrap tightly in plastic wrap. The cream cheese frosting can also be prepared up to 2 days in advance and stored in an airtight container in the refrigerator. Storing:
Store the assembled cheesecake in the refrigerator, either wrapped in plastic wrap or placed in an airtight container, for up to 5 days. Before serving, let the cake sit at room temperature for 20 to 30 minutes to soften slightly for best texture and flavor. Freezing the Cake Layers:
Once the cake layers have cooled completely, wrap them tightly in plastic wrap and store in the freezer for up to 3 months. When you’re ready to use them, transfer the wrapped cakes to the refrigerator the night before to thaw slowly and evenly. Freezing the Cream Cheese Frosting:
You can store the cream cheese frosting in an airtight container in the freezer for up to 3 months. When ready to use, thaw it overnight in the refrigerator. Once thawed, allow the frosting to come to room temperature, then stir vigorously with a rubber spatula until smooth and spreadable. Freezing the Entire Cheesecake:
To freeze the fully assembled cheesecake, wrap it tightly in plastic wrap and then in a layer of aluminum foil. Freeze for up to 1 month. Thaw in the refrigerator overnight before serving. Alternatively, you can freeze individual slices by wrapping each in plastic wrap and placing them in a resealable freezer bag. Thaw individual slices in the refrigerator overnight or at room temperature for about 30 minutes.