Introduction
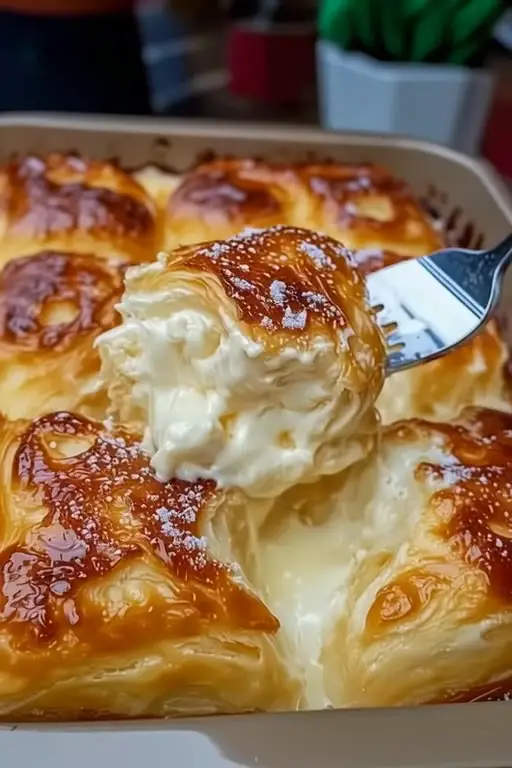
Welcome to the ultimate fusion dessert experience: Cheesecake Crescent Rolls Casserole — a decadent, crowd-pleasing, oven-baked marvel that marries the creamy richness of classic New York cheesecake with the buttery, flaky convenience of refrigerated crescent dough. This isn’t just a dessert—it’s a celebration in a baking dish. Whether you’re hosting a holiday brunch, planning a potluck showstopper, or craving something indulgent yet surprisingly simple to prepare, this casserole delivers luxurious texture, balanced sweetness, and nostalgic comfort in every golden, pull-apart bite. Unlike traditional cheesecake (which demands water baths, precise cooling, and hours of patience), this version comes together in under 30 minutes of hands-on time and bakes beautifully in a single 9×13-inch pan—no springform required. It’s the perfect bridge between homemade elegance and weeknight practicality, beloved by both novice bakers and seasoned dessert enthusiasts alike.
The History
The Cheesecake Crescent Rolls Casserole is a quintessential American “fridge-and-pantry” innovation born from mid-century convenience cooking culture and amplified by the digital recipe boom of the 2010s. Its roots trace back to two culinary movements: first, the 1950s–60s rise of canned fillings, pre-made doughs, and Jell-O-based desserts that prioritized ease without sacrificing appeal; second, the modern viral food trend era, where home cooks began experimenting with “deconstructed” and “casserole-ified” versions of iconic treats—think cinnamon roll casseroles, brownie-stuffed French toast bakes, and cookie dough-stuffed pancakes. While no single creator is credited, early iterations appeared on regional church cookbooks and Midwest supper club menus as “Cream Cheese Roll-Ups Bake” or “Crescent Cheesecake Squares.” The breakthrough moment arrived around 2014–2015, when food bloggers and Pinterest influencers began sharing variations featuring swirls of cream cheese, fruit compotes, and streusel toppings—all baked in a sheet pan for maximum portion control and minimal cleanup. Over time, the recipe evolved into its current beloved form: layered, swirled, lightly baked—not fried, not chilled overnight, but warmly served with a dusting of powdered sugar and optional berry coulis. It stands today as a delicious testament to American culinary ingenuity—where tradition meets transformation, and simplicity yields sophistication.
Ingredients Breakdown
Every extraordinary dish begins with intentional ingredients—and this casserole shines because each component serves a distinct, science-backed purpose:
- Cream Cheese (full-fat, brick-style): The foundational element—provides dense, velvety structure, tangy depth, and emulsifying power. Low-moisture, high-fat blocks (like Philadelphia) resist curdling and yield a luxuriously smooth filling. Avoid spreadable or whipped varieties—they contain stabilizers and excess water that cause separation during baking.
- Granulated Sugar: Not only sweetens but also aids in cream cheese aeration and contributes to surface caramelization. A portion is mixed into the filling; another is sprinkled over the top before baking for subtle crunch and visual contrast.
- Egg (large, room temperature): Acts as a binder and leavening agent—helping the filling set without becoming rubbery. Room temperature ensures even incorporation and prevents lumps.
- Vanilla Extract (pure, not imitation): Enhances aromatic complexity and rounds out acidity. A small amount goes a long way—skip alcohol-heavy extracts, which can impart bitterness at high heat.
- Lemon Zest (finely grated, organic if possible): Brightens the richness, cuts through fat, and adds nuanced citrus perfume. Avoid bottled zest—it lacks volatile oils and freshness.
- Refrigerated Crescent Dough (original, not “flaky” or “homestyle”): Chosen for its ideal balance of tenderness, butter content, and pliability. The perforated seams allow for easy separation and seamless rolling; its slightly salty, yeasty undertone complements the sweet filling perfectly. Pillsbury is the most widely tested and reliable brand for consistent results.
- Unsalted Butter (melted): Brushed between layers and over the top—ensures golden browning, flakiness, and rich mouthfeel. Salted butter may oversalt the dish due to cumulative sodium from dough and filling.
- Optional Add-ins: These aren’t afterthoughts—they’re functional upgrades: blueberries (frozen, tossed in cornstarch to prevent bleeding), strawberry jam swirl (seedless, warmed slightly for fluidity), cinnamon-sugar sprinkle (for warm spice notes), or crushed graham cracker crust layer (pressed into the bottom for textural contrast and authentic cheesecake resonance).
Crucially, this recipe intentionally omits heavy sour cream or Greek yogurt—common in traditional cheesecakes—because their added moisture would compromise the crescent dough’s integrity during baking, leading to sogginess or structural collapse. Instead, richness is achieved through precise fat ratios and gentle mixing techniques.
Step-by-Step Recipe
- Preheat & Prep: Position oven rack to center position. Preheat oven to 375°F (190°C). Lightly grease a 9×13-inch glass or light-colored metal baking dish with nonstick spray or softened butter. Line the bottom with parchment paper (optional but highly recommended for effortless lifting and clean slicing).
- Prepare Filling: In a large bowl using a hand mixer or stand mixer fitted with paddle attachment, beat room-temperature cream cheese on medium speed for 1–2 minutes until completely smooth and glossy—scraping down sides frequently. Gradually add granulated sugar (¾ cup), beating 2 more minutes until pale and airy. Add egg, vanilla, lemon zest, and a pinch of salt; mix on low just until fully incorporated—do NOT overmix (no more than 30 seconds). Overbeating incorporates excess air, risking cracks and puffing during baking. Set aside.
- Unroll & Layer Dough: Open both tubes of crescent dough. Carefully separate dough into 16 triangles (8 per tube). Lay half (8 triangles) in the prepared pan, arranging them point-side down in overlapping, shingled rows to fully cover the bottom—press seams gently to seal. Trim any overhang if needed; reserve scraps for topping.
- Add Filling: Using an offset spatula or spoon, evenly spread the cream cheese mixture over the dough layer in a thick, even slab—leave a ½-inch border around all edges to prevent oozing. Smooth surface with a wet spatula for professional finish.
- Top with Second Dough Layer: Arrange remaining 8 triangles over the filling, aligning points toward opposite ends to create a woven lattice effect. Press seams and edges firmly to seal—this prevents filling leakage and promotes even rising. Tuck in any loose corners.
- Brush & Sweeten: Gently brush entire surface with melted unsalted butter. Sprinkle evenly with remaining 2 tablespoons granulated sugar (or cinnamon-sugar blend). For extra luxury, dot with tiny pieces of cold butter (¼ tsp each) across the top—these will melt into rich pockets during baking.
- Bake with Precision: Place pan in preheated oven. Bake 22–26 minutes—until top is deeply golden brown, edges are crisp and bubbly, and center is *just* set (a gentle jiggle should show slight wobble, like firm gelatin—not liquid). Rotate pan halfway through for even browning. Do not open oven door before 18 minutes—sudden temperature drops cause collapse.
- Cool & Set: Remove from oven and let rest in pan on a wire rack for 25–30 minutes minimum. This critical step allows residual heat to fully set the filling and enables steam to escape—preventing condensation and soggy bottoms. For clean slices, refrigerate uncovered for 1–2 hours before cutting (optional but recommended).
- Serve & Garnish: Cut into 12 generous squares or 16 smaller bites using a hot, dipped knife (run under hot water and wipe dry between cuts). Serve warm or at room temperature. Garnish with powdered sugar, fresh berries, a drizzle of blueberry compote, or a dollop of lightly sweetened whipped cream.
Tips
- Cream Cheese Temperature Is Non-Negotiable: Cold cream cheese = lumpy filling. Let it sit at room temperature for 60–90 minutes before starting—or speed it up safely: unwrap block, place on microwave-safe plate, and microwave on DEFROST (30% power) for 15-second intervals, flipping each time, until soft but still cool to touch (never warm).
- Mix Like You Mean It—Then Stop: Beat cream cheese until silky, but once sugar and egg are added, switch to LOW speed and mix only until homogenous. Overmixing introduces air bubbles that expand then collapse in the oven—causing cracks, sinking, or uneven texture.
- Seal Those Seams: Use your fingertips—not a rolling pin—to press dough edges together. A tight seal keeps filling contained and creates defined, pull-apart layers instead of a monolithic slab.
- Use a Light-Colored Pan: Dark or nonstick pans absorb more heat and promote over-browning on the bottom before the center sets. If using dark metal, reduce oven temperature by 25°F and increase bake time by 2–4 minutes.
- Rotate, Don’t Peek: Opening the oven too soon causes thermal shock. Set a timer and wait until the 18-minute mark before rotating—then close immediately.
- Chill Before Slicing (For Presentation): While delicious warm, chilling 1–2 hours firms the filling dramatically—making clean, sharp cuts possible and enhancing flavor melding. Store covered in fridge up to 3 days.
- Reheat Gently: To refresh leftovers, place individual squares on parchment-lined baking sheet and warm in 325°F oven for 8–10 minutes—NOT the microwave (it makes dough rubbery and filling grainy).
- Freeze Like a Pro: Assemble unbaked casserole (through step 6), wrap tightly in plastic + foil, and freeze up to 3 months. Thaw overnight in fridge, then bake as directed—add 3–5 minutes to bake time.
Variations and Customizations
This casserole is endlessly adaptable—here are chef-tested, crowd-approved riffs for every occasion:
- Strawberry Swirl Cheesecake Crescent Bake: After spreading filling, dollop ⅓ cup seedless strawberry jam over surface. Use a butter knife to drag through in figure-8 patterns for elegant marbling. Top with crushed freeze-dried strawberries before serving.
- Blueberry Lemon Burst: Fold 1 cup frozen wild blueberries (tossed in 1 tbsp cornstarch + 1 tsp lemon juice) into filling before spreading. Add extra lemon zest (1 tsp) and a ¼ tsp of lemon oil for intensified brightness.
- Chocolate Hazelnut Dream: Mix ¼ cup Nutella or chocolate-hazelnut spread into filling. Swirl an additional 2 tbsp on top before second dough layer. Finish with chopped toasted hazelnuts and dark chocolate shavings.
- Graham Cracker Crumb Base: Press 1 cup finely crushed graham crackers + 3 tbsp melted butter into bottom of pan before laying first dough layer. Adds chewy-crisp contrast and classic cheesecake authenticity.
- Maple Pecan Streusel Top: Replace sugar sprinkle with maple pecan streusel: combine ¼ cup chopped pecans, 2 tbsp brown sugar, 1 tbsp maple syrup, 1 tbsp cold butter, and pinch of cinnamon. Sprinkle generously over butter-brushed top before baking.
- Mini Muffin Tin Version: Press dough triangles into greased standard muffin tin cups (1 per cup). Spoon 1 heaping tbsp filling into each. Fold dough points over filling and pinch to seal. Bake at 375°F for 14–16 minutes. Perfect for parties and portion control.
- Gluten-Free Adaptation: Substitute King Arthur Gluten-Free Pie Crust Mix (rolled thin) or pre-made GF puff pastry sheets (thawed, cut into triangles). Verify all other ingredients (vanilla, baking powder if used) are certified GF.
- Vegan Makeover: Use dairy-free cream cheese (Kite Hill or Miyoko’s), flax egg (1 tbsp ground flax + 2.5 tbsp water), coconut oil–based crescent dough (or vegan puff pastry), and maple syrup instead of granulated sugar in filling. Top with coconut whip.
Health Considerations and Nutritional Value
While undeniably indulgent, mindful preparation can enhance nutritional balance without sacrificing joy. Per standard serving (1/12th of casserole, approx. 185g):
- Calories: ~320–360 kcal (varies with add-ins—jam adds ~25, nuts add ~40, streusel adds ~60)
- Macros: Protein: 5–6g (from egg + cream cheese); Fat: 20–24g (mostly unsaturated from butter and cream cheese); Carbs: 30–34g (including 18–22g naturally occurring sugars)
- Nutrient Highlights: Rich in calcium (15% DV), vitamin A (12% DV), and choline (important for brain health). Contains probiotics if using live-culture cream cheese (check label).
- Dietary Notes: Naturally low in fiber—but easily boosted: add 2 tbsp ground flaxseed or psyllium husk to filling, or serve with a side of mixed berries (high-fiber, antioxidant-rich). Sodium sits at ~320mg/serving—moderate for a baked good; reduce by using low-sodium crescent dough (if available) and omitting added salt in filling.
- Portion Wisdom: This casserole is meant to be savored—not stuffed. Its richness satisfies quickly. Pair with a green salad dressed in citrus vinaigrette or fresh melon for a balanced, refreshing contrast.
- Allergen Alert: Contains dairy, wheat/gluten, and eggs. Always verify labels on store-bought dough and cream cheese for hidden allergens (e.g., whey, modified food starch, natural flavors).
Remember: Nutrition is personal. For those managing diabetes, consider reducing sugar by 25% and adding cinnamon (a natural blood-sugar modulator) to the filling. For heart health, swap half the butter for avocado oil in brushing step—retains browning while lowering saturated fat. Moderation, mindfulness, and ingredient quality matter far more than strict restriction.
Ingredients
- 2 (8 oz) packages full-fat brick-style cream cheese, room temperature
- ¾ cup granulated sugar, divided (½ cup for filling, ¼ cup for topping)
- 1 large egg, room temperature
- 2 tsp pure vanilla extract
- 1 tbsp finely grated lemon zest (from 1–2 organic lemons)
- ¼ tsp fine sea salt
- 2 (8 oz) tubes refrigerated original crescent dough (not flaky or honey butter varieties)
- 6 tbsp unsalted butter, melted (plus extra for greasing)
- Optional garnishes: powdered sugar, fresh berries, blueberry compote, whipped cream, mint leaves
Directions
- Preheat oven to 375°F (190°C). Grease a 9×13-inch baking dish and line bottom with parchment paper (optional but recommended).
- In a large bowl, beat cream cheese with electric mixer on medium until smooth and creamy (~2 min). Add ½ cup sugar; beat 2 more minutes until fluffy. Add egg, vanilla, lemon zest, and salt; mix on low just until combined (~20 sec). Scrape bowl thoroughly.
- Unroll both tubes of crescent dough. Separate into 16 triangles. Arrange 8 triangles in pan, overlapping slightly to cover bottom completely. Press seams to seal.
- Spread cream cheese mixture evenly over dough layer, leaving ½-inch border.
- Arrange remaining 8 triangles over filling, alternating direction for visual interest. Press edges and seams firmly to seal.
- Brush entire surface with melted butter. Sprinkle evenly with remaining ¼ cup sugar.
- Bake 22–26 minutes, until deep golden brown and center is just set (slight jiggle only). Rotate pan at 18 minutes.
- Cool in pan on wire rack 25–30 minutes minimum. For clean slices, refrigerate 1–2 hours before cutting.
- Cut into 12 squares or 16 rectangles. Serve warm or at room temperature. Dust with powdered sugar and garnish as desired.
FAQ
- Can I make this ahead of time?
- Absolutely! Assemble up to 24 hours in advance, cover tightly with plastic wrap, and refrigerate unbaked. Let sit at room temperature 15 minutes before baking. Or bake fully, cool completely, cover, and refrigerate up to 3 days. Reheat individual portions as instructed.
- Why did my casserole bubble over or leak?
- Most commonly due to: (1) overfilling—ensure ½-inch border remains clear; (2) under-sealed seams—press edges firmly; (3) using spreadable cream cheese—always use full-fat brick style; (4) oven too hot—verify with oven thermometer.
- Can I use homemade crescent dough?
- Yes—but it must be laminated, butter-rich, and rolled to ¼-inch thickness for comparable flakiness. Expect longer prep and chilling time. Most home bakers find store-bought delivers superior consistency and reliability for this application.
- Is there a lower-sugar option?
- You can reduce sugar to ⅓ cup total (2 tbsp in filling, 1 tbsp topping) without compromising structure—though flavor will be less pronounced. Add 1 tsp monk fruit–erythritol blend for bulk and sweetness if desired. Never omit egg or lemon zest—they’re essential for balance.
- What if I don’t have lemon zest?
- Lemon juice alone won’t replicate the aromatic oils. Substitute ¼ tsp lemon oil (food-grade) OR 1 tsp orange zest for bright, complementary citrus notes. Avoid dried lemon zest—it lacks potency and adds grit.
- Can I freeze leftovers?
- Yes! Store cooled, sliced portions in airtight container with parchment between layers. Freeze up to 2 months. Thaw overnight in fridge, then reheat as directed.
- Why does my top look pale or uneven?
- Ensure butter is fully melted (not pooled) and brushed evenly—not dabbed. Rotate pan halfway. Check oven calibration—many run hot or cold. Use an oven thermometer for accuracy.
- Can I add fruit inside?
- Fresh fruit adds too much moisture. Stick to frozen berries (tossed in cornstarch) or thick, reduced fruit compotes/swirls. Drain canned fruit thoroughly—or better yet, use fruit leather cut into thin strips.
Summary
Cheesecake Crescent Rolls Casserole is a brilliantly engineered, irresistibly comforting dessert that transforms pantry staples into a restaurant-worthy centerpiece—with zero fancy equipment or advanced technique required. It balances creamy, tangy, buttery, and subtly sweet notes in every tender, golden-brown, pull-apart square.
Whether you’re feeding a crowd, meal-prepping weekend treats, or simply treating yourself to joyful, stress-free baking, this casserole delivers nostalgia, novelty, and nourishment—all baked into one unforgettable 9×13-inch pan.