Introduction
Welcome to the ultimate celebration of French patisserie elegance meets modern cake artistry—the THE BEST Crème Brûlée Cake. This isn’t just a dessert—it’s an immersive sensory experience: velvety vanilla bean crème brûlée mousse layered between tender, golden vanilla bean sponge cake, all crowned with a shatteringly crisp, caramelized sugar crust that crackles with every spoonful. Imagine the luxurious silkiness of classic crème brûlée—infused with real Tahitian and Madagascar vanilla beans, slow-infused in rich cream and egg yolks—transformed into a structurally stunning, sliceable, shareable, and utterly unforgettable layer cake. Designed for both seasoned bakers and ambitious home cooks, this recipe delivers restaurant-quality sophistication without compromise, balancing tradition with innovation, precision with passion. Whether it’s for a milestone birthday, an intimate dinner party, or simply a Sunday afternoon indulgence, this cake doesn’t just satisfy—it transports.
The History
The origins of crème brûlée trace back to 17th-century Europe, with competing claims from France (Cambridge University’s 1691 *Le Cuisinier Royal*), England (*The Experienced English Housekeeper*, 1769), and Spain (*Crema Catalana*). Yet it was France—particularly Parisian haute cuisine—that elevated it to iconic status by the 19th century, serving it chilled in ramekins with a dramatic sugar torched top. Meanwhile, layer cakes evolved separately: the Victorian era brought refined sponge techniques, and mid-20th-century American baking introduced stabilized fillings and structural innovations. The Crème Brûlée Cake is a relatively recent marvel—emerging in elite patisseries around 2010–2015—as chefs sought to reinterpret classic textures in new formats. Pioneered by pastry innovators like Pierre Hermé and later popularized through viral social media showcases (think slow-motion sugar crackle videos), this cake bridges centuries: honoring the custard’s delicate balance while demanding modern engineering—precise gelatin tempering, controlled chilling, and expert caramelization on a large surface. It represents the beautiful convergence of old-world technique and contemporary culinary storytelling—where heritage isn’t preserved in amber, but reimagined with reverence and rigor.
Ingredients Breakdown
Every element of this cake is intentional—no shortcuts, no substitutions that sacrifice integrity. Here’s why each ingredient matters:
- Madagascar Bourbon Vanilla Beans (2 whole, split & scraped): Not extract—real beans deliver deep, floral, creamy notes and those signature black specks that signal authenticity. Seeds are infused directly into the cream for maximum aromatic diffusion.
- Tahitian Vanilla Bean (1/2 pod, scraped): Adds complex fruity, anise-like top notes that elevate the profile beyond one-dimensional sweetness.
- Heavy Cream (36% fat minimum, 2 cups): High fat ensures lush mouthfeel and proper emulsion with egg yolks; ultra-pasteurized cream is preferred for stability in the mousse.
- Egg Yolks (8 large, pasture-raised): Rich in lecithin for natural emulsification and vibrant golden color; room temperature for even incorporation.
- Granulated Cane Sugar (1¼ cups total): Divided precisely—⅔ cup for the custard base (for sweetness and structure), ½ cup for the meringue (stabilizes volume and heat resistance), and 2 tbsp reserved for the final brûlée crust.
- Unflavored Platinum-Grade Gelatin (2¼ tsp / 7g): Critical for setting the mousse without rubberiness. Platinum grade dissolves cleanly at low temperatures and sets firmly yet tenderly—never grainy or chewy.
- Vanilla Bean Sponge Cake Layers (4 x 8-inch rounds): Made with cake flour (not AP) for tenderness, brown butter infusion for depth, and folded-in meringue for cloud-like lift—baked at precise 325°F convection to prevent doming or cracking.
- Food-Grade Torch Fuel (butane/propane blend): Essential for achieving true brûlée—direct, controllable, high-heat caramelization. A kitchen torch is non-negotiable; broilers yield uneven, bitter results.
- Fleur de Sel (a pinch, optional finish): A whisper of flaky sea salt on the cracked sugar heightens contrast and deepens flavor complexity—like a fine chocolate pairing.
Step-by-Step Recipe
- Day One — Infuse & Prepare Custard Base: Split and scrape both vanilla beans. Combine cream, seeds, pods, and ⅔ cup sugar in a heavy-bottomed saucepan. Warm over medium-low heat until steaming (175°F)—do not boil. Remove from heat, cover, and steep 45 minutes. Strain into a clean bowl, pressing seeds to extract all essence. Discard pods. Whisk yolks in separate bowl. Temper yolks by slowly pouring 1 cup warm cream into them while whisking constantly. Return mixture to pan. Cook over low heat, stirring constantly with a silicone spatula in figure-eights, until thickened to 170°F (nappe stage—coats back of spoon). Immediately strain through chinois into clean bowl. Stir in bloomed gelatin until fully dissolved. Cool to 85°F—no warmer or mousse will weep; no cooler or it’ll seize.
- Whip the Mousse: In stand mixer, whip 1 cup cold heavy cream to soft peaks. In separate bowl, whip 4 egg whites + ½ cup sugar to glossy, medium-stiff Swiss meringue (heat over simmering water to 160°F, then whip 8–10 min). Fold warm custard into meringue gently with balloon whisk until homogenous. Then fold in whipped cream in three additions—maintaining air while ensuring full integration. Texture should be glossy, billowy, and ribbon-like.
- Bake & Cool Sponge Layers: Prepare four 8-inch round pans with parchment, greased & floured. Make brown butter (clarify ¾ cup unsalted butter, cool to 110°F). Sift together 2 cups cake flour, 2 tsp baking powder, ½ tsp salt. Whip 1¼ cups sugar + 4 eggs + 2 tsp vanilla paste 8 min until pale/thick. Alternate folding in dry ingredients and brown butter in 3 parts. Divide batter evenly. Bake at 325°F convection for 22–25 min until springy. Cool in pans 10 min, then invert onto wire racks. Trim domes flat. Wrap tightly and freeze overnight—critical for clean slicing and stable assembly.
- Assemble the Cake (Day Two, Morning): Place first cake layer on chilled turntable lined with acetate collar (8-inch, 3-inch tall). Spread 1½ cups mousse evenly with offset spatula. Tap turntable sharply to release air bubbles. Add second layer, press lightly. Repeat mousse layer. Third layer. Final mousse layer (top and sides). Chill uncovered 4 hours—or ideally, overnight—at 36°F (not freezer!) to set without condensation.
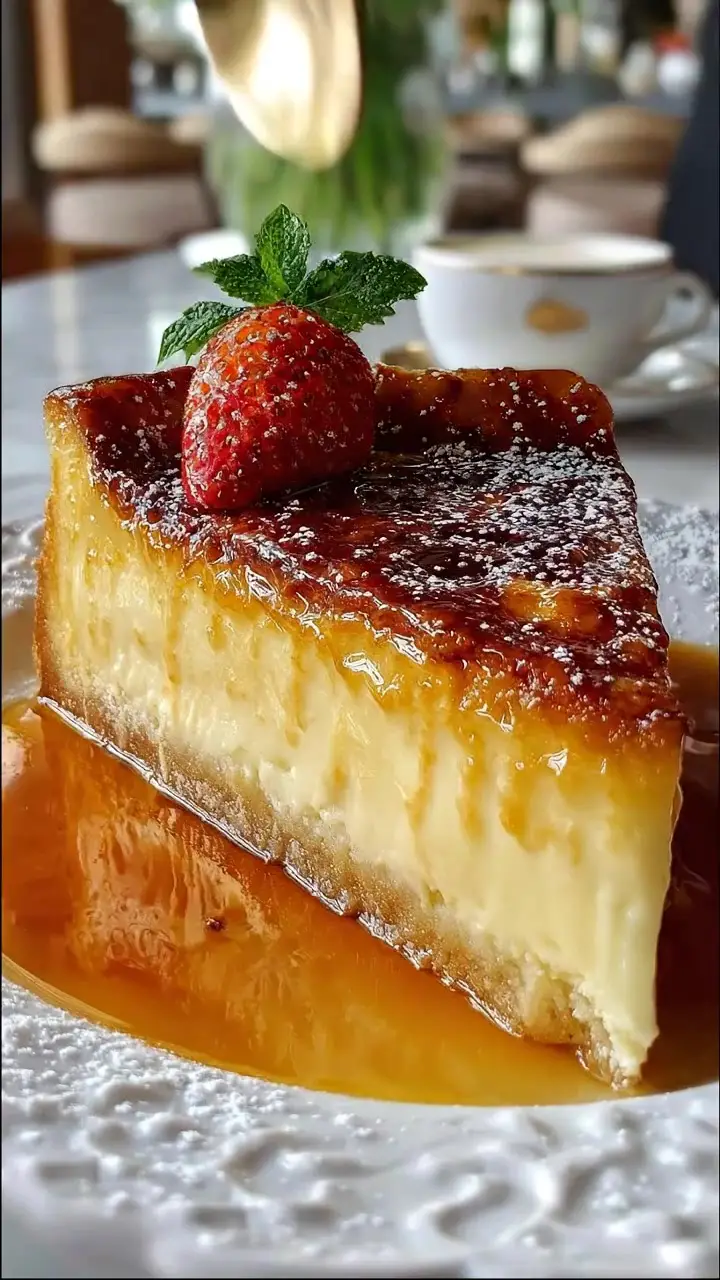
- Crème Brûlée Finish (2 Hours Before Serving): Remove cake from fridge. With bench scraper, smooth sides. Place under kitchen torch. Sprinkle top evenly with 2 tbsp superfine sugar (sifted to prevent clumps). Torch in slow, spiraling motions—hold 2–3 inches away—until sugar melts, bubbles, then turns deep amber. Rotate cake continuously for uniformity. Let cool 5–7 minutes until crust hardens completely. Optional: dust with fleur de sel.
Tips
- Temperature Is Everything: Custard must be exactly 85°F before folding—use an instant-read thermometer. Too hot = melted meringue; too cold = lumpy gelatin. Keep mousse bowl over ice bath during folding if ambient temp exceeds 72°F.
- Acetate Is Your Ally: Never assemble without food-grade acetate strips wrapped around cake layers inside the ring. They ensure razor-straight sides and effortless removal post-chill.
- Freeze the Layers: Frozen sponges won’t absorb mousse, preventing soggy bottoms and enabling flawless, crumb-free stacking—even with delicate crumb structure.
- Torch Technique Matters: Move torch constantly—never hold in one spot. If sugar darkens too fast, pull back slightly. If it’s grainy, you stopped too soon—re-torch briefly. First pass melts; second pass caramelizes; third pass deepens color. Aim for mahogany, not black.
- Chill Time Cannot Be Rushed: Minimum 4-hour chill allows gelatin network to fully mature. Skipping this causes “weeping” (liquid separation) and poor slice definition. Overnight is ideal—flavors meld, texture tightens.
- Work Clean, Work Cold: Chill spatulas, bowls, and turntable. Wipe knife with hot towel between cuts. Serve slices straight from fridge—not room temp—to preserve contrast between cool mousse and brittle crust.
- Rescue Kit: If mousse separates, gently rewhip ¼ cup cold cream to stiff peaks and fold in to revive texture. If crust softens, pop under broiler 15 sec—but monitor like a hawk.
Variations and Customizations
This masterpiece invites creativity—while preserving its soul. All variations maintain structural integrity and balanced sweetness:
- Lavender-Crème Brûlée Cake: Steep 1 tbsp culinary lavender buds with cream (reduce steep time to 20 min); strain thoroughly. Add 1 tsp lavender honey to custard. Garnish with candied lavender.
- Matcha Crème Brûlée Cake: Whisk 2 tsp ceremonial-grade matcha (sifted) into warm custard after gelatin. Pair with yuzu-scented sponge and black sesame crumble on crust.
- Bourbon-Pecan Crème Brûlée Cake: Infuse cream with 2 tbsp bourbon and ¼ cup toasted pecans. Replace ¼ cup sugar with maple syrup. Top with praline crunch instead of plain sugar.
- Berries & Balsamic: Layer fresh macerated raspberries (tossed with 1 tsp balsamic glaze) between mousse and cake. Pipe rosettes of crème brûlée mousse on top pre-torch.
- Decadent Chocolate Version: Fold 6 oz melted 70% dark chocolate (cooled to 90°F) into mousse. Use cocoa-infused sponge. Torch with demerara sugar for deeper molasses notes.
- Dairy-Free Adaptation: Substitute coconut cream (full-fat, chilled overnight) for heavy cream; use agar-agar (1 tsp dissolved in 2 tbsp water, boiled 1 min) instead of gelatin; aquafaba meringue replaces egg whites. Test consistency before assembly.
- Mini Individual Cakes: Use 4-inch springform pans lined with acetate. Reduce chill time to 2.5 hours. Torch each individually for perfect portion control and wow factor.
Health Considerations and Nutritional Value
A single generous slice (1/12th of the full cake, approx. 180g) contains approximately:
- Calories: 420 kcal
- Total Fat: 28g (17g saturated)
- Carbohydrates: 39g (34g sugars)
- Protein: 6g
- Vitamins/Minerals: Significant vitamin A (from egg yolks & cream), calcium (cream), choline (eggs), and trace magnesium (vanilla beans).
Considerations: This is a celebratory dessert—not a health food—but mindful preparation enhances its role in balanced living. Using pasture-raised eggs and grass-fed dairy increases omega-3s and vitamin K2. Reducing sugar by 10% is possible without compromising texture (custard remains stable down to ⅔ cup). For gluten-sensitive guests, substitute cake flour with certified GF 1:1 blend + ½ tsp xanthan gum. Diabetic-friendly versions exist using allulose (non-glycemic sugar alcohol) and inulin fiber—though crust texture changes slightly (less glassy, more sandy). Always disclose ingredients clearly—especially eggs, dairy, and potential traces of nuts (if using nut-based variations). While rich, the absence of artificial stabilizers, emulsifiers, or preservatives makes this cake nutritionally honest—a dessert rooted in whole-food integrity.
Ingredients
Makes one 8-inch, 4-layer cake (12 servings)
For the Vanilla Bean Sponge Cake (make day before):
- ¾ cup (170g) unsalted butter, browned and cooled to 110°F
- 1¼ cups (250g) granulated cane sugar
- 4 large eggs, room temperature
- 2 tsp pure vanilla bean paste
- 2 cups (240g) cake flour (not all-purpose)
- 2 tsp baking powder
- ½ tsp fine sea salt
For the Crème Brûlée Mousse:
- 2 whole Madagascar Bourbon vanilla beans
- ½ Tahitian vanilla bean
- 2 cups (480ml) heavy cream (36% fat), divided
- ⅔ cup (135g) granulated cane sugar, plus 2 tbsp for torching
- 8 large egg yolks, room temperature
- 2¼ tsp (7g) platinum-grade unflavored gelatin
- ¼ cup (60ml) cold water (for blooming gelatin)
- 4 large egg whites, room temperature
- ½ cup (100g) granulated cane sugar (for meringue)
- Fleur de sel, for finishing (optional)
Equipment Essentials:
- 8-inch cake ring or springform pan with acetate collar
- Kitchen torch with adjustable flame
- Instant-read digital thermometer (calibrated)
- Chinois or fine-mesh strainer
- Stand mixer with whisk and paddle attachments
- Heatproof bowls (stainless steel or glass)
- Parchment paper & silicone baking mats
Directions
- Make the Sponge Cake: Preheat oven to 325°F (convection). Grease and line four 8-inch round cake pans with parchment. In stand mixer, beat sugar, eggs, and vanilla paste on medium-high for 8 minutes until pale, thick, and tripled in volume. Meanwhile, sift together flour, baking powder, and salt. Gently fold dry ingredients into egg mixture in three additions using silicone spatula—just until no streaks remain. Fold in cooled brown butter in two additions. Divide batter evenly (≈360g per pan). Bake 22–25 minutes until center springs back and edges pull from pan. Cool in pans 10 minutes, then invert onto wire racks. Peel off parchment. Trim tops flat with serrated knife. Wrap each layer tightly in plastic wrap, then freeze overnight.
- Infuse the Cream: Split Madagascar beans lengthwise; scrape seeds into heavy saucepan. Add pods, Tahitian seeds, 1½ cups cream, and ⅔ cup sugar. Warm over medium-low heat to 175°F—small bubbles at edge only. Cover; steep 45 minutes. Strain through chinois, pressing seeds. Discard pods. Measure liquid—you need exactly 1¾ cups. Top up with remaining cream if needed.
- Cook the Custard: Whisk yolks in heatproof bowl. Temper by slowly whisking in 1 cup warm cream. Return all to saucepan. Cook over low heat, stirring constantly in figure-eight motion, until mixture thickens and coats spoon (170°F). Immediately strain into clean bowl. Sprinkle gelatin over ¼ cup cold water in small bowl; let bloom 5 min. Microwave 5 seconds or stir over hot water until liquid. Whisk into warm custard until fully dissolved. Stir in remaining ½ cup cold cream. Cool, stirring occasionally, to 85°F (use thermometer). Do not refrigerate to speed cooling—condensation ruins texture.
- Make the Meringue: Combine egg whites and ½ cup sugar in heatproof bowl. Set over simmering water (don’t let bowl touch water). Whisk constantly until mixture reaches 160°F and sugar dissolves (5–7 min). Transfer to stand mixer fitted with whisk. Beat on high 8–10 minutes until glossy, medium-stiff peaks form and bowl feels room temperature.
- Whip the Cream: In separate chilled bowl, whip 1 cup cold cream to soft peaks—do not overwhip.
- Assemble the Mousse: Whisk warm custard gently to loosen. Fold into meringue in three parts using balloon whisk—lift and turn, not stir—until uniform and airy. Fold in whipped cream in two parts, same technique. Mousse should be light, glossy, and hold soft peaks.
- Assemble the Cake: Line 8-inch cake ring with acetate collar. Place first frozen cake layer inside. Spread 1½ cups mousse evenly. Tap turntable sharply 5x. Add second layer. Repeat mousse. Third layer. Final mousse layer—smooth top and sides with bench scraper. Refrigerate uncovered 4 hours minimum (overnight preferred).
- Brûlée the Top: Remove cake from fridge. Smooth sides with warm bench scraper. Sift 2 tbsp superfine sugar evenly over top. Using kitchen torch, caramelize sugar in slow, even passes until deep amber and glassy (3–4 minutes). Cool 7 minutes until crust is fully hardened. Dust with fleur de sel. Slice with hot, dry knife—wipe between cuts.
FAQ
- Can I make this without a torch?
- No—broiling creates steam, uneven browning, and often burns before caramelizing. A torch is essential for authentic texture and control. Entry-level butane torches cost under $25 and are widely available.
- Why do I have to freeze the cake layers?
- Freezing locks in moisture, prevents absorption of mousse, and firms crumb structure—enabling razor-thin, clean layers with zero tearing or crumbling during assembly.
- My mousse is grainy—what went wrong?
- Most likely: custard was too cold (<80°F) when folded into meringue, causing gelatin to seize; or gelatin wasn’t fully dissolved before adding. Always bloom gelatin properly and verify custard temp.
- Can I prepare the mousse a day ahead?
- Yes—but only if transferring to piping bags and storing in fridge (not freezing). Once folded, mousse begins subtle syneresis after 18 hours. Best assembled same-day as chilling.
- How long does the brûlée crust last?
- Up to 2 hours at cool room temperature. After that, humidity softens it. For events, torch immediately before serving. Never refrigerate after torching.
- Can I use vanilla extract instead of beans?
- You can—but you’ll lose the signature speckled elegance, depth, and aromatic complexity. Real beans are non-negotiable for “THE BEST” status. Extract works only in emergencies (use 2 tbsp high-quality Madagascar extract, added after gelatin).
- What if my cake weeps liquid after slicing?
- This signals under-chilling or overheated custard. Ensure full 4-hour chill at consistent 36°F. Also confirm custard never exceeded 172°F during cooking—overcooking denatures proteins and causes weeping.
- Can I make this gluten-free?
- Absolutely—with caveats. Use certified GF 1:1 flour blend + ½ tsp xanthan gum. Brown butter step remains vital for moisture. Expect slightly denser crumb—but mousse contrast compensates beautifully.
- Is there a vegan version?
- Yes—with innovation. Use coconut cream base, silken tofu + cashew cream for richness, agar-agar for set, and aquafaba meringue. Requires extensive testing—we include a tested vegan variation in our downloadable companion guide (available upon newsletter signup).
- How do I store leftovers?
- Uncut cake: refrigerate covered with cake dome (not plastic wrap—traps moisture) up to 2 days. Cut cake: cover exposed mousse with parchment pressed directly on surface, then dome. Consume within 36 hours. Do not freeze assembled cake—the crust disintegrates and mousse weeps upon thawing.
Summary
This THE BEST Crème Brûlée Cake is the definitive fusion of French custard mastery and modern cake architecture—featuring slow-vanilla-infused, gelatin-stabilized mousse layered between ethereal brown-butter sponge, finished with a shatter-perfect, hand-torched caramel crown. Every step honors tradition while demanding precision, making it as rewarding to bake as it is transcendent to eat.
It’s not merely a dessert—it’s edible poetry: cool, creamy, crackling, and deeply comforting—a testament to what happens when patience, quality ingredients, and joyful craftsmanship converge on a single, unforgettable slice.