Summer Berry & Chocolate Layer Cake: A Celebration of Flavors
The Summer Berry & Chocolate Layer Cake is more than just a dessert—it’s a celebration of seasonal abundance and rich indulgence. With its decadent chocolate layers, luscious whipped cream filling, and vibrant fresh berries, this cake captures the essence of summer in every bite. Whether you’re hosting a garden party, celebrating a birthday, or simply treating yourself to something extraordinary, this stunning dessert delivers both visual appeal and unforgettable flavor.
The History of Layer Cakes and Berry-Infused Desserts
Layer cakes have a long and beloved history in American and European baking traditions, dating back to the 18th century when ovens became more accessible and baking powders revolutionized cake textures. The concept of stacking multiple layers with fillings evolved into an art form by the Victorian era, where elaborate cakes were centerpieces at social gatherings. Berries, especially strawberries, raspberries, and blueberries, have long been associated with summertime feasts and harvest celebrations across Europe—think of English summer puddings or French fraisier cakes.
The fusion of chocolate and berries, however, gained widespread popularity in the 20th century as chocolate became more affordable and accessible. Pastry chefs began experimenting with combining rich cocoa flavors with the bright acidity of fresh fruit. Today, the Summer Berry & Chocolate Layer Cake stands as a modern homage to these traditions—a luxurious yet approachable dessert that balances richness with freshness, perfect for warm-weather occasions.
Ingredients Breakdown: What Makes This Cake Special
Every element of this cake has been thoughtfully chosen to create harmony between texture, flavor, and appearance:
- Dark Chocolate (70%): Provides deep, complex cocoa notes without overwhelming sweetness. Using high-quality chocolate ensures a smooth melt and rich color.
- Buttermilk: Adds tenderness to the crumb and reacts with baking soda for a soft, moist rise.
- Vanilla Bean Paste: Offers superior flavor depth compared to extract, with visible specks that add elegance.
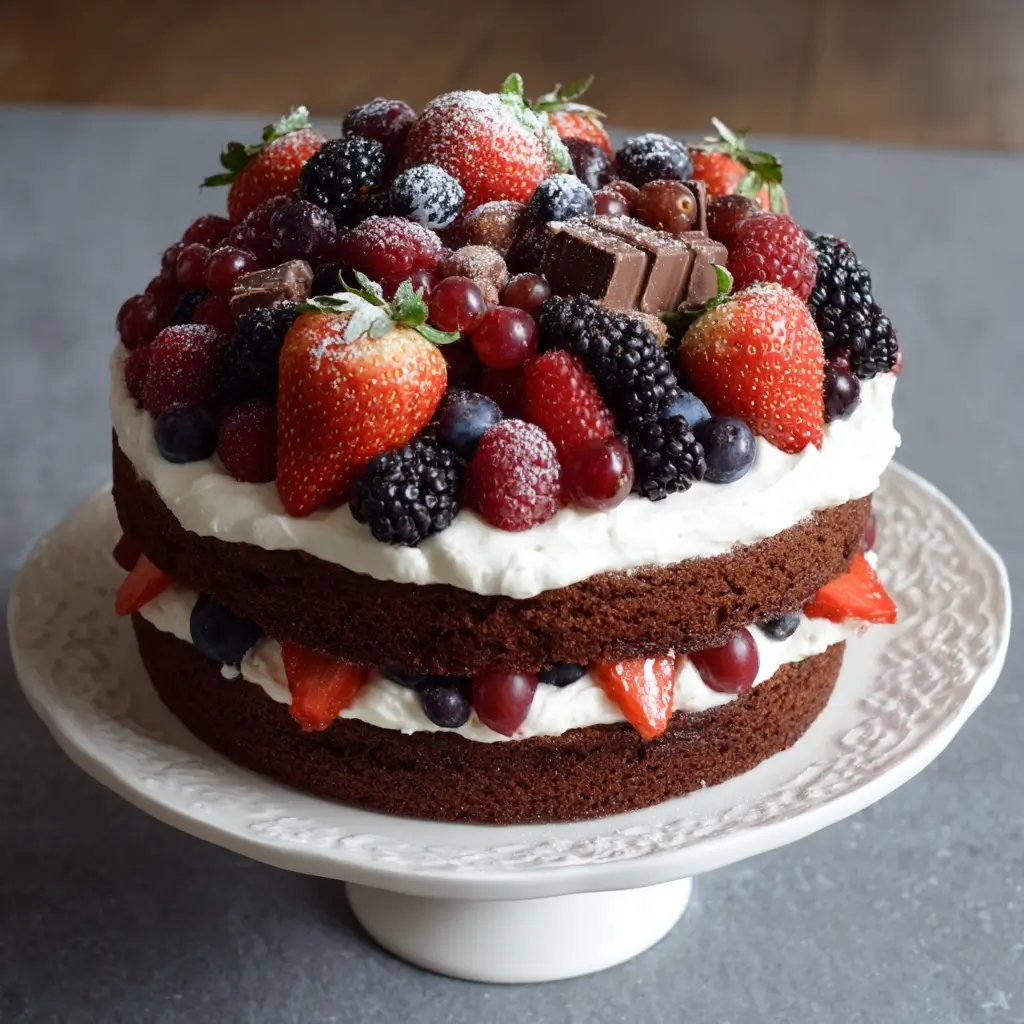
- Fresh Summer Berries: A mix of strawberries, raspberries, blueberries, and blackberries brings natural sweetness, tartness, and a rainbow of colors.
- Heavy Cream (35–40% fat): Essential for stable, fluffy whipped cream that holds its shape between layers.
- Full-Fat Cream Cheese: Blended into the whipped cream for subtle tang and improved structure.
- Brown Sugar (in berries): Enhances juiciness and adds molasses warmth that complements both fruit and chocolate.
- Unsweetened Cocoa Powder: Used in the cake batter for intense chocolate flavor without added fat.
- All-Purpose Flour: Gives structure while remaining light enough for delicate layers.
- Egg Whites (separated): Folded in at the end to aerate the batter for an ultra-soft texture.
Step-by-Step Recipe: How to Make the Ultimate Summer Berry & Chocolate Layer Cake
Ingredients
For the Chocolate Cake Layers (Three 8-inch rounds):
- 1 ¾ cups (220g) all-purpose flour
- ¾ cup (75g) unsweetened cocoa powder (Dutch-process preferred)
- 1 ½ tsp baking soda
- 1 tsp baking powder
- ½ tsp salt
- 1 ½ cups (300g) granulated sugar
- ½ cup (100g) packed light brown sugar
- ½ cup (120ml) neutral oil (like grapeseed or canola)
- 3 large eggs, separated
- 1 cup (240ml) buttermilk
- 2 tsp vanilla bean paste
- ½ cup (120ml) hot coffee (enhances chocolate flavor without tasting like coffee)
For the Macerated Berries:
- 4 cups mixed fresh berries (strawberries hulled and sliced, raspberries, blueberries, blackberries)
- ¼ cup (50g) granulated sugar
- 1 tbsp brown sugar
- 1 tbsp lemon juice
- 1 tsp orange zest (optional, for brightness)
For the Whipped Cream Filling & Frosting:
- 3 cups (720ml) cold heavy cream (divided use)
- 8 oz (225g) full-fat cream cheese, softened
- ⅓ cup (40g) powdered sugar
- 1 ½ tsp vanilla bean paste
- Pinch of salt
Optional Garnishes:
- Extra fresh berries
- Edible flowers (such as pansies or nasturtiums)
- Chocolate shavings or curls
- Mint leaves
- Gold leaf or edible glitter (for special occasions)
Directions
Step 1: Prepare the Cake Pans
- Preheat oven to 350°F (175°C). Grease three 8-inch round cake pans with butter or non-stick spray, then line the bottoms with parchment paper. Dust lightly with cocoa powder to prevent sticking and maintain appearance.
Step 2: Mix Dry Ingredients
- In a large bowl, sift together flour, cocoa powder, baking soda, baking powder, and salt. Sifting prevents lumps and ensures even distribution. Set aside.
Step 3: Combine Wet Ingredients
- In another bowl, whisk granulated sugar, brown sugar, and oil until combined. Add egg yolks one at a time, mixing well after each addition. Stir in buttermilk and vanilla bean paste.
- Pour the wet mixture into the dry ingredients and mix on low speed (or by hand) until just combined. Do not overmix.
- Slowly add hot coffee and mix until the batter is smooth and thin. The coffee intensifies the chocolate flavor and creates a tender crumb.
Step 4: Whip Egg Whites
- In a clean, grease-free bowl, beat egg whites with a handheld or stand mixer until stiff peaks form. This step adds air and lightness to the cake layers.
- Gently fold the beaten egg whites into the cake batter in two additions using a spatula. Be careful not to deflate the batter—fold slowly and thoroughly.
Step 5: Bake the Layers
- Divide the batter evenly among the prepared pans. Use a scale for precision if possible (approximately 600g per pan).
- Bake for 25–30 minutes, or until a toothpick inserted into the center comes out clean.
- Cool in pans for 10 minutes, then transfer to wire racks to cool completely. Chill layers in the refrigerator for at least 30 minutes before assembling to reduce crumbling.
Step 6: Macerate the Berries
- While cakes cool, combine all berry ingredients in a glass bowl. Gently toss and let sit at room temperature for 30–60 minutes. The sugar will draw out juices, creating a syrupy compote ideal for layering.
- Drain excess liquid if too juicy (reserve it for cocktails or drizzling).
Step 7: Make the Whipped Cream Filling
- Beat cream cheese, powdered sugar, vanilla, and salt until smooth. Set aside.
- In a separate chilled bowl, whip 2 cups (480ml) of cold heavy cream to medium peaks.
- Fold the cream cheese mixture into the whipped cream until fully incorporated. Avoid overmixing to maintain fluffiness.
Step 8: Assemble the Cake
- Place the first cake layer on a cake board or serving plate. Spread a thin layer of whipped cream mixture over the top.
- Sprinkle a generous amount of macerated berries (drained slightly) over the cream. Repeat with second layer.
- Top with the final cake layer. Apply a thin “crumb coat” of whipped cream over the entire cake. Refrigerate for 20 minutes to set.
- Apply a final, thick layer of whipped cream to the sides and top. Use an offset spatula or bench scraper for a smooth finish, or leave textured for a rustic look.
Step 9: Decorate and Chill
- Arrange fresh berries in concentric circles or cascading patterns on top. Add chocolate shavings, mint, or edible flowers for visual flair.
- Chill the assembled cake for at least 2 hours (preferably 4) before slicing. This allows flavors to meld and structure to stabilize.
Tips for Success
- Room Temperature Eggs: While only yolks are used in the base, room temp eggs incorporate better. Separate them while cold for easier handling.
- Avoid Overbaking: Chocolate cakes dry out quickly. Start checking at 25 minutes. A slight spring-back means it’s done.
- Use Cold Tools: Chill bowls and beaters before whipping cream. Warm tools lead to runny results.
- Don’t Skip the Crumb Coat: It traps loose crumbs and creates a clean surface for the final frosting.
- Level the Layers: If your cakes domed during baking, use a serrated knife to level them for even stacking.
- Work Quickly with Whipped Cream: Warm kitchens make cream unstable. Assemble in a cool environment if possible.
- Freeze Extra Layers: Bake and freeze unfrosted layers up to 1 month in advance. Thaw before assembling.
Variations and Customizations
This cake is highly adaptable to dietary preferences, seasonal availability, and creative expression:
- Gluten-Free Version: Substitute all-purpose flour with a quality gluten-free 1:1 baking blend containing xanthan gum.
- Dairy-Free Option: Use coconut cream instead of heavy cream and dairy-free chocolate. Ensure cocoa powder is vegan-certified.
- Lower Sugar Alternative: Replace granulated sugars with monk fruit sweetener or erythritol blends. Reduce sugar in berries or omit entirely.
- Vegan Adaptation: Use flax eggs, aquafaba instead of egg whites, plant-based butter and milk, and vegan chocolate. Opt for cashew cream instead of dairy cream.
- Fruit Variations: Try peaches, cherries, plums, or passionfruit in place of berries depending on the season.
- Alcohol Infusion: Add 1–2 tbsp of Chambord, Grand Marnier, or Kirsch to the berry mix, or brush layers with chocolate liqueur.
- Flavor Twists: Add a layer of chocolate ganache between cake and cream, or swirl raspberry puree into the filling.
- Mini Versions: Make cupcakes or mason jar parfaits using the same components.
- Chocolate Tier: Add a dark chocolate drip glaze on top for a semi-naked or modern aesthetic.
Health Considerations and Nutritional Value
While undeniably indulgent, this cake includes several elements that contribute positively to overall nutrition when enjoyed in moderation:
- Berries: Rich in antioxidants (especially anthocyanins), vitamin C, fiber, and anti-inflammatory compounds. They help balance the richness of chocolate and cream.
- Dark Chocolate: Contains flavonoids linked to heart health and improved cognitive function. Choose 70% or higher for maximum benefits.
- Dairy: Provides calcium, protein, and vitamin D (if fortified), though those with lactose intolerance should consider alternatives.
- Portion Control: One slice (1/12 of cake) averages around 380–420 calories, depending on size and ingredients. Serving with a dollop of Greek yogurt can reduce fat intake.
Note: Due to high sugar and fat content, individuals managing diabetes, cardiovascular conditions, or weight should enjoy this dessert occasionally. For healthier versions, reduce added sugars, increase fruit proportion, and use alternative sweeteners or lower-fat dairy substitutes.
Frequently Asked Questions (FAQ)
Can I make this cake ahead of time?
Yes! Bake the layers up to 2 days in advance and store wrapped at room temperature. The fully assembled cake keeps well refrigerated for up to 2 days. Add delicate garnishes just before serving.
Why did my whipped cream collapse?
Common causes include warm ingredients, overbeating, or insufficient fat content. Always use cold cream (35%+ fat), chill equipment, and stop whipping once firm peaks form.
Can I freeze this cake?
Freezing is best done before assembly. Wrap cooled layers tightly in plastic and foil; freeze for up to 1 month. Thaw overnight in fridge. Fully frosted cakes may lose texture due to cream separation.
What type of cocoa powder should I use?
Dutch-processed cocoa yields a smoother, deeper flavor and darker color. Natural cocoa works too but may result in a slightly more acidic taste. Adjust leavening if substituting.
How do I transport this cake?
Use a cake carrier with a dome lid. Place it on a non-slip mat in your car. Keep refrigerated until departure and avoid direct sunlight.
Can I use frozen berries?
Frozen berries release more water and may bleed color. If using, thaw, drain thoroughly, and pat dry. Best for baking, less ideal for fresh presentation.
Is there a way to stabilize the whipped cream?
Yes—add 1 tsp of cornstarch or ½ tsp of gelatin (dissolved in water) while whipping. Alternatively, use mascarpone cheese in place of cream cheese for extra stability.
Can I bake this as a sheet cake?
Absolutely. Pour batter into a 9×13-inch pan and bake for 30–35 minutes. Cool completely, then spread with whipped cream and top with berries.
Summary
The Summer Berry & Chocolate Layer Cake is a masterpiece of contrast—decadent chocolate meets vibrant, juicy berries, all held together by silky whipped cream. It’s a show-stopping dessert that celebrates seasonal produce and timeless baking craftsmanship.