Strawberry Cheesecake Dump Cake: The Ultimate Dessert Fusion You’ll Crave Again and Again
The History
The concept of a “dump cake” originated in the mid-20th century, gaining popularity during the 1950s and 1960s as American home cooks embraced convenience foods and easy-to-prepare recipes. Originally developed as a shortcut dessert using canned fruit and boxed cake mix, the dump cake earned its name from the simple method of “dumping” ingredients directly into a baking dish with minimal mixing or preparation. It was often featured in community cookbooks and promotional materials from companies like Campbell’s Soup and Duncan Hines, who encouraged homemakers to use their products for quick, satisfying desserts.
Over time, the dump cake evolved beyond its humble beginnings, transforming into a beloved staple at potlucks, family gatherings, and holiday celebrations across the United States. Its appeal lies in its simplicity—requiring no mixer, no complicated steps, and very little cleanup. As culinary trends shifted toward fusion desserts and richer flavor combinations, bakers began experimenting by blending elements from other classic treats. This led to the birth of hybrid desserts such as the Strawberry Cheesecake Dump Cake—a luxurious twist that fuses the creamy indulgence of cheesecake with the warm, buttery crumble of a traditional dump cake.
This particular variation draws inspiration not only from Southern comfort food traditions but also from the ever-popular strawberry shortcake and New York-style cheesecake. By layering rich cream cheese filling with sweetened strawberries and golden cake topping, this dessert bridges generations of American baking heritage. Today, it stands as a symbol of modern comfort cooking—elegant enough for dinner parties yet accessible enough for weeknight treats. With social media amplifying its visibility through viral recipe shares and food bloggers raving about its decadent texture and vibrant flavor, the Strawberry Cheesecake Dump Cake has cemented its status as a contemporary classic in the evolving world of homemade desserts.
Ingredients Breakdown
The magic of the Strawberry Cheesecake Dump Cake lies in its carefully balanced layers, each contributing unique textures and flavors. Let’s dive deep into every ingredient and understand why it plays an essential role in creating this unforgettable dessert.
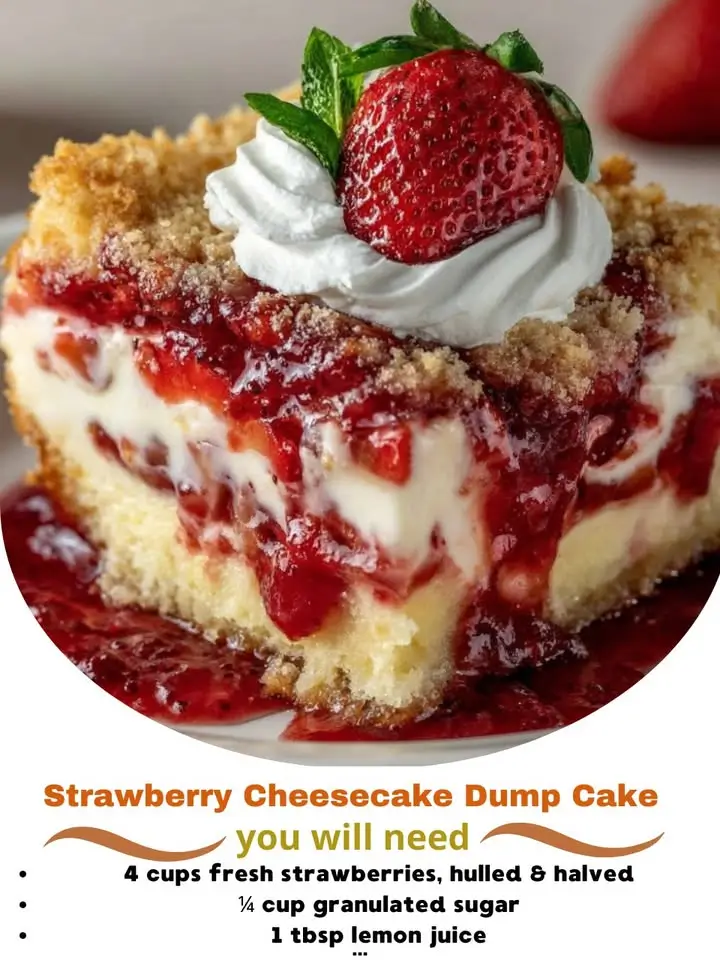
For the Cheesecake Layer:
- Cream Cheese (3 packages, 8 oz each, softened): The star of the show. Full-fat cream cheese provides a luxuriously smooth, tangy base that defines the essence of cheesecake. Softening it beforehand ensures a lump-free mixture when blended with sugar and eggs.
- Granulated Sugar (¾ cup): Adds sweetness while balancing the tartness of the strawberries. This amount is ideal—not too overpowering, allowing the natural fruit flavor to shine.
- Eggs (3 large): Bind the cheesecake layer together and give it structure. They help create a custard-like consistency that sets beautifully during baking.
- Vanilla Extract (1 tablespoon pure extract): Enhances the overall aroma and depth of flavor. Pure vanilla offers a more complex profile than imitation versions.
- Sour Cream (½ cup): Often overlooked, sour cream adds moisture, slight tanginess, and richness, contributing to a velvety texture without making the layer dense.
For the Strawberry Layer:
- Fresh Strawberries (4 cups sliced): Preferably ripe but firm, these provide juicy bursts of freshness and color. Fresh berries offer superior taste and texture compared to frozen ones, though thawed and drained frozen strawberries can be substituted in a pinch.
- Granulated Sugar (¼ cup): Draws out the natural juices from the strawberries, forming a glossy compote-like layer that seeps into the cake as it bakes.
- Lemon Juice (1 tablespoon fresh): Brightens the flavor, cuts through the sweetness, and prevents the strawberries from browning prematurely.
- Cornstarch (1 teaspoon): Helps thicken the strawberry juices slightly so they don’t make the bottom soggy while still maintaining a saucy consistency.
For the Cake Layer:
- Yellow Cake Mix (1 box, approximately 15.25 oz): The foundation of any dump cake. A yellow cake mix delivers a tender, buttery crumb with just enough sweetness. Avoid substituting with spice or chocolate mixes unless you’re intentionally altering the flavor profile.
- Unsalted Butter (½ cup, melted): Poured evenly over the dry cake mix, the butter melts into the mix during baking, creating a crisp, golden crust on top while helping the crumbs absorb moisture from below.
- Water (½ cup): Mixed with the melted butter, water helps distribute fat evenly and activates the leavening agents in the cake mix for optimal rise and texture.
Optional Garnishes & Additions:
- Whipped Cream (freshly whipped or canned): Perfect for dolloping on warm servings, adding lightness and cool contrast.
- Sliced Fresh Strawberries: For garnish and added freshness.
- Chopped Nuts (such as pecans or almonds): Sprinkle over the cake mix before baking for extra crunch and nutty flavor.
- White Chocolate Chips (½ cup): Pressed into the top layer before baking for a sweet, melty surprise in every bite.
- Lemon Zest: Grated over the finished dessert to elevate the citrus notes and add aromatic brightness.
Step-by-Step Recipe
- Preheat Oven: Begin by preheating your oven to 350°F (175°C). This ensures even baking from the moment the dish enters the oven. While the oven heats, prepare your 9×13-inch baking dish by lightly greasing it with nonstick spray or softened butter. For easier cleanup, consider lining the dish with parchment paper, leaving an overhang on two sides to lift the cake out later if desired.
- Prepare the Strawberry Layer: In a medium saucepan, combine the sliced strawberries, ¼ cup granulated sugar, lemon juice, and cornstarch. Cook over medium heat, stirring frequently, until the strawberries release their juices and the mixture thickens slightly—about 8–10 minutes. Remove from heat and let cool slightly. This step enhances flavor concentration and prevents excess liquid pooling at the bottom of the cake. Spread the warm strawberry mixture evenly across the bottom of the prepared baking dish.
- Make the Cheesecake Filling: In a large mixing bowl, beat the softened cream cheese with an electric hand mixer on medium speed until smooth and creamy (about 1 minute). Gradually add the ¾ cup granulated sugar and continue beating until fully incorporated and fluffy. Scrape down the sides of the bowl, then add the eggs one at a time, mixing well after each addition. Stir in the vanilla extract and sour cream until the batter is silky and uniform. Pour this rich filling directly over the strawberry layer and gently spread it into an even layer using a spatula. Be careful not to mix the layers together.
- Add the Cake Mix Layer: Open the box of yellow cake mix and pour the dry mix evenly over the surface of the cheesecake layer. Use a spoon or your hands to gently spread it out completely, covering the entire surface. Do not stir—this is where the “dump” method shines. The dry cake mix will transform into a soft, golden crust during baking.
- Pour Butter-Water Mixture: In a separate bowl, whisk together the melted unsalted butter and ½ cup water until combined. Slowly drizzle this mixture evenly over the top of the cake mix. Use the back of a spoon to gently nudge the liquid into any dry spots, ensuring all the powder gets moistened. This creates a self-saucing effect where the buttery liquid sinks down, reacting with the cake mix to form a tender cake layer above and a gooey sauce beneath.
- Bake Until Golden: Place the dish in the center rack of the preheated oven. Bake for 45 to 55 minutes, or until the top is deep golden brown and bubbling around the edges. The center should be set but may have a slight jiggle—it will firm up as it cools. If the top begins to brown too quickly, loosely tent it with aluminum foil halfway through baking.
- Cool Completely: Once baked, remove the dump cake from the oven and allow it to cool on a wire rack for at least 1 hour. Then transfer it to the refrigerator and chill for a minimum of 2 hours (preferably 3–4 hours) before serving. Chilling allows the layers to settle, the cheesecake to firm up, and the flavors to meld beautifully.
- Serve with Style: Slice into squares using a sharp knife dipped in hot water for clean cuts. Serve chilled or at room temperature, topped with a swirl of whipped cream and fresh strawberry slices. Optionally, drizzle with strawberry syrup or white chocolate sauce for an elegant presentation.
Tips
- Use Room-Temperature Ingredients: Ensure your cream cheese and eggs are at room temperature before starting. Cold ingredients can lead to lumpy cheesecake filling, which affects both texture and appearance.
- Don’t Skip the Pre-Cooked Strawberries: While some dump cake recipes call for raw fruit, precooking the strawberries intensifies their flavor, removes excess water, and prevents a soupy bottom layer.
- Avoid Overmixing the Cheesecake: Mix only until ingredients are combined. Overbeating incorporates too much air, which can cause cracking during baking.
- Let It Rest Before Serving: Patience pays off. Cooling and chilling the cake allows the layers to stabilize and enhances the eating experience significantly.
- Grease the Pan Well: Even if using parchment, lightly grease the corners and sides to prevent sticking, especially important given the sticky nature of the cake layer.
- Check for Doneness Properly: The cake is done when the top is golden and the center no longer looks wet. A toothpick inserted near the edge should come out clean; avoid testing in the middle to preserve the layered look.
- Drain Excess Liquid After Baking: If you notice pooling juice after cooling, carefully tilt the pan to drain off excess liquid before slicing for a cleaner plate presentation.
- Slice with a Hot Knife: Dip a thin-bladed knife in boiling water, wipe dry, and slice smoothly through the layers for neat, professional-looking portions.
- Double the Recipe Carefully: This dessert does not scale easily to larger pans due to layer imbalance. Stick to the 9×13 size unless modifying proportions accordingly.
- Store Leftovers Promptly: Cover tightly with plastic wrap or store in an airtight container in the fridge to maintain freshness and prevent drying.
Variations and Customizations
The beauty of the Strawberry Cheesecake Dump Cake is its adaptability. Whether you want to switch up the fruit, experiment with textures, or cater to dietary needs, there are countless ways to personalize this dessert.
Fruit Variations:
- Raspberry Cheesecake Dump Cake: Replace strawberries with fresh raspberries for a tart, jewel-toned version. Raspberries pair exceptionally well with white chocolate chips sprinkled on top.
- Blueberry Lemon Cheesecake Dump Cake: Swap strawberries for blueberries and add lemon zest to both the cheesecake and fruit layers for a bright, citrus-forward twist.
- Mixed Berry Medley: Combine strawberries, blackberries, raspberries, and blueberries for a colorful, antioxidant-rich option bursting with varied textures.
- Peach Cheesecake Dump Cake: Use peeled and sliced peaches instead of strawberries. Add a pinch of cinnamon to the cake mix for warmth and nostalgia.
Cake Mix Swaps:
- Vanilla Cake Mix: A milder alternative to yellow cake, letting the cheesecake and fruit flavors take center stage.
- German Chocolate Cake Mix: Introduce coconut and pecan notes for a tropical flair. Pair with banana slices for a banana-split-inspired treat.
- Red Velvet Cake Mix: Offers a subtle cocoa undertone and striking red hue that complements the pink strawberry layer beautifully.
Dietary Modifications:
- Gluten-Free Version: Substitute regular cake mix with a high-quality gluten-free yellow cake mix and ensure all other ingredients are certified gluten-free.
- Lower-Sugar Option: Use reduced-sugar cake mix, cut back on added sugars in the fruit layer, and opt for low-sugar cream cheese. Natural sweeteners like erythritol or monk fruit blend can replace granulated sugar in equal measure.
- Dairy-Free Alternative: Replace butter with vegan margarine, cream cheese with plant-based cream cheese (like Kite Hill or Miyoko’s), and sour cream with dairy-free sour cream substitute.
- Egg-Free Cheesecake Layer: Use commercial egg replacers (such as Bob’s Red Mill Egg Replacer) following package instructions, though results may vary slightly in texture.
Gourmet Upgrades:
- Infused Strawberry Layer: Add a splash of Grand Marnier, Chambord, or amaretto to the simmering strawberries for an adult-friendly version.
- Layered Crunch: Sprinkle crushed graham crackers or shortbread cookies between the cheesecake and cake layers for added texture.
- Swirl Technique: After pouring the cheesecake layer, drop spoonfuls of strawberry jam on top and gently swirl with a knife for a marbled effect.
- Caramel Drizzle: Finish with a ribbon of salted caramel sauce for a decadent contrast to the fruity sweetness.
Health Considerations and Nutritional Value
While undeniably delicious, the Strawberry Cheesecake Dump Cake is a rich dessert best enjoyed in moderation. Understanding its nutritional composition helps you make informed choices, especially for those managing dietary restrictions or health goals.
Nutritional Profile (Per Serving, Approx. 1/12th of Cake):
- Calories: ~420–480 kcal
- Total Fat: 22–26g (Saturated Fat: 12–15g)
- Cholesterol: 85–100mg
- Sodium: 350–400mg
- Total Carbohydrates: 50–58g (Dietary Fiber: 1–2g, Sugars: 38–45g)
- Protein: 5–7g
- Calcium: 60–80mg | Vitamin C: 20–30mg (from strawberries)
Key Health Notes:
- High in Saturated Fat: Due to cream cheese, butter, and eggs, this dessert contains significant saturated fat. Those monitoring heart health should consume sparingly or explore lower-fat alternatives.
- Sugar Content: With nearly half the calories coming from sugar, individuals with diabetes or insulin resistance should adjust portion sizes or use sugar substitutes carefully.
- Low in Fiber: Despite the fruit content, processing and limited whole grains mean fiber levels remain low. Adding oats or whole grain crumbs could marginally improve this.
- Lactose Sensitivity: Contains dairy products that may trigger discomfort in lactose-intolerant individuals. Lactose-free cream cheese and milk alternatives can mitigate this issue.
- Portion Control: Cutting into smaller servings (e.g., 16 pieces instead of 12) allows enjoyment without overindulgence. Pairing with a side of Greek yogurt boosts protein and balances the meal.
- Balanced Indulgence: Serve alongside a green salad or fresh fruit platter to round out a menu. Think of this dessert as an occasional treat rather than a daily habit.
Ingredients
For the Strawberry Layer:
- 4 cups fresh strawberries, hulled and thinly sliced
- ¼ cup granulated sugar
- 1 tablespoon fresh lemon juice
- 1 teaspoon cornstarch
For the Cheesecake Layer:
- 3 (8 oz) packages cream cheese, softened
- ¾ cup granulated sugar
- 3 large eggs
- 1 tablespoon pure vanilla extract
- ½ cup sour cream
For the Cake Layer:
- 1 box (15.25 oz) yellow cake mix
- ½ cup (1 stick) unsalted butter, melted
- ½ cup water
Optional Garnishes:
- Whipped cream
- Fresh strawberry slices
- White chocolate shavings
- Lemon zest
- Chopped pecans or almonds
Directions
- Preheat oven to 350°F (175°C). Grease a 9×13-inch baking dish with nonstick spray or butter.
- In a saucepan over medium heat, combine sliced strawberries, ¼ cup sugar, lemon juice, and cornstarch. Cook for 8–10 minutes, stirring occasionally, until strawberries soften and mixture thickens. Remove from heat and spread evenly in the prepared baking dish.
- In a large bowl, beat softened cream cheese with an electric mixer on medium speed until smooth (~1 minute). Add ¾ cup sugar and beat until fluffy. Add eggs one at a time, mixing well after each. Stir in vanilla extract and sour cream until smooth. Pour over strawberry layer and spread gently into an even layer.
- Sprinkle the dry yellow cake mix evenly over the cheesecake layer. Do not stir.
- In a small bowl, whisk together melted butter and water. Drizzle slowly and evenly over the cake mix, making sure all dry areas are moistened.
- Bake for 45–55 minutes, or until the top is golden brown and bubbly, and the center appears set. If browning too fast, cover loosely with foil after 30 minutes.
- Remove from oven and let cool on a wire rack for 1 hour. Then refrigerate for at least 2–4 hours before serving.
- Slice with a hot, wet knife for clean edges. Serve chilled or at room temperature, topped with whipped cream and fresh strawberries.
FAQ
- Can I make this Strawberry Cheesecake Dump Cake ahead of time?
- Absolutely! This dessert actually benefits from being made a day in advance. Assemble it, bake, cool, and refrigerate overnight. The flavors deepen and textures stabilize, resulting in an even better-tasting cake the next day.
- Can I use frozen strawberries?
- Yes, but with caution. Thaw them completely and drain excess liquid thoroughly before cooking. Frozen berries tend to release more water, so consider increasing cornstarch to 1½ teaspoons to compensate.
- Why did my cheesecake layer crack?
- Cracking usually occurs due to overmixing, sudden temperature changes, or overbaking. To minimize this, avoid beating the batter excessively and cool the cake gradually. Cracks don’t affect taste—just cover them with extra strawberries or whipped cream!
- Can I freeze this dump cake?
- You can freeze individual slices for up to 2 months. Wrap tightly in plastic wrap and place in an airtight container. Thaw in the refrigerator overnight before serving. Note: Texture may become slightly softer upon thawing.
- Is it safe to eat the cheesecake layer cold?
- Yes. All ingredients are cooked during baking, and the eggs are fully set. Refrigeration further ensures safety. Always store leftovers in the fridge within 2 hours of baking.
- Can I make mini versions in muffin tins?
- Yes! Use a lined muffin tin, divide ingredients proportionally, and reduce baking time to 25–30 minutes. These mini cheesecake dump cupcakes are perfect for parties.
- What can I substitute for sour cream?
- Plain Greek yogurt (full fat) works excellently as a 1:1 replacement. It offers similar tang and creaminess with added protein.
- Can I use a different cake mix flavor?
- Definitely. Vanilla, white, or even lemon cake mix can work. Just remember that flavored mixes may alter the final taste—pair accordingly with fruit choices.
Summary
The Strawberry Cheesecake Dump Cake is a heavenly fusion of creamy cheesecake, juicy strawberries, and buttery cake—all with minimal effort and maximum flavor. Easy enough for beginners yet impressive enough for guests, it’s the ultimate comfort dessert that never fails to satisfy.