Introduction
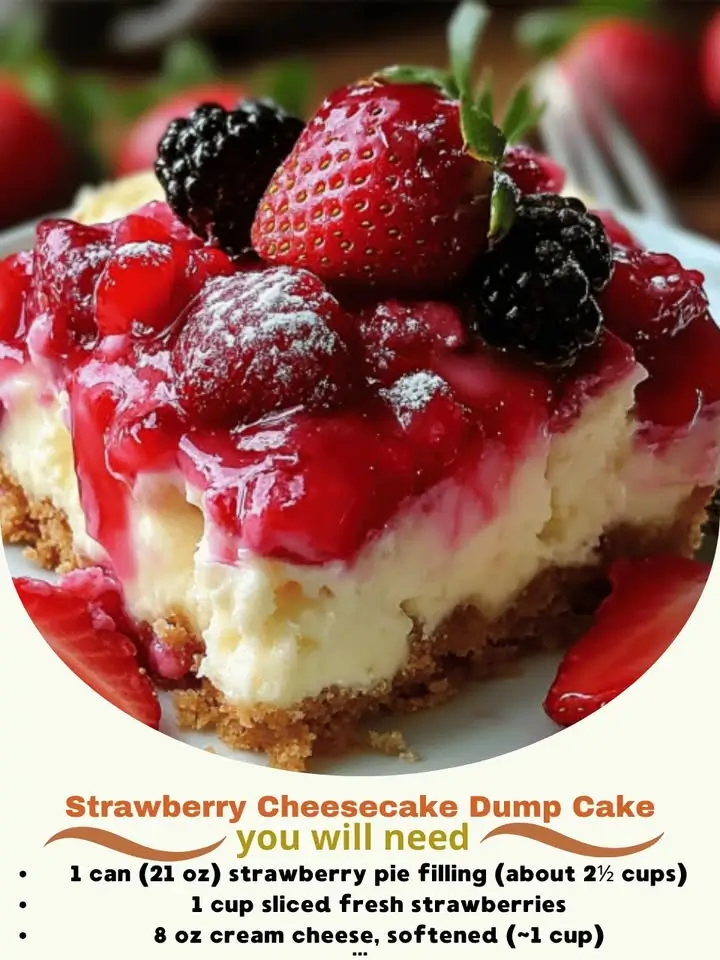
Strawberry Cheesecake Dump Cake is a luscious, no-fuss dessert that marries the creamy richness of classic New York-style cheesecake with the effortless charm of a dump cake—where minimal mixing, zero baking expertise, and maximum flavor converge. This beloved hybrid dessert delivers velvety strawberry swirls, tangy-sweet cream cheese pockets, and a buttery, golden-brown crumb topping—all baked in a single pan with virtually no prep work beyond opening packages and layering ingredients. Perfect for last-minute gatherings, potlucks, holiday buffets, or cozy weeknight treats, it’s a crowd-pleasing favorite that tastes decadent yet bakes like a breeze. Whether you’re a seasoned baker or a kitchen novice, this recipe celebrates simplicity without sacrificing indulgence—and proves that extraordinary desserts don’t require extraordinary effort.
The History
Dump cakes trace their origins to mid-20th-century American home cooking—born from post-war convenience culture, frugality, and the rise of boxed cake mixes. The earliest known published dump cake recipes appeared in the 1960s and ’70s, often featured in community cookbooks, women’s magazines like Good Housekeeping, and promotional materials from major food brands (notably Duncan Hines and Pillsbury). The concept was revolutionary: layer dry mix, fruit (often canned), and butter—then bake. No beating, no folding, no fuss. Meanwhile, cheesecake has ancient roots—dating back to Ancient Greece—but its modern American incarnation blossomed in the late 1800s with cream cheese’s commercial debut by William Lawrence in 1872 and the iconic development of the New York style at Reuben’s Delicatessen and later Junior’s Restaurant. The fusion into “Strawberry Cheesecake Dump Cake” emerged organically in the early 2000s, amplified by food blogs, Pinterest, and viral Facebook groups seeking retro-modern hybrids. It reflects a broader culinary trend: reimagining nostalgic desserts through minimalist techniques—transforming labor-intensive classics into accessible, shareable, oven-to-table wonders. Today, it’s a staple at church suppers in Texas, summer barbecues in the Midwest, and bridal showers nationwide—a delicious testament to American ingenuity, adaptability, and sweet-tooth pragmatism.
Ingredients Breakdown
Every ingredient in Strawberry Cheesecake Dump Cake serves a precise functional and sensory role—no filler, no fluff. Let’s explore them in depth:
- Strawberry Pie Filling (21 oz can): Provides consistent sweetness, tart balance, natural pectin for gentle thickening, and vibrant color. Opt for brands with real strawberries and no high-fructose corn syrup for superior depth; avoid “strawberry-flavored” fillings—they lack authentic brightness.
- Cream Cheese (8 oz, full-fat, brick-style): The soul of the cheesecake element. Must be at cool room temperature (60–65°F) for optimal scoopability and even dispersion. Low-fat or whipped versions destabilize the texture, causing greasiness or curdling. Philadelphia is the gold standard for reliability and neutral tang.
- Granulated Sugar (½ cup): Enhances sweetness, aids in browning the topping, and balances the acidity of strawberries and cream cheese. Not merely for flavor—sugar contributes to structural integrity and moisture retention in the crumb layer.
- Large Egg (1): Acts as a binder for the cream cheese layer and adds richness, lift, and tenderness. Cold eggs are fine here—unlike delicate cheesecake batters, the dump method tolerates minor temperature variance.
- Vanilla Extract (1 tsp, pure): Deepens aroma, rounds out dairy notes, and bridges fruity and creamy elements. Imitation vanilla lacks complexity and can taste medicinal when baked.
- Yellow Cake Mix (15.25 oz box): The foundation of the dump cake magic. Its pre-balanced blend of flour, sugar, leaveners, and emulsifiers creates the signature crisp-yet-tender crumb. Avoid gluten-free or reduced-sugar versions unless specifically formulated for dump cakes—they often yield gummy or overly dense results. Classic Duncan Hines or Betty Crocker work flawlessly.
- Unsalted Butter (½ cup / 1 stick, melted): Adds luxurious mouthfeel, promotes browning, and hydrates the cake mix into a cohesive, buttery crust. Unsalted ensures precise sodium control; salted butter can overpower and mask strawberry brightness.
- Optional but Highly Recommended Additions:
- 1 tbsp lemon juice: Brightens the strawberry layer and prevents cloying sweetness.
- ¼ tsp almond extract: A subtle, aromatic nuance that enhances fruit without dominating.
- ½ cup crushed graham crackers or shortbread cookies: Sprinkled on top before baking for textural contrast and nostalgic cheesecake authenticity.
- 1 tsp cinnamon or ¼ tsp nutmeg: Warm spice accents that complement both strawberry and cream cheese beautifully.
Step-by-Step Recipe
This foolproof, truly hands-off method guarantees perfect results every time—no mixer, no parchment, no anxiety:
- Preheat & Prep: Position oven rack in the center. Preheat to 350°F (175°C). Lightly grease a 9×13-inch metal baking pan with nonstick spray or softened butter. Do not line with parchment—it interferes with the crumb’s crisp bottom layer.
- Layer 1 — Strawberry Base: Pour the entire 21-oz can of strawberry pie filling evenly into the prepared pan. Use a silicone spatula to spread gently into corners. Do not stir or swirl yet—keep it pristine for clean layering.
- Layer 2 — Cream Cheese Mixture: In a medium bowl, combine the softened cream cheese, ½ cup granulated sugar, 1 large egg, and 1 tsp pure vanilla extract. Using a sturdy spoon or rubber spatula (no electric mixer needed), stir vigorously for 60–90 seconds until completely smooth, lump-free, and slightly glossy. Optional: whisk in 1 tbsp fresh lemon juice and/or ¼ tsp almond extract at this stage. Carefully dollop the mixture by spoonfuls over the strawberry layer. Then, using the back of a spoon or a butter knife, gently swirl *just 4–5 times*—enough to create ribbons, not full integration. Over-swirling causes muddying and loss of visual appeal.
- Layer 3 — Cake Mix Crust: Evenly sprinkle the entire box (15.25 oz) of yellow cake mix over the swirled surface. Do not press down—let it rest lightly. This dry layer will absorb butter and bake into a tender, golden crumb.
- Layer 4 — Butter Saturation: Slowly drizzle the ½ cup (1 stick) of melted unsalted butter *evenly* across the cake mix. Tip the pan gently side-to-side to help butter pool into dry spots. For best coverage, use a pastry brush to lightly spread any concentrated pools toward drier areas—this ensures uniform moisture and prevents burnt or raw patches.
- Bake with Precision: Place pan on center oven rack. Bake for 50–60 minutes, rotating halfway through for even browning. The cake is done when the top is deeply golden brown, edges are bubbling vigorously, and the center registers 205–210°F on an instant-read thermometer. Visual cues: surface should look set (no wet sheen), and a toothpick inserted near the center should come out with moist crumbs—not wet batter—but not completely clean (a few sticky crumbs are ideal).
- Cool & Set: Remove from oven and place pan on a wire cooling rack. Let cool *undisturbed* for at least 90 minutes. This critical step allows the layers to stabilize, the strawberry filling to thicken fully, and the cream cheese to firm without weeping. Cutting too soon yields a soupy, separated mess.
- Serve: Cut into generous 2×2-inch squares. Serve warm or at room temperature. Optional garnishes: a dollop of freshly whipped cream, a few fresh hulled strawberry halves, a light dusting of powdered sugar, or a drizzle of reduced balsamic glaze for gourmet flair.
Tips
Master the nuances with these professional-grade insights:
- Room-Temperature Cream Cheese is Non-Negotiable: Take it out 1.5–2 hours ahead. If rushed, cut into ½-inch cubes and let sit 30 minutes—never microwave, which causes partial melting and oil separation.
- Don’t Skip the Swirl—But Don’t Overdo It: 4–5 gentle passes create beautiful marbling. Too few = distinct layers that don’t marry; too many = homogenous gray-brown batter lacking visual or textural interest.
- Butter Temperature Matters: Melt butter until liquid and clear—not browned or foamy. Hotter-than-needed butter can prematurely “cook” the cake mix surface, leading to uneven texture.
- Altitude Adjustments: At 3,000+ feet, reduce oven temp by 25°F and add 1–2 tbsp milk to the cream cheese mixture to combat dryness.
- Prevent Edge Burn: If top browns too quickly (common in convection ovens), tent loosely with foil after 40 minutes—but only if needed. Never cover the entire pan early; steam needs to escape.
- Consistency Check Before Baking: Gently shake pan after layering. If cake mix shifts significantly or butter pools heavily, tilt pan slightly to redistribute—ensuring even saturation.
- Resting Is Baking’s Secret Partner: That 90-minute cool isn’t passive—it’s active setting. The residual heat continues gentle cooking while starches and proteins coalesce. Rush it, and you’ll sacrifice structure and clarity of layers.
- Storage Wisdom: Cover tightly and refrigerate up to 5 days. Reheat individual squares in the microwave for 15–20 seconds—or enjoy cold, where the cream cheese firms into a luxuriously dense, almost mousse-like texture.
Variations and Customizations
This recipe is gloriously adaptable—here are 12 inspired riffs, each tested for structural integrity and flavor harmony:
- White Chocolate–Strawberry Swirl: Fold ½ cup finely chopped white chocolate into the cream cheese mixture before swirling. Adds creamy sweetness and elegant melt-in-your-mouth pockets.
- Berry Medley: Replace half the strawberry filling with 10.5 oz raspberry or blackberry pie filling for complex tartness and jewel-toned marbling.
- Graham Cracker Crust Upgrade: Substitute 1 cup finely crushed graham crackers + 2 tbsp melted butter for the *bottom third* of the cake mix layer—press gently, then proceed. Reinforces cheesecake authenticity.
- Lemon-Raspberry Zing: Use raspberry pie filling + add 2 tbsp lemon zest and 2 tsp lemon juice to the cream cheese mixture. Finish with candied lemon peel.
- Gluten-Free Friendly: Use King Arthur Gluten-Free Yellow Cake Mix and certified GF pie filling. Add 1 tsp xanthan gum to cream cheese mixture for binding stability.
- Low-Sugar Version: Swap regular cake mix for a keto-friendly almond flour–based mix (e.g., NuNaturals), use sugar-free strawberry filling, and replace granulated sugar with ⅓ cup erythritol + ¼ tsp stevia. Texture remains remarkably close.
- Decadent Salted Caramel Drizzle: After cooling, drizzle ⅓ cup warmed salted caramel sauce over the entire surface and sprinkle with flaky sea salt.
- Boozy Elegance: Stir 2 tbsp Chambord (raspberry liqueur) or Grand Marnier into the cream cheese mixture. Reduces alcohol during baking but intensifies berry notes.
- Coconut Dream: Add ½ cup unsweetened shredded coconut to the cake mix layer and top with toasted coconut flakes before serving.
- Spiced Chai Infusion: Whisk 1½ tsp chai spice blend (cinnamon, cardamom, ginger, clove, black pepper) into the cake mix before sprinkling.
- Mini Mason Jar Individual Servings: Layer in 12-oz wide-mouth jars: ⅓ cup filling, 2 tbsp cream cheese mix, 2 tbsp cake mix, 1 tsp butter. Bake at 350°F for 32–38 minutes. Perfect for gifts or portion control.
- Vegan Adaptation: Use dairy-free cream cheese (Kite Hill or Miyoko’s), flax “egg” (1 tbsp ground flax + 2.5 tbsp water), vegan butter, and plant-based cake mix. Top with coconut whipped cream.
Health Considerations and Nutritional Value
A balanced perspective on this celebratory dessert—nutritionally transparent and practically mindful:
Nutrition Facts (per standard 2×2-inch serving, based on 12 servings):
- Calories: ~385 kcal
- Total Fat: 18g (11g saturated)
- Cholesterol: 65mg
- Sodium: 320mg
- Total Carbohydrates: 52g (34g sugars, including ~22g added sugars)
- Fiber: 0.8g
- Protein: 4g
Key Health Notes:
- Sugar Awareness: While strawberries contribute natural sugars and antioxidants (vitamin C, folate, manganese), the majority of sugar comes from the pie filling and cake mix. Opting for reduced-sugar pie filling cuts ~15g added sugar per serving.
- Portion Power: Serving size dramatically impacts impact. Enjoying one square alongside a protein-rich snack (Greek yogurt, almonds) or fiber-forward meal slows glucose response.
- Cream Cheese Context: Full-fat cream cheese provides satiating fat and vitamin A—but those watching saturated fat can substitute neufchâtel (⅓ less fat) with negligible texture change.
- Processing Reality: Cake mixes contain preservatives and refined flour. For cleaner eating, try a scratch-made “dump-style” base: 1 cup all-purpose flour + 1 cup sugar + 1½ tsp baking powder + ½ tsp salt.
- Allergen Transparency: Contains wheat (gluten), dairy (butter, cream cheese), eggs, and soy (in most cake mixes and pie fillings). Always verify labels for specific sensitivities.
- Pregnancy & Immune Considerations: Pasteurized ingredients make this safe during pregnancy—but avoid raw egg variations or underbaked centers.
- Diabetic-Friendly Tweaks: Replace cake mix with almond/coconut flour blend + psyllium husk; use monk fruit–sweetened pie filling; increase cinnamon (shown to support insulin sensitivity).
Remember: Dessert nourishes the spirit as much as the body. Enjoyed mindfully and occasionally, Strawberry Cheesecake Dump Cake fits beautifully within a balanced, joyful lifestyle.
Ingredients
- 1 (21 oz) can strawberry pie filling (look for no high-fructose corn syrup)
- 1 (8 oz) package full-fat brick cream cheese, softened to 60–65°F
- ½ cup granulated sugar
- 1 large egg
- 1 teaspoon pure vanilla extract
- 1 (15.25 oz) box classic yellow cake mix (Duncan Hines or Betty Crocker recommended)
- ½ cup (1 stick / 113g) unsalted butter, melted until clear and liquid
- Optional enhancements: 1 tablespoon fresh lemon juice, ¼ teaspoon almond extract, ½ cup crushed graham crackers, 1 teaspoon ground cinnamon
Directions
- Preheat oven to 350°F (175°C). Lightly grease a 9×13-inch metal baking pan.
- Pour strawberry pie filling into the pan and spread evenly.
- In a medium bowl, combine cream cheese, sugar, egg, and vanilla. Stir vigorously with a spoon or spatula for 60–90 seconds until completely smooth and lump-free. Optional: stir in lemon juice and/or almond extract.
- Dollop cream cheese mixture over strawberry layer. Gently swirl 4–5 times with a knife or spoon—do not overmix.
- Sprinkle entire box of yellow cake mix evenly over the top—do not press down.
- Drizzle melted butter slowly and evenly across the cake mix. Tilt pan gently to distribute butter into dry spots; use a pastry brush if needed.
- Bake for 50–60 minutes, rotating pan halfway through, until top is deep golden brown and center reaches 205–210°F.
- Remove from oven and cool on a wire rack for at least 90 minutes before cutting.
- Cut into 12 squares. Serve plain or garnished with whipped cream, fresh strawberries, or powdered sugar.
FAQ
- Can I use frozen strawberries instead of pie filling?
- No—frozen strawberries release excessive water, creating a soggy, separated cake. If craving fresh fruit, simmer 2 cups sliced strawberries + ¼ cup sugar + 1 tbsp lemon juice + 1 tsp cornstarch until thickened (10 min), then cool completely before using as a 1:1 replacement.
- Why did my cake sink in the middle?
- Most commonly caused by underbaking or cutting too soon. Ensure internal temperature hits 205°F and allow full 90-minute cool. Opening the oven door before 45 minutes can also trigger collapse.
- Can I prepare this the night before and bake it fresh in the morning?
- Absolutely! Assemble all layers (except butter), cover tightly with plastic wrap, and refrigerate overnight. Bring to cool room temperature (~30 min) before drizzling butter and baking—no adjustment to time needed.
- My topping is too dry/crunchy. What went wrong?
- Insufficient butter coverage or uneven drizzling. Next time, melt butter fully, pour in slow concentric circles, and gently tilt pan to coat all dry areas. Also confirm your cake mix isn’t past its prime—stale mix absorbs poorly.
- Is there a way to make this dairy-free?
- Yes—with excellent results: use Kite Hill or Miyoko’s dairy-free cream cheese, vegan butter (Miyoko’s or Earth Balance), flax “egg,” and a dairy-free cake mix. Texture remains rich and cohesive.
- Can I freeze leftovers?
- Yes! Wrap cooled, uncut cake tightly in plastic wrap + aluminum foil. Freeze up to 3 months. Thaw overnight in fridge, then warm in a 325°F oven for 15 minutes before serving.
- What’s the best cake mix brand for texture?
- Duncan Hines Classic Yellow consistently yields the most tender, buttery crumb with ideal browning. Betty Crocker works well too—but avoid “Super Moist” or “Pound Cake” varieties, which alter hydration balance.
- Can I add nuts?
- Yes—fold ½ cup chopped pecans or walnuts into the cake mix before sprinkling for delightful crunch. Toast them first for deeper flavor.
- Why does my cream cheese layer look curdled?
- Usually due to cold cream cheese or overmixing. Soften properly and stir just until smooth—no more. If already curdled, don’t panic: it will bake into delicious, tender pockets.
- Can I double the recipe for a larger crowd?
- Yes—use a 13×18-inch half-sheet pan, double all ingredients, and bake at 350°F for 65–75 minutes. Rotate pan twice and check temp at 60 minutes.
Summary
Strawberry Cheesecake Dump Cake is a brilliantly simple yet deeply satisfying fusion dessert—layering luscious strawberry pie filling, velvety cream cheese swirls, and a buttery yellow cake mix crumb into one effortlessly baked, crowd-pleasing masterpiece.
With no mixer required, minimal prep, and forgiving technique, it delivers restaurant-quality indulgence straight from your home oven—proving that the most memorable desserts are often the easiest to make.