Introduction
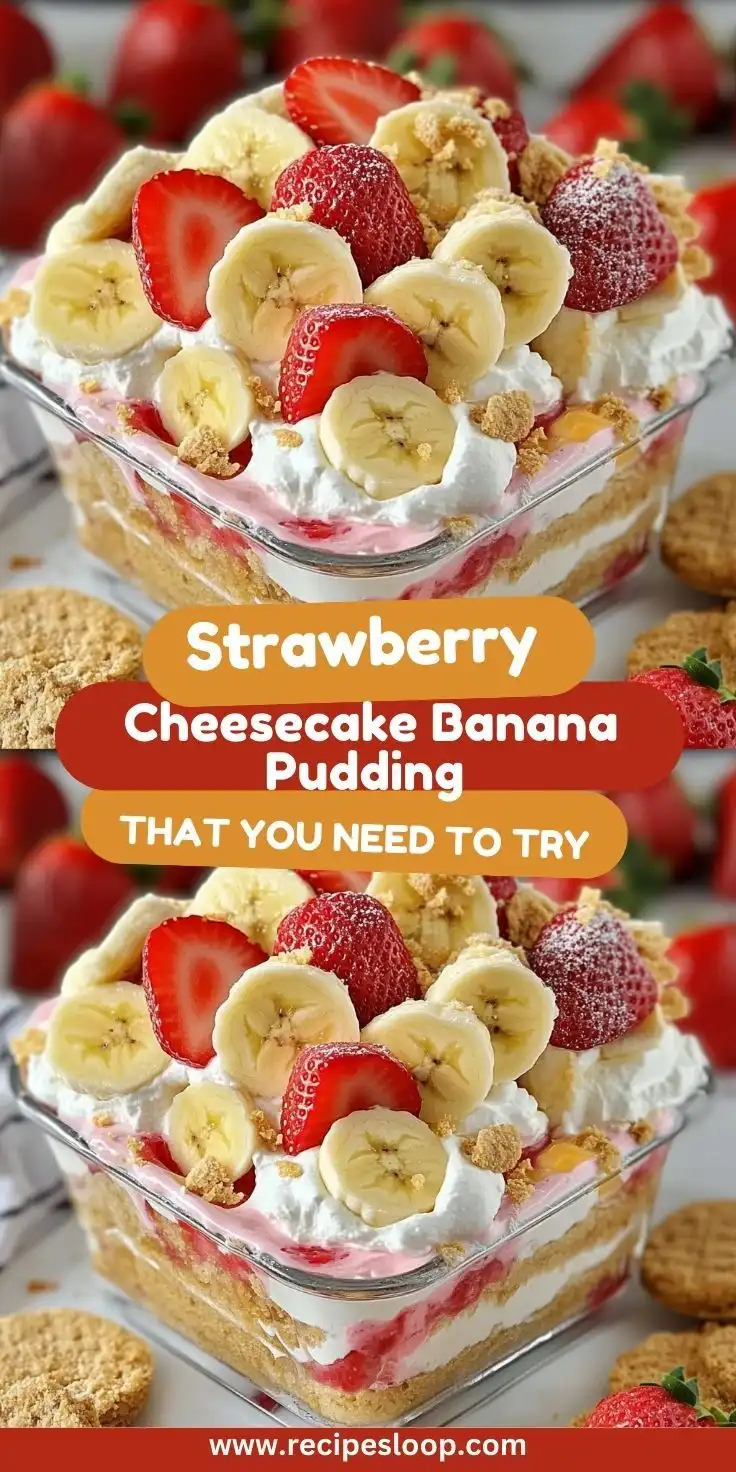
Welcome to the ultimate fusion dessert experience—Strawberry Cheesecake Banana Pudding: A No-Bake Dream! This isn’t just another twist on a classic—it’s a symphony of textures and flavors that marries the creamy tang of New York–style cheesecake, the luscious sweetness of ripe bananas, the bright, juicy pop of fresh strawberries, and the nostalgic comfort of Southern banana pudding—all without turning on your oven. Whether you’re prepping for a summer potluck, soothing a late-night craving, or impressing guests with minimal effort and maximum impact, this no-bake marvel delivers elegance, nostalgia, and indulgence in every spoonful. Velvety, vibrant, and impossibly easy, it’s the dessert that proves decadence doesn’t require heat—just heart, quality ingredients, and a little culinary alchemy.
The History
Banana pudding traces its roots to the American South in the early 20th century, emerging as a humble yet beloved staple in church suppers, family reunions, and Depression-era kitchens—where resourceful cooks transformed affordable staples like vanilla wafers, ripe bananas, and homemade custard into something deeply comforting. Its evolution accelerated with the rise of boxed instant pudding mixes in the 1950s, cementing its status as an accessible, crowd-pleasing favorite. Meanwhile, cheesecake boasts ancient origins—from Greek honey-sweetened cheese loaves served at Olympic games—to its modern American incarnation: dense, rich, and often baked to golden perfection in New York delis and Chicago bakeries.
The fusion of these two icons is a relatively recent innovation—born from the viral creativity of food bloggers, TikTok dessert alchemists, and home bakers seeking elevated twists on retro classics. The Strawberry Cheesecake Banana Pudding emerged organically as a response to growing demand for layered, visually stunning, no-bake desserts that balance richness with freshness. By folding in strawberry purée and swirls, integrating cream cheese into the pudding base, and elevating texture with whipped cream and garnishes, this version honors tradition while boldly reimagining it—making it not just a dessert, but a cultural moment on a serving dish.
Ingredients Breakdown
Every extraordinary dessert begins with intention—and this one is no exception. Below is a meticulous, chef-inspired breakdown of each ingredient, explaining *why* it matters—not just *what* it is:
- Cream Cheese (full-fat, brick-style, room temperature): The soul of the cheesecake element. Full-fat ensures lush mouthfeel and prevents graininess; room temperature guarantees seamless blending and avoids lumps in the filling. Avoid low-fat or spreadable varieties—they contain stabilizers and excess moisture that destabilize the pudding’s structure.
- Granulated Sugar: Provides balanced sweetness and aids in dissolving the cream cheese. A portion is also used to macerate strawberries—drawing out their juices and intensifying flavor.
- Full-Fat Sour Cream & Heavy Whipping Cream: Sour cream adds subtle tang and velvety body; heavy cream—when whipped to soft peaks—introduces air, lightness, and luxurious stability. Together, they create a mousse-like layer that’s rich but never cloying.
- Instant Vanilla Pudding Mix (not cook-and-serve): Chosen for its ability to thicken *cold*, ensuring no cooking step. Opt for a high-quality brand with real vanilla for depth. Note: Do *not* substitute with cook-and-serve pudding—it requires boiling and will curdle when mixed with cold dairy.
- Whole Milk (cold): Cold milk prevents premature activation of pudding starches and ensures smooth incorporation. Whole milk’s fat content contributes to creaminess and helps suspend fruit pulp evenly.
- Fresh Ripe Bananas (firm-yet-speckled): Ideal ripeness delivers natural sweetness, creamy texture, and structural integrity—overripe bananas turn mushy and brown too quickly; underripe ones lack flavor and resist softening.
- Fresh Strawberries (hulled & sliced): The vibrant, aromatic heart of the dessert. Use peak-season berries for maximum fragrance and natural pectin, which helps stabilize the strawberry layer. Frozen berries are discouraged—they release excess water and dilute flavor.
- Vanilla Wafers (original Nilla Wafers preferred): Their signature buttery-crisp texture and subtle vanilla notes provide essential contrast to the creamy layers. They soften *just enough* upon chilling—not so much that the pudding becomes soupy, but enough to achieve that ideal “melting” mouthfeel.
- Real Vanilla Extract (pure, not imitation): Adds warmth and complexity that synthetic vanillin simply can’t replicate—especially important when no baking occurs to develop deeper caramelized notes.
- Lemon Juice (freshly squeezed): A tiny amount brightens the entire dessert, cuts through richness, and helps preserve the color of both bananas and strawberries by slowing oxidation.
- Pinch of Fine Sea Salt: The quiet conductor of flavor—enhancing sweetness, balancing acidity, and unifying all components without tasting salty.
Step-by-Step Recipe
Follow this detailed, foolproof sequence—designed for success even for first-time no-bake bakers. Total hands-on time: 35 minutes. Chill time: minimum 6 hours (ideally overnight).
- Prep the Strawberry Layer: In a medium bowl, combine 1½ cups sliced strawberries (¼-inch thick) with 2 tbsp granulated sugar and 1 tsp lemon juice. Gently stir, cover, and let macerate at room temperature for 20 minutes. Then, using a fork or potato masher, lightly crush half the berries to release juices—leaving the rest whole for texture. Refrigerate until needed.
- Prepare the Cheesecake Pudding Base: In a large mixing bowl, beat softened cream cheese (8 oz) with an electric mixer on medium speed for 1 minute until completely smooth and glossy. Scrape down sides. Add ⅓ cup granulated sugar and 1 tsp pure vanilla extract; beat 1 more minute until fluffy. Add ½ cup full-fat sour cream and beat until fully incorporated and silky—about 30 seconds. Set aside.
- Whip the Cream: In a separate chilled bowl, whip 1 cup cold heavy cream with 2 tbsp sugar and a pinch of salt using a whisk attachment until soft peaks form—do NOT overwhip. Fold ⅓ of the whipped cream into the cream cheese mixture to lighten it, then gently fold in the remaining whipped cream in two additions using a silicone spatula—cutting and folding from bottom to top until *just* combined. Overmixing deflates air and yields denser texture.
- Activate the Pudding: In another bowl, whisk together 2 (3.4 oz) boxes instant vanilla pudding mix and 2½ cups cold whole milk for exactly 2 minutes—until thick and glossy (no lumps). Let stand 2 minutes to fully hydrate. Then, gently fold the pudding into the cheesecake mixture in three additions, rotating the bowl and folding with care after each addition. Mixture should be airy, billowy, and uniform—like a cloud-infused mousse.
- Layer with Intention: In a 3-quart trifle bowl or (13×9-inch) deep baking dish, begin with a ½-inch base layer of vanilla wafers (approx. 20 wafers, broken if needed to fit). Top with ⅓ of the cheesecake pudding mixture (smooth with offset spatula). Arrange ½ of the remaining whole strawberries (not the macerated ones) over pudding. Scatter ⅓ of the macerated strawberry mixture (juices + crushed berries) evenly. Repeat layers twice more: wafers → pudding → whole berries → macerated mix. Finish with a final wafer layer pressed gently into the top pudding layer.
- Chill with Care: Cover tightly with plastic wrap, pressing it directly onto the surface to prevent a skin from forming. Refrigerate for *minimum* 6 hours—but 12–24 hours is ideal. This allows wafers to soften perfectly, flavors to marry, and layers to set with gentle cohesion—not stiffness.
- Final Flourish (Just Before Serving): Remove from fridge 15 minutes before serving. Garnish generously with reserved whole strawberries, a dusting of crushed vanilla wafers, a drizzle of reduced strawberry coulis (simmer ¼ cup macerated juice + 1 tsp sugar until syrupy), and optional mint leaves for color and aroma.
Tips
- Room Temperature Is Non-Negotiable: Cream cheese *must* be truly softened—not just taken from the fridge. Test by pressing your finger in: it should yield with zero resistance. If rushed, cut into cubes and microwave at 50% power for 10-second bursts—stirring between—until pliable (never melted).
- Chill Your Tools: Whip cream in a bowl and with beaters chilled in the freezer for 10 minutes prior—cold tools = faster, sturdier whipping.
- Layer Timing Matters: Assemble pudding within 1 hour of making the base—if left sitting, the pudding may begin to weep or separate. Work efficiently but mindfully.
- Prevent Browning Bananas: Toss banana slices in 1 tsp lemon juice + 1 tsp cold water *immediately* after slicing—then pat dry lightly before layering. This preserves color and freshness without adding excess liquid.
- Wafer Wisdom: For ultra-clean layers, line your trifle dish with parchment paper strips (handles!) before layering—makes serving and cleanup effortless.
- Texture Troubleshooting: If pudding feels slightly thin after folding, refrigerate base mixture for 20 minutes before layering—it will thicken naturally without compromising airiness.
- Serving Temperature: Serve straight from the fridge—not room temp. Cold enhances flavor clarity and prevents the layers from sliding or separating on the spoon.
- Make-Ahead Magic: Fully assemble up to 24 hours ahead. For longer storage (up to 48 hours), omit the top wafer layer until 1 hour before serving—prevents sogginess.
Variations and Customizations
This recipe is a canvas—designed for personalization without sacrificing integrity. Here are inspired, tested adaptations:
- Chocolate-Dipped Strawberry Cheesecake Pudding: Dip half the strawberries in tempered dark chocolate (70%) and chill until set before layering. Adds crunch, bitterness, and visual drama.
- Tropical Twist: Swap strawberries for macerated mango and kiwi; replace vanilla wafers with graham cracker crumbs mixed with toasted coconut; add 1 tsp lime zest to pudding base.
- Decadent Dark Chocolate Swirl: Melt 3 oz high-quality dark chocolate, cool slightly, then drizzle over each pudding layer before adding fruit—swirl gently with a toothpick for marble effect.
- Protein-Powered Version: Add 2 scoops unflavored collagen peptides or vanilla whey isolate to pudding mixture while whisking milk—blends seamlessly and adds ~20g protein per serving.
- Vegan & Dairy-Free: Use cashew-based cream cheese (soaked & blended), coconut cream instead of heavy cream, oat milk + cornstarch slurry instead of pudding mix, and gluten-free vegan wafers. Macerate strawberries with maple syrup instead of sugar.
- Mini Mason Jar Individual Servings: Layer in 12-oz wide-mouth mason jars: 3 wafers → ⅓ cup pudding → 2 banana slices → 1 tbsp macerated berries → repeat ×2. Top with wafer crumble and fresh berry. Perfect for parties or meal prep.
- Boozy Brilliance (21+): Stir 2 tbsp bourbon or Grand Marnier into the macerated strawberries—or fold 1 tbsp into the finished pudding base for subtle warmth and complexity.
- Kid-Friendly Fun: Add rainbow sprinkles between layers, use heart-shaped wafers, or pipe whipped cream rosettes on top with edible glitter.
Health Considerations and Nutritional Value
While undeniably indulgent, this dessert *can* be thoughtfully adapted and enjoyed mindfully—with transparency about its nutritional profile and wellness-friendly options. Per standard serving (1/12 of full recipe, approx. 1 cup):
- Calories: ~340 kcal (moderate for a dessert—comparable to a slice of classic cheesecake)
- Total Fat: 18g (11g saturated)—primarily from dairy fats, which support fat-soluble vitamin absorption. Optional swap: use low-fat cream cheese + light sour cream to reduce by ~4g sat fat.
- Carbohydrates: 41g (28g sugars)—mostly naturally occurring from fruit and dairy, plus added sugars from pudding and maceration. Reduce added sugar by 25% without sacrificing flavor due to banana and strawberry sweetness.
- Protein: 6g—boostable with collagen, Greek yogurt (sub ¼ cup sour cream), or cottage cheese (blended smooth).
- Fiber: ~2g—easily increased to 4–5g by adding 1 tbsp chia or ground flaxseed to pudding mixture (adds omega-3s and gentle thickness).
- Vitamins & Minerals: Excellent source of potassium (bananas), vitamin C (strawberries), calcium (dairy), and B12 (fortified milk). Strawberries contribute ellagic acid and anthocyanins—potent antioxidants linked to reduced inflammation.
Wellness Notes: This dessert contains no artificial dyes, hydrogenated oils, or preservatives when made from scratch. It’s naturally gluten-free *if* GF-certified wafers are used. For blood sugar sensitivity, serve with a side of plain Greek yogurt or a handful of almonds to slow glucose response. Always consult a registered dietitian for personalized guidance.
Ingredients
- 8 oz full-fat brick cream cheese, softened to room temperature
- ⅓ cup granulated sugar, plus 2 tbsp for strawberries
- 1 tsp pure vanilla extract
- ½ cup full-fat sour cream
- 1 cup cold heavy whipping cream
- 2 tbsp additional granulated sugar (for whipped cream)
- Pinch of fine sea salt
- 2 (3.4 oz) boxes instant vanilla pudding mix (e.g., Jell-O)
- 2½ cups cold whole milk
- 2½ cups fresh strawberries, hulled and sliced (divided: 1½ cups for maceration, 1 cup for whole layering)
- 1 tsp fresh lemon juice (plus extra for bananas)
- 4–5 ripe but firm bananas, peeled and sliced ¼-inch thick
- 60–70 original vanilla wafers (Nilla Wafers or equivalent)
- Optional garnishes: fresh whole strawberries, crushed wafers, mint leaves, strawberry coulis
Directions
- In a medium bowl, combine 1½ cups sliced strawberries, 2 tbsp sugar, and 1 tsp lemon juice. Stir gently, cover, and let sit at room temperature for 20 minutes. Afterward, lightly crush half the berries with a fork—reserve all juices and pieces.
- In a large bowl, beat cream cheese with electric mixer on medium for 1 minute until smooth. Add ⅓ cup sugar and 1 tsp vanilla; beat 1 minute more until fluffy. Beat in sour cream until fully combined and silky.
- In a separate chilled bowl, whip heavy cream, 2 tbsp sugar, and pinch of salt until soft peaks form. Fold ⅓ into cream cheese mixture to lighten, then gently fold in remaining whipped cream until just combined.
- In another bowl, whisk pudding mix and cold milk for 2 minutes until thick and lump-free. Let stand 2 minutes, then gently fold into cream cheese mixture in three additions—folding carefully after each until uniform and airy.
- Assemble in trifle bowl or 13×9 dish: Begin with ½-inch layer of wafers (~20). Top with ⅓ of pudding mixture, smoothed evenly. Arrange ½ of remaining whole strawberries over pudding. Spoon ⅓ of macerated strawberry mixture (juices + crushed berries) over top. Repeat layers twice more. Finish with final wafer layer, gently pressed in.
- Cover surface directly with plastic wrap. Refrigerate for minimum 6 hours—or ideally, overnight (12–24 hrs).
- Before serving, remove from fridge 15 minutes. Garnish with reserved whole strawberries, crushed wafers, optional coulis drizzle, and mint. Serve chilled with long spoons for perfect layered scoops.
FAQ
- Can I use frozen strawberries?
- No—we strongly advise against frozen strawberries. They release excessive water when thawed, creating a diluted, icy, and fragmented texture that disrupts the delicate balance of the pudding. Fresh, in-season berries are essential for brightness, structure, and visual appeal.
- Why does my pudding look lumpy or curdled?
- Lumps usually stem from either cold cream cheese not being softened enough (causing unmixed pockets), or adding cold pudding mixture too quickly into the cream cheese base. Always soften cheese thoroughly, and fold pudding in gradually—pausing to scrape bowl and rotate direction.
- How do I keep bananas from turning brown?
- Toss freshly sliced bananas in 1 tsp lemon juice + 1 tsp cold water, then gently pat dry with paper towel before layering. This inhibits enzymatic browning without watering down the pudding.
- Can I make this ahead for a party?
- Absolutely—and it’s highly recommended! Assemble up to 24 hours in advance. For best texture, add final wafer garnish and fresh strawberry topping 1 hour before serving. Store covered tightly in refrigerator.
- What if I don’t have a trifle bowl?
- No problem! A deep 13×9-inch glass baking dish works beautifully—and makes portioning easier. You can also use individual 12-oz mason jars for charming, portable servings (reduce chill time to 4 hours).
- Can I freeze this dessert?
- We do not recommend freezing. Dairy-based no-bake puddings separate upon thawing—cream cheese hardens, whipped cream weeps, and bananas become grainy and discolored. Best enjoyed fresh-chilled.
- Is there a lower-sugar option?
- Yes—reduce added sugar by 25% across the board (cream cheese base, whipped cream, maceration) without noticeable sacrifice, thanks to natural sweetness of bananas and strawberries. Also consider monk fruit blend (1:1 ratio) in place of granulated sugar for keto-friendly adaptation.
- My pudding seems too soft after chilling—did I do something wrong?
- Not necessarily. This is intentionally a *soft-set*, mousse-like pudding—not a rigid custard. If overly loose, ensure you used instant (not cook-and-serve) pudding, measured milk precisely, and chilled at least 6 hours. Overmixing after folding can also cause slight weeping.
- Can I substitute Greek yogurt for sour cream?
- You can—but only full-fat, plain Greek yogurt, strained to remove excess whey (line a strainer with cheesecloth, add yogurt, refrigerate 30 min). Regular Greek yogurt is too acidic and watery; strained version mimics sour cream’s richness and pH balance.
- What’s the best way to store leftovers?
- Keep tightly covered in refrigerator for up to 3 days. To minimize surface drying, press plastic wrap directly onto exposed layers. Avoid stirring—serve with a clean spoon each time to maintain integrity.
Summary
Strawberry Cheesecake Banana Pudding is a revolutionary no-bake dessert that masterfully bridges generations, regions, and cravings—transforming pantry staples into a showstopping, make-ahead masterpiece layered with velvety cheesecake mousse, jewel-toned macerated strawberries, creamy-sweet banana ribbons, and tender-crisp vanilla wafers.
Effortless to prepare, endlessly customizable, nutritionally mindful when desired, and guaranteed to spark joy at first spoonful—it’s not just a dessert. It’s a no-bake dream, realized.