
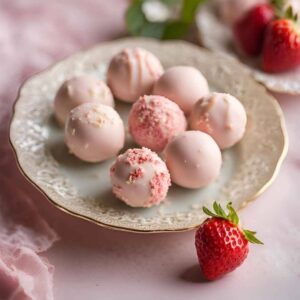
Strawberry cake truffles are a delightful treat that combines the rich flavor of strawberries with the moist, decadent texture of cake, all encased in a smooth chocolate coating. These truffles are a perfect fusion of cake and candy, offering a bite-sized indulgence that’s ideal for celebrations, gift-giving, or a simple sweet craving. With their vibrant pink hue and irresistible flavor, they add a festive touch to any occasion. The recipe is simple to follow, yet the outcome is luxurious, making these truffles a favorite choice for both seasoned bakers and beginners. The process of making strawberry cake truffles involves baking a strawberry cake, crumbling it, and mixing it with frosting to form truffle balls. These balls are then dipped in chocolate, creating a beautiful and delicious treat that’s sure to impress anyone who tries them.
The History of Strawberry Cake Truffles
The concept of cake truffles, also known as cake pops or cake balls, emerged as a creative way to repurpose leftover cake or cake scraps. Cake truffles were first popularized in the early 2000s by bakeries and food bloggers, quickly becoming a trendy dessert. Strawberry cake, with its fresh, fruity flavor and vibrant color, naturally became a favorite variation of cake truffles. The sweet and tart strawberry flavor pairs perfectly with chocolate, leading to its widespread popularity in both homemade and commercial versions of cake truffles. Over the years, this dessert has evolved with various flavor profiles and decorating styles, but strawberry cake truffles have remained a crowd-pleasing favorite due to their rich flavor and eye-catching presentation.
Ingredients Breakdown
For this recipe, you will need a few essential ingredients: strawberry cake mix, eggs, oil, water, butter, powdered sugar, strawberry puree, and chocolate (either white, milk, or dark). The strawberry cake mix forms the base of the truffles, providing a soft, flavorful cake. The eggs and oil help create a moist texture, while water ensures the batter is the right consistency. The frosting is made from butter, powdered sugar, and strawberry puree, which gives the truffles their signature creamy, fruity filling. The chocolate coating is the final step, which adds a rich, glossy finish that contrasts perfectly with the softness of the cake inside. You can also add flavoring like vanilla or almond extract to enhance the taste, and sprinkles or chopped nuts can be used for decoration.
Step-by-Step Recipe
- Preheat your oven to 350°F (175°C). Grease and flour an 8-inch round cake pan or line it with parchment paper.
- Prepare the strawberry cake mix according to the instructions on the box, typically by mixing the cake mix with eggs, oil, and water. Pour the batter into the prepared pan.
- Bake the cake for 25-30 minutes, or until a toothpick inserted into the center comes out clean. Let the cake cool completely in the pan before removing it.
- Once the cake has cooled, crumble it into small pieces using your hands or a fork.
- In a bowl, mix the crumbled cake with the frosting. Start with a small amount of frosting and gradually add more until the mixture holds together but is not too wet. The consistency should be firm enough to roll into balls but not too sticky.
- Roll the cake mixture into 1-inch balls and place them on a parchment-lined baking sheet.
- Melt the chocolate of your choice in a microwave-safe bowl, stirring every 20-30 seconds until smooth.
- Dip each cake ball into the melted chocolate, making sure it’s fully coated. You can use a fork to dip and remove the truffle, tapping off any excess chocolate.
- Place the dipped truffles back on the parchment paper to set. You can place them in the fridge for about 15-20 minutes to speed up the setting process.
- Once the chocolate has hardened, the truffles are ready to serve! Optionally, you can decorate them with sprinkles, chopped nuts, or a drizzle of contrasting chocolate.
Tips for the Perfect Strawberry Cake Truffles
- Ensure the cake is completely cooled before crumbling. This prevents the mixture from becoming too wet and helps the truffles hold their shape.
- Be mindful when adding frosting; too much can make the mixture too sticky, while too little will cause the truffles to be dry.
- If you’re using white chocolate, add a tiny bit of vegetable oil to smooth it out and make it easier to dip.
- If you want a stronger strawberry flavor, you can add more strawberry puree to the frosting or even a few drops of strawberry extract.
- Make sure the chocolate coating is not too thick or too thin. If it’s too thick, it will overwhelm the cake’s flavor; too thin, and it won’t create a satisfying coating.
- Chill the truffles before serving to ensure the chocolate has completely set and to improve the texture of the cake inside.
Variations and Customizations
While strawberry cake truffles are delicious on their own, there are many ways to customize the recipe to suit your tastes or theme. You can experiment with different types of cake mix, such as using a vanilla or chocolate cake as the base, while still incorporating strawberry puree for flavor. For a tangier twist, try mixing in a bit of cream cheese with the frosting to give it a cheesecake-like texture. The chocolate coating can also be customized by using dark chocolate for a richer, less sweet flavor, or opt for milk chocolate for a creamier taste. For a fun touch, you can dip the truffles in colored sprinkles, crushed graham crackers, or even drizzle a contrasting chocolate (such as dark chocolate on white chocolate truffles) to add a visual element.
Health Considerations and Nutritional Value
Strawberry cake truffles are a rich and indulgent dessert that should be enjoyed in moderation. While they offer a sweet treat, they are relatively high in calories, sugar, and fat due to the cake, frosting, and chocolate. A single truffle can contain around 100-150 calories, depending on the size and ingredients used. If you’re looking for a healthier version, you can experiment with using a sugar-free cake mix, low-fat frosting, or a dark chocolate coating, which has less sugar and more antioxidants than milk chocolate. For a lighter twist, consider using Greek yogurt or a plant-based frosting to reduce the fat content. However, keep in mind that the base of the truffles is still a cake, so they may not be suitable for those on strict low-carb or gluten-free diets unless modifications are made.
FAQ
Can I make these truffles ahead of time?
Yes, you can make the truffles up to 3 days ahead of time. Store them in an airtight container in the fridge to keep them fresh. You can also freeze them for up to a month; just make sure they are properly wrapped to prevent freezer burn.
Can I use fresh strawberries instead of strawberry puree?
Yes, you can use fresh strawberries, but they should be pureed and reduced down to avoid excess moisture. This will help maintain the consistency of the truffles and prevent them from becoming soggy.
Can I use a different frosting instead of store-bought?
Absolutely! If you prefer, you can make homemade frosting using butter, powdered sugar, and strawberry puree or even use cream cheese frosting for a tangier flavor.
How do I keep the chocolate coating from cracking?
Make sure the truffles are chilled before dipping, as this helps the chocolate adhere better. Also, allow the chocolate to cool slightly before dipping the truffles to prevent the heat from melting the cake.
How long do these truffles last?
These truffles will stay fresh for about 3-4 days at room temperature or up to a week in the fridge. If frozen, they can last for up to a month.
Strawberry Cake Truffles Recipe
Ingredients
- 15.25 ounces of Betty Crocker strawberry cake mix
- 8- ounce block of cream cheese softened to room temperature
- ⅓ cup of roughly chopped cream cheese chips
- 2 bags 10 oz each of Ghirardelli vanilla melting wafers
- ½ cup of Wilton pink candy melts
- ½ cup of Wilton bright pink candy melts
- Sprinkles optional
Instructions
- Preheat the oven to 350°F and line a baking sheet with parchment paper. Before starting, you’ll need to heat treat the cake mix to eliminate any bacteria.
- Once the oven is preheated, spread the cake mix evenly onto the prepared baking sheet and bake for 5 minutes. After baking, remove from the oven and let it cool completely on a wire rack.
- While the cake mix cools, place the softened cream cheese into a medium-sized mixing bowl and beat with a hand mixer on medium-high speed until smooth and creamy.
- Add the cooled cake mix to the bowl, and gently fold it in with a rubber spatula a few times. Then, use the hand mixer on medium-high speed to fully combine the mixture into a dough-like consistency. I recommend folding with the spatula first to avoid making a mess with the flour.
- Fold in the chopped cream cheese chips until evenly mixed.
- Cover the dough with plastic wrap and chill it in the refrigerator for 2 hours.
- After chilling, line two baking sheets with parchment paper. Use a 1 ½ tablespoon cookie scoop to portion the dough onto the sheets. Roll each portion into smooth, even balls with your hands. Allow the dough balls to sit for about 15 minutes to expand, which helps prevent cracking in the coating.
- To melt the vanilla melting wafers, set up a double boiler on the stovetop over low heat, or alternatively, use a microwave-safe bowl and heat in 30-second increments, stirring each time, until fully melted. I prefer using the double boiler to maintain the right temperature.
- Take a dough ball and place it on a fork, dipping it fully into the melted vanilla wafers. Lift it out, tapping the fork gently on the edge of the bowl or pot to remove any excess coating. Then, place the coated balls onto the prepared baking sheet.
- Continue dipping the remaining dough balls, spacing them about 2 inches apart on the sheet. Before the coating hardens, sprinkle your choice of sprinkles on top of half of the coated cake balls.
- Next, place the pink candy melts into two separate small microwave-safe piping bags. Heat them on a low setting until fully melted.
- Once melted, cut a small tip off each piping bag and drizzle the pink melts over the remaining coated cake balls.
- Allow the cake balls to set completely before serving. Enjoy!