Introduction
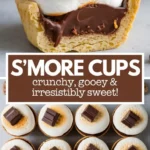
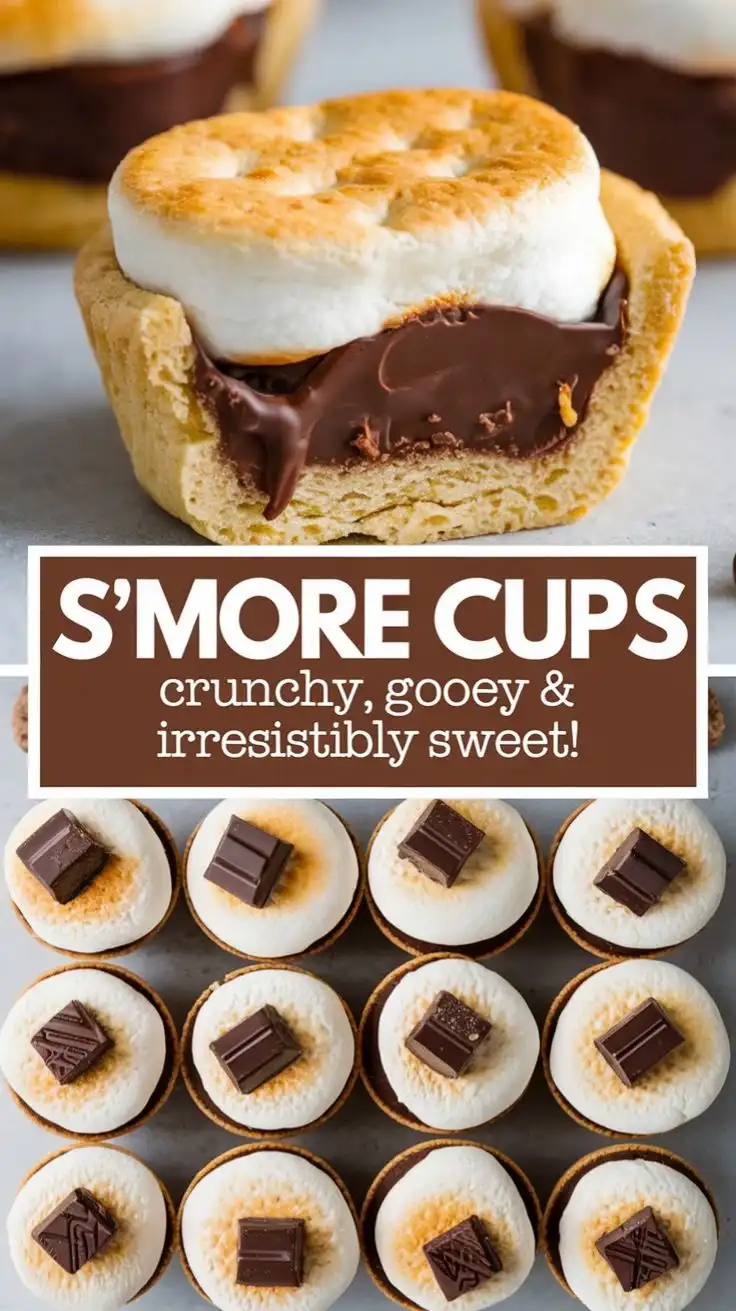
Welcome to the ultimate indulgence—S’more Cups! These miniature, no-bake, oven-free delights capture the soul of a classic campfire s’more in a single, bite-sized, handheld cup. Imagine the nostalgic crackle of a bonfire, the melty stretch of toasted marshmallow, the rich snap of dark chocolate, and the buttery crunch of graham cracker—all harmoniously layered into elegant, portion-controlled cups that are as Instagram-worthy as they are decadently delicious. Whether you’re hosting a summer soirée, packing school lunchboxes, prepping for holiday cookie exchanges, or simply treating yourself after a long day, S’more Cups deliver pure, unapologetic joy in every spoonful. They’re not just dessert—they’re edible nostalgia, reimagined with modern convenience, textural brilliance, and customizable charm.
The History
The beloved s’more—a contraction of “some more”—has roots tracing back to at least the early 1920s, first appearing in print in the 1927 Girl Scouts handbook *Tramping and Trailing with the Girl Scouts*, where it was described as “a sandwich of two graham crackers and a roasted marshmallow, with a piece of chocolate between.” Long before that, Indigenous North American communities used roasted marshmallow root (Althaea officinalis) for medicinal purposes, while European settlers adapted the plant into confections—eventually evolving into the fluffy, sugar-laden marshmallows we know today. Graham crackers were invented by 19th-century Presbyterian minister Sylvester Graham as part of a health reform movement promoting whole grains and temperance. Chocolate, of course, traveled from Mesoamerica to Europe and then across the Atlantic—transforming from bitter ceremonial drink to sweetened bar by the late 1800s. The convergence of these three ingredients around the American campfire became a cultural rite of passage—and decades later, enterprising bakers began transforming that open-fire ritual into portable, mess-free formats. S’more Cups emerged in the early 2010s on food blogs and Pinterest, gaining viral traction thanks to their photogenic layers, make-ahead ease, and brilliant solution to the “melty marshmallow drip” problem. Today, they’re a mainstay in bakery case displays, wedding dessert tables, and even gourmet ice cream shops—proving that tradition and innovation can melt together perfectly.
Ingredients Breakdown
Every extraordinary S’more Cup begins with intentional, high-quality components—each playing a precise role in flavor, texture, structure, and mouthfeel:
- Graham Cracker Crumbs (Base & Rim): Finely crushed honey-sweetened graham crackers provide the foundational crunch, subtle cinnamon-vanilla warmth, and structural integrity. Whole-grain varieties add nuttiness; cinnamon-spiced or chocolate-dipped graham options introduce nuance.
- Unsalted Butter (Binder): Melted and cooled, it binds the crumbs into a firm, cohesive crust without greasiness—acting like edible cement while enhancing richness and aroma.
- High-Quality Dark or Milk Chocolate (Layer 1): 60–70% cacao dark chocolate delivers deep, complex bitterness that balances sweetness; milk chocolate offers creamy, caramelized notes. Chopped bars (not chips) ensure superior melt and gloss. Vegan chocolate or white chocolate are stunning alternatives.
- Homemade or Gourmet Marshmallow Fluff (Layer 2): Store-bought fluff works—but for true luxury, a quick stovetop or stand-mixer marshmallow creme (using egg whites, sugar syrup, and vanilla) adds ethereal airiness, glossy sheen, and superior stability. Toasted marshmallow swirls elevate visual appeal and deepen flavor via Maillard reaction.
- Roasted Mini Marshmallows (Topping): Lightly torched or broiled mini marshmallows crown each cup with golden-brown blistered peaks, smoky-sweet aroma, and irresistible chew—recreating the campfire essence without flame.
- Flavor Enhancers (Optional but Recommended): A pinch of flaky sea salt intensifies chocolate’s depth; a drop of pure peppermint or orange extract brightens richness; espresso powder amplifies cocoa notes; toasted coconut or crushed pretzels add playful contrast.
Crucially, all ingredients should be at room temperature before assembly—cold chocolate won’t set smoothly; warm fluff will melt the base; chilled marshmallows won’t toast evenly.
Step-by-Step Recipe
- Prep & Chill Equipment: Place silicone mini muffin pan (24-cup standard size) and small mixing bowls in freezer for 15 minutes. Cold tools prevent premature melting and improve layer adhesion.
- Make the Graham Cracker Crust: In a food processor, pulse 1 ½ cups graham cracker crumbs (about 10 full sheets) until ultra-fine. Add 6 tbsp melted unsalted butter and 1 tbsp brown sugar. Pulse 5–6 times until mixture resembles wet sand. Press 1 heaping tsp firmly into each cavity using a ½ tsp measuring spoon or small tamper—ensuring even coverage up the sides. Freeze 10 minutes.
- Temper the Chocolate Layer: Chop 8 oz high-quality chocolate. Melt gently using double boiler method: simmer 1 inch water, place heatproof bowl atop (not touching water), add chocolate, stir constantly until smooth (115°F max). Remove from heat, stir in 1 tsp coconut oil for shine and fluidity. Let cool to 88–90°F (slightly warm to touch)—critical for proper snap and gloss.
- Layer the Chocolate: Spoon 1 tsp tempered chocolate into each cup. Tilt and rotate pan to coat sides and bottom evenly. Tap sharply on counter to release air bubbles. Freeze 8 minutes until fully set but not brittle.
- Prepare the Marshmallow Core: Whip 1 cup marshmallow fluff with ¼ tsp vanilla bean paste and pinch of salt until light and airy (1–2 min). For extra luxury, fold in 2 tbsp toasted mini marshmallows (reserve remaining for garnish).
- Add the Fluff Layer: Pipe or spoon 1 generous tsp of fluff into each cup, pressing gently to adhere. Smooth tops with damp offset spatula. Freeze 12 minutes—long enough to set, not so long it becomes icy.
- Toasted Marshmallow Crown: Arrange 1–2 mini marshmallows atop each cup. Use culinary torch on low setting, moving steadily in circular motion until golden-brown and puffed (5–8 seconds per cup). Alternatively, broil 3 inches from element for 30–45 seconds—watch obsessively.
- Final Set & Garnish: Return to freezer for 15 minutes. Just before serving, sprinkle with flaky sea salt, cocoa nibs, crushed graham, or edible gold dust. Store frozen until ready to serve—never refrigerate (condensation ruins texture).
Tips
- Crumb Consistency is Key: Too coarse? Crust crumbles. Too fine? It turns pasty. Aim for sandy—not powdery—texture. Pulse, don’t grind.
- Butter Temperature Matters: Warm, not hot—butter above 120°F will make crumbs greasy and oily. Cool melted butter to 95°F before mixing.
- Chocolate Tempering Non-Negotiable: Skipping this leads to dull, streaky, soft chocolate that won’t snap. Use instant-read thermometer and practice patience.
- Freeze Between Layers—Religiously: Each freeze step ensures clean separation, prevents bleeding, and builds structural integrity. Rushing = smudged layers and sloppy presentation.
- Torch Technique: Hold torch 4–6 inches away. Move continuously. If marshmallows blacken, you’re too close or too slow. Keep a bowl of ice water nearby for emergency cooling.
- Serve Straight From Freezer: S’more Cups taste best at 18–22°F—cold enough for crisp chocolate and chewy marshmallow, warm enough for optimal flavor release. Let sit 60 seconds at room temp before eating.
- Prevent Sticking: Line pan with parchment paper squares before adding crust—or use nonstick silicone molds. Run knife under hot water, dry thoroughly, and glide around edges before unmolding.
- Batch Efficiency: Make crusts and chocolate layer one day; fluff and torch the next. Assemble up to 2 hours before serving for peak freshness.
- No Torch? No Problem: Broil on lowest rack, door ajar, timer set for 15-second intervals. Or use a match (carefully!) held near marshmallow surface for controlled charring.
- Texture Troubleshooting: Grainy fluff? Sugar syrup crystallized—add 1 tsp corn syrup next time. Crumbly crust? Add ½ tsp honey or maple syrup. Chocolate blooming? Humidity or improper tempering—store finished cups below 65% RH.
Variations and Customizations
S’more Cups are a canvas for creativity—limited only by imagination and pantry inventory. Here’s how to personalize them for every palate, occasion, and dietary need:
Dietary Adaptations
- Vegan: Use vegan graham crackers (check honey-free), dairy-free dark chocolate (cocoa butter + coconut sugar), aquafaba-based marshmallow fluff, and refined coconut oil instead of butter.
- Gluten-Free: Substitute certified GF graham-style crackers (like Pamela’s or Schär) or blend GF oats + almond flour + cinnamon + coconut sugar for a grain-free base.
- Keto/Low-Carb: Crush keto graham crackers (almond flour, erythritol, cinnamon), use sugar-free dark chocolate (at least 85%), and layer with keto marshmallow fluff (gelatin, monk fruit, egg whites).
- Nut-Free: Avoid almond flour bases; stick to sunflower seed butter in crust binder or use pumpkin seed butter for richness.
Flavor Twists
- Peanut Butter S’mores: Swirl ½ tsp natural peanut butter into chocolate layer; top with crushed Reese’s cups.
- Peppermint Bark: Add ¼ tsp peppermint extract to chocolate; garnish with crushed candy canes and white chocolate drizzle.
- Orange Blossom: Infuse chocolate with ½ tsp orange blossom water; rim cups with candied orange zest.
- Spiced Chai: Mix ½ tsp chai spice blend into graham crumbs; steep 1 tsp loose-leaf chai in warm cream for fluff layer.
- Salted Caramel: Drizzle homemade salted caramel over chocolate layer before adding fluff; finish with caramel popcorn crumble.
Textural & Visual Upgrades
- Crunch Layers: Press toasted quinoa, puffed amaranth, or crushed pretzels into crust before freezing.
- Swirled Elegance: Alternate dollops of chocolate and fluff, then marble with toothpick before freezing.
- Miniature Masterpieces: Use 1-inch silicone molds for jewel-toned, single-bite versions—perfect for weddings or tasting menus.
- Seasonal Themes: Pumpkin spice crumbs + maple fluff (fall); rosewater-chocolate + dried raspberry (spring); matcha-white chocolate + black sesame (winter).
- Boozy Boost: Add ½ tsp bourbon, rum, or Grand Marnier to fluff for adult-only versions (label accordingly).
Occasion-Specific Styling
- Weddings: White chocolate + rose petal fluff + edible pearl dust + gold leaf rim.
- Holiday Parties: Red & green sprinkles, peppermint-studded chocolate, holly-shaped marshmallow toppers.
- Kids’ Birthday: Rainbow marshmallow fluff, chocolate chips, and colorful candy eyes.
- Corporate Gifting: Monogrammed boxes with custom-printed recipe cards and branded wooden spoons.
Health Considerations and Nutritional Value
While S’more Cups are inherently indulgent, mindful ingredient choices transform them from occasional treat to thoughtfully crafted delight—with transparency, balance, and nutritional awareness at the core.
Nutrition Snapshot (Per Standard Cup – Approx. 65g)
- Calories: 185–220 kcal (varies by chocolate % and added toppings)
- Total Fat: 10–12g (mostly unsaturated from cocoa butter and nuts in GF versions)
- Saturated Fat: 5–7g (reduced by using 70%+ dark chocolate)
- Sugar: 14–18g (naturally occurring from graham crackers + added; reduced by 30% with monk fruit–sweetened alternatives)
- Fiber: 1–2g (boosted to 3g+ with whole-grain or oat-based crusts)
- Protein: 2–3g (enhanced with collagen-infused fluff or protein-enriched graham crumbs)
- Micronutrients: Magnesium (dark chocolate), calcium (fortified graham), iron (cocoa), B vitamins (whole grains)
Smart Swaps for Wellness Alignment
- Reduce Refined Sugar: Replace brown sugar in crust with date paste; use monk fruit–sweetened chocolate; opt for low-sugar marshmallow alternatives (stevia-sweetened or gelatin-based).
- Increase Fiber & Antioxidants: Blend 1 tbsp ground flaxseed or chia into graham crumbs; add raw cacao nibs to chocolate layer; top with fresh berries (serve immediately).
- Support Gut Health: Incorporate prebiotic-rich ingredients—raw honey in crust binder (if not vegan), inulin-fortified chocolate, or a dusting of fermented cocoa powder.
- Blood Sugar Balance: Pair with a source of healthy fat or protein when serving—e.g., alongside Greek yogurt dip or almond butter drizzle—to slow glucose absorption.
- Allergen Awareness: Clearly label cups containing nuts, dairy, soy, or gluten—even trace amounts—for inclusive hospitality.
Mindful Enjoyment Principles
S’more Cups align beautifully with intuitive eating philosophies: they satisfy deep cravings without deprivation, honor pleasure as part of nourishment, and invite presence through multi-sensory engagement—the crunch, the stretch, the aroma, the visual delight. Portion control is built-in (no endless refills!), and the act of slow, intentional eating—observing the glossy chocolate, inhaling toasted marshmallow, savoring the layered textures—supports satiety cues and reduces mindless consumption. They’re not “healthy,” per se—but they *can* be health-supportive when crafted with care, served with joy, and enjoyed without guilt.
Ingredients
- 1 ½ cups (120g) finely crushed honey graham crackers (about 10 full sheets)
- 6 tablespoons (85g) unsalted butter, melted and slightly cooled
- 1 tablespoon (12g) light brown sugar, packed
- 8 ounces (227g) high-quality dark chocolate (60–70% cacao), finely chopped
- 1 teaspoon (5g) refined coconut oil (for chocolate shine and fluidity)
- 1 cup (240g) marshmallow fluff (homemade preferred—see note below)
- ¼ teaspoon (0.5g) pure vanilla bean paste or extract
- Pinch of fine sea salt
- ½ cup (50g) mini marshmallows, for toasting
- Flaky sea salt, cocoa nibs, or crushed graham crackers for garnish (optional)
Homemade Marshmallow Fluff Note: Combine ½ cup granulated sugar, ¼ cup water, and ⅛ tsp cream of tartar in a small saucepan. Heat to 240°F (soft-ball stage) without stirring. Meanwhile, whip 2 large egg whites and ¼ tsp salt to stiff peaks. Slowly pour hot syrup down side of bowl while beating on high. Add 1 tsp vanilla. Beat 8–10 minutes until cool, glossy, and tripled in volume.
Directions
- Chill a 24-cup silicone mini muffin pan and two small mixing bowls in the freezer for 15 minutes.
- In a food processor, pulse graham cracker sheets into fine crumbs (15–20 seconds). Transfer to bowl; whisk in melted butter and brown sugar until mixture resembles wet sand.
- Press 1 heaping teaspoon of crumb mixture firmly into each cavity, covering bottom and climbing ⅓ up sides. Freeze 10 minutes.
- Prepare double boiler: Simmer 1 inch water in saucepan. Place heatproof bowl on top (no contact with water). Add chopped chocolate and coconut oil. Stir constantly until fully melted and smooth (115°F max). Remove from heat; stir 2 minutes to cool slightly.
- Spoon 1 teaspoon tempered chocolate into each cup. Tilt and rotate pan to coat sides evenly. Tap firmly on counter to settle. Freeze 8 minutes.
- In separate bowl, beat marshmallow fluff, vanilla, and salt until light and airy (~2 minutes). Fold in 2 tablespoons toasted mini marshmallows (reserve rest for topping).
- Pipe or spoon 1 generous teaspoon fluff into each cup. Smooth tops with damp offset spatula. Freeze 12 minutes.
- Arrange 1–2 mini marshmallows atop each cup. Using culinary torch, toast until golden-brown and puffed (5–8 seconds). Watch closely.
- Return pan to freezer for 15 minutes. Just before serving, garnish with flaky salt or toppings of choice.
- Store in airtight container in freezer up to 4 weeks. Serve straight from freezer for optimal texture and flavor.
FAQ
- Can I make S’more Cups ahead of time?
- Absolutely! They’re ideal for make-ahead dessert prep. Assembled cups freeze beautifully for up to 4 weeks. Thawing isn’t required—serve directly from the freezer for perfect texture. For best results, torch the marshmallow topping within 2 hours of serving to preserve its delicate puff and caramelized crust.
- Why does my chocolate layer look dull or streaky?
- This signals improper tempering—either overheating (causing cocoa butter separation) or insufficient cooling (preventing stable crystal formation). Always use a thermometer, avoid steam contact, and cool chocolate to 88–90°F before pouring. Stirring in 1 tsp coconut oil helps stabilize sheen and improves fluidity.
- My marshmallow fluff collapsed or wept liquid—is something wrong?
- Yes—usually due to humidity, under-beaten egg whites (if homemade), or residual grease in the bowl. Ensure all equipment is spotlessly clean and completely dry. For store-bought fluff, check expiration date—older batches lose viscosity. Refrigeration also causes weeping; always store fluff at room temperature and use within 2 weeks of opening.
- Can I use regular marshmallows instead of fluff?
- You can—but texture suffers. Whole marshmallows don’t spread or adhere well, creating gaps and instability. For best results, melt and whip regular marshmallows with 1 tbsp corn syrup and ½ tsp gelatin for a hybrid fluff. Or slice mini marshmallows thinly and press into chocolate layer before adding fluff.
- What’s the best way to transport S’more Cups?
- Freeze solid first (minimum 3 hours), then nestle upright in rigid, insulated cooler with frozen gel packs. Line container with parchment and separate layers with wax paper. Avoid stacking. Upon arrival, return to freezer until service. Never leave at room temperature longer than 10 minutes.
- Are S’more Cups safe for kids?
- Yes—with supervision. The toasted marshmallow topping is warm immediately after torching—allow 60 seconds to cool before serving to children. Also, verify graham cracker and chocolate ingredients for common allergens (wheat, dairy, soy, nuts). For toddlers, skip whole mini marshmallows (choking hazard) and use finely minced toasted marshmallow bits instead.
- Can I bake these instead of freezing?
- Not recommended. Baking alters the chemistry—chocolate blooms, marshmallow dries into rubber, graham crust hardens excessively. The magic lies in the cold-set structure and temperature contrast. However, you *can* bake the graham crust alone (350°F for 8 minutes) before chilling if you prefer a firmer base—but still assemble and freeze the rest.
- How do I scale this for a crowd?
- Double or triple the recipe seamlessly—just maintain ratios. Use multiple pans and stagger freezing steps to avoid overcrowding your freezer. For events, prepare crusts and chocolate layers 2 days ahead; fluff and torch same-day. Pro tip: Label pans with prep date and layer status (e.g., “Crust-Frozen,” “Choc-Set”) to streamline assembly.
- What if I don’t have a torch?
- Broiling works beautifully: Place pan on top rack, 3 inches from broiler element. Heat on LOW for 30–45 seconds—watch constantly. Rotate pan halfway. If uneven, use kitchen tweezers to reposition marshmallows. A butane lighter (held 4 inches away) is another effective, accessible tool—just keep flame moving.
- Can I use milk or white chocolate exclusively?
- You can—but adjust expectations. Milk chocolate burns more easily and sets softer; white chocolate is highly sensitive to moisture and heat. For success: reduce double-boiler heat, stir constantly, and cool to 82–84°F before pouring. Add ½ tsp lecithin to improve stability. Pair milk chocolate with salted caramel fluff; white chocolate with raspberry or lemon zest.
Summary
S’more Cups are a masterclass in nostalgic reinvention—transforming the rustic campfire ritual into an elegant, texturally transcendent, no-bake dessert that balances crunchy graham, glossy tempered chocolate, cloud-like marshmallow fluff, and golden toasted crowns with flawless precision.
Infinitely customizable, effortlessly impressive, and deeply satisfying, they prove that the sweetest moments aren’t just about taste—they’re about memory, craftsmanship, and the joyful ritual of making something truly special, one irresistible cup at a time.