Introduction
Sheet Pan Fajitas are a modern, convenient twist on the beloved classic Mexican-inspired dish that has captured hearts and taste buds around the world. Traditionally, fajitas involve sizzling strips of marinated meat and colorful bell peppers cooked in a cast-iron skillet over high heat, served with warm tortillas and an array of fresh toppings. However, not everyone has the time or equipment to achieve that perfect sear on the stovetop—especially when cooking for a family or entertaining guests. Enter the sheet pan fajita: a one-pan wonder that simplifies cleanup, maximizes flavor, and delivers restaurant-quality results right from your oven.
This recipe transforms the traditional method into a fuss-free, hands-off approach by roasting everything together on a single large baking sheet. The beauty lies in its simplicity: minimal prep, no constant monitoring, and even cooking thanks to the magic of high-heat roasting. Whether you’re a busy parent looking for a quick weeknight dinner, a meal-prepper aiming for batch-friendly dishes, or someone who simply loves bold, zesty flavors without the mess, sheet pan fajitas are your new go-to solution. They’re customizable, nutritious, and guaranteed to bring vibrant color and excitement to your dinner table.
The History
The origins of fajitas trace back to the ranches of South Texas in the early 20th century, where Mexican cowboys known as vaqueros were often paid in less desirable cuts of beef, including skirt steak—the part wrapped around the diaphragm. Rather than discard this tough but flavorful cut, they developed methods to tenderize and cook it, often marinating it with spices and grilling it over open flames. The term “fajita” comes from the Spanish word faja, meaning “belt” or “girdle,” referring to the strip-like shape of the meat.
Fajitas didn’t gain widespread popularity until the 1960s and 70s when Tex-Mex restaurants began featuring them on menus, especially in cities like Austin and San Antonio. By the 1980s, fajitas had exploded in popularity across the United States, becoming synonymous with sizzling platters, smoke rising from hot iron skillets, and the ritual of wrapping seasoned meat and vegetables in soft flour tortillas. Over time, variations emerged—chicken, shrimp, and vegetarian versions—and cooking techniques evolved with home kitchens adapting the dish using available tools.
The sheet pan adaptation is a relatively recent innovation, gaining traction in the 2010s alongside the rise of one-pan meals and clean-eating trends. Food bloggers, dietitians, and busy families embraced the concept of roasting fajita ingredients together for ease, consistency, and reduced cleanup. While purists may argue that true fajitas require high-heat searing, the sheet pan version honors the spirit of the dish—bold seasonings, colorful veggies, and interactive dining—while making it more accessible to everyday cooks. Today, sheet pan fajitas represent the evolution of culinary tradition meeting modern convenience.
Ingredients Breakdown
The success of any fajita dish hinges on the balance of savory, tangy, and slightly spicy flavors, all brought together through a carefully curated blend of ingredients. Here’s a detailed look at what goes into a classic sheet pan fajita recipe and why each component matters:
- Protein (Chicken, Steak, or Shrimp): Boneless, skinless chicken breasts or thighs are the most common choice due to their mild flavor and ability to absorb marinade well. For a richer taste, skirt or flank steak offers authentic texture and beefy depth. Shrimp provides a lighter, quicker-cooking alternative ideal for seafood lovers. Regardless of your choice, uniform slicing ensures even cooking.
- Bell Peppers: A mix of red, yellow, orange, and green bell peppers adds sweetness, crunch, and vibrant color. Red peppers tend to be the sweetest, while green ones offer a slightly bitter contrast. Sliced into thin strips, they roast beautifully alongside the protein.
- Onion: Yellow or red onions caramelize slightly during roasting, adding natural sweetness and complexity. Thinly sliced half-moons ensure they soften evenly without burning.
- Olive Oil: High-quality extra virgin olive oil coats the ingredients, promoting browning and helping the spices adhere. It also contributes a subtle fruitiness that complements the other flavors.
- Lime Juice: Fresh lime juice adds brightness and acidity, cutting through the richness of the meat and oil. It enhances the overall freshness and activates certain spices in the marinade.
- Garlic: Minced fresh garlic brings aromatic depth. When roasted, it mellows into a sweet, umami-rich note rather than remaining sharp.
- Chili Powder: A cornerstone of Tex-Mex seasoning, chili powder typically contains ground chiles, cumin, garlic powder, and oregano. It imparts warmth and earthiness without excessive heat.
- Ground Cumin: This warm, nutty spice deepens the flavor profile and pairs exceptionally well with both chicken and beef. It’s essential for achieving that signature fajita aroma.
- Paprika: Sweet paprika adds color and mild pepper flavor, while smoked paprika can introduce a deeper, campfire-like smokiness if desired.
- Onion Powder & Garlic Powder: These concentrated forms boost savory notes and ensure consistent flavor distribution, especially important when roasting.
- Dried Oregano: Mexican oregano (slightly different from Mediterranean oregano) has a citrusy, earthy quality that works perfectly in fajita seasoning.
- Crushed Red Pepper Flakes (Optional): For those who enjoy a bit of heat, a pinch adds gentle spiciness without overwhelming the dish.
- Salt and Black Pepper: Essential for enhancing all other flavors. Kosher salt is preferred for its clean taste and easy dispersion.
- Tortillas: Warm flour or corn tortillas serve as the vessel. Flour tortillas are softer and more pliable, while corn offers a denser, gluten-free option with a rustic flavor.
- Toppings (Optional): Guacamole, sour cream, pico de gallo, shredded cheese, pickled red onions, cilantro, and jalapeños elevate the final presentation and add layers of texture and temperature contrast.
Step-by-Step Recipe
- Preheat Oven: Begin by preheating your oven to 425°F (220°C). This high temperature is crucial for achieving caramelization and slight charring on the edges of the vegetables and meat, mimicking the effect of a grill or skillet.
- Prepare Protein: Slice 1.5 pounds of boneless chicken breasts, flank steak, or peeled shrimp into thin, uniform strips about ½ inch wide. Uniformity ensures everything cooks at the same rate.
- Make Marinade: In a large mixing bowl, whisk together ¼ cup olive oil, 3 tablespoons fresh lime juice (about 1–2 limes), 4 minced garlic cloves, 1 tablespoon chili powder, 1 teaspoon ground cumin, 1 teaspoon paprika, ½ teaspoon onion powder, ½ teaspoon garlic powder, 1 teaspoon dried oregano, ½ teaspoon crushed red pepper flakes (optional), 1 teaspoon salt, and ½ teaspoon black pepper.
- Marinate Ingredients: Add the sliced protein to the marinade and toss thoroughly to coat. Let sit for at least 15 minutes at room temperature, or up to 2 hours in the refrigerator for deeper flavor infusion.
- Prepare Vegetables: While the protein marinates, slice 3 large bell peppers (assorted colors) into thin strips and 1 large onion into thin half-moons. Add them to a separate bowl, drizzle with 1–2 tablespoons of olive oil, and season lightly with salt and pepper. You may reserve a small portion of the marinade to toss with the veggies if desired, though this isn’t necessary.
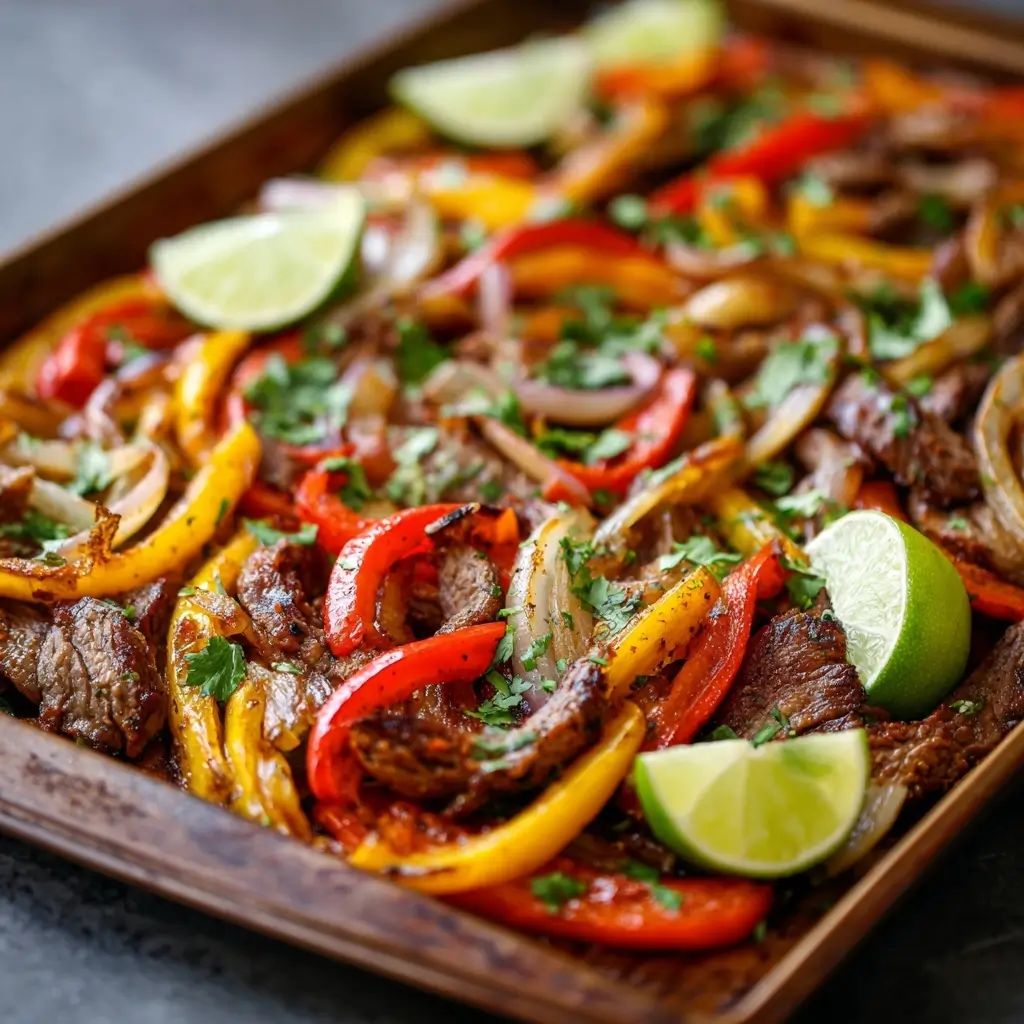
- Arrange on Sheet Pan: Line a large rimmed baking sheet with parchment paper or foil for easy cleanup. Spread the marinated protein in the center of the pan. Arrange the peppers and onions around the meat in a single layer, ensuring nothing is overcrowded. If needed, use two pans to avoid steaming instead of roasting.
- Roast: Place the sheet pan in the preheated oven and roast for 18–22 minutes, depending on the thickness of your protein. Chicken and steak usually take 20–22 minutes, flipping halfway through with tongs or a spatula. Shrimp cook faster—about 12–15 minutes—and should be added later if using mixed proteins.
- Warm Tortillas: While the fajitas roast, wrap a stack of 8–10 tortillas in aluminum foil and place them in the oven during the last 5–10 minutes of cooking to warm gently.
- Rest and Serve: Remove the sheet pan from the oven. Let the fajitas rest for 2–3 minutes to allow juices to redistribute. Squeeze additional fresh lime juice over the top for a burst of freshness.
- Assemble: Serve directly from the pan or transfer to a serving platter. Offer warm tortillas and a variety of toppings such as guacamole, sour cream, shredded lettuce, diced tomatoes, chopped cilantro, and pickled jalapeños for a build-your-own fajita experience.
Tips
- Don’t Overcrowd the Pan: Spacing is key. Overlapping ingredients will steam instead of roast, resulting in soggy, less flavorful fajitas. Use two sheet pans if necessary.
- Cut Uniform Pieces: Consistent sizing ensures even cooking. Varying sizes can lead to some pieces being undercooked while others dry out.
- Use a Rimmed Baking Sheet: A sheet pan with raised edges prevents juices from spilling into the oven and allows for better browning.
- Flip Midway: Turning the protein and stirring the veggies halfway through promotes even browning and prevents sticking.
- Pat Meat Dry Before Marinating: Excess moisture can inhibit browning. Pat chicken or steak dry with paper towels before adding to the marinade.
- Marinate Longer for More Flavor: While 15 minutes works in a pinch, letting the protein soak for 1–2 hours significantly enhances taste and tenderness.
- Add Delicate Ingredients Later: If including mushrooms or zucchini, add them in the last 10 minutes to prevent overcooking.
- Boost Charred Flavor: For a grilled effect, broil the fajitas for 2–3 minutes at the end, watching closely to avoid burning.
- Prep Ahead: Slice vegetables and make the marinade a day in advance. Store separately in airtight containers in the fridge.
- Reuse Leftover Marinade? Only if boiled first. Never reuse raw marinade that touched uncooked meat unless simmered for at least 2 minutes to kill bacteria.
Variations and Customizations
One of the greatest strengths of sheet pan fajitas is their versatility. With just a few tweaks, you can adapt the recipe to suit dietary preferences, cultural influences, or seasonal ingredients. Here are some creative variations:
- Vegetarian/Vegan Fajitas: Replace meat with portobello mushrooms, tofu, tempeh, or a plant-based chicken substitute. Toss with the same marinade and roast alongside peppers and onions. Add black beans or roasted sweet potatoes for heartiness.
- Pineapple Fajitas: Add chunks of fresh pineapple to the sheet pan during the last 10 minutes of roasting for a sweet-tart tropical twist that pairs beautifully with chicken or shrimp.
- Cauliflower Fajitas: Roast cauliflower florets with fajita spices for a low-carb, nutrient-dense alternative. The florets develop a nutty, almost meaty texture when roasted at high heat.
- Mexican Street Corn Style: After roasting, toss the fajita mix with crumbled cotija cheese, a squeeze of mayo or vegan crema, and a sprinkle of chili-lime seasoning for elote-inspired flair.
- Korean-Inspired Fusion: Swap the traditional spices for a gochujang-based marinade with soy sauce, ginger, sesame oil, and brown sugar. Serve with kimchi and rice noodles.
- Breakfast Fajitas: Skip the meat and use scrambled eggs or tofu scramble with roasted peppers and onions. Top with salsa and avocado for a morning twist.
- Low-Sodium Version: Use low-sodium spices and reduce added salt. Boost flavor with extra lime, fresh herbs, or a splash of apple cider vinegar.
- Gluten-Free Option: Ensure all spices are certified gluten-free and use corn tortillas or lettuce wraps instead of flour tortillas.
- Spicy Chipotle Kick: Add 1–2 teaspoons of chipotle powder or 1–2 minced canned chipotles in adobo sauce to the marinade for smoky heat.
- Meal Prep Friendly: Cook a double batch and store components separately in the fridge for up to 4 days. Reheat in a skillet or microwave and assemble fresh tortillas when ready to eat.
Health Considerations and Nutritional Value
Sheet pan fajitas are inherently a balanced meal, combining lean protein, fiber-rich vegetables, and healthy fats—all with minimal added sugars or processed ingredients. Here’s a breakdown of the nutritional benefits and considerations based on a typical serving (approximately 1 cup filling + 1 tortilla):
- Calories: Approximately 350–450 per serving, depending on protein choice and tortilla size.
- Protein: 25–35g, supporting muscle repair and satiety. Chicken and shrimp are particularly high in complete protein.
- Fat: 12–18g, mostly unsaturated from olive oil and avocado (if used). Opt for lean cuts of meat and moderate oil usage to keep fat levels in check.
- Carbohydrates: 30–40g, primarily from vegetables and tortillas. Choose whole wheat or corn tortillas for added fiber (5–7g per serving).
- Fiber: 5–8g, thanks to bell peppers, onions, and optional additions like beans or sweet potatoes. Fiber supports digestion and helps stabilize blood sugar.
- Vitamins & Minerals: Extremely rich in vitamin C (from peppers and lime), vitamin A (from red/orange peppers), potassium (from vegetables), and antioxidants like beta-carotene and lycopene.
- Sodium: Around 600–800mg per serving, mostly from seasoning and salt. Reduce sodium by using low-salt spices and limiting added salt.
- Diabetes-Friendly: Can be adapted with low-glycemic tortillas, increased non-starchy veggies, and controlled portions.
- Heart Health: Olive oil and lean proteins support cardiovascular wellness when consumed as part of a balanced diet.
- Allergens: Naturally free from nuts and dairy (unless toppings include cheese/sour cream). Use gluten-free tortillas for those with celiac disease or sensitivity.
Overall, sheet pan fajitas align well with various eating patterns, including Mediterranean, DASH, and flexitarian diets. Their emphasis on whole foods, vibrant produce, and healthy fats makes them a smart choice for long-term wellness.
Ingredients
- 1.5 lbs boneless, skinless chicken breasts, flank steak, or large shrimp (peeled and deveined)
- 3 large bell peppers (red, yellow, orange, green), thinly sliced
- 1 large yellow or red onion, thinly sliced
- ¼ cup extra virgin olive oil
- 3 tbsp fresh lime juice (about 1–2 limes)
- 4 garlic cloves, minced
- 1 tbsp chili powder
- 1 tsp ground cumin
- 1 tsp paprika (sweet or smoked)
- ½ tsp onion powder
- ½ tsp garlic powder
- 1 tsp dried oregano
- ½ tsp crushed red pepper flakes (optional)
- 1 tsp kosher salt
- ½ tsp black pepper
- 8–10 medium flour or corn tortillas
- Optional toppings: guacamole, sour cream, pico de gallo, shredded cheese, chopped cilantro, pickled jalapeños, shredded lettuce
Directions
- Preheat oven to 425°F (220°C). Line a large rimmed baking sheet with parchment paper or foil for easy cleanup.
- Slice the chosen protein into thin, even strips (about ½ inch wide). Place in a large bowl.
- In a small bowl, whisk together olive oil, lime juice, minced garlic, chili powder, cumin, paprika, onion powder, garlic powder, oregano, red pepper flakes (if using), salt, and black pepper.
- Pour the marinade over the protein and toss to coat evenly. Let marinate for at least 15 minutes at room temperature or up to 2 hours in the refrigerator.
- While marinating, prepare the bell peppers and onions. Place them in a separate bowl, drizzle with 1–2 tbsp olive oil, and season with a pinch of salt and pepper.
- Spread the marinated protein in the center of the prepared sheet pan. Arrange the peppers and onions around it in a single layer, ensuring space between pieces for proper roasting.
- Roast in the preheated oven for 20–22 minutes for chicken or steak, flipping halfway through. For shrimp, roast for 12–15 minutes, adding them midway if using with slower-cooking meats.
- During the last 5–10 minutes of cooking, place the tortillas in the oven (wrapped in foil) to warm.
- Remove from oven and let rest for 2–3 minutes. Squeeze additional lime juice over the top for brightness.
- Serve immediately with warm tortillas and desired toppings, allowing everyone to assemble their own fajitas.
FAQ
Can I make sheet pan fajitas ahead of time?
Yes! You can prep the vegetables and marinate the protein up to 24 hours in advance. Store separately in airtight containers in the fridge. Assemble and roast when ready to serve.
Can I freeze sheet pan fajitas?
Cooked fajita fillings freeze well for up to 3 months. Cool completely, then store in freezer-safe containers. Thaw in the fridge overnight and reheat in a skillet or microwave. Tortillas are best made fresh.
Why are my fajitas soggy?
This usually happens when the pan is overcrowded or the oven isn’t hot enough. Make sure to spread ingredients in a single layer and preheat the oven fully. Using two pans is better than one overloaded pan.
Can I use frozen vegetables?
It’s not recommended. Frozen peppers and onions release excess water when thawed, leading to steaming instead of roasting. Always use fresh produce for best texture and flavor.
What kind of tortillas work best?
Flour tortillas are traditional and more pliable, but corn tortillas offer a gluten-free, authentic taste. Warm them before serving to prevent cracking.
How do I store leftovers?
Store cooled fajita filling and tortillas separately in airtight containers in the fridge for up to 4 days. Reheat filling in a skillet to restore texture.
Can I cook everything on the same pan if using shrimp and chicken?
To avoid overcooking, add shrimp during the last 10–12 minutes of roasting. Alternatively, cook them on a separate pan for precise timing.
Are sheet pan fajitas healthy?
Yes, when made with lean protein, minimal oil, and plenty of vegetables. They’re naturally low in sugar, high in fiber, and can be tailored to fit keto, gluten-free, or diabetic diets.
Summary
Sheet Pan Fajitas are a flavorful, easy-to-make dinner that brings the vibrant essence of Tex-Mex cuisine straight to your kitchen with minimal effort and cleanup. Packed with colorful vegetables, tender protein, and zesty seasonings, they’re perfect for weeknights, meal prep, or entertaining.