Introduction
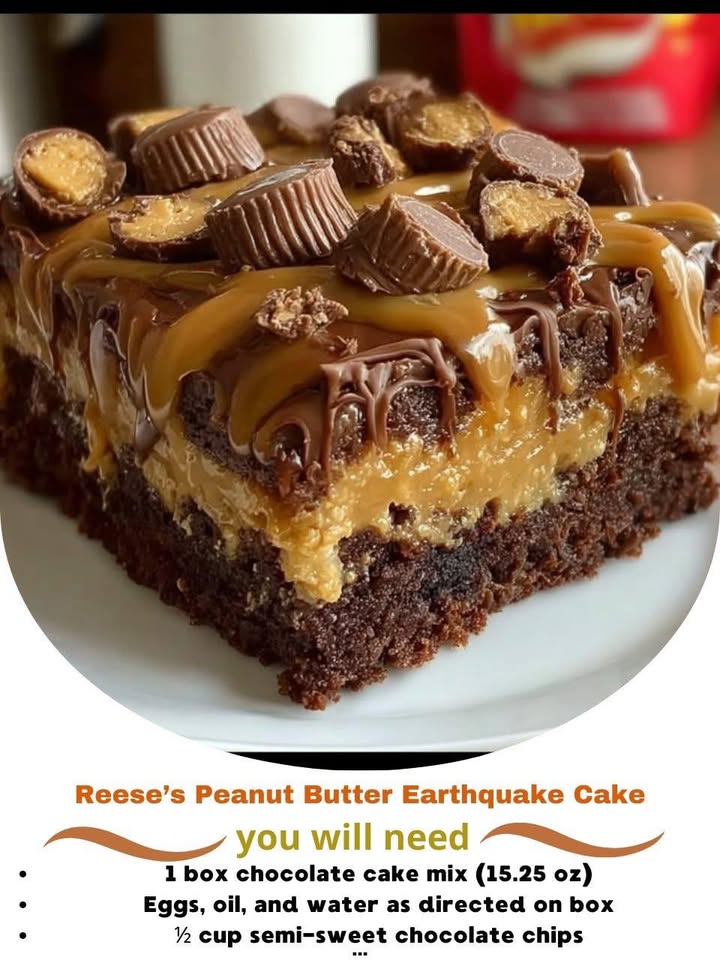
Welcome to the ultimate indulgence—Reese’s Peanut Butter Earthquake Cake! This isn’t just another dessert; it’s a seismic event of flavor, texture, and pure nostalgic joy. Imagine a moist, golden-brown cake base that ripples with tremors of creamy peanut butter, gooey chocolate, crunchy Reese’s cups, and a signature “earthquake” crackle on top—cracks so dramatic they look like tectonic plates shifting under layers of decadence. Born from the viral trend of “earthquake cakes” (known for their dramatic cracked surfaces caused by intentional structural instability), this version elevates the concept with America’s most beloved peanut butter–chocolate duo: Reese’s. Whether you’re baking for game day, a birthday bash, a holiday potluck, or simply to treat yourself after a long week, this cake delivers showstopping appeal, crowd-pleasing familiarity, and an unforgettable sensory experience—rich, salty-sweet, chewy, crisp, and impossibly comforting all at once.
The History
The Reese’s Peanut Butter Earthquake Cake is a relatively modern confection born in the early 2010s from the fertile ground of food blogging, Pinterest virality, and recipe remix culture. Its lineage traces back to two iconic American desserts: the classic Blondie (a dense, buttery, brown-sugar-based bar cookie) and the Earthquake Cake phenomenon—a clever, chemistry-driven dessert where a layer of cream cheese mixture is poured over a yellow or white cake batter, then topped with crushed cookies or candy. During baking, differential expansion rates between layers cause dramatic fissures—hence the “earthquake” effect. Early versions used Oreos or Nutter Butters, but as Reese’s Peanut Butter Cups surged in cultural dominance (over 400 million cups sold annually in the U.S. alone), home bakers began substituting them for maximum flavor synergy. The first documented iteration appeared on Taste of Home’s community platform in 2013, quickly followed by viral posts on Facebook groups and food-focused subreddits. By 2016, major brands—including Hershey’s official baking site—had published optimized, tested versions, cementing its status as a staple in the “funfetti generation” of desserts. It’s more than a cake—it’s edible pop culture, a delicious convergence of snack food innovation, social media storytelling, and Midwestern baking tradition.
Ingredients Breakdown
Every component in this cake serves a precise functional and sensory role—no ingredient is arbitrary. Let’s explore each element in depth:
- Yellow Cake Mix (18.25 oz box): The structural backbone—provides reliable leavening (baking powder/soda), emulsifiers for moisture retention, and a neutral, slightly sweet base that doesn’t compete with Reese’s bold profile. Opt for a name-brand mix (Duncan Hines or Betty Crocker) with real vanilla for best crumb integrity.
- Packaged Instant Vanilla Pudding Mix (3.4 oz): Not just for flavor—this is your secret textural engineer. The starches (modified cornstarch, dextrose) thicken the batter, inhibit gluten overdevelopment, and lock in moisture during baking. Avoid sugar-free or cook-and-serve varieties—they lack the rapid-thickening agents needed.
- Eggs (3 large): Provide structure via protein coagulation, richness through yolks, and lift via air incorporation. Room-temperature eggs blend more uniformly, preventing curdling in the cream cheese layer.
- Vegetable Oil (½ cup): A high-ratio fat that yields unparalleled tenderness and shelf stability. Unlike butter, oil remains liquid at room temperature, ensuring the cake stays moist for up to 5 days. Canola or grapeseed oil are ideal for neutral flavor.
- Water (1 cup, lukewarm): Hydrates dry ingredients and activates leaveners. Lukewarm (not hot) prevents premature pudding gelation and ensures even mixing.
- Cream Cheese (8 oz, full-fat, softened): The “earthquake” catalyst. Full-fat cream cheese provides the necessary density and fat content to create thermal resistance—when baked atop the lighter cake batter, it expands slower, causing controlled fracturing. Low-fat versions contain gums and stabilizers that inhibit cracking and yield rubbery texture.
- Granulated Sugar (½ cup): Sweetens and tenderizes the cream cheese layer while aiding in browning and surface caramelization.
- Vanilla Extract (1 tsp, pure): Enhances aromatic complexity and balances peanut butter’s earthiness. Imitation vanilla lacks nuance and can taste medicinal under heat.
- Reese’s Peanut Butter Cups (18–24 standard cups, unwrapped & halved): The star—and the seismic trigger. Halving exposes more surface area for melting, allowing warm, viscous peanut butter to seep into cracks. Mini cups work but yield less visual impact; king-size cups may overwhelm structure. Always use original milk chocolate (not white or dark) for authentic contrast.
- Chopped Reese’s Pieces (¾ cup): Adds crunch, color, and bursts of peanut butter flavor without structural weight. Their candy shell resists full melting, creating delightful textural punctuation.
- Unsalted Butter (¼ cup, melted): Brushed over the top pre-bake to encourage deep browning, glossy sheen, and subtle richness. Salted butter risks oversalting given peanut butter’s inherent sodium.
- Optional Garnishes: Flaky sea salt (Maldon), extra Reese’s Pieces, drizzled melted chocolate (milk or peanut butter), chopped roasted peanuts, or a scoop of vanilla bean ice cream for à la mode service.
Step-by-Step Recipe
This method prioritizes precision, timing, and technique to maximize crack formation and flavor layering. Follow in order—deviations compromise the earthquake effect.
- Preheat & Prep: Position oven rack in center position. Preheat to 350°F (177°C). Generously grease a 9×13-inch metal baking pan (non-stick spray + light dusting of flour works best—glass pans conduct heat differently and inhibit cracking). Line bottom with parchment paper for foolproof removal.
- Mix the Cake Batter: In a large bowl, whisk together dry cake mix and instant pudding mix until fully homogenous (≈30 seconds). Add eggs, oil, and lukewarm water. Beat with electric mixer on medium speed for 2 minutes—scraping bowl halfway. Batter should be thick, glossy, and free of lumps. Overmixing develops gluten and causes toughness; undermixing leaves dry pockets.
- Layer One — Cake Base: Pour batter into prepared pan. Use an offset spatula to spread evenly, smoothing corners and edges. Tap pan sharply on counter 3 times to release air bubbles and ensure level surface. Set aside.
- Prepare Cream Cheese Layer: In a separate medium bowl, beat softened cream cheese with granulated sugar using mixer on medium until completely smooth and lump-free (1 minute). Add vanilla; beat 15 seconds more. Mixture should be velvety—not runny or grainy.
- Layer Two — Cream Cheese Blanket: Spoon cream cheese mixture evenly over cake batter. Gently spread with spatula to within ¼ inch of pan edges. Do not swirl—keep layers distinct. Refrigerate uncovered for 15 minutes. This chilling step is non-negotiable: it firms the cream cheese, increasing thermal contrast with the cake batter during baking—essential for dramatic cracking.
- Add Candy Toppings: Remove pan from fridge. Arrange halved Reese’s cups cut-side down in a tight, overlapping grid pattern (e.g., 4 rows × 5 columns = 20 cups). Press gently so bases adhere. Sprinkle chopped Reese’s Pieces evenly over entire surface. Drizzle melted butter evenly across top (use a spoon or pastry brush).
- Bake with Precision: Place pan in preheated oven. Bake for 42–48 minutes. Key visual cues: edges should be deeply golden and pulling slightly from pan; center should appear set but still have a subtle jiggle (like firm Jell-O); and deep, jagged cracks should radiate from the center outward—some up to ¼-inch wide. Rotate pan 180° at 30 minutes for even baking. Do not open oven door before 35 minutes—temperature drops halt crack formation.
- Cool Strategically: Remove pan from oven. Cool on wire rack for 20 minutes—this allows steam to escape and sets the structure. Then, refrigerate, uncovered, for at least 2 hours (ideally 4). Chilling firms the cream cheese layer, solidifies peanut butter pools, and transforms texture from fragile to sliceable. Skipping chill results in crumbling and sliding layers.
- Final Touch & Serve: Run thin knife around edges. Lift cake out using parchment overhang. Place on cutting board. For clean slices, dip knife in hot water and wipe dry between cuts. Garnish as desired. Serve at cool room temperature (not straight from fridge) for optimal flavor release.
Tips
- Crack Guarantee Tip: If cracks don’t form, your cream cheese layer was too warm or too thin. Next time, chill 20 minutes and use ¼ cup less water in batter for thicker consistency.
- Room Temperature Rule: All dairy (cream cheese, eggs, even butter for brushing) must be truly room temp (68–72°F). Cold ingredients cause separation and uneven baking.
- Measuring Matters: Spoon dry ingredients into measuring cups and level with straight edge—don’t scoop directly from bag. 1 cup of flour can vary by 30g if packed!
- Pan Choice Science: Aluminum pans heat faster and more evenly than stainless steel or glass, promoting uniform cracking. Dark non-stick pans? Reduce temp to 325°F and add 3–5 minutes to bake time.
- No-Spill Assembly: Place pan on a rimmed baking sheet before adding toppings—catches butter drips and simplifies cleanup.
- Flavor Boosters: Add 1 tbsp peanut butter to cream cheese layer for intensified nuttiness. Or stir ½ tsp cinnamon into cake batter for warmth.
- Storage Hack: Store covered in fridge for up to 5 days. To refresh, microwave individual slices 8–10 seconds—melts peanut butter just enough for “fresh-baked” feel.
- Freezing Success: Freeze uncut, wrapped tightly in plastic + foil, for up to 3 months. Thaw overnight in fridge, then bring to cool room temp before slicing.
- Altitude Adjustment: Above 3,000 ft? Add 1 tbsp water to batter, reduce sugar in cream cheese layer by 1 tbsp, and increase bake time by 5–7 minutes.
- Photo-Ready Finish: Dust with powdered sugar using a fine-mesh sieve *just* before serving—prevents sogginess. Add fresh Reese’s Pieces on top for vibrant color contrast.
Variations and Customizations
This cake is a canvas—adaptable for dietary needs, seasonal themes, global flavors, and pantry improvisation:
- Gluten-Free Version: Use certified GF yellow cake mix (King Arthur or Pillsbury) + GF instant pudding. Ensure Reese’s cups are labeled GF (U.S. standard cups are, but verify packaging—some international versions contain barley grass).
- Vegan Earthquake: Substitute flax eggs (3 tbsp ground flax + 9 tbsp water, rested 10 min), vegan butter (Miyoko’s), silken tofu blended with lemon juice for cream cheese layer, and dairy-free Reese’s-style cups (Justin’s Peanut Butter Cups or Unreal Dark Chocolate Peanut Butter Cups).
- Mini Mason Jar Edition: Portion batter into 8 oz mason jars (½ full), top with 1 tsp cream cheese mix, 1 halved cup, and pieces. Bake at 350°F for 28–32 minutes. Perfect for gifts or portion control.
- S’mores Seismic: Replace half the Reese’s cups with mini marshmallows and graham cracker crumbs. Add ¼ cup chocolate chips to batter.
- Spiced Chai Variation: Infuse ½ cup water with 2 chai tea bags (steep 5 min, cool), use in batter. Add 1 tsp ground ginger + ¼ tsp cardamom to cream cheese layer.
- White Chocolate Raspberry: Swap Reese’s for white chocolate chunks and freeze-dried raspberries. Add 1 tsp raspberry extract to cream cheese layer.
- Protein-Packed: Stir 2 scoops vanilla whey protein into dry cake mix. Use Greek yogurt (¼ cup) in place of 2 tbsp water.
- Boozy Upgrade: Add 2 tbsp bourbon to cream cheese layer and 1 tbsp to batter. Garnish with candied pecans.
- Kid’s Birthday Blast: Press colorful sprinkles into top before baking. Use peanut butter cup-shaped silicone molds for individual servings.
- Low-Sugar Adaptation: Use sugar-free cake mix, sugar-free pudding, and monk fruit-sweetened Reese’s alternatives (like SmartSweets Peanut Butter Bites). Note: Cracking may be less pronounced due to altered starch behavior.
Health Considerations and Nutritional Value
While undeniably indulgent, understanding the nutritional profile empowers mindful enjoyment. Per standard 2″×2″ slice (1/16th of recipe, ≈185g):
- Calories: ≈420–460 kcal (varies by brand, oil type, and cup count)
- Total Fat: 24–28g (Saturated: 9–12g — primarily from palm kernel oil in Reese’s, butter, and cream cheese)
- Carbohydrates: 48–54g (Dietary Fiber: 1–2g; Sugars: 32–38g — mostly added sugars from cake mix, pudding, Reese’s, and frosting)
- Protein: 5–7g (modest contribution from eggs, cream cheese, and peanut butter)
- Sodium: 320–410mg (cake mix and Reese’s contribute significantly—check labels for low-sodium alternatives)
- Vitamins/Minerals: Contains calcium (cream cheese), vitamin E (peanut butter), and small amounts of magnesium and niacin. Not a significant source of micronutrients relative to calorie load.
Dietary Notes:
- Allergens: Contains peanuts, milk, eggs, soy (lecithin in chocolate), wheat (gluten), and often tree nuts (cross-contamination warning on Reese’s packaging).
- Heart Health: High saturated fat and added sugar exceed American Heart Association daily limits (13g sat fat, 25g added sugar for women). Enjoy occasionally—not daily.
- Blood Sugar Impact: Rapid glycemic response due to refined carbs and sugar. Pair with a protein-rich snack (e.g., Greek yogurt) or serve post-exercise to mitigate spikes.
- Portion Mindfulness: The visual drama encourages larger servings. Pre-cut into 16 squares and store extras out of sight to avoid mindless eating.
- Better-For-You Swaps: Use avocado oil (monounsaturated fat), reduce sugar in cream cheese layer by 2 tbsp, choose dark chocolate Reese’s (higher cocoa, lower sugar), and add 2 tbsp ground flaxseed to batter for fiber and omega-3s.
Ingredients
- 1 (18.25 oz) box yellow cake mix (plus ingredients listed on box—typically eggs, oil, water)
- 1 (3.4 oz) box instant vanilla pudding mix
- 3 large eggs, room temperature
- ½ cup vegetable oil (canola or grapeseed)
- 1 cup lukewarm water (about 105°F)
- 1 (8 oz) package full-fat cream cheese, softened
- ½ cup granulated sugar
- 1 teaspoon pure vanilla extract
- 18–24 standard Reese’s Peanut Butter Cups, unwrapped and halved
- ¾ cup Reese’s Pieces, chopped
- ¼ cup unsalted butter, melted
- Flaky sea salt, for garnish (optional)
Directions
- Preheat oven to 350°F (177°C). Grease a 9×13-inch metal baking pan and line bottom with parchment paper.
- In a large bowl, whisk cake mix and pudding mix until combined. Add eggs, oil, and water; beat with electric mixer on medium for 2 minutes until smooth.
- Pour batter into prepared pan and smooth surface. Tap pan firmly on counter 3 times.
- In another bowl, beat cream cheese, sugar, and vanilla until smooth (1 minute). Spread evenly over batter. Refrigerate 15 minutes.
- Arrange halved Reese’s cups cut-side down over cream cheese layer. Sprinkle with Reese’s Pieces. Drizzle melted butter evenly.
- Bake 42–48 minutes until edges are golden, center is set with slight jiggle, and deep cracks appear.
- Cool on wire rack 20 minutes. Refrigerate uncovered 2–4 hours minimum.
- Lift cake using parchment. Cut with hot, wiped knife. Serve cool room temperature.
FAQ
- Q: Why didn’t my cake crack?
- A: Most common causes: cream cheese layer wasn’t chilled long enough, oven temperature was too low, pan was glass (slower heat transfer), or batter was overmixed. Try chilling 20 minutes and using aluminum pan next time.
- Q: Can I make this ahead?
- A: Absolutely! Bake and chill up to 2 days ahead. Keep covered in fridge. Let sit at room temp 15 minutes before serving for best texture.
- Q: My cracks filled in after cooling—is that normal?
- A: Minor filling is typical as peanut butter cools and thickens, but deep fissures should remain visible. If cracks vanish entirely, batter was too wet—reduce water by 2 tbsp next batch.
- Q: Can I use homemade cake batter instead of boxed?
- A: Yes—but adjust ratios. Use a high-ratio yellow cake recipe (with extra egg yolks and oil) and add ¼ cup instant pudding mix to mimic the moisture-locking effect. Expect longer bake time.
- Q: How do I prevent the Reese’s cups from sinking?
- A: Press them gently into the cream cheese layer—not the batter. Their weight naturally anchors them during baking. Halving also increases surface adhesion.
- Q: Is there a way to make it less sweet?
- A: Reduce sugar in cream cheese layer to ⅓ cup, use dark chocolate Reese’s (lower sugar), skip optional butter drizzle, and serve with tart fruit compote.
- Q: Can I freeze leftovers?
- A: Yes! Wrap tightly in plastic wrap, then foil. Freeze up to 3 months. Thaw overnight in fridge, then bring to cool room temp before serving.
- Q: What if I don’t have Reese’s Pieces?
- A: Substitute with chopped roasted peanuts, mini chocolate chips, or even crushed pretzels for sweet-salty contrast. Avoid candy-coated chocolates that bleed color.
- Q: Why does the recipe specify “lukewarm” water?
- A: Warm water (105°F) optimally activates baking powder without cooking eggs or causing pudding to clump. Cold water slows leavening; hot water cooks egg proteins prematurely.
- Q: Can I double the recipe for a larger crowd?
- A: Yes—double all ingredients and use two 9×13 pans. Bake time remains the same, but rotate pans top-to-bottom at 30 minutes for even baking.
Summary
Reese’s Peanut Butter Earthquake Cake is a masterclass in playful baking science—where thermal physics, starch chemistry, and childhood nostalgia collide to create a visually stunning, texturally dynamic, and deeply satisfying dessert defined by its dramatic cracks, molten peanut butter rivers, and rich chocolate-peanut harmony.
With its forgiving box-mix foundation, customizable variations, and make-ahead versatility, it’s equal parts celebration centerpiece and weeknight treat—proving that sometimes, the most memorable desserts aren’t just eaten… they’re experienced like a delicious, edible natural disaster.