Introduction
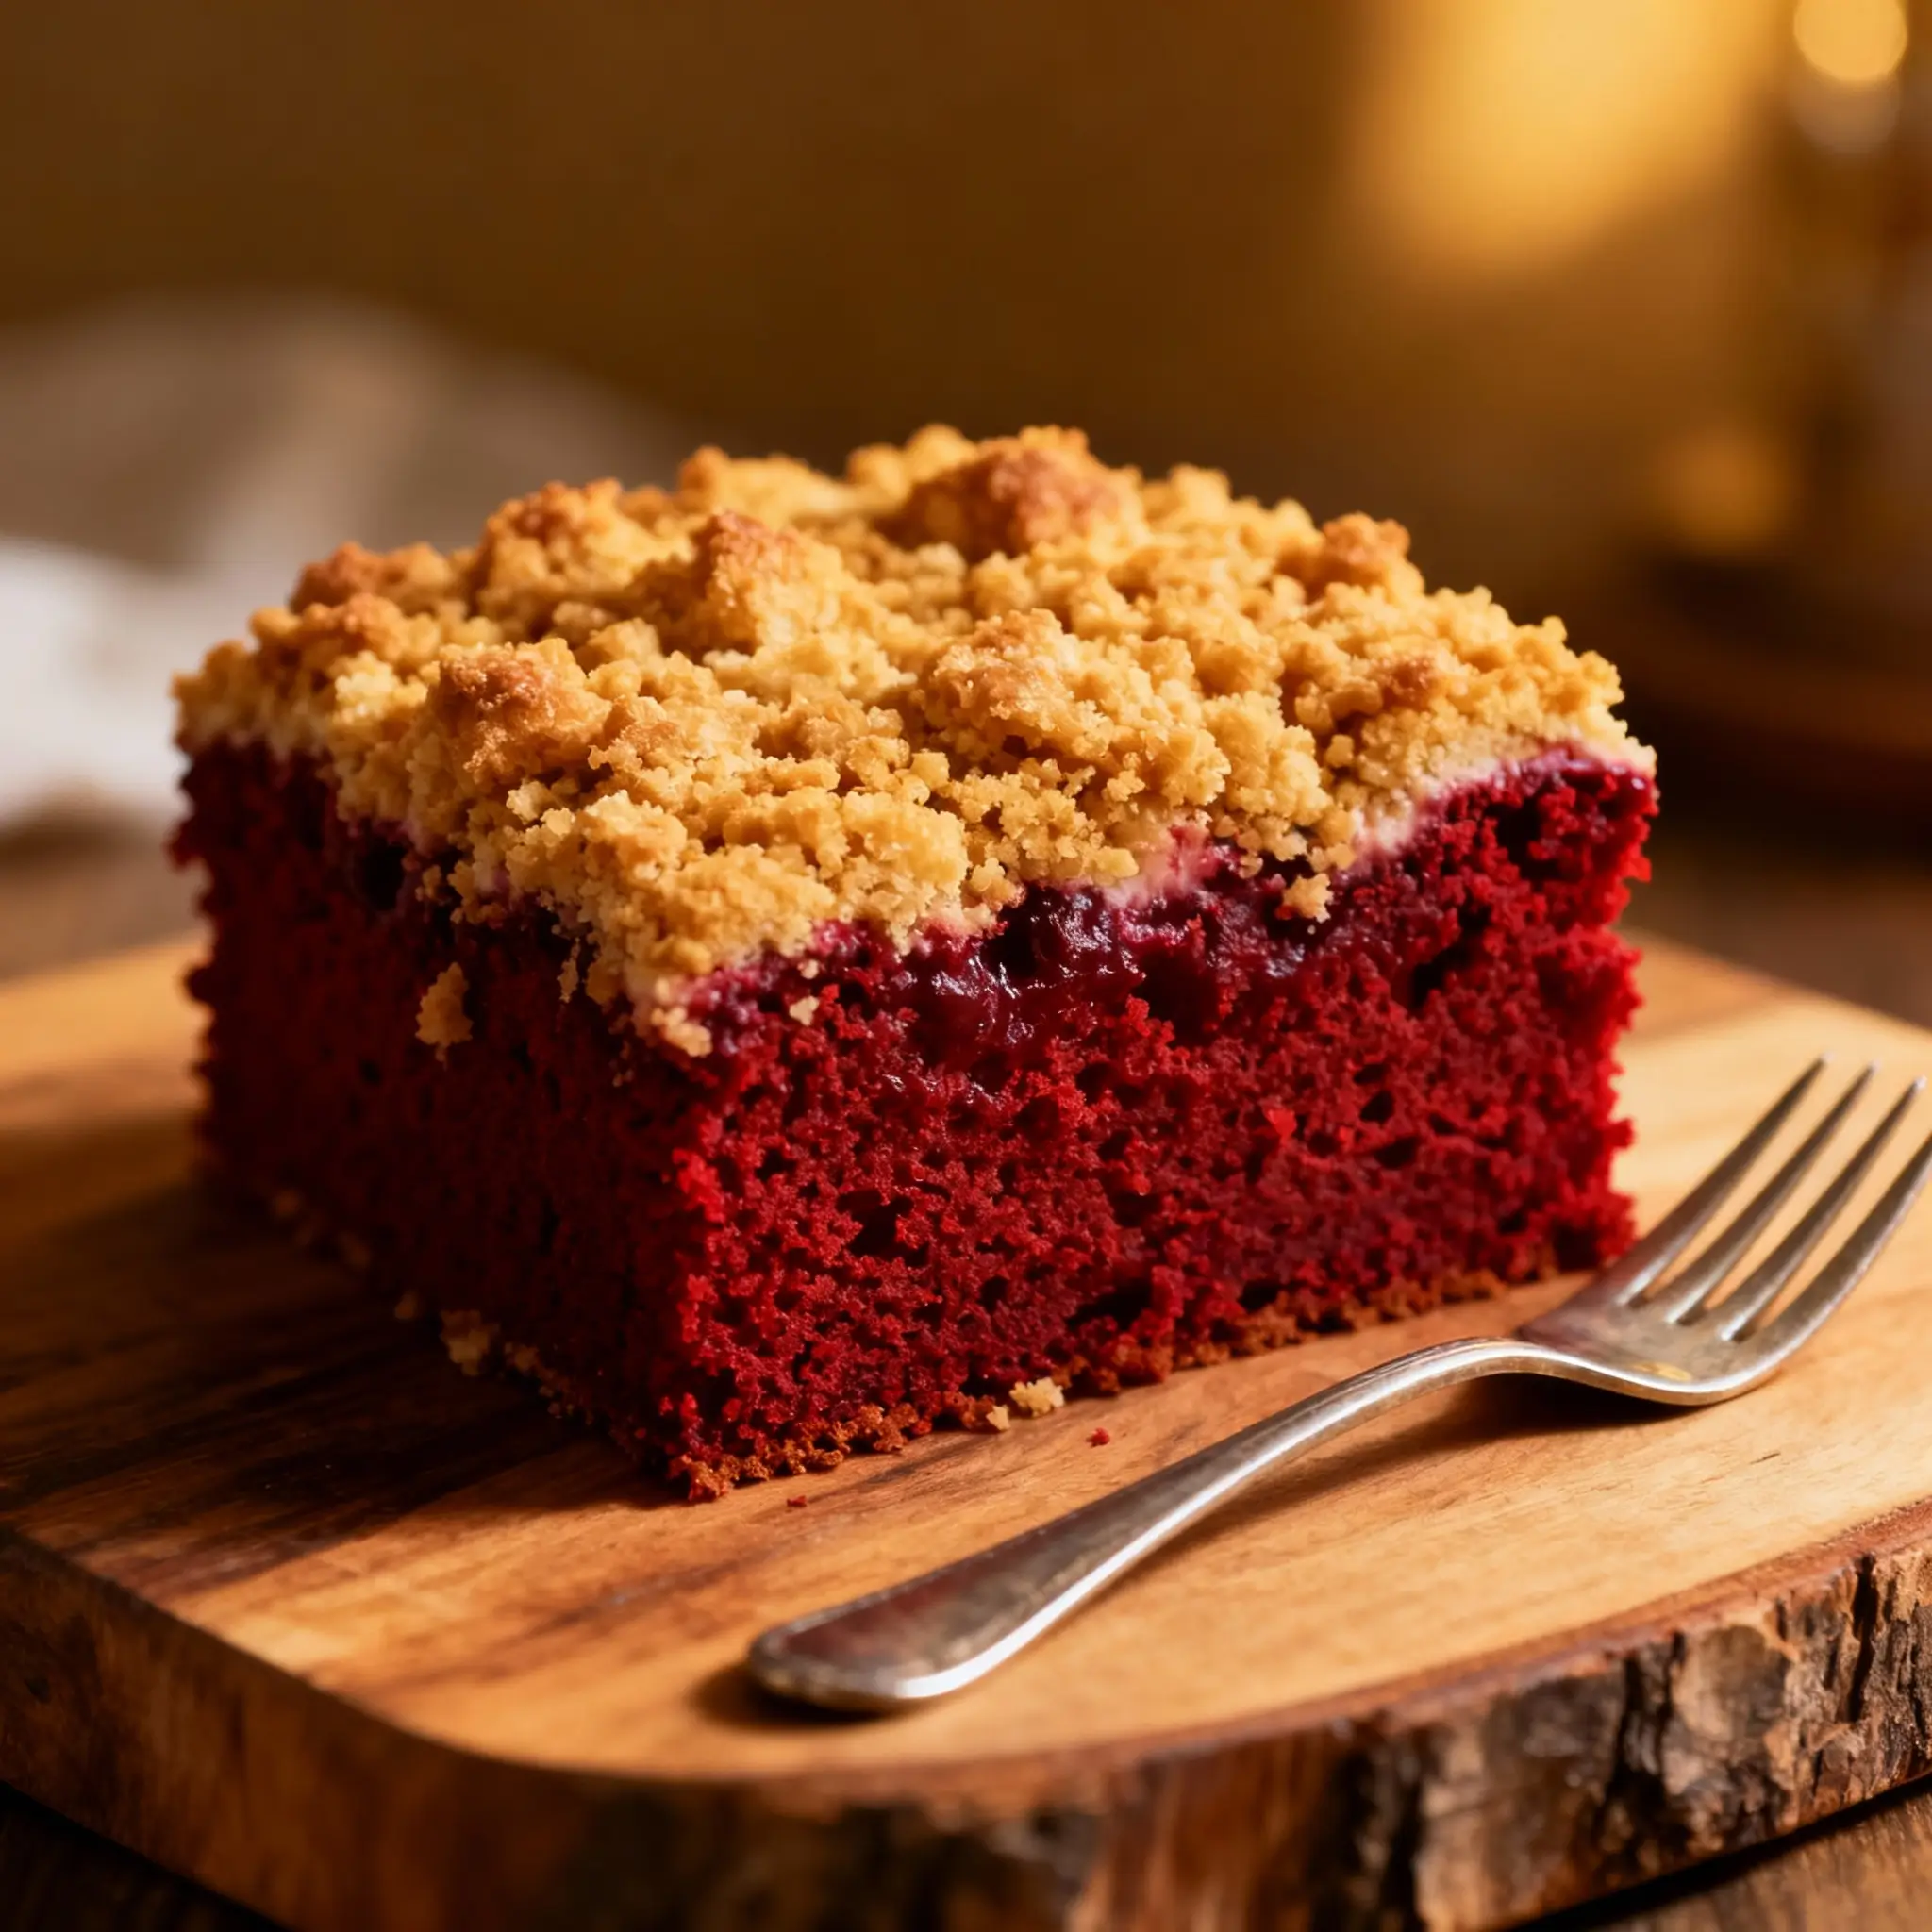
The Red Velvet Streusel Cake is a decadent fusion of Southern charm and modern baking elegance, combining the rich, velvety texture of red velvet cake with the buttery crunch of a classic streusel topping. This dessert has become a staple at family gatherings, holiday celebrations, and special occasions due to its striking appearance and irresistible flavor. With its deep crimson crumb, moist interior, and golden-brown sugary crust, this cake offers a sensory experience that delights both the eyes and the palate. Whether you’re a seasoned baker or just beginning your journey into the world of desserts, this recipe promises to elevate your baking game while remaining accessible and enjoyable.
The History
The origins of red velvet cake trace back to the early 20th century in the American South, where it first gained popularity through regional cookbooks and culinary traditions. The name “red velvet” originally referred to the soft, fine texture of the cake—similar to velvet fabric—rather than its color. Early versions derived their faint reddish hue from a reaction between natural cocoa powder and acidic ingredients like buttermilk and vinegar. This chemical interaction produced a subtle red tint, which was later enhanced by food coloring for dramatic effect.
The cake’s rise to fame was further propelled by the Adams Extract Company, which reportedly created the recipe as a marketing strategy to sell more red food dye during the Great Depression. Over time, red velvet became associated with luxury and celebration, often served at weddings and holidays. The addition of cream cheese frosting cemented its status as a classic American dessert.
The incorporation of streusel—a German-inspired crumbly topping made from butter, sugar, and flour—into red velvet cake is a more recent innovation. Bakers began experimenting with textural contrasts, leading to the creation of the Red Velvet Streusel Cake. This hybrid version combines the smoothness of traditional red velvet with the rustic crunch of streusel, offering a delightful contrast that sets it apart from its cream cheese-topped counterpart. Today, the Red Velvet Streusel Cake stands as a beloved variation, celebrated for its balance of flavors and textures.
Ingredients Breakdown
To create the perfect Red Velvet Streusel Cake, each ingredient plays a crucial role in building flavor, texture, and structure. Here’s an in-depth look at what goes into this indulgent treat:
For the Cake:
- All-Purpose Flour: Provides the foundational structure of the cake. It contains gluten-forming proteins that give the cake its tender yet stable crumb.
- Cocoa Powder (Unsweetened, Natural): Adds depth of chocolate flavor without overpowering the delicate red velvet profile. Natural cocoa reacts with acidic ingredients to enhance color and leavening.
- Baking Soda: Acts as a leavening agent when combined with acid (buttermilk and vinegar), helping the cake rise evenly.
- Salt: Enhances overall flavor and balances sweetness.
- Butter (Unsalted, Room Temperature): Contributes richness and moisture. Creaming it with sugar aerates the batter, resulting in a light texture.
- Granulated Sugar: Sweetens the cake and helps retain moisture. It also aids in creaming the butter for a fluffy consistency.
- Eggs (Large, Room Temperature): Bind the ingredients together and add structure and moisture. Room temperature eggs incorporate more smoothly into the batter.
- Buttermilk: Adds tanginess and tenderness. Its acidity activates the baking soda and enhances the red color naturally.
- White Vinegar: Works with buttermilk and cocoa to deepen the red hue and improve leavening.
- Vanilla Extract: Enhances the overall aroma and complements the cocoa and butter notes.
- Red Food Coloring (Liquid or Gel): Gives the cake its iconic vibrant red shade. Gel coloring is preferred for intense color without altering liquid ratios.
For the Streusel Topping:
- Flour: Forms the base of the crumbly mixture.
- Brown Sugar (Packed): Adds molasses flavor and promotes caramelization during baking, giving the streusel its golden, crunchy texture.
- Granulated Sugar: Balances sweetness and contributes to crispness.
- Cinnamon: Introduces warmth and spice, enhancing the complexity of the topping.
- Salted Butter (Cold, Cubed): When cut into the dry ingredients, creates flaky, clumpy pieces that bake into crisp clusters.
- Chopped Pecans or Walnuts (Optional): Add nuttiness and extra crunch for those who enjoy a more textured topping.
Step-by-Step Recipe
Follow these detailed instructions to create a luscious Red Velvet Streusel Cake with a perfectly balanced crumb and a golden, buttery topping.
- Preheat Oven & Prepare Pan: Preheat your oven to 350°F (175°C). Grease a 9×13-inch rectangular baking pan or a 9-inch round springform pan and line it with parchment paper for easy removal. Set aside.
- Make the Streusel Topping: In a medium bowl, combine ½ cup all-purpose flour, ⅓ cup packed brown sugar, 2 tablespoons granulated sugar, ½ teaspoon ground cinnamon, and a pinch of salt. Cut in ¼ cup (4 tablespoons) cold cubed butter using a pastry cutter or fork until the mixture resembles coarse crumbs with some pea-sized clumps. If using nuts, stir in ¼ cup chopped pecans or walnuts. Place the bowl in the refrigerator to chill while you prepare the cake batter.
- Mix Dry Ingredients: In a large mixing bowl, whisk together 2 cups all-purpose flour, 2 tablespoons unsweetened natural cocoa powder, 1 teaspoon baking soda, and ½ teaspoon salt. Ensure there are no lumps and the ingredients are evenly distributed.
- Cream Butter and Sugar: In a separate large bowl (or stand mixer fitted with paddle attachment), beat ½ cup (1 stick) softened unsalted butter with 1 ½ cups granulated sugar on medium speed for 3–4 minutes until light and fluffy. Scrape down the sides of the bowl as needed.
- Add Eggs One at a Time: Add two large room-temperature eggs, one at a time, beating well after each addition. Mix in 1 teaspoon vanilla extract.
- Incorporate Wet Ingredients Alternately: Begin adding the dry ingredients in three parts, alternating with buttermilk. Start and end with the dry mix. Pour in 1 cup of buttermilk in two additions. Mix on low speed just until combined after each addition—do not overmix.
- Add Acidic Components: In a small bowl, combine 1 tablespoon white vinegar with 1 teaspoon liquid red food coloring (or ¼ teaspoon gel coloring). Stir briefly, then pour into the batter. Mix on low speed for about 10 seconds until the color is evenly distributed. The batter will thicken slightly and may turn a deeper red.
- Pour Batter into Pan: Transfer the smooth, velvety batter into the prepared baking pan, spreading it evenly with a spatula to ensure uniform thickness.
- Top with Streusel: Remove the chilled streusel from the refrigerator. Sprinkle it generously and evenly over the surface of the batter. Gently press down to ensure some contact, but avoid submerging it completely.
- Bake Until Done: Place the pan in the preheated oven and bake for 35–45 minutes (for round pan) or 40–50 minutes (for rectangular pan), or until a toothpick inserted into the center comes out clean or with a few moist crumbs. The top should be golden brown and the cake should spring back lightly when touched.
- Cool Completely: Allow the cake to cool in the pan on a wire rack for at least 30 minutes. For best results and easier slicing, let it cool completely before serving. If using a springform pan, run a knife around the edges before releasing the clamp.
- Serve: Slice into squares or wedges and serve plain or with a dusting of powdered sugar, a dollop of whipped cream, or a scoop of vanilla ice cream.
Tips
- Use Room Temperature Ingredients: Cold eggs or butter can cause the batter to curdle or result in a dense cake. Take them out of the fridge 30–60 minutes before baking.
- Don’t Overmix the Batter: Once you start adding flour, mix only until ingredients are incorporated. Overmixing develops gluten and leads to a tough texture.
- Gel Food Coloring is Best: It provides a vibrant red hue without adding excess liquid. Liquid coloring may require larger quantities, which can affect consistency.
- Chill the Streusel: Keeping the topping cold ensures it maintains its crumbly structure and doesn’t melt into the batter before baking.
- Even Distribution of Streusel: Use your fingers to scatter the topping evenly across the batter for consistent coverage and maximum crunch in every bite.
- Check Doneness Early: Ovens vary, so begin checking the cake 5 minutes before the minimum bake time. Overbaking dries out red velvet quickly.
- Cool Before Cutting: A fully cooled cake holds its shape better and yields cleaner slices. For neat presentation, use a sharp knife dipped in hot water.
- Storage Tip: Store leftovers covered at room temperature for up to 2 days or refrigerate for up to 5 days. Bring to room temperature before serving for best texture.
Variations and Customizations
The beauty of the Red Velvet Streusel Cake lies in its versatility. You can adapt it to suit dietary needs, seasonal themes, or personal taste preferences. Consider these creative variations:
- Lemon-Zested Version: Add 1 tablespoon of fresh lemon zest to the cake batter for a bright, citrusy twist that cuts through the richness.
- Spiced Streusel: Boost the topping with a pinch of nutmeg, ginger, or cardamom for a warm, autumnal flair.
- Chocolate Swirl: Melt ¼ cup dark chocolate and drizzle it into the batter before adding the streusel. Use a knife to swirl it gently for a marbled effect.
- Gluten-Free Option: Substitute the all-purpose flour with a high-quality gluten-free flour blend (with xanthan gum included). Test brands like Bob’s Red Mill 1:1 Baking Flour for best results.
- Dairy-Free Adaptation: Replace butter with vegan butter (e.g., Earth Balance), use almond or oat milk with 1 tablespoon lemon juice instead of buttermilk, and choose dairy-free chocolate if adding swirls.
- Mini Mason Jar Cakes: Divide the batter among greased mason jars or ramekins, top with streusel, and bake at 350°F for 20–25 minutes. Perfect for individual servings or gifts.
- Holiday Edition: Add red and green sprinkles to the streusel or pipe festive designs with white chocolate after cooling.
- Nut-Free Version: Simply omit nuts from the streusel or replace with toasted oats or crushed graham crackers for crunch.
- Alcohol-Infused: Soak the finished cake with a simple syrup made from ¼ cup water, ¼ cup sugar, and 1–2 tablespoons bourbon or amaretto for an adult-friendly dessert.
- Double-Layer Cake: Bake the batter in two 9-inch round pans and layer them with cream cheese frosting between and on top, then sprinkle the streusel over the final layer for a hybrid masterpiece.
Health Considerations and Nutritional Value
While the Red Velvet Streusel Cake is undeniably a treat, understanding its nutritional content can help you enjoy it mindfully. A typical slice (1/12 of a 9×13-inch cake) contains approximately:
- Calories: 380–420 kcal
- Total Fat: 18–22g (Saturated Fat: 10–12g)
- Cholesterol: 60–70mg
- Sodium: 250–300mg
- Total Carbohydrates: 50–55g (Dietary Fiber: 1–2g, Sugars: 30–35g)
- Protein: 4–5g
This cake is high in sugar and saturated fat primarily due to butter, sugar, and eggs. However, it contains minimal fiber and limited micronutrients unless fortified ingredients are used. To make it slightly healthier:
- Reduce Sugar: Decrease granulated sugar in the cake by ¼ cup and use a sugar substitute like erythritol or monk fruit blend designed for baking.
- Whole Wheat Option: Replace half the all-purpose flour with whole wheat pastry flour for added fiber and nutrients.
- Lower-Fat Dairy: Use reduced-fat buttermilk or Greek yogurt alternative, though this may affect texture slightly.
- Portion Control: Serve smaller slices and pair with fresh berries to increase volume and nutrition without adding many calories.
- Occasional Indulgence: Enjoy this cake as part of a balanced diet rather than a daily dessert. Its richness makes it satisfying even in modest portions.
Note: Those with allergies to dairy, eggs, or gluten should proceed with caution and use appropriate substitutions. Always verify ingredient labels, especially when using food coloring or flavored extracts, which may contain hidden allergens.
Ingredients
Cake:
- 2 cups (250g) all-purpose flour
- 2 tablespoons (8g) unsweetened natural cocoa powder
- 1 teaspoon baking soda
- ½ teaspoon salt
- ½ cup (1 stick / 113g) unsalted butter, softened
- 1 ½ cups (300g) granulated sugar
- 2 large eggs, room temperature
- 1 cup (240ml) buttermilk, room temperature
- 1 teaspoon vanilla extract
- 1 tablespoon white vinegar
- 1–2 teaspoons red food coloring (liquid or gel)
Streusel Topping:
- ½ cup (63g) all-purpose flour
- ⅓ cup (70g) packed brown sugar
- 2 tablespoons (25g) granulated sugar
- ½ teaspoon ground cinnamon
- ¼ teaspoon salt
- ¼ cup (4 tablespoons / 57g) cold salted butter, cubed
- ¼ cup (30g) chopped pecans or walnuts (optional)
Directions
- Preheat oven to 350°F (175°C). Grease and line a 9×13-inch baking pan or 9-inch round springform pan. Set aside.
- To make the streusel, combine flour, brown sugar, granulated sugar, cinnamon, and salt in a bowl. Cut in cold butter using a pastry cutter until crumbly. Stir in nuts if using. Chill in the refrigerator.
- In a large bowl, whisk together flour, cocoa powder, baking soda, and salt.
- In another bowl, beat softened butter and granulated sugar until light and fluffy, about 3–4 minutes.
- Add eggs one at a time, mixing well after each. Stir in vanilla extract.
- Gradually add dry ingredients alternately with buttermilk, starting and ending with dry mix. Mix on low speed just until combined.
- In a small bowl, mix vinegar and red food coloring. Add to batter and mix briefly until color is uniform.
- Pour batter into prepared pan, spreading evenly with a spatula.
- Sprinkle chilled streusel over the top, pressing gently for adherence.
- Bake for 35–50 minutes (depending on pan size) until a toothpick comes out clean.
- Cool in the pan on a wire rack for 30 minutes, then allow to cool completely before slicing.
- Serve as-is or with powdered sugar, whipped cream, or ice cream.
FAQ
Can I make this cake ahead of time?
Yes! Bake and cool the cake completely, then store it covered at room temperature for up to 2 days. For longer storage, refrigerate for up to 5 days or freeze for up to 3 months.
Why is my cake not red enough?
The intensity of color depends on the type of food coloring. Gel coloring gives a deeper hue. Natural cocoa and buttermilk contribute a slight red tone, but for vibrant results, use high-quality red gel paste.
Can I use Dutch-process cocoa?
It’s not recommended. Natural cocoa is acidic and reacts with baking soda and vinegar for proper leavening and color development. Dutch-process is neutral and may alter the chemistry.
How do I store leftover cake?
Keep it in an airtight container at room temperature for 1–2 days. For extended freshness, refrigerate and bring to room temperature before serving.
Can I freeze this cake?
Absolutely. Wrap individual slices tightly in plastic wrap and place in a freezer-safe bag. Thaw overnight in the refrigerator or at room temperature for 2–3 hours.
Why did my streusel sink into the batter?
This usually happens if the streusel wasn’t chilled or if the cake pan was jostled during baking. Make sure the topping is cold and handle the pan gently after assembly.
Is this cake supposed to be dense?
No. A properly made red velvet cake should be moist and tender but light. Overmixing, expired leavening agents, or incorrect measurements can lead to a heavy texture.
Can I add cream cheese frosting?
Of course! While this version features streusel, you can frost cooled slices with homemade cream cheese icing for a hybrid experience.
Summary
The Red Velvet Streusel Cake blends the classic Southern red velvet with a buttery, spiced crumb topping for a dessert that’s rich, moist, and irresistibly textured. Perfect for celebrations or cozy nights, it offers a delicious twist on a timeless favorite.