Introduction
Red Velvet Pancake Bites are a whimsical, bite-sized fusion of two beloved breakfast classics: the rich, velvety allure of red velvet cake and the comforting, fluffy charm of homemade pancakes. These miniature delights—typically 1.5 to 2 inches in diameter—are perfect for brunch buffets, holiday morning spreads, baby showers, Valentine’s Day treats, or even as an elegant after-school snack. With their signature crimson hue, subtle cocoa depth, tangy buttermilk brightness, and creamy cream cheese glaze, Red Velvet Pancake Bites deliver visual drama and layered flavor in every morsel. Unlike traditional pancakes served stacked on a plate, these portable bites are designed for ease—no syrup-dripping, no flipping stress, and zero utensil dependency—making them ideal for entertaining, meal prep, and mindful portion control. Whether you’re a seasoned baker seeking playful innovation or a novice craving approachable elegance, this recipe bridges nostalgia and novelty with irresistible charm.
The History
The origins of Red Velvet Pancake Bites are delightfully modern—a product of culinary cross-pollination rather than centuries-old tradition. To understand their emergence, we must first trace the lineage of their foundational inspirations. Red velvet cake traces its roots to the early 20th century, with documented recipes appearing as early as the 1920s in the United States. Its distinctive color was originally derived from natural anthocyanin pigments in non-Dutched (natural) cocoa reacting with acidic ingredients like vinegar and buttermilk—a chemical reaction that yielded a subtle maroon tint. By the 1940s, especially with the rise of Adams Extract and later food coloring brands, bakers began amplifying the hue with beet juice and, eventually, synthetic red dye #40 for dramatic effect. The cake gained widespread popularity through the Waldorf Astoria Hotel’s legendary (though historically contested) red velvet cake story in the 1950s—and later cemented its status via pop culture, Southern baking traditions, and the cupcake revolution of the early 2000s.
Pancakes, of course, boast millennia of history—from ancient fermented grain gruels in Egypt and China to colonial American johnnycakes and Dutch pannenkoeken. The modern American pancake evolved alongside leavening innovations: pearl ash in the 1700s, baking soda in the 1800s, and double-acting baking powder by the late 19th century. The “bite-sized” pancake concept surged with the rise of mini-muffin tins, silicone molds, and the “fun-size” food trend of the 2010s—spurred by social media demand for photogenic, shareable, and portion-conscious breakfast formats. Red Velvet Pancake Bites first appeared in niche food blogs around 2013–2014, often styled as “red velvet waffle bites” or “pancake poppers,” before evolving into a distinct category with dedicated cookbooks, YouTube tutorials, and even commercial frozen versions launched by brands like Krusteaz and Stonewall Kitchen by 2018. Their ascent reflects broader cultural shifts: the dessertification of breakfast, the elevation of comfort food through technique and presentation, and the growing appetite for customizable, Instagram-ready morning experiences.
Ingredients Breakdown
Every ingredient in Red Velvet Pancake Bites plays a precise functional and sensory role—far beyond mere flavor contribution. Below is a meticulous, chef-level analysis:
- All-Purpose Flour (2 cups): Provides gluten structure and tender crumb. For optimal lift and tenderness, use unbleached flour with ~10–11% protein. Sifting twice ensures even distribution and eliminates lumps that could cause uneven browning or dense pockets.
- Unsweetened Natural Cocoa Powder (¼ cup): Critical for authentic red velvet character—not Dutch-processed, which neutralizes acidity and dulls the color reaction. Natural cocoa contains anthocyanins that interact with acid (buttermilk, vinegar) to deepen the red tone and add nuanced bitterness to balance sweetness.
- Granulated Sugar (¾ cup): Not just for sweetness—sugar tenderizes gluten, retains moisture, aids browning (caramelization), and stabilizes air bubbles during mixing and cooking. A slightly higher ratio than standard pancakes ensures richness without cloyingness.
- Baking Powder (2 tsp) + Baking Soda (½ tsp): A dual-leavening system for maximum height and airy texture. Baking powder provides baseline lift; baking soda reacts instantly with buttermilk’s lactic acid and vinegar’s acetic acid, creating rapid CO₂ release for fine, uniform crumb and enhanced tang.
- Sea Salt (¾ tsp): Enhances all flavors, curbs sweetness perception, and strengthens gluten network subtly. Fine sea salt dissolves more evenly than coarse varieties.
- Buttermilk (1¼ cups, full-fat preferred): The cornerstone of tang, tenderness, and color activation. Its lactic acid tenderizes gluten, activates leaveners, and interacts with cocoa to intensify red tones. Shelf-stable cultured buttermilk works—but avoid “buttermilk substitutes” made with milk + lemon juice for this recipe; they lack consistent acidity and fat content needed for richness and stability.
- Large Eggs (2, room temperature): Emulsify fats and liquids, contribute structure via proteins, add richness via yolks, and trap air for fluffiness. Room temperature ensures uniform batter temperature and optimal leavening gas retention.
- Unsalted Butter (⅓ cup, melted & cooled): Adds mouth-coating richness, golden-brown crust development, and subtle nuttiness. Melted (not browned) butter integrates seamlessly without forming gluten strands; cooling prevents cooking the eggs upon mixing.
- White Vinegar (1 tbsp): A strategic acid booster—amplifies the red hue reaction, sharpens tang to offset sugar, and enhances leavener performance. Apple cider vinegar may impart subtle fruit notes; distilled white is most neutral and reliable.
- Red Food Coloring (1½–2 tbsp liquid or 1 tsp gel): The visual anchor. Gel coloring (like Americolor Super Red or Chefmaster) delivers intense, fade-resistant color with minimal liquid impact—critical for maintaining batter consistency. Liquid coloring requires larger volumes, risking thin batter and steamed (not fried) texture. For natural alternatives: 2 tbsp concentrated beet powder + 1 tsp lemon juice (color will be deeper burgundy, less vibrant red; flavor remains earthy-sweet).
- Vanilla Extract (1½ tsp, pure Madagascar Bourbon): Adds warm, floral complexity and rounds out cocoa’s sharpness. Imitation vanilla lacks depth and can taste medicinal when heated.
- Cream Cheese Glaze (optional but recommended): Made with full-fat brick-style cream cheese (softened), powdered sugar (sifted), whole milk or heavy cream (for silkiness), fresh lemon juice (brightness), and pinch of salt. This isn’t mere garnish—it’s a flavor counterpoint: cool, tart, and luxuriously thick, cutting through sweetness while echoing the tang of buttermilk and vinegar.
Step-by-Step Recipe
- Prep & Preheat: Line a standard 12-cup muffin tin with high-quality silicone mini-muffin liners (or grease thoroughly with clarified butter + cocoa dusting to prevent sticking). Position oven rack in center position. Preheat oven to 375°F (190°C)—not 350°F. The higher temp ensures rapid initial rise and crisp-edged, tender-centered bites. While oven heats, gather all ingredients at room temperature. Sift together flour, cocoa, sugar, baking powder, baking soda, and salt into a large bowl—whisk 30 seconds to fully aerate and combine.
- Wet Ingredients Prep: In a separate 4-cup liquid measuring cup or medium bowl, whisk buttermilk, eggs, melted butter, vinegar, food coloring, and vanilla until completely homogenous—about 45 seconds. The mixture should be uniformly deep red with no streaks. Let rest 2 minutes—this allows cocoa to bloom and acids to begin activating leaveners.
- The Fold (Not Stir!): Pour wet mixture into dry ingredients. Using a flexible silicone spatula, gently fold in a wide, slow figure-eight motion—just until *no dry flour remains*. Expect lumps; overmixing develops gluten = tough, rubbery bites. Total fold time: 12–15 seconds. Batter will be thick, glossy, and pourable—similar to soft-serve ice cream. If too thick, add 1 tsp buttermilk; if too thin, sprinkle in ½ tsp flour and fold once.
- Rest & React: Cover bowl with damp kitchen towel or plastic wrap. Let batter rest 10 minutes at room temperature. This crucial step hydrates flour fully, relaxes gluten, and allows leaveners to generate initial CO₂ bubbles—resulting in dramatically lighter, more uniform rise.
- Portion with Precision: Use a 1.5-tablespoon cookie scoop (or 2-tsp measuring spoon) to portion batter evenly into each liner—fill only ¾ full (≈1.5 tbsp per bite). Smooth tops lightly with damp fingertip for even browning. Tap tin sharply on counter 3 times to release air pockets and settle batter.
- Bake with Discipline: Place tin in preheated oven. Bake 13–15 minutes—do not open oven before 12 minutes. Bites are done when tops spring back to light touch, edges are set and faintly caramelized, and a toothpick inserted in center comes out clean *with moist crumbs* (not wet batter). Overbaking dries them out instantly.
- Cool Strategically: Remove tin from oven. Let bites cool in tin for 3 minutes—this sets structure. Then, transfer to a wire rack using a silicone-tipped tweezers or offset spatula. Cool completely (20+ minutes) before glazing. Warm bites absorb glaze; cold bites hold it luxuriously.
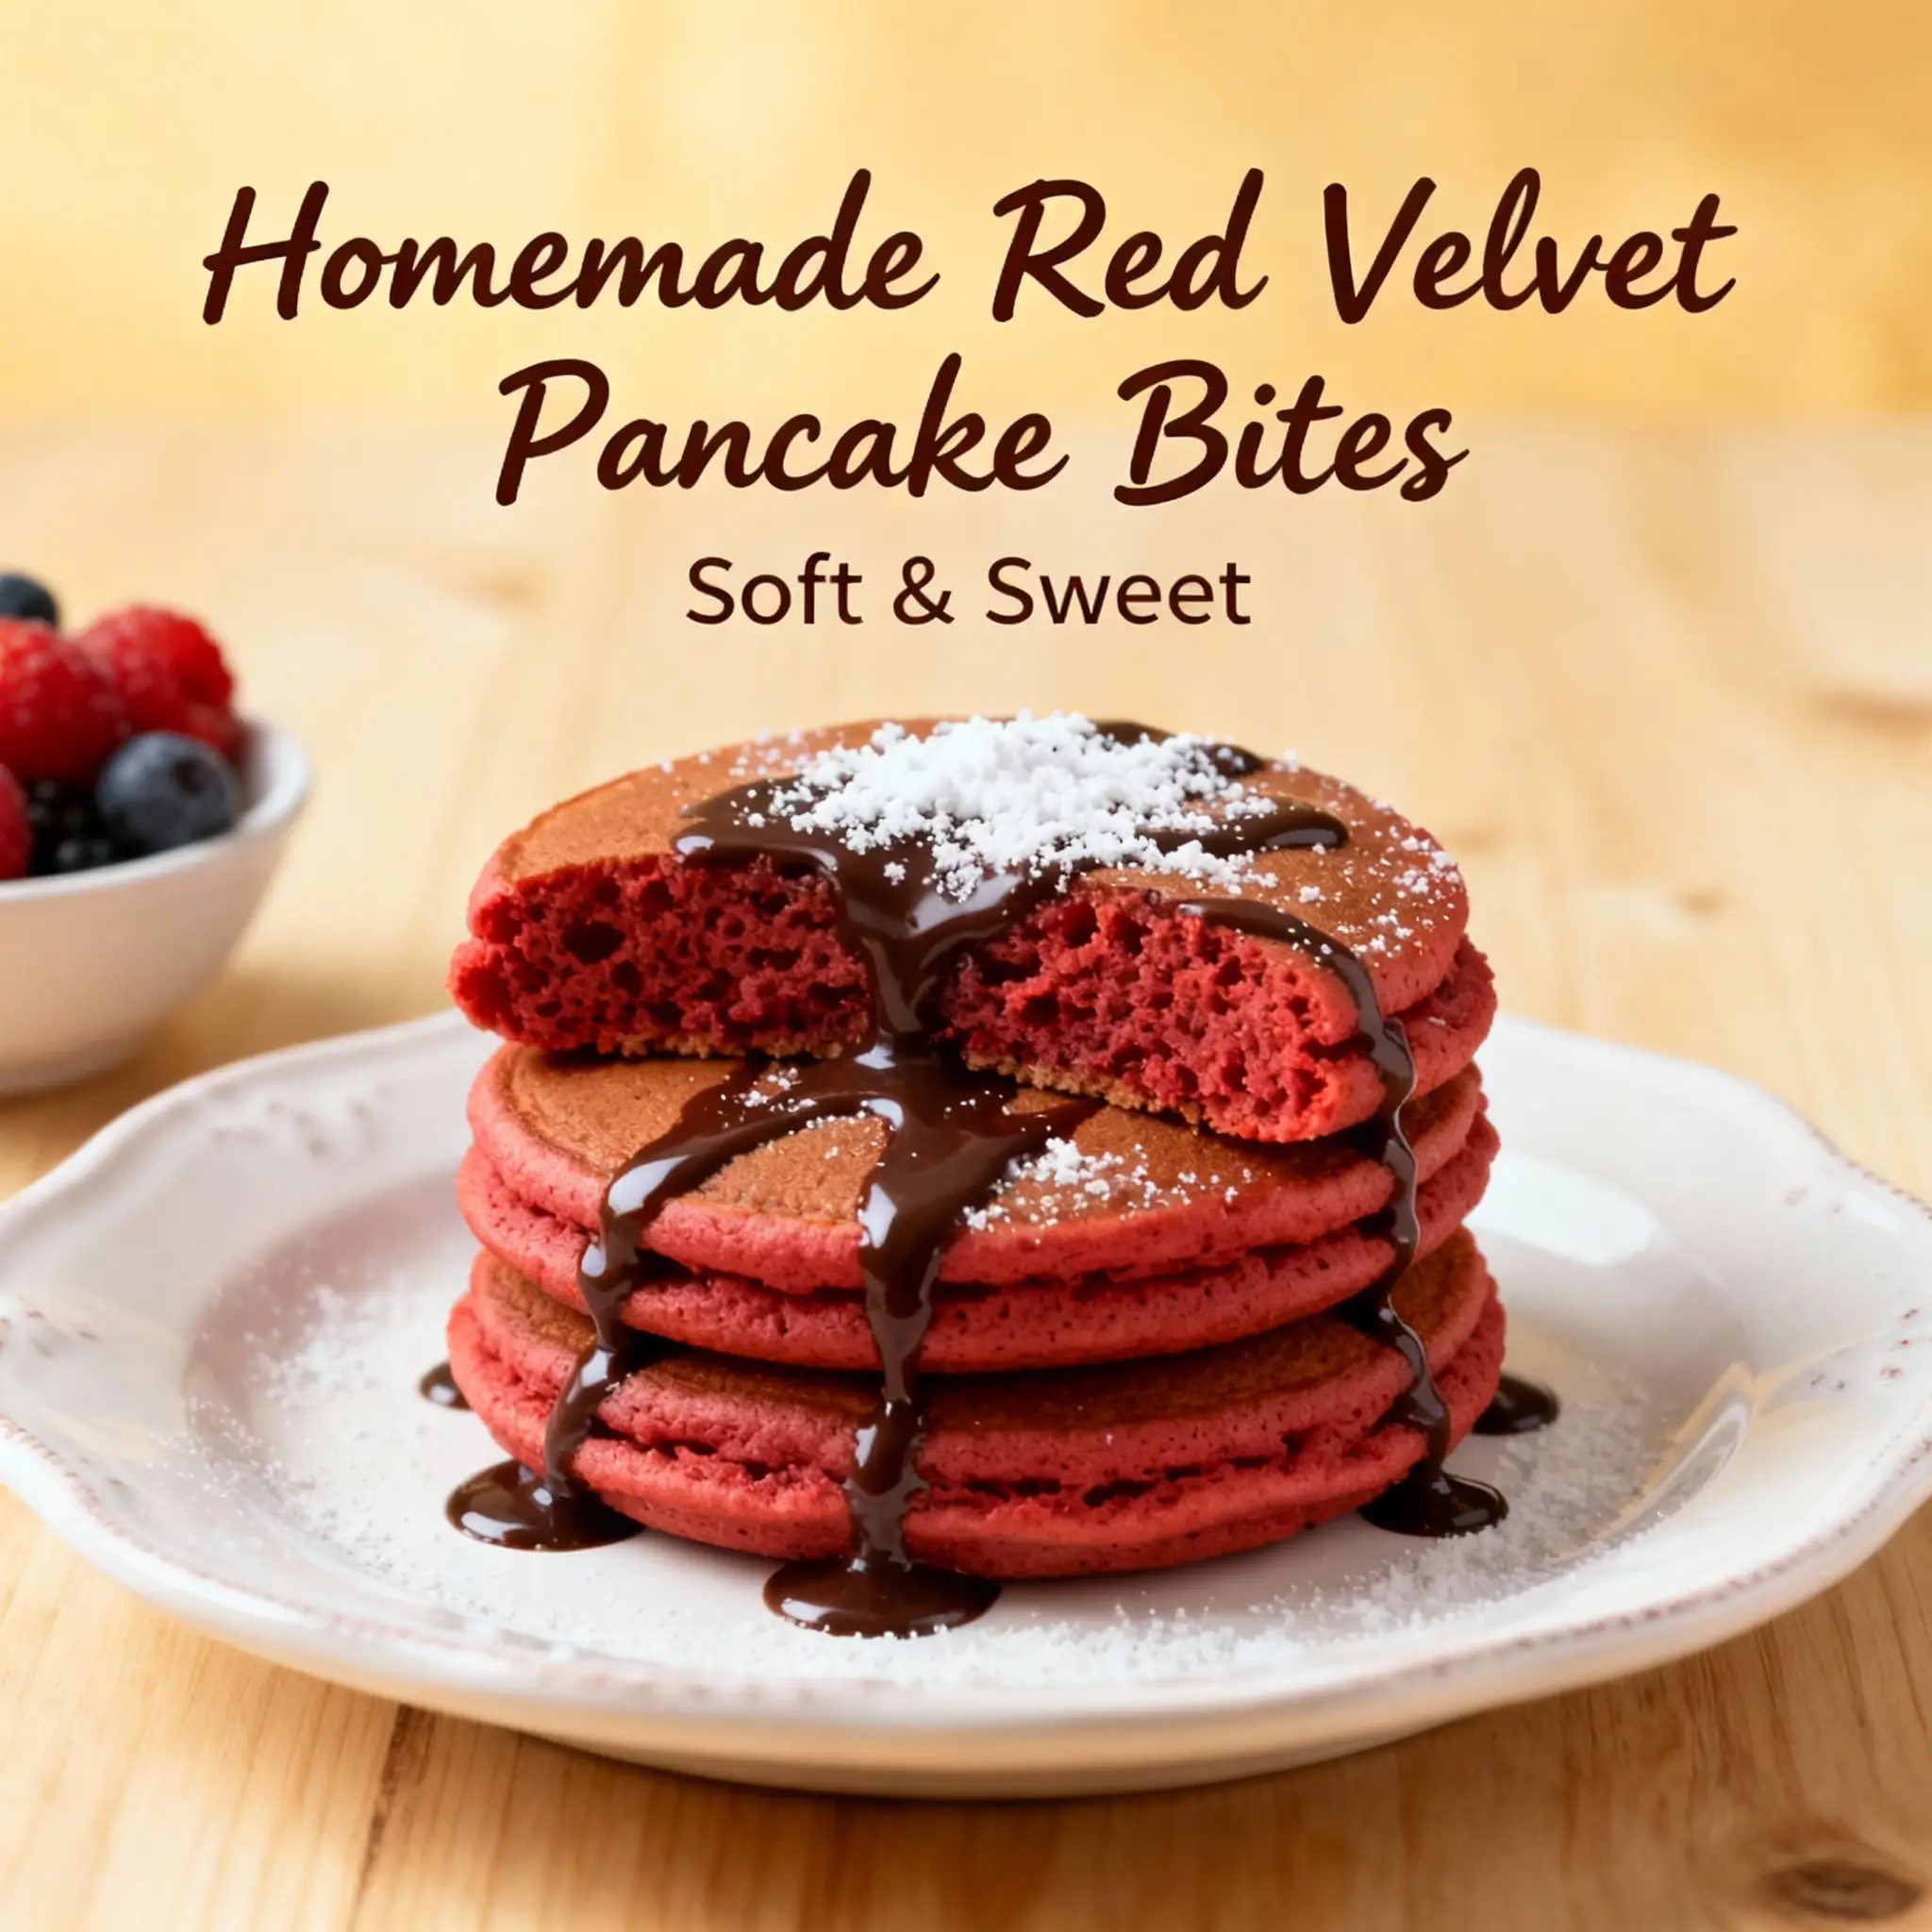
- Glaze Application: Whisk glaze until smooth and pourable (adjust with ½ tsp milk if too thick). Dip each cooled bite top-down into glaze, allowing excess to drip off. Place back on wire rack over parchment. Optional: Immediately sprinkle with crushed freeze-dried raspberries, white chocolate shavings, or edible gold dust before glaze sets (5–7 minutes).
Tips
- Color Consistency Secret: Add food coloring in two stages—half with wet ingredients, half after folding. This prevents pooling and ensures even dispersion. For ultra-vibrant results, let colored batter sit 5 minutes before portioning—the hue deepens as cocoa oxidizes.
- Fluffy Guarantee: Never skip the 10-minute rest. It’s non-negotiable for achieving cloud-like interiors. If rushing, rest for minimum 7 minutes—but never skip.
- Perfect Portioning Hack: Freeze unused batter in ice cube trays (1 cube = 1 bite). Thaw overnight in fridge, stir gently, then bake—yields identical texture and color as fresh batter.
- No-Stick Assurance: Silicone liners alone aren’t enough. Lightly brush liners with melted butter, then dust with unsweetened cocoa powder—shakes off excess. Prevents “stuck bottoms” and adds subtle chocolate layer.
- Oven Thermometer Required: Built-in oven thermostats vary ±25°F. An accurate oven thermometer ensures precise 375°F—critical for proper rise and crust formation.
- Glaze Timing: Glaze only when bites are at room temperature—never warm or chilled. Cold bites cause glaze to seize; warm bites cause melting and sliding.
- Storage Wisdom: Store unglazed bites airtight at room temp up to 2 days, refrigerated up to 5 days, or frozen up to 3 months. Glaze *only* before serving—glazed bites soften quickly.
- Reheating Revival: To refresh refrigerated or frozen bites: place on parchment-lined baking sheet, warm in 325°F oven for 4–5 minutes. Then glaze immediately after removing—creates “fresh-baked” sheen.
Variations and Customizations
Red Velvet Pancake Bites are a canvas for creativity—here are 12 thoughtfully engineered variations, each tested for structural integrity and flavor harmony:
- Black Cocoa Luxe: Replace 2 tbsp natural cocoa with black cocoa (like King Arthur or Valrhona). Deepens color to near-black velvet, adds roasted coffee/chocolate intensity, and pairs exquisitely with espresso-infused glaze.
- Beetroot Earthy: Substitute ¼ cup fresh beet purée (steamed, strained) for part of buttermilk. Adds natural sweetness, fiber, and a sophisticated ruby-red hue—best with orange-zest cream cheese glaze.
- Maple-Bourbon Swirl: After portioning batter, drizzle ½ tsp real maple syrup + ¼ tsp bourbon per bite, then swirl gently with toothpick. Introduces complex warmth without overpowering.
- White Chocolate–Raspberry: Fold ⅓ cup finely chopped white chocolate and 2 tbsp freeze-dried raspberry powder into batter. Glaze with raspberry-kissed cream cheese.
- Gluten-Free Adaptation: Use certified GF 1:1 blend (like Bob’s Red Mill) + ½ tsp xanthan gum. Increase buttermilk by 1 tbsp and rest batter 15 minutes for full hydration.
- Vegan Version: Swap eggs for flax eggs (2 tbsp ground flax + 5 tbsp water), buttermilk for coconut buttermilk (1¼ cups coconut milk + 1 tbsp vinegar), butter for refined coconut oil. Use beet powder for color.
- Protein-Packed: Add 2 scoops unflavored whey or collagen peptides. Compensate with extra 1 tbsp buttermilk and rest 12 minutes.
- Spiced Velvet: Add ½ tsp ground cinnamon, ¼ tsp ground cardamom, and pinch of clove to dry ingredients. Glaze with spiced honey-cream cheese.
- Decadent Double-Chocolate: Fold in ⅓ cup mini dark chocolate chips (60–70% cacao). Batter becomes richer; reduce sugar to ⅔ cup.
- Coconut-Mango Tropical: Replace buttermilk with coconut buttermilk, add ¼ cup toasted coconut flakes and 2 tbsp diced dried mango to batter. Glaze with mango-passionfruit cream cheese.
- Savory-Sweet Herb: Add 1 tsp finely minced fresh rosemary and zest of ½ orange to batter. Glaze with orange-cream cheese and finish with flaky sea salt.
- Kid-Friendly Confetti: Fold in ⅓ cup rainbow sprinkles (jimmies, not nonpareils—they bleed). Use natural food coloring for allergen-safe version.
Health Considerations and Nutritional Value
A single Red Velvet Pancake Bite (approx. 1.75” diameter, unglazed, made with full-fat ingredients) contains roughly:
- Calories: 115–130 kcal
- Total Fat: 4.5–5.5g (2.5g saturated)
- Carbohydrates: 18–20g (12–14g sugars)
- Protein: 2.5–3g
- Fiber: 0.8g
- Sodium: 140–160mg
- Calcium: 45mg (4% DV)
- Iron: 0.9mg (5% DV)
Nutritional Notes & Mitigation Strategies:
- Sugar Awareness: The 12–14g sugar per bite comes primarily from granulated sugar and glaze. To reduce: cut sugar to ½ cup, use monk fruit–erythritol blend (1:1 ratio), or omit glaze entirely—dust with powdered erythritol + cocoa instead.
- Food Coloring Safety: FDA-approved red dyes (like Red #40) are deemed safe in typical consumption amounts. For sensitive individuals (especially children with ADHD), opt for natural alternatives: beet powder, hibiscus extract, or annatto seed oil—though color intensity and shelf life differ.
- Dairy Considerations: Buttermilk’s lactic acid makes it lower-lactose than regular milk—often tolerated by mild lactose-intolerant individuals. Vegan adaptations eliminate dairy entirely.
- Gluten Sensitivity: Standard recipe contains gluten. Certified GF adaptations are safe for celiac disease when prepared with dedicated GF equipment and verified ingredients.
- Antioxidant Upside: Natural cocoa contributes flavanols linked to cardiovascular and cognitive benefits. Using high-cocoa-content (≥70%) dark chocolate chips in variations boosts polyphenols further.
- Portion Control Strength: Their built-in single-serve size inherently discourages overconsumption—unlike stackable pancakes where portions easily double or triple.
- Balanced Brunch Pairing: Serve bites alongside Greek yogurt parfaits, sautéed spinach, or smoked salmon to add protein, fiber, and healthy fats—transforming them from indulgence to nutritionally rounded meal.
Ingredients
Makes 24 bites
- 2 cups (250g) unbleached all-purpose flour
- ¼ cup (20g) unsweetened natural cocoa powder (not Dutch-processed)
- ¾ cup (150g) granulated sugar
- 2 tsp aluminum-free baking powder
- ½ tsp baking soda
- ¾ tsp fine sea salt
- 1¼ cups (300ml) full-fat cultured buttermilk, room temperature
- 2 large eggs, room temperature
- ⅓ cup (75g) unsalted butter, melted and cooled to 100°F
- 1 tbsp distilled white vinegar
- 1½–2 tbsp red food coloring (liquid) OR 1 tsp super-concentrated red gel
- 1½ tsp pure vanilla extract
Cream Cheese Glaze:
- 4 oz (113g) full-fat brick-style cream cheese, softened
- 1¼ cups (150g) sifted powdered sugar
- 2–3 tbsp whole milk or heavy cream
- ½ tsp pure vanilla extract
- ¼ tsp fresh lemon juice
- Pinch of fine sea salt
Directions
- Preheat oven to 375°F (190°C). Line a 12-cup standard muffin tin with silicone mini-muffin liners (or grease with butter and dust with cocoa).
- In a large bowl, sift together flour, cocoa, sugar, baking powder, baking soda, and salt. Whisk vigorously for 30 seconds until fully blended and aerated.
- In a 4-cup liquid measuring cup, whisk buttermilk, eggs, melted butter, vinegar, food coloring, and vanilla until smooth and uniformly red—about 45 seconds. Let stand 2 minutes.
- Pour wet mixture into dry ingredients. Using a flexible silicone spatula, fold gently in a wide figure-eight motion until *just combined* and no dry flour remains—approximately 12–15 seconds. Do not overmix; lumps are ideal.
- Cover bowl with damp towel or plastic wrap. Rest batter at room temperature for 10 minutes.
- Stir batter once gently. Portion 1.5 tbsp (or use #40 scoop) into each liner, filling only ¾ full. Smooth tops with damp finger. Tap tin firmly on counter 3 times.
- Bake 13–15 minutes, until tops spring back when lightly pressed and edges are set. Do not open oven before 12 minutes.
- Let bites cool in tin for 3 minutes, then transfer to wire rack. Cool completely (20+ minutes) before glazing.
- For glaze: Beat cream cheese until smooth. Gradually add powdered sugar, then milk, vanilla, lemon juice, and salt. Beat until silky—add milk ½ tsp at a time until desired drizzling consistency.
- Dip cooled bites top-down into glaze. Return to wire rack. Optional: Decorate before glaze sets.
FAQ
- Can I make these on the stovetop instead of baking?
- Yes—but texture differs significantly. Use a mini pancake griddle or nonstick skillet with 1.5-inch round cutter. Cook over medium-low heat, covered, for 2–3 minutes per side. They’ll be denser and less uniform than oven-baked bites, but still delicious.
- Why did my bites turn brown instead of red?
- Most common causes: (1) Using Dutch-process cocoa (neutral pH kills color reaction), (2) Insufficient acid (check buttermilk freshness; substitute 1 tsp extra vinegar if needed), (3) Too little food coloring, or (4) Overbaking—prolonged heat oxidizes red pigment into brown.
- Can I prepare batter the night before?
- Absolutely. Mix batter, cover tightly, and refrigerate up to 12 hours. Before portioning, let sit at room temp for 20 minutes and stir gently—cold batter spreads poorly and rises weakly.
- My glaze is too thin/thick—how do I fix it?
- Too thin? Chill 10 minutes, then beat in 1 tbsp more powdered sugar. Too thick? Add milk ¼ tsp at a time, beating 15 seconds between additions. Never add water—it dilutes flavor and causes separation.
- Are these safe for nut allergies?
- Yes—the base recipe contains no nuts. However, always verify labels on food coloring, vanilla, and powdered sugar, as some brands process in facilities with tree nuts or peanuts.
- Can I freeze baked, unglazed bites?
- Yes! Cool completely, freeze uncovered on tray for 2 hours, then transfer to airtight freezer bag. Store up to 3 months. Reheat at 325°F for 5 minutes, then glaze.
- What’s the best food coloring brand for vibrant red?
- Top performers: Americolor Super Red (gel), Chefmaster Liqua-Gel Red, or Wilton No-Taste Red (liquid). Avoid generic grocery store dyes—they often require excessive volume and impart bitterness.
- Can I use low-fat or skim buttermilk?
- Technically yes, but full-fat buttermilk yields superior tenderness, richness, and color depth. Skim versions produce drier, paler, less flavorful bites.
- Why do you recommend silicone liners over paper?
- Silicone prevents sticking without greasing, maintains shape during baking, conducts heat evenly for uniform browning, and allows easy removal—even from delicate, tender bites. Paper liners often tear or cling.
- How do I prevent the glaze from cracking or drying out?
- Apply glaze only to fully cooled bites. Store glazed bites uncovered at room temperature for up to 4 hours—or refrigerate in single layer on parchment (no stacking) for up to 24 hours. Rewarm gently before serving if refrigerated.
Summary
Red Velvet Pancake Bites are a masterclass in joyful precision—where the science of acid-activated cocoa meets the artistry of miniature baking, delivering vivid color, luxurious texture, and nostalgic flavor in every handheld morsel. They transform everyday breakfast into celebration-worthy ritual, balancing indulgence with approachability, tradition with innovation, and whimsy with culinary integrity.
Whether served dusted with edible gold at a bridal brunch or tucked into a child’s lunchbox with a smile, these bites remind us that the most memorable moments often come in the smallest, reddest, most velvety packages.