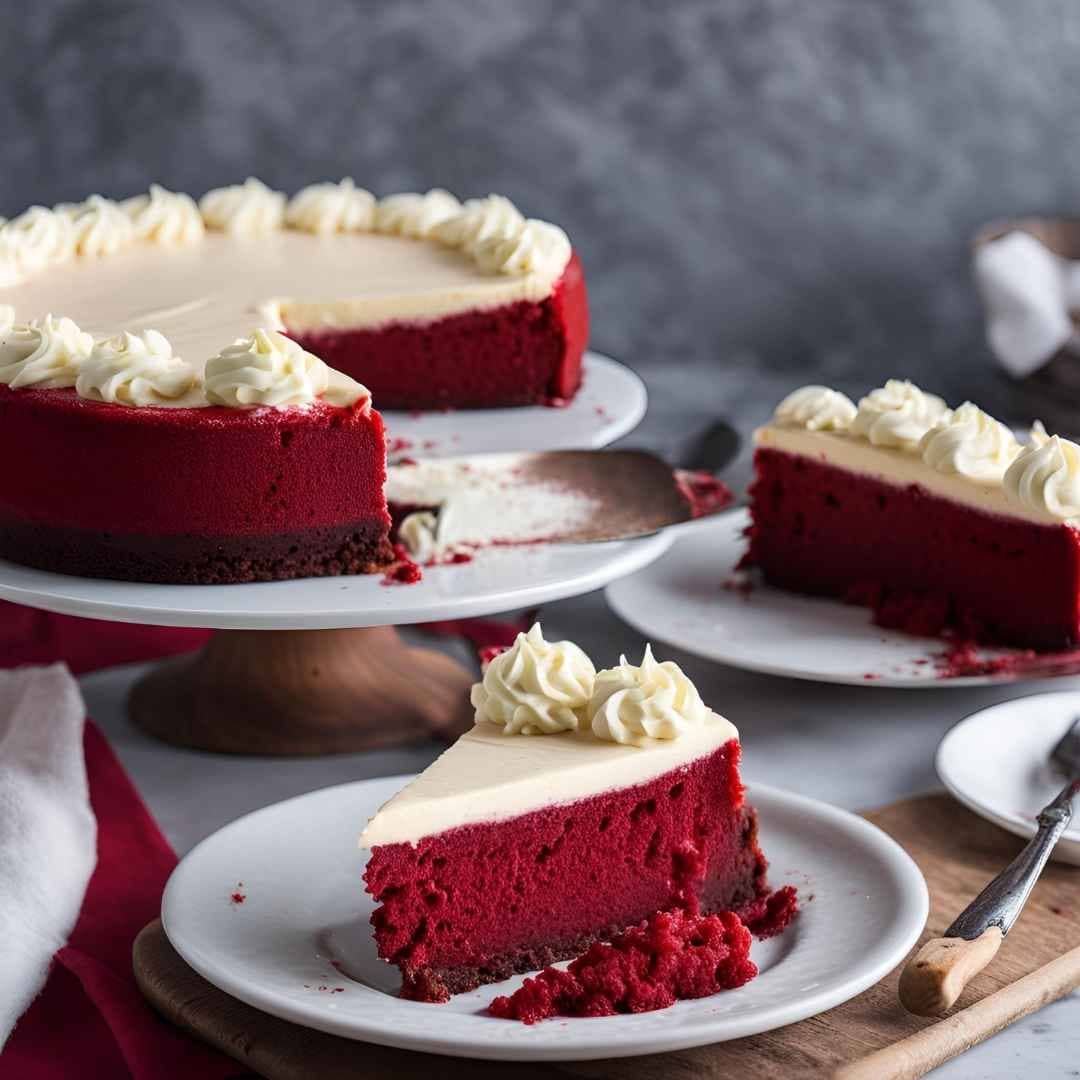
Red Velvet Oreo Cheesecake is a decadent dessert that marries the bold flavors of red velvet cake, the creamy richness of cheesecake, and the irresistible crunch of Oreo cookies. This dessert is perfect for celebrations, indulgent evenings, or simply satisfying your sweet tooth. It’s a showstopper that not only tastes divine but also looks stunning with its vibrant red and white layers accented by the dark Oreo crust.
The history of this dessert is rooted in the combination of two beloved classics: red velvet cake and cheesecake. Red velvet cake originated in the early 20th century and gained popularity in the American South, becoming a staple at celebrations. Cheesecake, on the other hand, dates back to ancient Greece and has evolved into countless variations worldwide. The Oreo cookie, invented in 1912, has been a favorite snack for over a century. Combining these three iconic treats creates a dessert that captures the essence of indulgence and creativity, making it a modern favorite.
Ingredients Breakdown:
- Oreo Cookie Crust: This forms the base of the cheesecake and provides a rich, chocolatey crunch. Typically made with crushed Oreo cookies and melted butter, it balances the creamy texture of the cheesecake filling.
- Red Velvet Cheesecake Layer: A mixture of cream cheese, sugar, eggs, cocoa powder, buttermilk, and red food coloring creates the signature flavor and color of red velvet. It’s tangy, slightly chocolatey, and velvety smooth.
- Vanilla Cheesecake Layer: This classic cheesecake layer adds a creamy contrast to the bold red velvet, creating a balanced flavor profile.
- Whipped Cream and Oreo Garnish: Optional toppings that enhance the visual appeal and add a light, airy texture to each bite.
Step-by-Step Recipe:
- Preheat your oven to 325°F (160°C). Prepare a springform pan by greasing it and wrapping the outside with aluminum foil to prevent water from seeping in during the baking process.
- Make the crust: Crush about 24 Oreo cookies into fine crumbs. Mix with 6 tablespoons of melted butter until the mixture resembles wet sand. Press this firmly into the bottom of the prepared pan. Bake for 10 minutes, then let it cool.
- Prepare the red velvet layer: In a large bowl, beat 16 ounces of softened cream cheese and ¾ cup of granulated sugar until smooth. Add 2 large eggs, one at a time, mixing after each addition. Mix in 2 tablespoons of cocoa powder, ½ cup of buttermilk, 1 teaspoon of vanilla extract, and 1 tablespoon of red food coloring until fully combined.
- Pour the red velvet batter over the crust and spread evenly.
- Prepare the vanilla cheesecake layer: In another bowl, beat another 16 ounces of softened cream cheese and ¾ cup of granulated sugar until creamy. Add 2 large eggs and 1 teaspoon of vanilla extract, mixing until smooth.
- Carefully spoon the vanilla batter over the red velvet layer, ensuring an even surface.
- Bake the cheesecake in a water bath: Place the springform pan inside a larger baking dish and fill the dish with hot water, ensuring it reaches about halfway up the sides of the pan. Bake for 1 hour, or until the center is just set.
- Turn off the oven and crack the door open slightly, allowing the cheesecake to cool gradually for 1 hour. Then refrigerate for at least 4 hours or overnight.
- Decorate the cheesecake: Spread whipped cream on top and garnish with crushed Oreo cookies or whole Oreos.
Tips for the Perfect Cheesecake:
- Use room-temperature ingredients for a smooth batter.
- Avoid overmixing the batter to prevent air bubbles that can cause cracks.
- Bake the cheesecake in a water bath for even cooking and a creamy texture.
- Allow gradual cooling to minimize the risk of cracks.
- Chill thoroughly for the best flavor and texture.
Variations and Customizations:
- Use chocolate-flavored whipped cream for an extra cocoa kick.
- Swap the red food coloring for natural beet juice for a healthier alternative.
- Add a layer of chocolate ganache for an ultra-decadent twist.
- Experiment with different Oreo flavors, such as Golden Oreos or Mint Oreos, to customize the crust.
- Create mini cheesecakes in a muffin tin for individual servings.
Health Considerations and Nutritional Value: While Red Velvet Oreo Cheesecake is an indulgent dessert, it can be enjoyed in moderation as part of a balanced diet. Each slice is rich in calories, fats, and sugars, primarily from cream cheese, butter, and Oreos. For a lighter version, consider using reduced-fat cream cheese, less sugar, and a thinner crust. Adding fresh fruit as a topping can also boost the nutritional value. Be mindful of portion sizes to savor the dessert without overindulging.
FAQ: Q: Can I make this cheesecake without a water bath? A: While a water bath ensures even baking and a creamy texture, you can bake without it, but the texture may be slightly denser, and cracks might form. Q: How long does the cheesecake last? A: Store the cheesecake in an airtight container in the refrigerator for up to 5 days. Q: Can I freeze this cheesecake? A: Yes, wrap it tightly in plastic wrap and foil, then freeze for up to 3 months. Thaw overnight in the refrigerator before serving. Q: What can I use instead of red food coloring? A: Beet juice or natural red food powders are great alternatives.
Red Velvet Oreo Cheesecake
Ingredients
Crust:
- 3 cups Oreo crumbs from 36 finely crushed Oreos, 480g
- 4 tablespoons unsalted butter melted
- ¼ teaspoon sea salt
Filling:
- 32 oz cream cheese softened
- 1 cup granulated sugar
- ¼ teaspoon sea salt
- ¾ cup sour cream at room temperature
- ½ cup heavy cream
- 1 tablespoon white vinegar
- 1 tablespoon pure vanilla extract
- 4 tablespoons cocoa powder
- 3 large eggs at room temperature
- Red gel food coloring
Ganache:
- 1 cup semisweet chocolate chips
- ¾ cup heavy whipping cream
Whipped Cream:
- 1 cup cold heavy whipping cream
- ¼ cup powdered sugar
- ½ teaspoon pure vanilla extract
- 12 Oreos
Instructions
Crust:
- Preheat your oven to 180°C (355°F). Grease a 9-inch baking pan with a pat of cold butter (see notes for alternative pan options).
- In a large bowl, combine Oreo crumbs, melted butter, and sea salt. Stir until the mixture is evenly incorporated.
- Ingredients: 3 cups Oreo crumbs, 4 tablespoons unsalted butter, ¼ teaspoon sea salt
- Transfer the mixture to the prepared baking pan and spread it into an even layer.
- Use the bottom of a glass to firmly press the crumbs down into the pan, ensuring they are packed tightly. Push the crumbs about an inch high along the edges to create a border.
- Bake for 12 minutes. Remove from the oven and let it cool while preparing the filling.
Filling:
- Fill a kettle with water and set it to boil.
- In a large bowl or a stand mixer fitted with a paddle attachment, beat cream cheese, granulated sugar, and salt until completely smooth. Scrape down the sides of the bowl.
- Ingredients: 32 oz cream cheese, 1 cup granulated sugar, ¼ teaspoon sea salt
- Add sour cream and mix thoroughly. Scrape down the bowl again, then add heavy cream and mix. Incorporate vinegar and vanilla extract, followed by the cocoa powder. Mix well after each addition.
- Ingredients: ¾ cup sour cream, ½ cup heavy cream, 1 tablespoon white vinegar, 1 tablespoon pure vanilla extract, 4 tablespoons cocoa powder
- Beat in the eggs one at a time, scraping the bowl and mixing well after each addition.
- Ingredients: 3 large eggs
- Add red gel food coloring until the batter reaches your desired red hue. Mix gently to combine without overmixing; the color will deepen as it bakes.
- Ingredients: Red gel food coloring
- Place the prebaked crust in a round baking pan that is 1–2 inches wider than the cheesecake pan. Set this pan into a large rectangular baking dish. (See notes for water bath alternatives.)
- Pour the cheesecake filling into the crust and smooth the top with a spatula.
- Carefully pour the boiling water into the large rectangular baking dish until it reaches halfway up the sides of the round pan. Use oven mitts to transfer the setup to the oven.
- Bake for 70–90 minutes, or until the edges are set, and the center is still slightly jiggly. The cheesecake will finish setting as it cools.
- Leave the oven door slightly ajar for 10 minutes to allow the cheesecake to cool gradually. Remove it from the water bath and cool completely at room temperature. Cover and refrigerate for at least 8 hours or overnight.
Ganache:
- On the day of serving, bring heavy whipping cream to a simmer over medium heat.
- Place the chocolate chips in a heat-safe bowl.
- Ingredients: 1 cup semisweet chocolate chips, ¾ cup heavy whipping cream
- Pour the hot cream over the chocolate and let it sit undisturbed for 7 minutes.
- Whisk until the ganache is completely smooth. Set aside to cool while preparing the whipped cream.
Whipped Cream:
- In a large bowl or a stand mixer fitted with a whisk attachment, combine heavy cream, powdered sugar, and vanilla extract.
- Ingredients: 1 cup heavy whipping cream, ¼ cup powdered sugar, ½ teaspoon pure vanilla extract
- Whip the mixture until stiff peaks form.
- Transfer the whipped cream to a piping bag fitted with a star tip (such as a Wilton 1M tip). Alternatively, use a piping bag with the tip cut off, or simply use a spoon or spatula.
Assembly:
- Pour the cooled ganache over the chilled cheesecake, spreading it evenly with a spatula or spoon. Place the cake in the freezer for 10 minutes to set the ganache.
- Pipe a border of whipped cream along the top edge of the cheesecake.
- Arrange 8 Oreos evenly on top of the cake. Crumble the remaining 4 Oreos over the whipped cream and ganache.
- Ingredients: 12 Oreos
- Slice the cheesecake and serve!
- Enjoy your decadent Oreo Red Velvet Cheesecake!
Notes
Water Bath Options
-
Best Option:
Use a round baking pan that is 1–2 inches larger than the cheesecake pan. This setup prevents water from seeping into the cheesecake, keeping it from becoming soggy. Place the cheesecake pan inside the larger pan, then nest both into a large roasting tray. Add the hot water to the roasting tray. (Ideal for cheesecakes baked in a springform pan.) -
For Regular Round Pans (Not Springform):
If using a regular round pan, you can place it directly into the water bath since water won’t seep through the edges. To make removal easier after chilling, create a parchment paper sling to lift the cheesecake out of the pan. -
For Springform Pans:
Wrap the outside of the springform pan tightly with a double layer of aluminum foil, ensuring the foil covers the entire bottom and sides. Alternatively, use a heat-safe sous vide bag to nestle the pan instead of aluminum foil.