Introduction
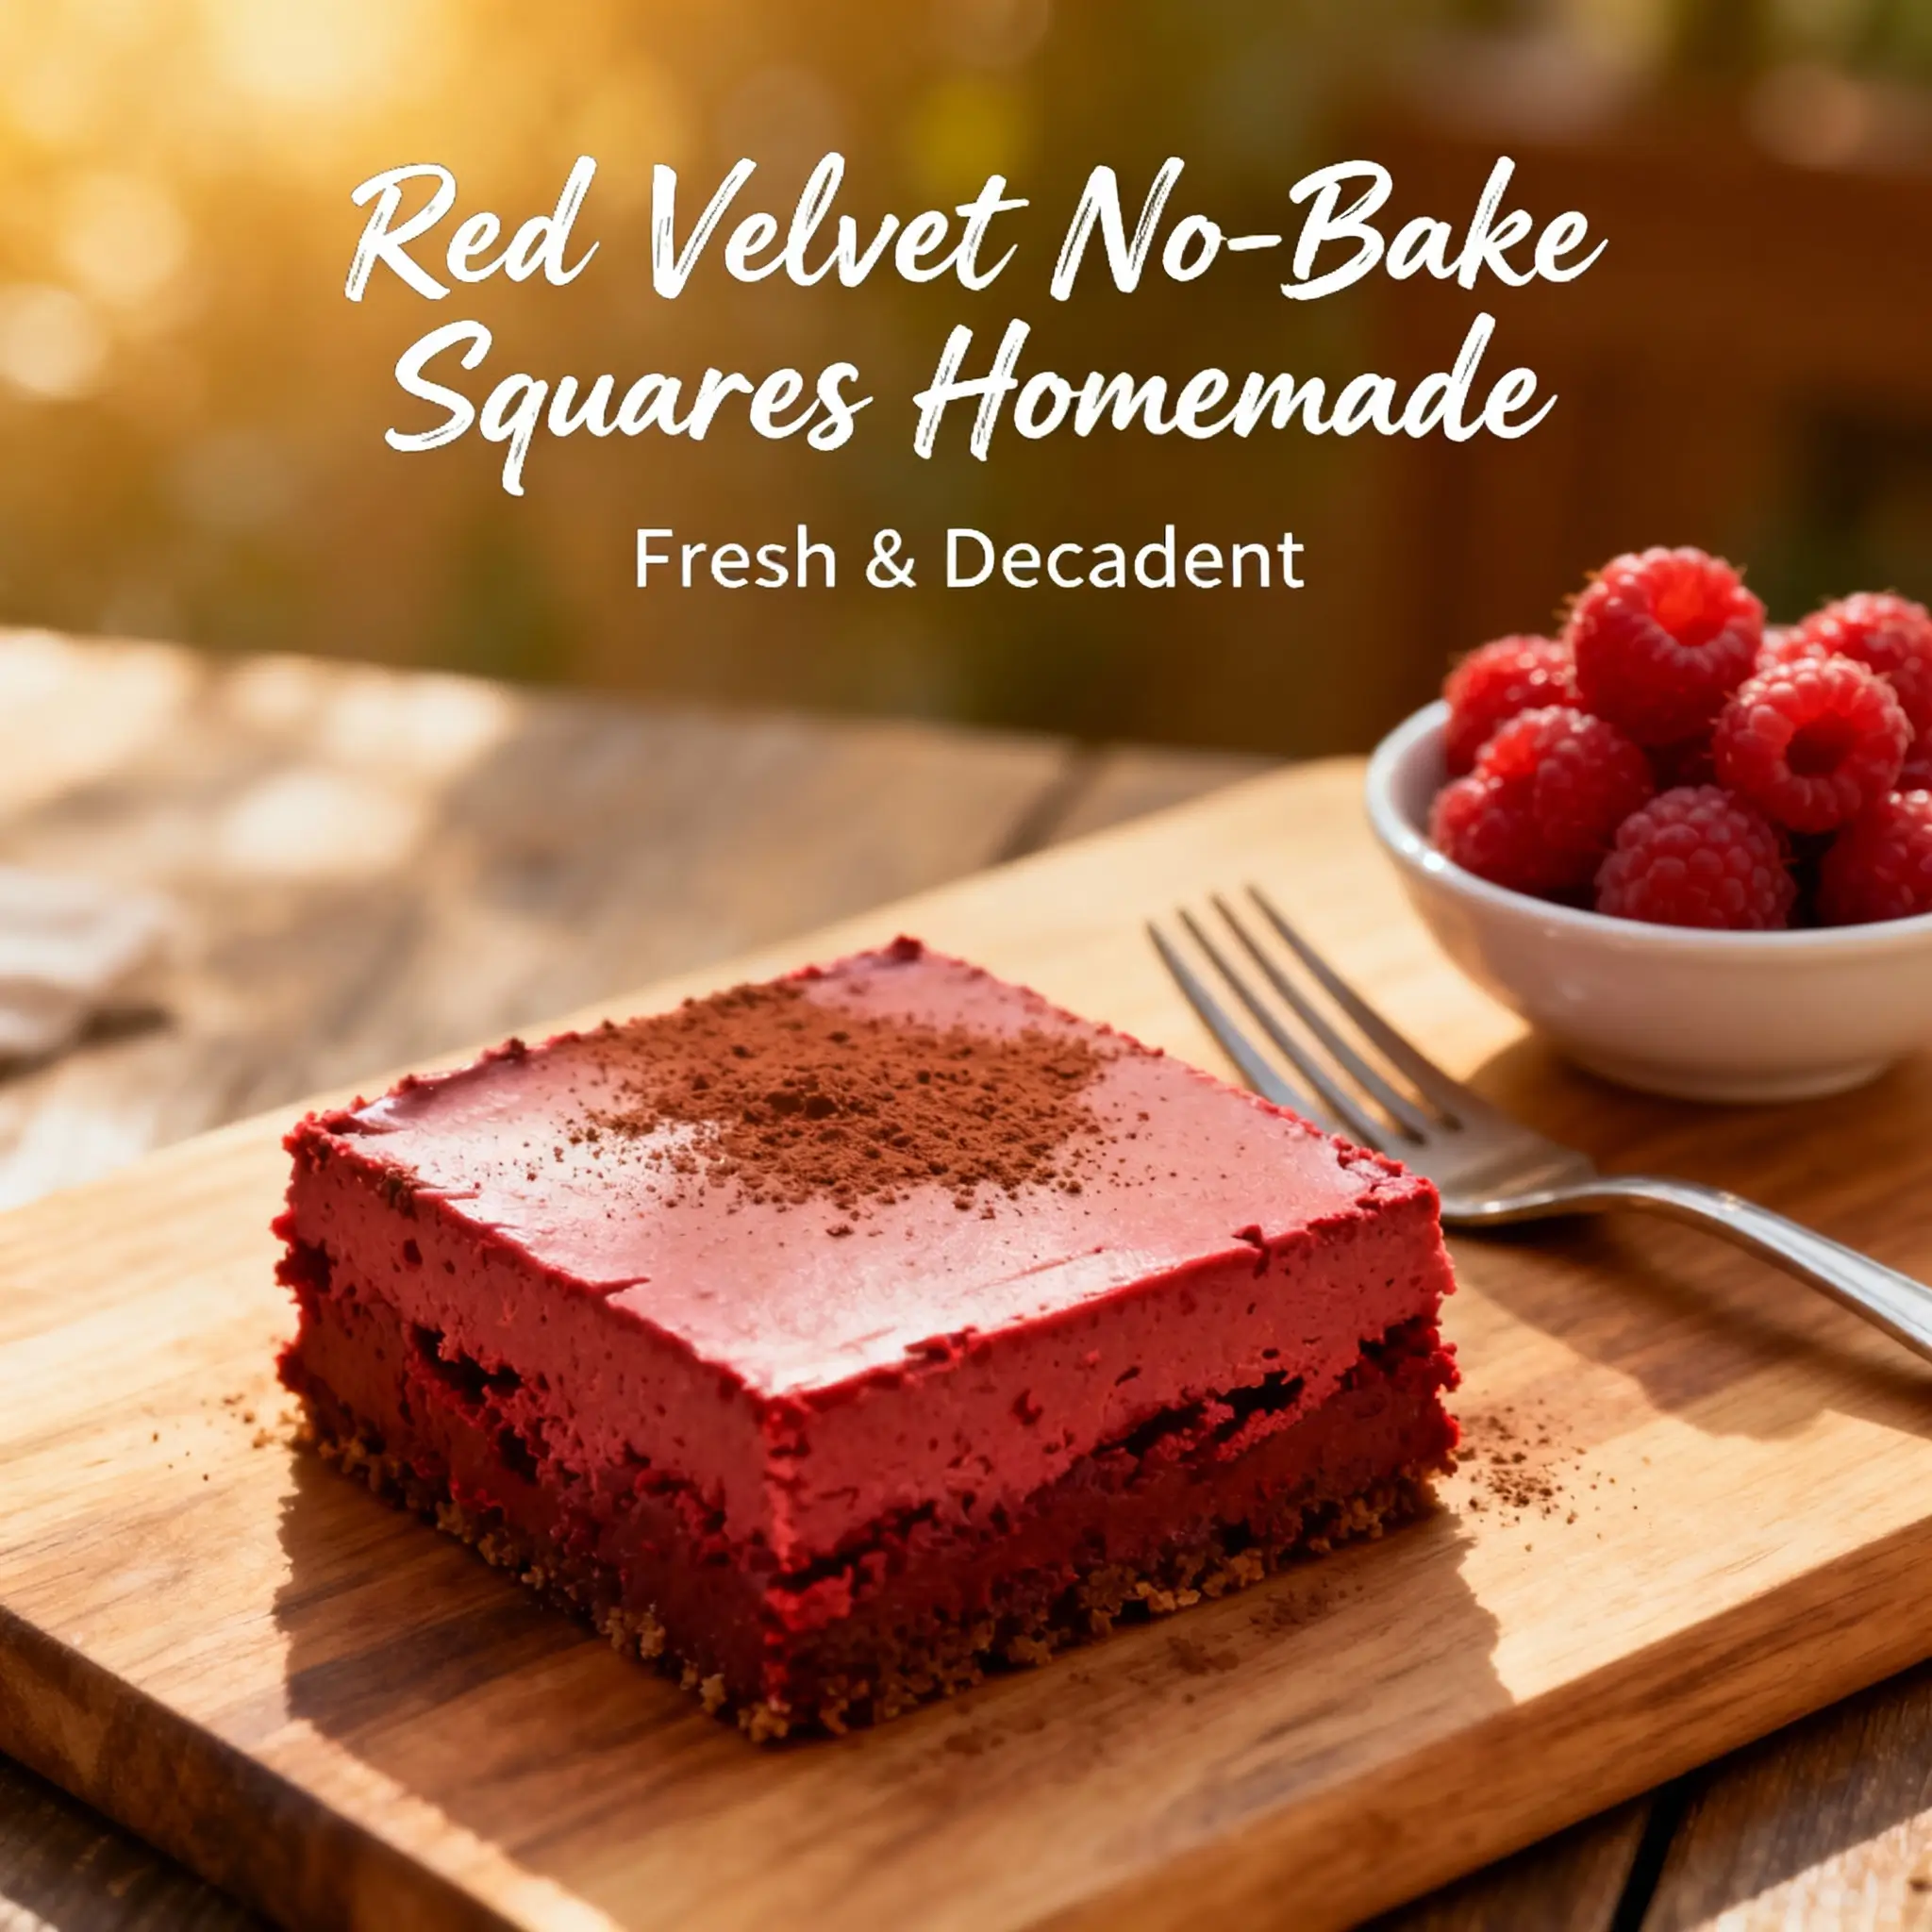
Red Velvet No-Bake Squares are a decadent, crowd-pleasing dessert that captures all the romance and richness of classic red velvet cake—without the oven, without the fuss, and without the wait. These luscious, velvety squares boast a striking crimson hue, a delicate cocoa-kissed flavor, creamy tang from cream cheese, and a luxuriously smooth texture that melts on the tongue. Perfect for holiday gatherings, potlucks, bridal showers, or even a spontaneous self-care treat, they require no baking expertise, minimal equipment (just a mixing bowl, spatula, and 8×8 pan), and come together in under 30 minutes—plus chilling time. Whether you’re a seasoned baker looking to simplify your dessert repertoire or a beginner craving something impressive yet approachable, these no-bake squares deliver elegance, nostalgia, and indulgence in every bite.
The History
The origins of red velvet cake trace back to the early 20th century, with roots often linked to the Waldorf-Astoria Hotel in New York City (though this claim remains debated by food historians) and later popularized in Southern U.S. home kitchens during the 1940s. Its signature red color was originally derived from a natural chemical reaction between non-Dutched (anthocyanin-rich) cocoa and acidic ingredients like buttermilk and vinegar—a phenomenon enhanced by the presence of beet juice in some heirloom recipes. The advent of commercial red food coloring in the 1930s cemented the cake’s vibrant identity. As convenience culture surged in the post-war era, no-bake adaptations began appearing in community cookbooks and women’s magazines—first as layered “refrigerator cakes,” then evolving into bars and squares. Red Velvet No-Bake Squares emerged more prominently in the 2000s alongside the rise of food blogs and social media, where their photogenic color, minimalist technique, and nostalgic appeal made them viral favorites. Today, they represent a modern fusion of tradition and practicality—honoring the soul of red velvet while embracing the ease and accessibility of no-bake confectionery.
Ingredients Breakdown
Every ingredient in Red Velvet No-Bake Squares plays a deliberate, functional role—contributing not only to flavor and color but also to structure, texture, stability, and mouthfeel:
- Unsalted Butter: Provides richness, binds dry ingredients, and enables the base layer to set firmly when chilled. Melted butter acts as the “glue” for the crust, while softened butter in the filling ensures proper creaming and emulsification.
- Granulated Sugar: Sweetens and aids in creaming with butter to create air pockets for lightness. Also contributes to shelf stability and texture control in the filling.
- Cream Cheese (full-fat, brick-style): The cornerstone of authentic red velvet tang and creaminess. Must be at room temperature for smooth incorporation; low-fat or whipped versions yield grainy, unstable results.
- Vanilla Extract (pure): Enhances depth and balances acidity—avoid imitation, which can impart a harsh, artificial aftertaste.
- White Vinegar or Apple Cider Vinegar: Reacts subtly with cocoa and baking soda (if used in variations) to brighten flavor and tenderize texture. Also helps stabilize the cream cheese mixture by slightly lowering pH.
- Unsweetened Natural Cocoa Powder (non-alkalized): Delivers essential chocolate notes and participates in the acid-reactive color shift. Dutch-processed cocoa lacks sufficient acidity for optimal red development and yields a muted, brownish tone.
- Red Food Coloring (gel or paste preferred): Concentrated, water-free formulas provide intense, true-red vibrancy without thinning the batter. Liquid coloring introduces excess moisture, risking a runny, poorly set filling. For natural alternatives: beet powder (¼–½ tsp) or pomegranate juice concentrate (reduced ⅓ cup to 1 tbsp), though color intensity and shelf life may vary.
- Crushed Graham Cracker Crumbs (or digestive biscuits): Forms the sturdy, slightly sweet, buttery base. The fine crumb size ensures uniform compaction and clean slicing. Gluten-free graham alternatives work seamlessly for dietary accommodations.
- Heavy Whipping Cream (cold): Used in stabilized whipped cream toppings or folded into lighter variations. High fat content (≥36%) is essential for volume retention and heat resistance.
- Confectioners’ Sugar: Adds sweetness and silkiness to frostings or whipped toppings—and serves as a thickening agent in no-bake fillings.
- Pinch of Salt: A critical flavor balancer that heightens sweetness, tempers acidity, and deepens overall complexity.
- Optional Add-ins: White chocolate chips, chopped pecans, freeze-dried raspberries, or crushed candy cane for seasonal flair—all added after mixing to preserve texture integrity.
Step-by-Step Recipe
- Prepare the Pan: Line an 8×8-inch square baking dish with parchment paper, leaving a 2-inch overhang on two opposite sides for easy removal. Lightly grease the parchment and pan edges with butter or non-stick spray.
- Make the Crust: In a medium bowl, combine 1 ½ cups finely crushed graham cracker crumbs (about 10 full sheets), ¼ cup granulated sugar, and 6 tablespoons melted unsalted butter. Mix thoroughly until all crumbs are evenly moistened and resemble wet sand. Press firmly and evenly into the bottom of the prepared pan using the back of a measuring cup or flat-bottomed glass. Refrigerate uncovered for at least 20 minutes—or freeze for 10 minutes—for maximum firmness.
- Whip the Filling Base: In a large bowl using a hand mixer or stand mixer fitted with the paddle attachment, beat 8 oz (227g) full-fat, room-temperature cream cheese on medium speed for 1 minute until completely smooth and free of lumps. Scrape down the bowl. Add ½ cup (100g) granulated sugar and beat 2–3 minutes until pale, fluffy, and airy—do not rush this step; proper aeration is key to texture. Add 1 tsp pure vanilla extract and 1 tsp white vinegar; mix 30 seconds until fully incorporated.
- Incorporate Cocoa & Color: Sift ¼ cup (20g) natural unsweetened cocoa powder into the mixture. Add 1–2 tsp high-quality red gel food coloring (start with 1 tsp; add more drop-by-drop until desired intensity is reached). Beat on low speed just until combined—overmixing after adding color can cause streaking or air bubble loss. Scrape down sides and bottom thoroughly.
- Chill & Set the Filling: Pour the vibrant red filling over the chilled crust and spread gently with an offset spatula or the back of a spoon dipped in warm water for a perfectly smooth surface. Tap the pan sharply 3–4 times on the counter to release air bubbles. Cover loosely with plastic wrap (avoid touching the surface) and refrigerate for a minimum of 4 hours—or preferably overnight (8–12 hours)—to allow full setting, flavor melding, and clean, sliceable firmness.
- Add Optional Topping: Just before serving, prepare a simple white chocolate ganache (½ cup finely chopped white chocolate + ⅓ cup heated heavy cream, stirred until glossy) or stabilized whipped cream (1 cup cold heavy cream + 2 tbsp confectioners’ sugar + ½ tsp vanilla + ¼ tsp cream of tartar, whipped to soft peaks). Drizzle or pipe over chilled squares.
- Cut & Serve: Use the parchment overhang to lift the entire slab from the pan onto a cutting board. With a sharp, hot knife (dipped in hot water and wiped dry between each cut), slice into 16 even 2×2-inch squares. Wipe the blade after every 2–3 cuts for pristine edges.
Tips
- Temperature Is Non-Negotiable: Cream cheese and butter must be truly room temperature (65–70°F / 18–21°C)—not just “softened.” Cold dairy creates lumps; overheated dairy causes separation. Let sit out 60–90 minutes ahead of time—or cut into small cubes and leave for 30 minutes.
- Measure Cocoa by Weight When Possible: Volume measurements of cocoa vary wildly due to sifting and packing. For consistency, use 20g per batch (≈¼ cup lightly spooned and leveled).
- Gel > Liquid Every Time: One teaspoon of red gel equals roughly 1 tablespoon of liquid dye—but without the dilution. Brands like AmeriColor Super Red, Chefmaster Liqua-Gel, or Wilton Icing Colors offer superior performance and fade resistance.
- Prevent Weeping & Sweating: Always cover chilled squares with parchment-lined plastic wrap—not direct plastic—to avoid condensation. Store in the coldest part of your refrigerator (not the door), and serve within 4 days for peak quality.
- For Ultra-Clean Cuts: Chill the entire pan for 15 minutes after topping application. Use a chef’s knife with a long, thin blade (e.g., 8-inch santoku). Heat under hot tap water, dry completely, then cut with gentle downward pressure—no sawing.
- Fix Common Issues: If filling is too soft after chilling, re-chill 1–2 hours or freeze 20 minutes. If crust crumbles, it wasn’t pressed tightly enough—or butter was too warm. If color fades, exposure to light/air caused oxidation; store covered and serve within 2 days for brightest hue.
- Scale With Confidence: This recipe doubles flawlessly in a 9×13-inch pan (increase chilling to 6+ hours). Halving works in a 6×6-inch dish—reduce crust to ¾ cup crumbs + 3 tbsp butter.
Variations and Customizations
Red Velvet No-Bake Squares are a versatile canvas—ideal for personalization across seasons, diets, and occasions:
- Vegan Version: Substitute dairy-free cream cheese (Kite Hill or Miyoko’s), refined coconut oil (melted) for butter, and gluten-free vegan graham crackers. Use beet powder + 1 tsp lemon juice instead of vinegar for tang, and coconut cream (chilled, solid portion only) for whipped topping.
- Gluten-Free: Use certified GF graham crackers or almond flour–coconut flour blend (¾ cup almond flour + ¼ cup coconut flour + 2 tbsp tapioca starch + 2 tbsp sugar + 6 tbsp butter) for crust. Ensure cocoa and food coloring are GF-certified.
- Protein-Packed: Fold in 2 scoops (60g) unflavored or vanilla whey or plant-based protein powder into the cream cheese mixture—add 1 extra tbsp cream if too thick. Top with crushed protein bars or chocolate-covered espresso beans.
- Boozy Elegance: Add 1 tbsp premium vodka (for clarity and evaporation) or 2 tsp Chambord (raspberry liqueur) to the filling—reduce vinegar by ½ tsp to balance acidity.
- Seasonal Twists: Fall: Add ½ tsp pumpkin pie spice + 2 tbsp maple syrup (reduce sugar by 1 tbsp); top with candied walnuts. Winter: Infuse cream cheese with ¼ tsp peppermint extract + crushed candy cane garnish. Spring: Swirl in 3 tbsp fresh strawberry purée (strained) before chilling. Summer: Layer with lemon curd or top with fresh blackberries and mint.
- Texture Play: Press ¼ cup toasted pecans or walnuts into the crust before chilling. Fold ⅓ cup mini marshmallows or white chocolate chunks into the filling. Add a thin middle layer of raspberry jam (simmered 5 mins with 1 tsp chia seeds to thicken) for a stunning stained-glass effect.
- Mini Format: Press crust into lined muffin tin cups (24 cavities). Fill with 1 heaping tbsp filling each. Chill 3 hours. Top with a single white chocolate chip or edible gold leaf for party-perfect bites.
Health Considerations and Nutritional Value
While undeniably indulgent, Red Velvet No-Bake Squares can be mindfully enjoyed with thoughtful modifications and realistic expectations. A standard 2×2-inch square (1/16 of the full recipe) contains approximately:
- Calories: 220–260 kcal
- Total Fat: 14–17g (8–10g saturated)
- Carbohydrates: 22–26g (16–20g sugars)
- Protein: 2–3g
- Sodium: 120–160mg
- Calcium: ~35mg (from cream cheese and graham crackers)
Nutritional Highlights & Considerations:
- Cocoa Benefits: Natural cocoa powder provides flavonoids linked to improved circulation and antioxidant activity—but alkalized (Dutch-process) cocoa loses up to 90% of these compounds. Stick with natural cocoa for maximum phytonutrient retention.
- Cream Cheese Notes: Offers modest amounts of vitamin A, B12, and selenium. Full-fat versions support satiety and fat-soluble vitamin absorption—unlike low-fat substitutes, which often contain gums and stabilizers that may trigger digestive sensitivity.
- Sugar Awareness: Granulated sugar contributes empty calories and rapid blood glucose spikes. Alternatives like erythritol or allulose (used 1:1) reduce glycemic load without cooling aftertaste or laxative effects common with maltitol or xylitol.
- Food Coloring Transparency: While FDA-approved red dyes (Red #40) are considered safe in typical consumption amounts, some individuals report sensitivities (e.g., hyperactivity in children, migraines). Opt for natural alternatives (beetroot, spirulina + carmine blends) when possible—and always check labels for hidden additives.
- Dietary Accommodations: Easily adapted for keto (replace graham crust with almond flour + coconut flour + erythritol + butter; reduce sugar to zero; use sugar-free gel coloring), paleo (tigernut flour crust + coconut cream filling + raw cacao), or nut-free (sunflower seed butter crust + oat-based crumbs).
- Mindful Enjoyment Tip: Pair a square with herbal tea (peppermint or ginger) and fresh seasonal fruit to slow digestion, enhance satisfaction, and round out micronutrient intake.
Ingredients
- 1 ½ cups (150g) finely crushed graham cracker crumbs (about 10 full sheets; gluten-free if needed)
- ¼ cup (50g) granulated sugar
- 6 tablespoons (85g) unsalted butter, melted and slightly cooled
- 8 oz (227g) full-fat brick-style cream cheese, room temperature
- ½ cup (100g) granulated sugar
- 1 teaspoon pure vanilla extract
- 1 teaspoon white vinegar or apple cider vinegar
- ¼ cup (20g) natural unsweetened cocoa powder (non-alkalized)
- 1–2 teaspoons red gel food coloring (AmeriColor Super Red recommended)
- Pinch of fine sea salt
- Optional Topping: ½ cup white chocolate, ⅓ cup heavy cream, flaky sea salt, or fresh berries
Directions
- Line an 8×8-inch baking dish with parchment paper, allowing 2-inch overhang on two opposite sides. Lightly grease parchment and pan edges.
- In a medium bowl, combine graham cracker crumbs, ¼ cup sugar, and melted butter. Mix until evenly moistened. Firmly press into the bottom of the pan using a flat-bottomed glass or measuring cup. Refrigerate 20 minutes.
- In a large bowl, beat cream cheese with a hand mixer on medium for 1 minute until smooth. Add ½ cup sugar and beat 2–3 minutes until light and fluffy. Scrape bowl.
- Add vanilla and vinegar; mix 30 seconds. Sift in cocoa powder and add 1 tsp red gel. Beat on low until fully incorporated and uniformly red—about 45 seconds. Do not overmix.
- Pour filling over chilled crust. Smooth surface with an offset spatula. Tap pan sharply 3–4 times to remove air bubbles.
- Cover loosely with plastic wrap (not touching surface) and refrigerate minimum 4 hours—ideally overnight (8–12 hours).
- Just before serving, prepare optional topping. Lift slab from pan using parchment overhang. Slice into 16 squares using a hot, dry knife—wiping between cuts.
- Serve chilled. Store covered in refrigerator up to 4 days.
FAQ
- Can I freeze Red Velvet No-Bake Squares?
- Yes! Fully chilled squares (uncut) freeze beautifully for up to 3 months. Wrap the whole slab tightly in plastic wrap, then in aluminum foil. Thaw overnight in the refrigerator before slicing. Avoid freezing topped squares—the ganache or whipped cream may weep or separate.
- Why did my filling turn brown instead of red?
- Most commonly due to using Dutch-processed cocoa (alkalized), which neutralizes the acidity needed for red pigment stability. Also check: expired or low-quality food coloring, excessive mixing after adding color, or exposure to baking soda (which shifts pH and dulls red tones).
- Can I use Cool Whip or frozen whipped topping?
- Not recommended. These contain stabilizers, gums, and high-fructose corn syrup that compromise texture, cause weeping, and mute flavor. Real heavy cream or properly whipped full-fat dairy delivers superior richness, stability, and clean taste.
- My crust is crumbly—how do I fix it?
- Press more firmly next time—and chill longer before cutting. If already sliced, gently re-press loose pieces and return to fridge for 30 minutes. For future batches, add 1 extra tablespoon butter or substitute 1 tbsp honey for added binding power.
- Is there a way to reduce the sugar without ruining texture?
- Absolutely. Reduce granulated sugar in the filling to ⅓ cup (67g)—the cream cheese and graham crackers provide inherent sweetness. For further reduction, replace half the sugar with monk fruit–erythritol blend (1:1 ratio), maintaining volume and creaming ability.
- Can I make these dairy-free?
- Yes—with excellent results. Use Kite Hill or Miyoko’s plain cream cheese, refined coconut oil (melted) for butter, and dairy-free graham crackers. For best color retention, use beet powder (¼ tsp) + 1 tsp lemon juice instead of vinegar.
- How far in advance can I make these?
- Up to 2 days ahead—store covered in the refrigerator. For events, prepare crust and filling separately: crust stays crisp for 3 days wrapped in parchment; filling keeps 2 days refrigerated. Assemble day-of and chill 4 hours.
- What’s the best way to transport them?
- Keep chilled until departure. Place squares upright in a rigid container with parchment between layers. Pack surrounded by ice packs inside an insulated cooler bag. Serve within 2 hours of arrival—or re-chill 30 minutes before serving.
Summary
Red Velvet No-Bake Squares are a stunning, effortlessly elegant dessert that delivers the beloved flavor and romance of traditional red velvet—without heat, timers, or baking anxiety. With a buttery graham crust, vivid cocoa-cream cheese filling, and endless customization potential, they’re as practical for weeknight treats as they are unforgettable at celebrations.
Rich in nostalgic charm and modern flexibility, these squares prove that extraordinary desserts don’t demand extraordinary effort—just quality ingredients, mindful technique, and a little chill time.