Introduction
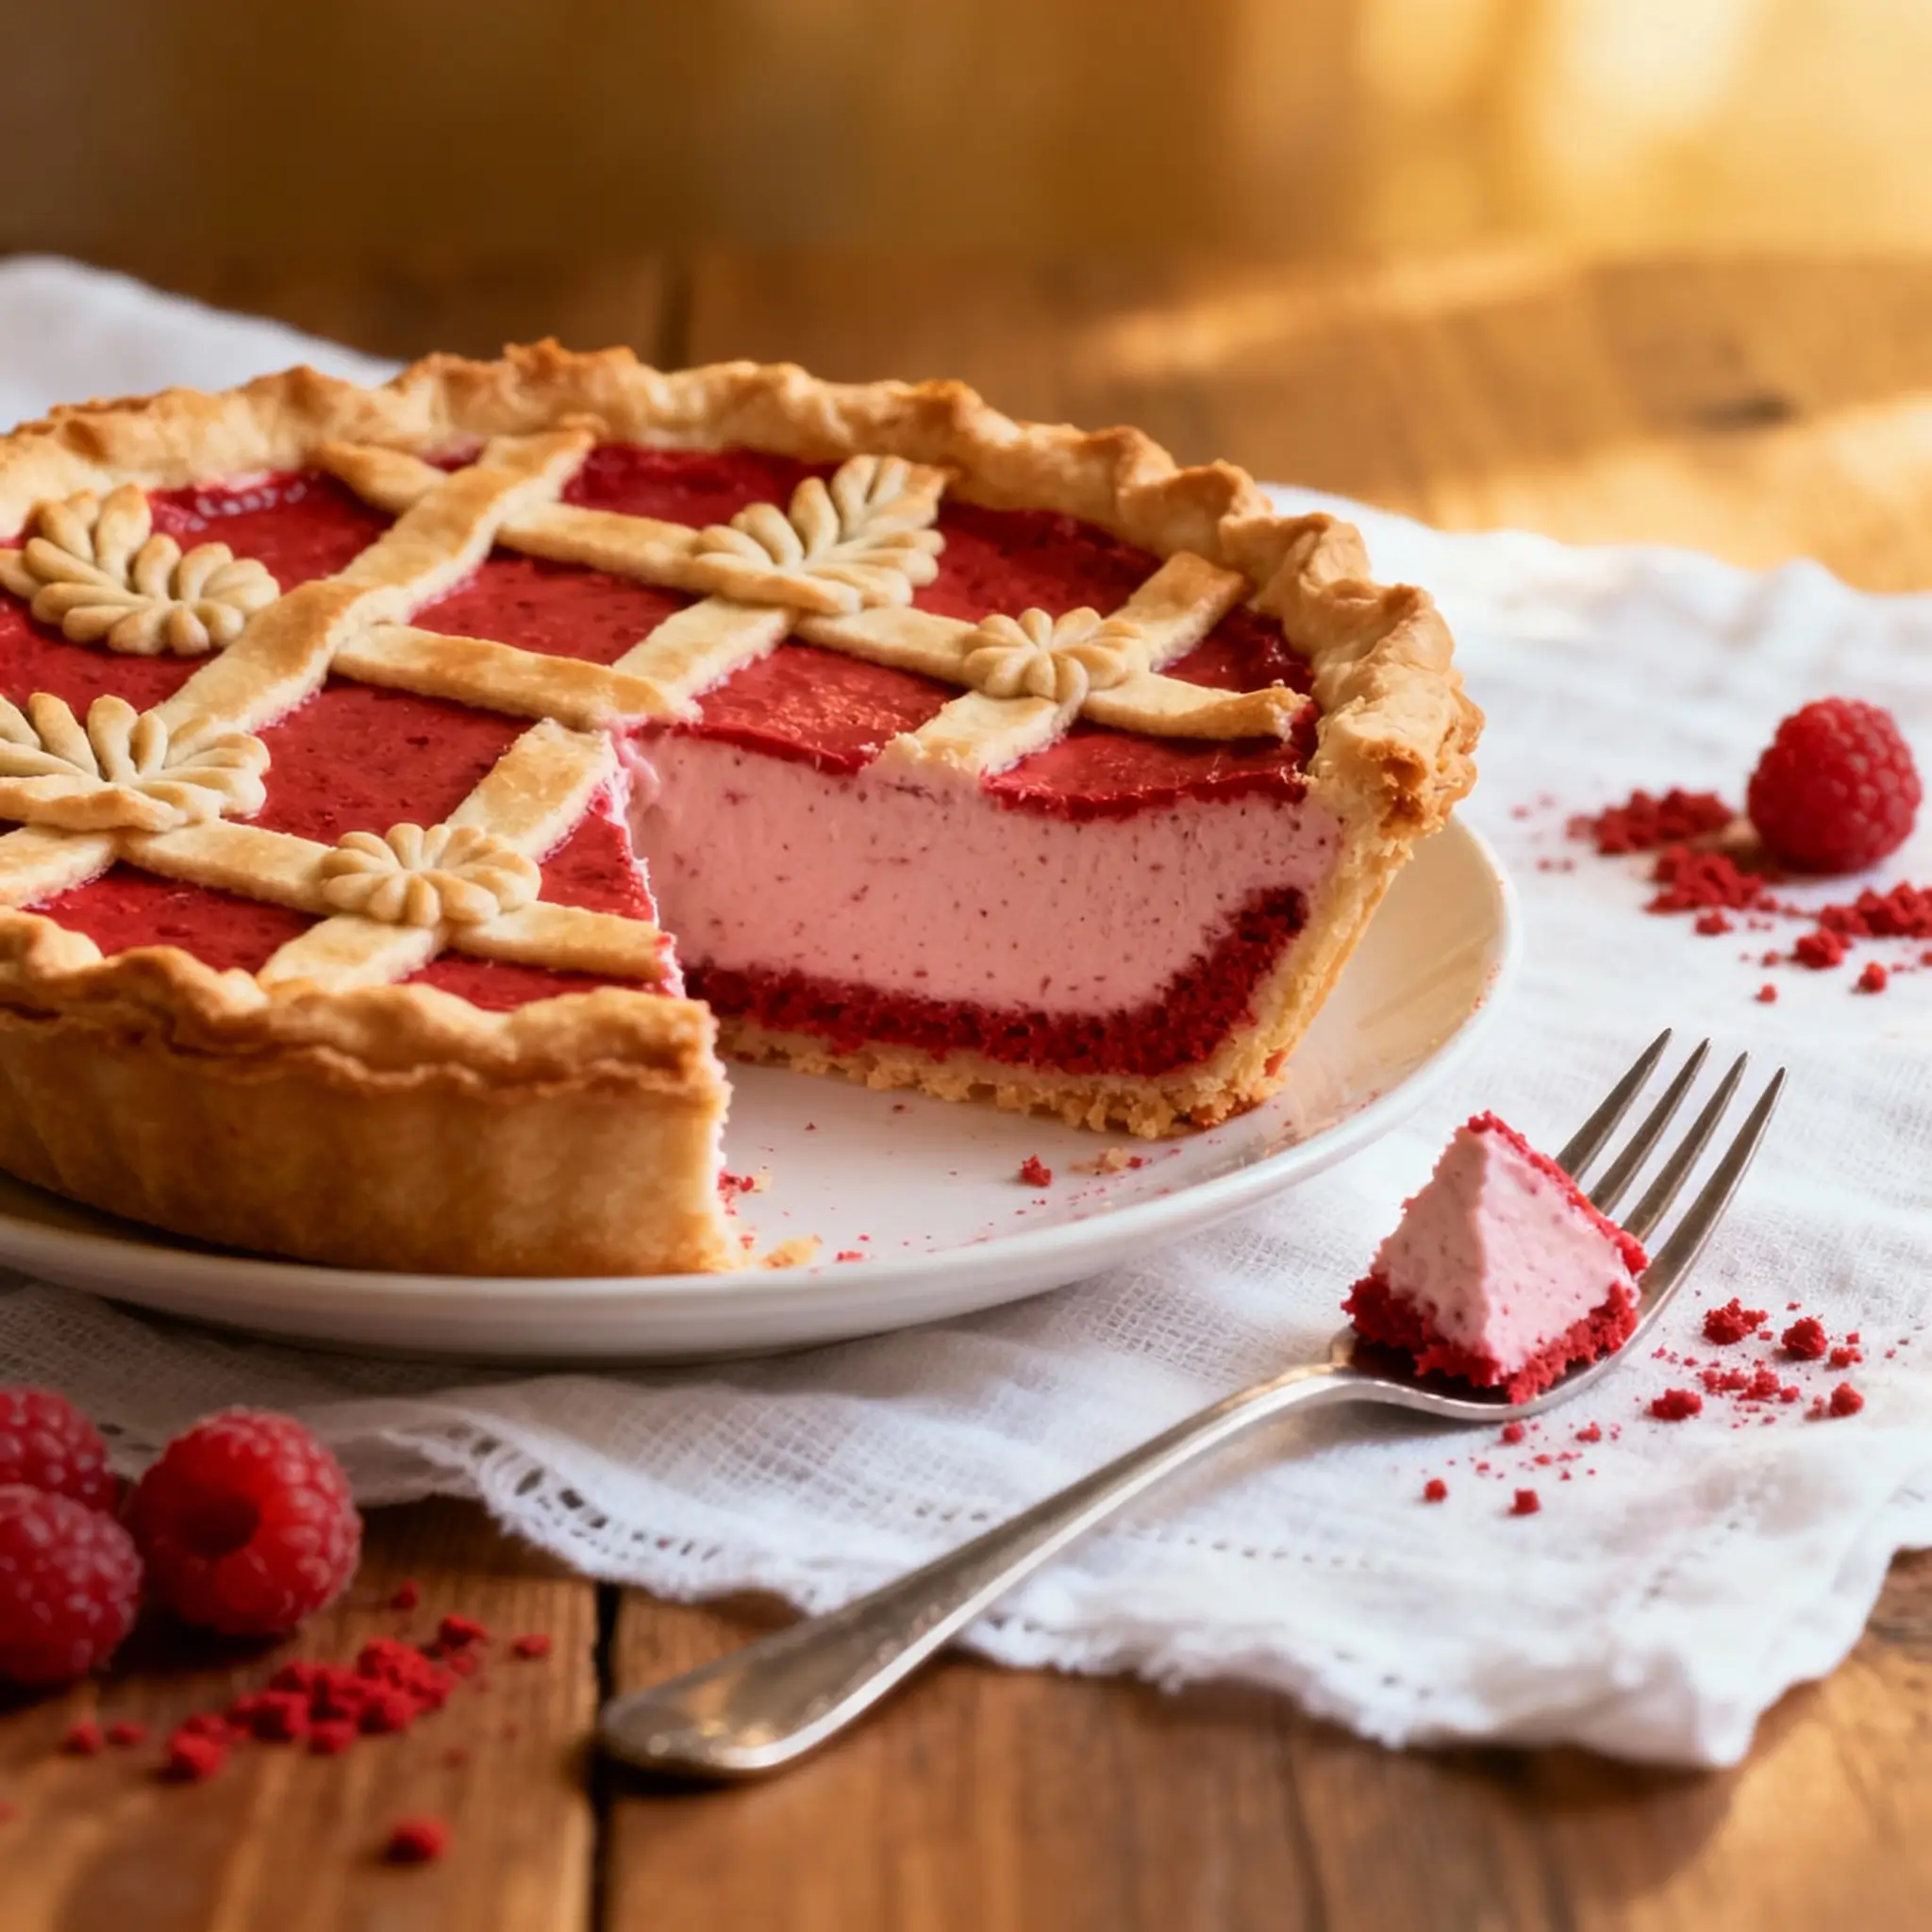
Red Velvet Milk Pie is a decadent, visually stunning, and nostalgically comforting dessert that masterfully bridges the beloved flavors of classic red velvet cake with the creamy elegance of a traditional custard or milk pie. Unlike its more familiar cousins—red velvet cupcakes or layer cakes—this pie transforms the signature cocoa-kissed, tangy-sweet, crimson-hued batter into a luxuriously smooth, velvety filling encased in a buttery, flaky, or graham cracker crust. It’s a showstopper at holiday tables, bridal showers, Valentine’s Day gatherings, and any occasion where romance, richness, and a touch of whimsy are on the menu. With its vibrant ruby-red hue (naturally derived or artfully enhanced), silky texture, and subtle hints of buttermilk, vinegar, and vanilla, Red Velvet Milk Pie delivers an unforgettable sensory experience—simultaneously nostalgic and refreshingly innovative.
The History
While no single documented origin point exists for Red Velvet Milk Pie, its roots are deeply entwined with the broader evolution of both red velvet cake and American milk pie traditions. Red velvet cake itself traces back to the early 20th century, gaining popularity during the Great Depression when home bakers used natural cocoa (rich in anthocyanins) reacting with acidic ingredients like buttermilk and vinegar to produce a subtle reddish tint—later amplified by beet juice or, eventually, synthetic red food dye. The iconic Waldorf Astoria Hotel in New York is often credited with popularizing the cake in the 1940s, though earlier versions appeared in Southern cookbooks and community church collections.
Milk pies—including lemon meringue, chess pie, and the Southern “milk custard pie”—have long been staples of American home baking, prized for their simplicity, pantry-friendly ingredients, and luscious, set-but-tender fillings. The fusion into “Red Velvet Milk Pie” emerged organically in the 2010s as part of the broader “deconstructed dessert” and “flavor crossover” movement. Food bloggers, pastry chefs, and viral social media creators began experimenting—replacing traditional lemon or chocolate custards with red velvet–infused variations. Early iterations appeared on platforms like Pinterest and Instagram around 2014–2015, often tagged with #RedVelvetDessert or #MilkPieRevival. By the late 2010s, it had earned dedicated spots in boutique bakeries from Austin to Asheville, frequently served with white chocolate shavings, cream cheese whipped topping, or candied rose petals. Today, Red Velvet Milk Pie stands as a testament to culinary reinvention—honoring tradition while daring to reimagine texture, color, and emotional resonance in every slice.
Ingredients Breakdown
Every exceptional Red Velvet Milk Pie begins with intentionality—not just in measurement, but in ingredient quality and function. Below is a comprehensive, chef-level breakdown of each component and why it matters:
- All-Purpose Flour (2 tbsp): Provides essential structure and thickening power without gumminess. Opt for unbleached, low-protein flour for optimal tenderness in the custard matrix.
- Granulated Sugar (1 cup + 2 tbsp): Sweetens and aids in caramelization of the crust edge; also stabilizes the egg proteins during cooking. The extra 2 tbsp is reserved for the filling’s final balance.
- Cocoa Powder (3 tbsp, unsweetened, natural—not Dutch-processed): Critical for authentic red velvet flavor and chemical reactivity. Natural cocoa contains higher acidity, which interacts with vinegar and baking soda to deepen color and add subtle tang. Dutch-processed cocoa will mute both color development and signature brightness.
- Distilled White Vinegar (1 tsp): The secret catalyst—lowers pH to activate anthocyanins in cocoa and enhance red pigment development. Also tenderizes gluten and adds bright counterpoint to sweetness.
- Baking Soda (¼ tsp): Reacts instantly with vinegar to create gentle leavening and lift within the custard, yielding airy lightness instead of dense heaviness—key to the “velvet” mouthfeel.
- Buttermilk (1 cup, full-fat, cultured, not powdered substitute): Imparts signature tang, moisture, and acidity. Real buttermilk contains live cultures that subtly ferment lactose, lending nuanced depth impossible to replicate with milk + lemon juice.
- Whole Milk (1½ cups): Adds creaminess, fat content for richness, and protein for stable coagulation. Avoid skim or ultra-pasteurized varieties—they lack body and may curdle under heat.
- Egg Yolks (6 large, room temperature): The foundation of custard silkiness. Yolks contribute emulsifying lecithin, fat for mouth-coating richness, and natural yellow-orange pigment that harmonizes with red dye for a truer burgundy tone.
- Unsalted Butter (4 tbsp, cubed, cold): Swirled in at the end for gloss, sheen, and luxurious melt-in-the-mouth finish. Cold butter ensures even dispersion without greasiness.
- Pure Vanilla Extract (2 tsp, Madagascar Bourbon grade): Adds floral warmth and complexity. Imitation vanillin lacks aromatic nuance and can clash with cocoa’s earthiness.
- Red Food Coloring (1½–2 tbsp liquid or 1½ tsp high-strength gel): Not optional for visual impact—but choose wisely. Gel dyes yield deeper, more stable color with less liquid interference. For clean-label appeal, consider beetroot powder (2 tsp) + pomegranate juice reduction (1 tbsp), though color will be softer and more rustic.
- Salt (¼ tsp fine sea salt): Enhances all other flavors, balances sweetness, and sharpens cocoa’s bitterness—never omit.
- Crust Options (choose one):
- Classic Flaky Pastry Crust: 1½ cups all-purpose flour, ½ tsp salt, ½ cup cold unsalted butter (cubed), ¼ cup ice water + 1 tsp apple cider vinegar. Blind-baked until golden and crisp.
- Graham Cracker Crust: 1½ cups finely crushed graham crackers, 6 tbsp melted butter, ¼ cup brown sugar, ¼ tsp cinnamon. Pressed and pre-baked for 10 minutes at 350°F.
- Oreo Crust (for bold contrast): 24 crushed Oreo cookies (filling included), 6 tbsp melted butter, pinch of espresso powder. Delivers deep chocolate base that complements rather than competes.
- Optional Garnishes: Whipped cream cheese frosting (½ cup full-fat cream cheese, ¾ cup powdered sugar, 1 cup heavy cream, 1 tsp vanilla), white chocolate curls, edible gold flakes, freeze-dried raspberry dust, mint sprigs, or a delicate drizzle of red velvet glaze (powdered sugar + buttermilk + red dye).
Step-by-Step Recipe
- Prepare the Crust (Day Before Recommended): Whichever crust you select, prepare it at least 4–6 hours ahead—or ideally overnight—to allow full chilling and flavor integration. For pastry crust: combine dry ingredients, cut in cold butter until pea-sized crumbs form, add vinegar-water mixture gradually, gather into disc, wrap, and refrigerate ≥2 hours. Roll out on floured surface to ⅛” thickness, fit into 9-inch pie dish, trim, flute edges, line with parchment, fill with pie weights or dried beans, and bake at 375°F for 20 minutes. Remove weights, prick base, bake 12–15 minutes more until golden. Cool completely on wire rack. For graham or Oreo crust: press firmly into dish, bake 10 minutes, cool fully.
- Temper the Egg Yolks (Critical Step): In a medium heatproof bowl, whisk together egg yolks, ¼ cup of the granulated sugar, and salt until pale and slightly thickened (~2 min). Set aside.
- Build the Cocoa-Vinegar Base: In a heavy-bottomed saucepan, whisk together remaining sugar, cocoa powder, and flour until no lumps remain. Gradually whisk in buttermilk and whole milk until fully smooth. Place over medium-low heat and stir constantly with a silicone spatula, scraping corners and bottom, until mixture begins to steam (≈3–4 minutes). Do not boil yet.
- Activate the Velvet Reaction: Remove pan from heat. Whisk in vinegar and baking soda—observe the gentle foaming reaction (a sign of proper pH shift and color activation). Immediately return to low heat and stir 1 minute more to stabilize.
- Temper & Thicken the Custard: Slowly pour about 1 cup of the warm milk-cocoa mixture into the yolk mixture in a thin stream, whisking vigorously the entire time to prevent scrambling. Once combined, pour this tempered mixture back into the saucepan. Return to medium-low heat, stirring constantly in a figure-eight motion. Continue cooking, without boiling, until the custard thickens enough to coat the back of a spoon (≈170–175°F on an instant-read thermometer)—typically 8–12 minutes. It should leave a clear path when you run your finger across the spatula.
- Infuse Flavor & Color: Remove from heat. Immediately whisk in vanilla extract and red food coloring, starting with 1 tbsp liquid or 1 tsp gel. Stir thoroughly, then assess color intensity. Add more in ½-tsp increments until desired deep crimson is achieved. Let rest 2 minutes—this allows color to bloom.
- Finish with Butter & Strain: Whisk in cold butter, one cube at a time, until fully melted and emulsified. The filling should now be glossy, velvety, and hold soft peaks. Immediately strain through a fine-mesh sieve into a clean bowl to remove any possible lumps or cooked egg bits—non-negotiable for true silkiness.
- Fill & Chill: Pour warm filling into the completely cooled crust. Smooth the top with an offset spatula. Cover *directly* with plastic wrap—pressing it flush against the surface to prevent skin formation. Refrigerate undisturbed for *at least 8 hours*, preferably 12–24 hours. This slow, even chill sets the custard with flawless sliceability and intensifies flavor harmony.
- Final Touches Before Serving: At least 30 minutes before serving, remove pie from fridge. If using whipped cream cheese topping, prepare it separately: beat cream cheese until smooth, gradually add powdered sugar, then fold in whipped cream. Pipe or spread over chilled pie. Garnish thoughtfully—avoid overcrowding. Slice with a hot, wet knife for clean edges.
Tips
- Temperature Is Everything: All dairy and eggs must be room temperature before combining. Cold ingredients cause uneven emulsification and increase risk of lumps or graininess.
- Patience with Heat: Never rush the custard—medium-low heat prevents curdling. If you see tiny bubbles breaking the surface, reduce heat immediately. A double boiler is acceptable for beginners but extends cook time significantly.
- Straining Is Non-Negotiable: Even if the filling looks perfectly smooth, microscopic particles remain. Straining guarantees the signature “velvet” texture—skip it only if you prefer rustic charm over refined luxury.
- Color Timing Matters: Add red dye *after* removing from heat and *before* adding butter. High heat degrades some dyes; butter can inhibit even dispersion.
- Cool the Crust Completely: A warm crust will partially cook the bottom of the custard, causing weeping or separation upon slicing.
- Chill Overnight, Not Just “a Few Hours”: Custard continues to set and mature in flavor during extended chilling. Pies chilled less than 8 hours often slump or slide when sliced.
- Prevent Soggy Bottoms: For pastry crusts, brush the *baked, cooled* crust interior with a thin layer of melted white chocolate or egg white and rebake 2 minutes—creates a moisture barrier.
- Whipped Topping Stability: Stabilize cream cheese whipped topping with ½ tsp unflavored gelatin (bloomed in 1 tbsp cold water, then microwaved 5 seconds) for service up to 4 hours at room temperature.
- Knife Technique: Run a long, thin knife under very hot water, wipe dry, slice, then repeat for each cut. This yields glass-smooth slices with defined layers.
- Freezing Option: Unfrosted, fully chilled pie (without whipped topping) freezes beautifully for up to 3 months. Wrap tightly in plastic + foil. Thaw overnight in fridge—not at room temp—to preserve texture.
Variations and Customizations
Red Velvet Milk Pie is remarkably adaptable—its core custard framework welcomes creativity without compromising integrity. Here are inspired, tested variations ranging from subtle enhancements to bold reimaginings:
- Black Cocoa Red Velvet: Replace 1½ tbsp natural cocoa with black cocoa (like King Arthur or Hoosier Hill Farm). Delivers an intense, almost Oreo-like depth, near-black crumb, and dramatic maroon-to-ebony gradient when paired with gel dye.
- Maple-Bourbon Velvet: Substitute ¼ cup of the whole milk with pure maple syrup and add 1 tbsp aged bourbon after removing from heat. Infuses warm, woody, caramelized notes—ideal for fall menus. Garnish with candied pecans.
- Coconut-Lime Velvet: Use coconut milk (full-fat canned) for half the dairy, add zest of 1 lime with the vanilla, and top with toasted coconut flakes and lime zest. Tropical twist with balanced acidity.
- Espresso Velvet: Dissolve 1 tsp instant espresso powder into the warm milk mixture before adding cocoa. Deepens chocolate notes and adds sophisticated bitterness—pairs exquisitely with dark chocolate garnish.
- Vegan Velvet Milk Pie: Swap egg yolks for ¼ cup cornstarch + 2 tbsp silken tofu (blended smooth); replace dairy with oat milk + coconut cream (3:1 ratio); use vegan butter and apple cider vinegar. Requires precise temp control but achieves remarkable richness.
- Mini Mason Jar Pies: Scale recipe down to ⅔ and portion into 4–6 oz sterilized mason jars. Chill 6+ hours. Perfect for weddings, picnics, or gift-giving—top with piped cream and a single red velvet crumb.
- Layered Velvet Tart: Bake in a 9×13″ tart pan with removable bottom. After chilling, top with a thin layer of white chocolate ganache and a mirror glaze (white chocolate + gelatin + glucose + red dye) for professional patisserie presentation.
- Spiced Velvet (Holiday Edition): Add ½ tsp ground cinnamon, ¼ tsp ground cardamom, and a pinch of freshly grated nutmeg to the dry ingredients. Serve with spiced whipped cream and crystallized ginger.
- “Unfilled” Deconstructed Version: Serve chilled custard in glasses layered with crumbled red velvet cake, cream cheese mousse, and red velvet crumble—textural contrast meets nostalgic flavor stacking.
- Alcohol-Infused Velvet: Stir in 2 tbsp Chambord (raspberry liqueur), Grand Marnier, or Kahlúa post-cooking for adult sophistication. Reduce added sugar by 1 tbsp to compensate.
Health Considerations and Nutritional Value
While Red Velvet Milk Pie is undeniably indulgent, understanding its nutritional composition empowers mindful enjoyment—and opens doors for thoughtful adaptations. Per standard slice (1/8 of a 9-inch pie with flaky pastry crust, made with full-fat dairy and traditional ingredients), approximate values are:
- Calories: 425–470 kcal
- Total Fat: 24–28g (14–17g saturated)
- Carbohydrates: 48–52g (38–42g sugars)
- Protein: 6–8g
- Sodium: 210–260mg
- Calcium: ~12% DV (from dairy)
- Iron: ~6% DV (from cocoa)
- Antioxidants: Moderate—cocoa provides flavanols; natural red dyes (beet, pomegranate) add betalains and polyphenols.
Key Health Notes:
- Sugar Content: The high sugar load comes primarily from granulated sugar, buttermilk lactose, and crust sweeteners. For reduced sugar: replace ¼ cup granulated with monk fruit-erythritol blend (1:1), and use unsweetened cocoa. Note: artificial sweeteners may alter mouthfeel and browning.
- Saturated Fat: Primarily from butter, egg yolks, and whole milk. Lower-fat options (2% milk, light butter) risk graininess or poor set—better to reduce portion size than compromise texture.
- Gluten: Naturally present in flour-based crust and thickener. Gluten-free adaptation is highly successful using 1:1 GF flour blend (with xanthan gum) and GF graham or almond flour crust.
- Dairy Sensitivity: Lactose-intolerant individuals may tolerate small servings due to fermentation in buttermilk—but vegan version is safest alternative.
- Food Dye Concerns: While FDA-approved red dyes (Red #40) are deemed safe in regulated amounts, sensitive individuals (especially children with ADHD) may prefer natural alternatives: beet powder (adds earthy note), hibiscus tea reduction (tart, floral), or strawberry purée (adds fruit sweetness).
- Nutrient Enhancement: Boost fiber with whole wheat pastry flour in crust (up to 50% substitution); add chia or flaxseed meal (1 tsp) to dry ingredients for omega-3s; garnish with fresh raspberries for vitamin C and anthocyanins.
- Mindful Enjoyment Strategy: Serve smaller portions (1/10 or 1/12 slices), pair with herbal tea or sparkling water, and savor slowly. One well-crafted slice offers greater satisfaction than two rushed ones.
Ingredients
Makes one 9-inch pie (8–10 servings)
- 1 unbaked 9-inch flaky pastry crust (or graham cracker/Oreo crust), fully baked and cooled
- 1 cup full-fat cultured buttermilk, room temperature
- 1½ cups whole milk, room temperature
- 1 cup + 2 tbsp granulated sugar, divided
- 3 tbsp unsweetened natural cocoa powder (not Dutch-processed)
- 2 tbsp all-purpose flour
- 6 large egg yolks, room temperature
- ¼ tsp fine sea salt
- 1 tsp distilled white vinegar
- ¼ tsp baking soda
- 4 tbsp unsalted butter, cold and cubed
- 2 tsp pure Madagascar Bourbon vanilla extract
- 1½–2 tbsp liquid red food coloring or 1½ tsp high-strength red gel food coloring
Directions
- Preheat oven to 375°F if blind-baking pastry crust. Prepare and fully bake your chosen crust according to instructions. Cool completely on a wire rack—minimum 2 hours, preferably overnight.
- In a medium heatproof bowl, whisk egg yolks, ¼ cup of the granulated sugar, and salt until pale yellow and slightly thickened (~90 seconds). Set aside.
- In a heavy-bottomed, medium saucepan, whisk together remaining sugar, cocoa powder, and flour until homogeneous and lump-free.
- Gradually whisk in buttermilk and whole milk until completely smooth and uniform. Place over medium-low heat.
- Stir constantly with a silicone spatula, scraping sides and bottom, until mixture begins to steam gently (≈3–4 minutes). Do not let it simmer or boil.
- Remove saucepan from heat. Whisk in vinegar and baking soda—the mixture will foam lightly. Return to low heat and stir 1 minute to stabilize.
- Slowly pour about 1 cup of the warm milk-cocoa mixture into the yolk mixture in a thin, steady stream, whisking vigorously the entire time to prevent curdling.
- Pour the tempered yolk mixture back into the saucepan. Return to medium-low heat.
- Continue stirring constantly in a figure-eight motion until the custard thickens sufficiently to coat the back of a spoon (≈170–175°F), 8–12 minutes. It should be velvety, glossy, and leave a clean trail when you run your finger across the spatula.
- Immediately remove from heat. Whisk in vanilla extract and red food coloring, beginning with 1 tbsp liquid or 1 tsp gel. Stir thoroughly, then assess color. Add more dye in small increments until deep, even crimson is achieved.
- Let stand 2 minutes. Whisk in cold butter, one cube at a time, until fully incorporated and glossy.
- Immediately strain custard through a fine-mesh sieve into a clean bowl, pressing solids with a spatula to extract all liquid. Discard any residue.
- Pour warm custard into the completely cooled pie crust. Smooth surface with an offset spatula.
- Cover *directly* with plastic wrap—pressing it flush against the custard surface to prevent skin formation.
- Refrigerate undisturbed for at least 8 hours—or optimally 12–24 hours—for perfect set and flavor development.
- At least 30 minutes before serving, remove pie from refrigerator. Add optional whipped cream cheese topping and garnishes. Slice with a hot, wet knife for clean presentation.
FAQ
- Q: Can I make this pie without food coloring?
- A: Yes—but the result won’t be “red velvet” in appearance or full flavor profile. Natural alternatives include 2 tsp beetroot powder + 1 tbsp pomegranate juice (reduced by half), or 3 tbsp strained raspberry purée. Expect a muted pink-burgundy hue and subtle fruity undertones. The vinegar-cocoa reaction still occurs, preserving tang and depth.
- Q: Why did my custard curdle or become grainy?
- A: Most commonly due to overheating (boiling or exceeding 175°F), adding cold eggs to hot milk, or insufficient whisking during tempering. Always use low heat, temper yolks slowly, and stir constantly. If minor curdling occurs, straining while warm usually rescues texture.
- Q: Can I use Dutch-process cocoa?
- A: Technically yes—but it will yield a darker, less vibrant red, diminished tang, and potentially thicker, pastier texture due to neutralized acidity. Natural cocoa is strongly recommended for authenticity.
- Q: How do I prevent a soggy bottom crust?
- A: Ensure crust is fully cooled before filling. For pastry crusts, brush interior with melted white chocolate or egg white and bake 2 minutes more before cooling. Also, avoid over-chilling the custard before pouring—it should be warm, not hot nor cold.
- Q: Can I make this ahead for Thanksgiving or Christmas?
- A: Absolutely—and encouraged! Fully assembled pie keeps beautifully refrigerated for up to 4 days. Prepare crust and custard 1–2 days ahead, then assemble and chill overnight before serving. Whipped topping should be added no more than 2 hours before serving.
- Q: Is there a way to make it lighter or lower-calorie?
- A: While full-fat dairy is ideal for texture, you can successfully use 2% milk and reduce butter to 2 tbsp—but expect slightly less richness. For significant reduction, try the vegan version with coconut cream and tofu—it delivers surprising decadence with fewer saturated fats.
- Q: My pie wept or released liquid after slicing—what went wrong?
- A: This “weeping” is usually caused by under-chilling (custard didn’t fully set), overmixing after adding butter, or temperature shock (e.g., placing warm custard into a warm crust). Ensure full 12-hour chill, strain meticulously, and always use cooled crust.
- Q: Can I freeze Red Velvet Milk Pie?
- A: Yes—unfrosted, fully chilled pie (without whipped topping or fresh garnishes) freezes well for up to 3 months. Wrap tightly in plastic wrap, then aluminum foil. Thaw overnight in the refrigerator. Do not thaw at room temperature or refreeze.
- Q: What’s the best way to store leftovers?
- A: Cover tightly with plastic wrap pressed directly onto the surface, or transfer slices to an airtight container. Refrigerate for up to 4 days. Avoid storing with strong-smelling foods—the custard readily absorbs odors.
- Q: Can I add chocolate chips or nuts to the filling?
- A: Not recommended in the main custard—it disrupts smooth texture and causes separation. Instead, fold in mini chocolate chips or chopped toasted pecans into the whipped cream cheese topping, or sprinkle over the finished pie just before serving.
Summary
Red Velvet Milk Pie is a masterclass in nostalgic reinvention—melding the iconic tang