Red Velvet Ice Cream Sandwiches: A Decadent Fusion of Cake and Cream
The History: Where Southern Elegance Meets Frozen Delight
The story of Red Velvet Ice Cream Sandwiches begins with the legendary red velvet cake, a dessert shrouded in both culinary tradition and myth. Originating in the early 20th century, red velvet cake gained prominence at the Waldorf-Astoria Hotel in New York City, where it was served as an elegant, subtly chocolatey cake with a striking crimson hue. The original color came not from artificial dyes but from a reaction between natural cocoa (rich in anthocyanin) and acidic ingredients like buttermilk and vinegar—though modern versions rely heavily on red food coloring for that iconic look.
Over time, red velvet transcended its cake origins, inspiring cupcakes, cheesecakes, pancakes, and even beverages. The evolution into an ice cream sandwich was almost inevitable—a fusion of Southern baking charm and American frozen treat culture. By the 2010s, gourmet dessert shops and home bakers alike began experimenting with red velvet-flavored cookies paired with cream cheese or vanilla ice cream, creating a hybrid dessert that balances rich, tangy, and sweet elements in one indulgent bite.
Today, Red Velvet Ice Cream Sandwiches are a staple at summer gatherings, birthday parties, and upscale dessert menus. They represent a creative twist on two beloved classics: the soft, tender crumb of red velvet cake and the creamy coolness of homemade ice cream. This dessert is not just a treat—it’s an experience, combining texture, temperature, and nostalgia in every mouthful.
Ingredients Breakdown: What Makes It Irresistible?
The magic of Red Velvet Ice Cream Sandwiches lies in the harmony between two components: the cookie-cake layer and the ice cream filling. Each ingredient plays a crucial role in delivering flavor, texture, and visual appeal.
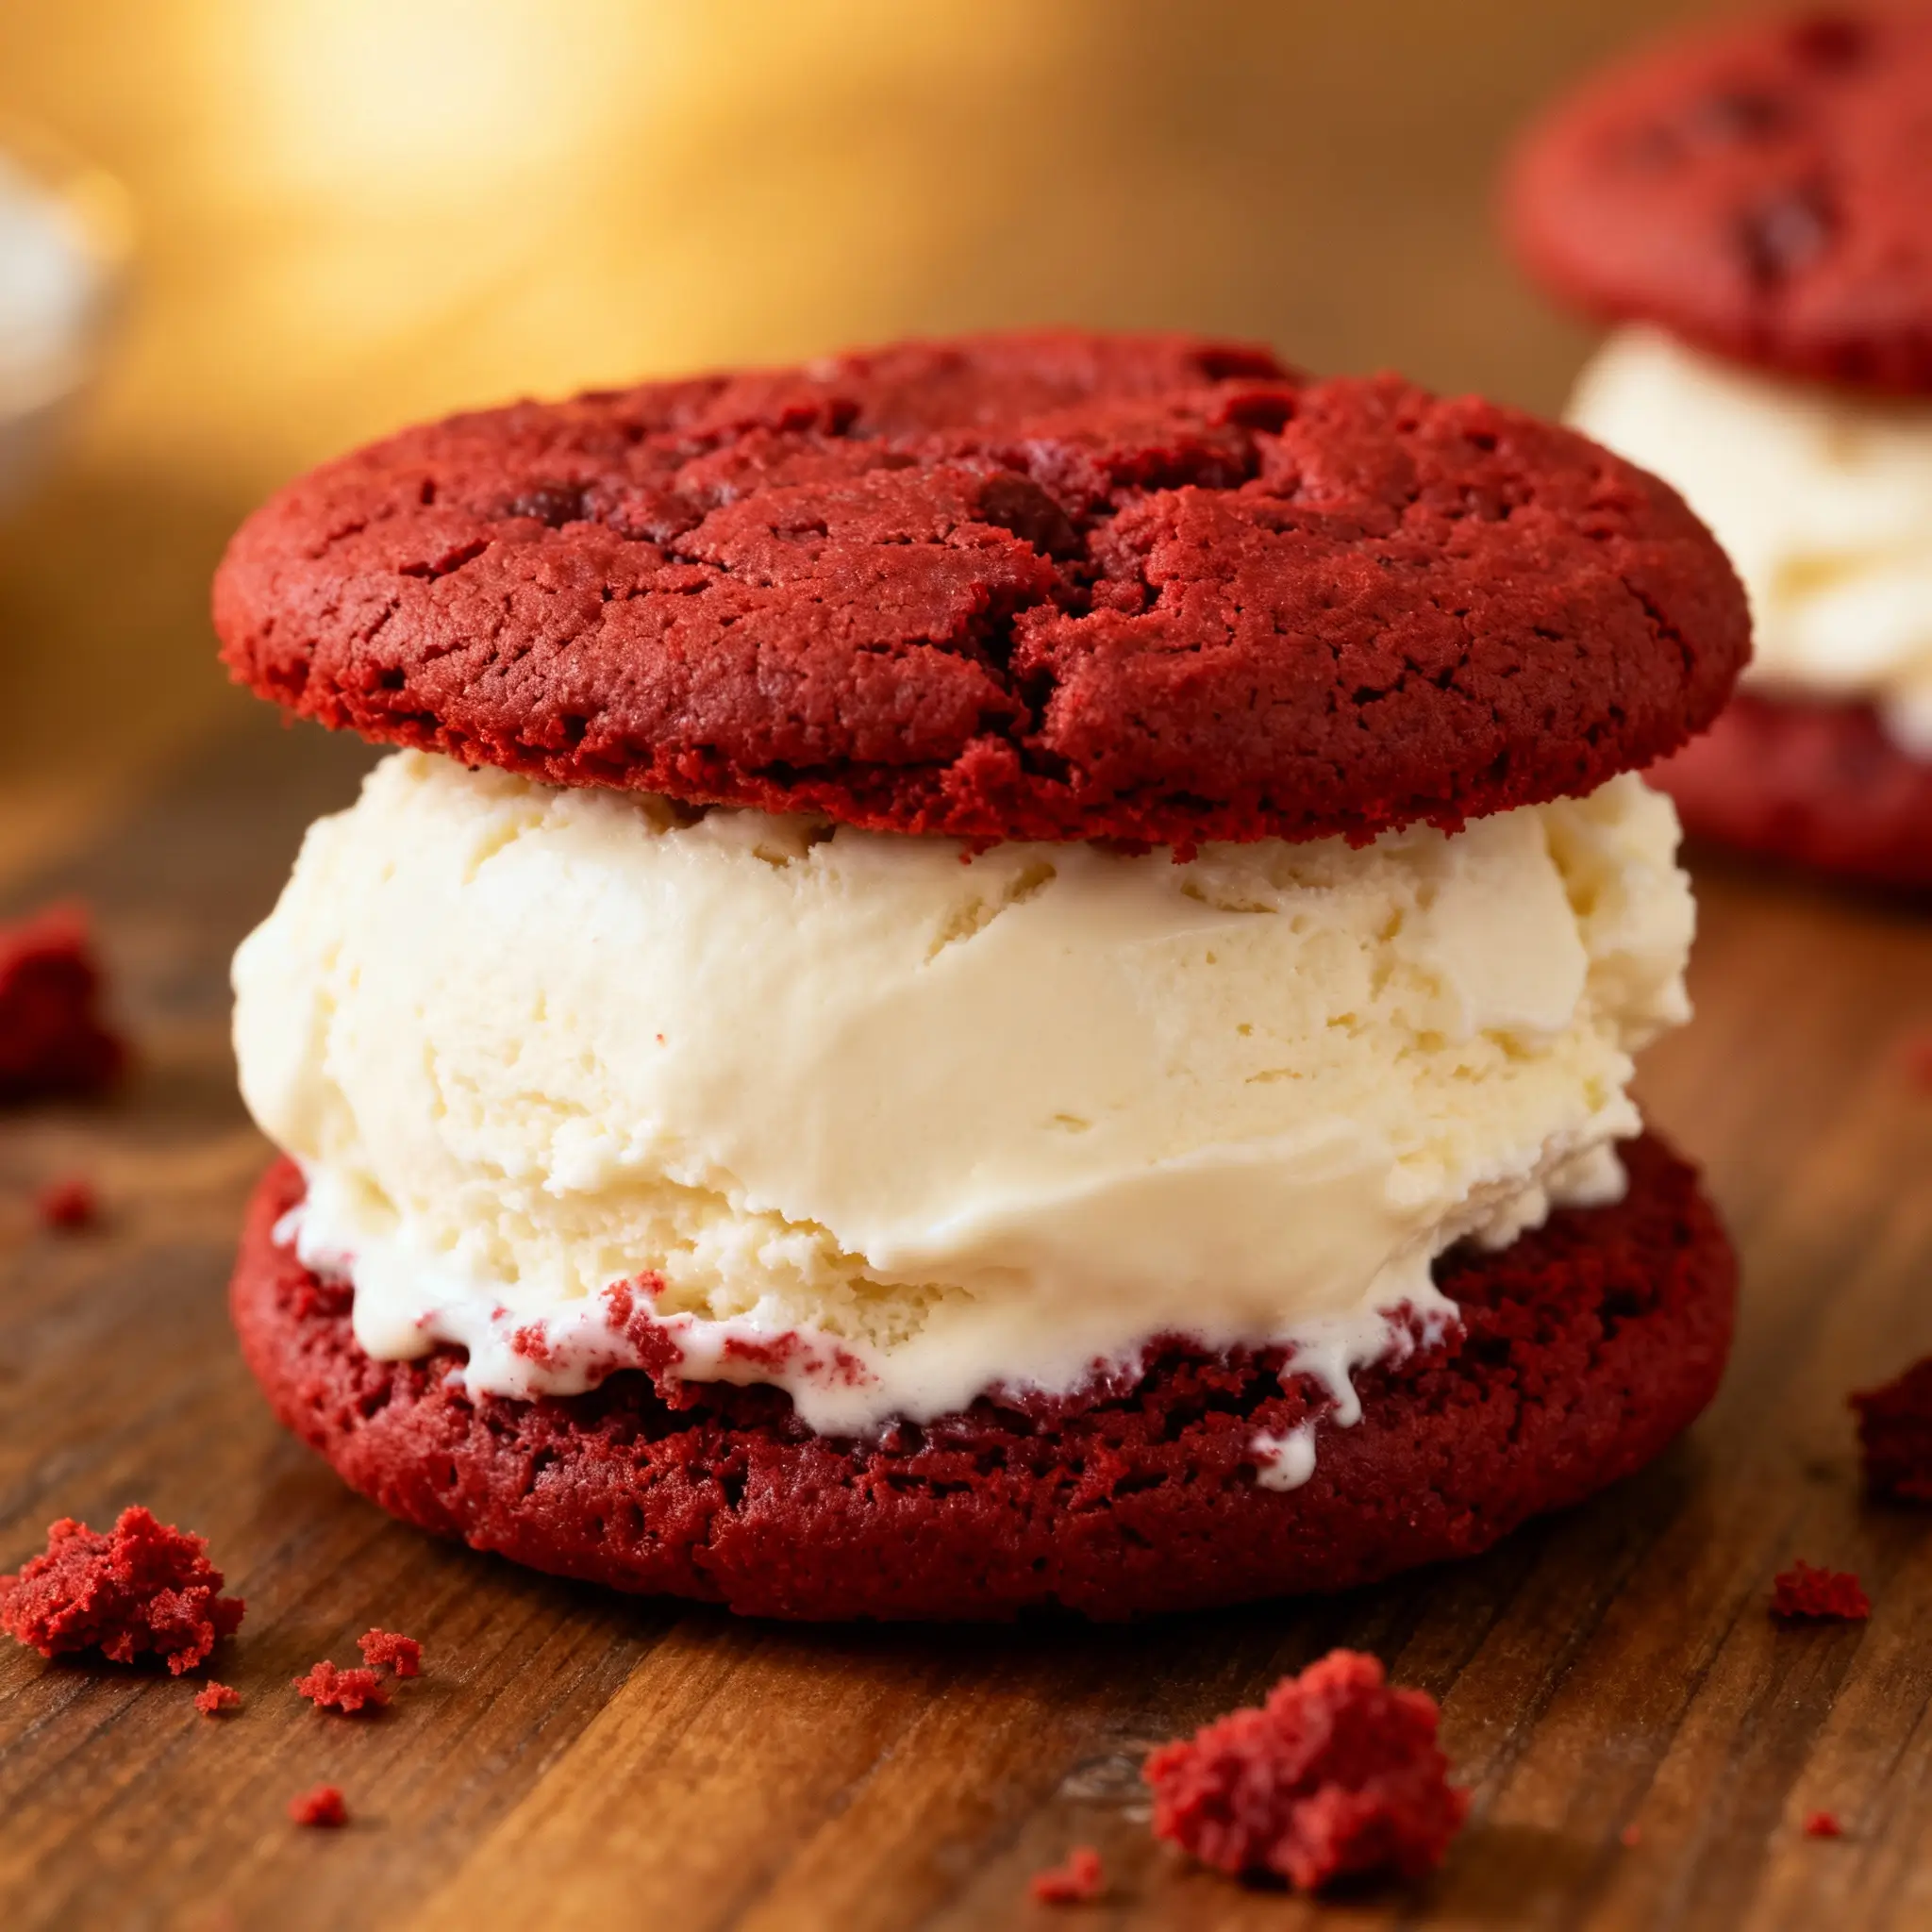
For the Red Velvet Cookies (Cake Layers):
- All-Purpose Flour: Provides structure and a soft, cake-like consistency. Sifted to avoid clumps and ensure lightness.
- Cocoa Powder (Unsweetened, Natural): Adds a mild chocolate flavor without overpowering the other notes. Natural cocoa reacts with acid for the classic red velvet chemistry.
- Baking Soda & Baking Powder: Leavening agents that help the cookies rise slightly while maintaining a tender crumb.
- Salt: Enhances all flavors and balances sweetness.
- Butter (Unsalted, Softened): Adds richness and moisture. Room temperature ensures even mixing and creaming.
- Granulated Sugar: Sweetens and contributes to a delicate chewiness.
- Brown Sugar: Adds moisture, depth, and a hint of molasses for complexity.
- Eggs (Large, Room Temperature): Bind ingredients together and add structure and richness.
- Buttermilk: The key acid that reacts with cocoa and baking soda, enhancing color and tenderness.
- Vanilla Extract: Boosts aroma and rounds out the flavor profile.
- Red Food Coloring (Liquid or Gel): Gives the signature vibrant red. Gel provides more intense color with less liquid.
- White Vinegar: Activates baking soda and enhances the tangy undertone typical of red velvet.
For the Ice Cream Filling:
- Heavy Cream: The base of the ice cream, providing richness and a smooth, creamy texture when churned.
- Whole Milk: Thins the mixture slightly and adds dairy sweetness.
- Granulated Sugar: Sweetens the ice cream and lowers the freezing point for a softer consistency.
- Cream Cheese (Full-Fat, Softened): The star ingredient—adds tanginess and mimics the traditional red velvet frosting, tying the sandwich together.
- Vanilla Extract: Complements the cream cheese and enhances overall flavor.
- Salt: Balances sweetness and brings out the cream cheese’s savory notes.
Optional additions include mini chocolate chips, crushed red velvet cake crumbs, or a swirl of raspberry puree for a fruity contrast.
Step-by-Step Recipe: Crafting the Perfect Red Velvet Ice Cream Sandwich
Making Red Velvet Ice Cream Sandwiches from scratch is a labor of love, but the results are worth every minute. Follow this detailed guide for bakery-quality results.
Part 1: Prepare the Red Velvet Cookies
- Preheat & Prep: Preheat your oven to 350°F (175°C). Line two large baking sheets with parchment paper or silicone mats.
- Dry Ingredients: In a medium bowl, whisk together 2 cups all-purpose flour, 2 tablespoons unsweetened cocoa powder, 1/2 teaspoon baking soda, 1 teaspoon baking powder, and 1/4 teaspoon salt. Set aside.
- Cream Butter & Sugars: In a large mixing bowl, beat 1 cup (2 sticks) softened unsalted butter with 1 cup granulated sugar and 1/2 cup packed brown sugar until light and fluffy (about 3–4 minutes).
- Add Eggs: Beat in 2 large eggs, one at a time, followed by 2 teaspoons vanilla extract. Mix until fully incorporated.
- Combine Wet & Dry: Gradually add the dry ingredients to the wet mixture, mixing on low speed until just combined.
- Add Buttermilk Mixture: In a small bowl, mix 1/2 cup buttermilk, 1 tablespoon white vinegar, and 1–2 tablespoons red gel food coloring. Slowly pour into the batter and mix until uniform. Do not overmix.
- Portion Dough: Use a cookie scoop (about 2 tablespoons per cookie) to form evenly sized balls. Place them 2 inches apart on prepared baking sheets.
- Bake: Bake for 10–12 minutes, until edges are set and centers spring back lightly when touched. Avoid overbaking to keep them soft.
- Cool Completely: Let cookies cool on the baking sheet for 5 minutes, then transfer to a wire rack. Cool completely before assembling (at least 1 hour).
Part 2: Make the Cream Cheese Ice Cream
- Chill Mixing Bowl: Place your stand mixer bowl and whisk attachment in the freezer for 15 minutes.
- Whip Cream: In the chilled bowl, whip 2 cups heavy cream until stiff peaks form. Transfer to another bowl and refrigerate.
- Mix Base: In the same bowl (no need to wash), beat 8 oz softened cream cheese until smooth. Add 1 cup whole milk, 3/4 cup granulated sugar, 1 teaspoon vanilla extract, and a pinch of salt. Mix until fully blended and creamy.
- Combine: Gently fold the whipped cream into the cream cheese mixture until no streaks remain. Be careful not to deflate the mixture.
- Churn (Optional): For a denser texture, pour into an ice cream maker and churn according to manufacturer’s instructions (usually 20–25 minutes). If you don’t have a machine, proceed to freezing.
- Freeze: Pour the mixture into a loaf pan or shallow container. Cover with plastic wrap touching the surface to prevent ice crystals. Freeze for at least 4–6 hours, preferably overnight.
Part 3: Assemble the Sandwiches
- Match Cookies: Pair cooled cookies by size for even sandwiches.
- Softening Ice Cream: Remove ice cream from freezer and let sit at room temperature for 2–3 minutes to soften slightly.
- Fill & Press: Place a generous scoop (about 1/4 cup) of ice cream onto the flat side of one cookie. Top with a matching cookie and press down gently until ice cream reaches edges.
- Freeze Again: Place assembled sandwiches on a tray and freeze for at least 30 minutes to re-harden.
- Optional Roll: For extra flair, roll the edges in mini chocolate chips, crushed Oreos, or red velvet crumbs before the final freeze.
- Wrap & Store: Individually wrap each sandwich in parchment paper and place in an airtight container. Store in the freezer for up to 3 weeks.
Tips for Success: Mastering the Art
- Uniform Cookies: Use a cookie scoop to ensure consistent size and even baking.
- Don’t Overbake: These should be soft and slightly underdone in the center to mimic cake texture.
- Room Temperature Ingredients: Especially eggs and cream cheese—this prevents lumps and ensures smooth blending.
- Gel Food Coloring: More concentrated than liquid, so you get bold color without adding excess moisture.
- Freeze Cookies First: If making ahead, freeze unfilled cookies in a single layer, then store in a bag. Thaw before use.
- Use Parchment Paper: Prevents sticking and makes transferring easier.
- Work Quickly: Have everything ready before assembling—ice cream melts fast!
- Double the Batch: These are popular—make extra for guests or future cravings.
Variations and Customizations: Make It Your Own
While classic Red Velvet Ice Cream Sandwiches are delicious on their own, there are countless ways to personalize them for different tastes and occasions.
- Gluten-Free Version: Substitute all-purpose flour with a 1:1 gluten-free baking blend. Ensure cocoa and food coloring are certified GF.
- Dairy-Free Option: Use plant-based butter, coconut cream, almond milk, and vegan cream cheese. Choose non-dairy red food coloring.
- Vegan Red Velvet: Replace eggs with flax eggs (1 tbsp ground flax + 3 tbsp water per egg), use vegan sugars, and follow dairy-free substitutions.
- Low-Sugar Alternative: Use erythritol or monk fruit sweetener in both components. Note: texture may vary slightly.
- Flavor Twists:
- Chocolate-Dipped: Dip half of each sandwich in melted dark or white chocolate and sprinkle with sprinkles.
- Raspberry Swirl: Swirl seedless raspberry jam into the ice cream before freezing.
- Peanut Butter Core: Add a dollop of peanut butter to the center of the ice cream before closing the sandwich.
- Boozy Version: Add 1–2 tablespoons of bourbon or Kahlúa to the ice cream base for an adult twist.
- Holiday Themes: Use green or pastel food coloring for Christmas, Easter, or baby showers. Add themed sprinkles or edible glitter.
- Mini Sandwiches: Make bite-sized versions using teaspoon-sized cookies—perfect for dessert platters.
- Cake Layer Style: Instead of cookies, bake the red velvet batter in a sheet pan, chill, cut into rectangles, and sandwich with ice cream—essentially a homemade ice cream cake bar.
Health Considerations and Nutritional Value
Red Velvet Ice Cream Sandwiches are undeniably indulgent, so it’s important to enjoy them in moderation, especially for those monitoring sugar, fat, or calorie intake.
Nutritional Profile (Per Sandwich, Approximate):
- Calories: 450–550 kcal
- Total Fat: 28–35g (Saturated Fat: 16–20g)
- Carbohydrates: 50–60g (Sugars: 35–45g)
- Protein: 6–8g
- Sodium: 250–350mg
The high fat content comes from butter, cream, and cream cheese, while the sugar load is significant due to both components. However, the cream cheese adds protein and calcium compared to plain vanilla ice cream.
Dietary Notes:
- Not Suitable for Low-Fat Diets: High in saturated fat; consider reduced-fat alternatives cautiously (may affect texture).
- Diabetes Consideration: High glycemic impact; best enjoyed occasionally with blood sugar monitoring.
- Allergens: Contains dairy, eggs, wheat, and soy (depending on brand ingredients). Always check labels if allergies are a concern.
- Artificial Dyes: Red #40 is commonly used. Natural alternatives include beet juice or powdered beetroot, though color may be less vibrant.
To make a slightly healthier version, reduce sugar by 25%, use Greek yogurt in place of some cream cheese, and increase fiber with whole wheat pastry flour (blend with all-purpose).
Ingredients
Red Velvet Cookies:
- 2 cups all-purpose flour
- 2 tbsp unsweetened cocoa powder (natural)
- 1/2 tsp baking soda
- 1 tsp baking powder
- 1/4 tsp salt
- 1 cup (2 sticks) unsalted butter, softened
- 1 cup granulated sugar
- 1/2 cup packed brown sugar
- 2 large eggs, room temperature
- 2 tsp vanilla extract
- 1/2 cup buttermilk
- 1 tbsp white vinegar
- 1–2 tbsp red gel food coloring
Cream Cheese Ice Cream:
- 2 cups heavy cream
- 1 cup whole milk
- 8 oz cream cheese, softened
- 3/4 cup granulated sugar
- 1 tsp vanilla extract
- Pinch of salt
Directions
- Preheat oven to 350°F. Line baking sheets with parchment paper.
- In a bowl, whisk flour, cocoa, baking soda, baking powder, and salt.
- Cream butter and sugars until fluffy. Add eggs and vanilla; mix well.
- Gradually add dry ingredients, mixing until combined.
- In a small bowl, combine buttermilk, vinegar, and food coloring. Stir into batter.
- Drop 2-tbsp scoops onto baking sheets. Bake 10–12 minutes. Cool completely.
- For ice cream: Whip cream to stiff peaks. Set aside.
- Beat cream cheese, milk, sugar, vanilla, and salt until smooth.
- Fold whipped cream into mixture. Churn or freeze in a container for 6+ hours.
- Pair cookies by size. Soften ice cream slightly, then sandwich together.
- Freeze again for 30 minutes. Wrap and store in airtight container.
FAQ
Can I make these without an ice cream maker?
Absolutely! No-churn ice cream works perfectly here. Just whip the cream and fold it into the sweetened cream cheese mixture, then freeze.
How long do they last in the freezer?
Up to 3 weeks when stored properly in an airtight container with parchment between layers.
Why are my cookies spreading too much?
Ensure your butter isn’t too soft, chill the dough briefly before baking, and avoid greasing the pans if using parchment.
Can I use boxed red velvet cake mix?
Yes, adapt the mix into cookies by reducing liquid and adding extra flour. However, homemade offers better texture control.
Is buttermilk essential?
Ideal for flavor and texture, but you can substitute with 1/2 cup milk + 1/2 tbsp vinegar, left to sit for 5 minutes.
Can I make them nut-free?
Yes, this recipe contains no nuts, but always verify ingredient labels (especially food coloring or vanilla extract).
How do I prevent ice crystals in the ice cream?
Press plastic wrap directly onto the surface before freezing, and avoid repeated thawing and refreezing.
Summary
Red Velvet Ice Cream Sandwiches blend the moist, tangy richness of red velvet cake with creamy, slightly tart cream cheese ice cream, all nestled between soft chocolate-swirled cookies.
A show-stopping dessert perfect for celebrations, warm days, or whenever you crave a luxurious bite of comfort and creativity.