
Introduction
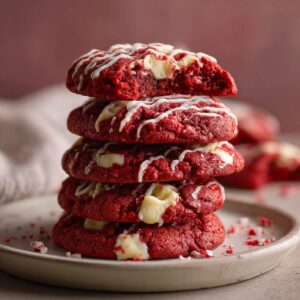
Red Velvet Gooey Butter Cookies are the ultimate indulgence—a rich, vibrant twist on the traditional gooey butter cookie, known for their soft, melt-in-your-mouth centers and lightly crisped edges. With their signature red hue, velvety texture, and subtle cocoa flavor, these cookies are not only eye-catching but also irresistibly decadent. A cross between a brownie and a soft sugar cookie, Red Velvet Gooey Butter Cookies bring together the best of both worlds: the luxurious taste of red velvet cake and the creamy richness of a classic butter cookie. Their crackled powdered sugar coating offers a delightful contrast in texture, while the slightly tangy undertone from cream cheese gives each bite a complex, layered flavor. Perfect for holidays, Valentine’s Day, cookie swaps, or simply as an anytime treat, these cookies are a showstopper both in appearance and taste. They’re easy to make, store well, and are sure to become a beloved favorite in any baker’s repertoire.
The History of Red Velvet Gooey Butter Cookies
Red velvet cake, the namesake flavor of these cookies, has roots tracing back to the early 20th century, becoming widely popular in the American South. Originally made with natural cocoa powder and buttermilk, the “velvet” texture referred to its fine crumb and moist richness. Its distinct red color was likely enhanced over time with food coloring for dramatic effect. Gooey butter cookies, on the other hand, are inspired by the famous St. Louis Gooey Butter Cake, a dense, chewy, and buttery dessert that emerged in the 1930s as the result of a baking mistake. Home bakers eventually adapted the beloved cake into cookie form, simplifying it with cake mix and cream cheese to recreate the gooey, tender texture. Red Velvet Gooey Butter Cookies are a modern evolution of this trend, merging two classic desserts into one luxurious treat that highlights the visual appeal and flavor depth of red velvet with the irresistible chew of a gooey butter cookie.
Ingredients Breakdown
- Red velvet cake mix: The base of the cookie, providing flavor, color, and structure. It simplifies the recipe while delivering consistent results.
- Cream cheese: Adds tang and moisture, contributing to the gooey, soft texture that defines this cookie.
- Unsalted butter: Enhances richness and binds the dough while balancing the sweetness of the cake mix.
- Egg: Helps bind the ingredients and adds moisture to achieve the ideal cookie texture.
- Vanilla extract: Deepens flavor and enhances the red velvet profile.
- Powdered sugar: Used to coat the dough before baking, creating the classic crackled surface and a touch of extra sweetness.
- Optional: Chocolate chips or white chocolate chips: For added richness and texture variation.
Step-by-Step Recipe
- Preheat your oven to 350°F (175°C) and line a baking sheet with parchment paper.
- In a large mixing bowl, beat the cream cheese and butter together until smooth and creamy, about 2–3 minutes.
- Add the egg and vanilla extract, and continue mixing until fully incorporated.
- Gradually add the red velvet cake mix, mixing on low speed until a thick, sticky dough forms. If using chocolate chips, fold them in at this stage.
- Cover the dough and chill in the refrigerator for 30–60 minutes to firm up, making it easier to handle.
- Once chilled, scoop the dough into tablespoon-sized balls and roll each one in powdered sugar to coat generously.
- Place the dough balls on the prepared baking sheet, spaced 2 inches apart.
- Bake for 10–12 minutes, or until the edges are just set and the centers look slightly underbaked—this ensures the signature gooey texture.
- Allow the cookies to cool on the baking sheet for 5 minutes, then transfer to a wire rack to cool completely. The cookies will continue to set as they cool.
Tips for the Perfect Cookie
For best results, make sure the cream cheese and butter are softened but not too warm, which helps them cream smoothly without making the dough greasy. Chilling the dough is essential—not only does it make the sticky dough easier to work with, but it also helps prevent excessive spreading during baking. Use a cookie scoop to ensure uniform size and even baking. Roll each dough ball thoroughly in powdered sugar; a thick coating enhances the crackled effect and prevents the dough from sticking to your hands. Don’t overbake—these cookies should be just barely set when removed from the oven to maintain their gooey centers. Let them cool on the baking sheet before moving them to a rack, as they will be very soft immediately out of the oven.
Variations and Customizations
Red Velvet Gooey Butter Cookies are versatile and easy to personalize. Add white chocolate chips for a classic red velvet pairing, or semi-sweet chocolate chips for added depth. Mix in chopped pecans or walnuts for a nutty crunch. Swirl in a bit of cream cheese frosting before baking for a cheesecake-like effect. Substitute the red velvet cake mix with chocolate, lemon, or spice cake mix to create other gooey butter cookie flavors. For a festive look, roll the cookies in colored sanding sugar or add holiday sprinkles. Turn them into sandwich cookies by spreading frosting or ganache between two cookies. For a gluten-free option, use a gluten-free red velvet cake mix and ensure all other ingredients are certified gluten-free. For a dairy-free version, use plant-based butter and cream cheese substitutes, keeping in mind this may slightly alter texture.
Health Considerations and Nutritional Value
These cookies are rich and indulgent, typically containing between 120–160 calories per cookie, depending on size and add-ins. They are high in sugar and fat due to the butter, cream cheese, and powdered sugar. While not a health food, they can be enjoyed in moderation as a special treat. To lighten them up slightly, use a reduced-fat cream cheese and cut back on the powdered sugar for coating. Consider using a sugar-free or low-sugar cake mix if available, or substitute some of the butter with applesauce—though this may affect the gooey texture. These cookies are not suitable for those with dairy allergies or sensitivities unless modified with plant-based alternatives. Always read labels on cake mixes and mix-ins to ensure they align with any dietary restrictions.
FAQ
Can I use homemade red velvet cake mix instead of boxed? Yes, but ensure your homemade mix contains the proper ratio of flour, sugar, cocoa powder, baking agents, and red food coloring for comparable results.
Why is my dough so sticky? That’s normal for this type of cookie. Chilling the dough makes it easier to handle and shape.
Can I freeze the dough or baked cookies? Absolutely. Dough balls can be frozen for up to 2 months—just roll in powdered sugar right before baking. Baked cookies can also be frozen; thaw at room temperature before serving.
Do I have to chill the dough? Yes, chilling is highly recommended to prevent spreading and to help maintain the gooey texture.
How long do they stay fresh? Store in an airtight container at room temperature for up to 4–5 days. They can be refrigerated to extend shelf life but may lose some softness.
Can I make them without cream cheese? Cream cheese is essential to achieving the gooey texture in this recipe, but some versions use mascarpone or vegan cream cheese as alternatives.
Red Velvet Gooey Butter Cookies
Ingredients
- 1 box red velvet cake mix see notes below for brand suggestions
- 8 oz full-fat cream cheese softened to room temperature
- ½ cup unsalted butter 1 stick, softened
- 1 large egg
- Powdered sugar for rolling
Instructions
- Ensure the cream cheese and butter are very soft and at room temperature before beginning. Place them in a large mixing bowl, add the egg, and use a hand mixer or a sturdy whisk to blend the wet ingredients until smooth and well combined.
- Add the red velvet cake mix and stir it in until a sticky dough forms. Once the dough is fully mixed and smooth, cover the bowl and place it in the refrigerator to chill for 1 to 2 hours.
- When you’re ready to bake, preheat the oven to 350°F (175°C) and line a baking sheet with parchment paper. Use a cookie scoop to portion the dough, then roll each scoop into a 1-inch ball using clean hands.
- Pour ½ to 1 cup of powdered sugar into a small bowl. Roll each dough ball in the powdered sugar, coating it thoroughly on all sides. Place the coated dough balls on the prepared baking sheet without pressing them down.
- Repeat this process for the remaining dough, spacing each cookie about 2 inches apart. This recipe yields approximately 20 cookies.
- Bake for 12–13 minutes if you prefer cookies with an extra gooey center, or 15–17 minutes for a firmer cookie with a crispier edge. Once baked, transfer the cookies to a cooling rack and allow them to firm up before serving.