Introduction
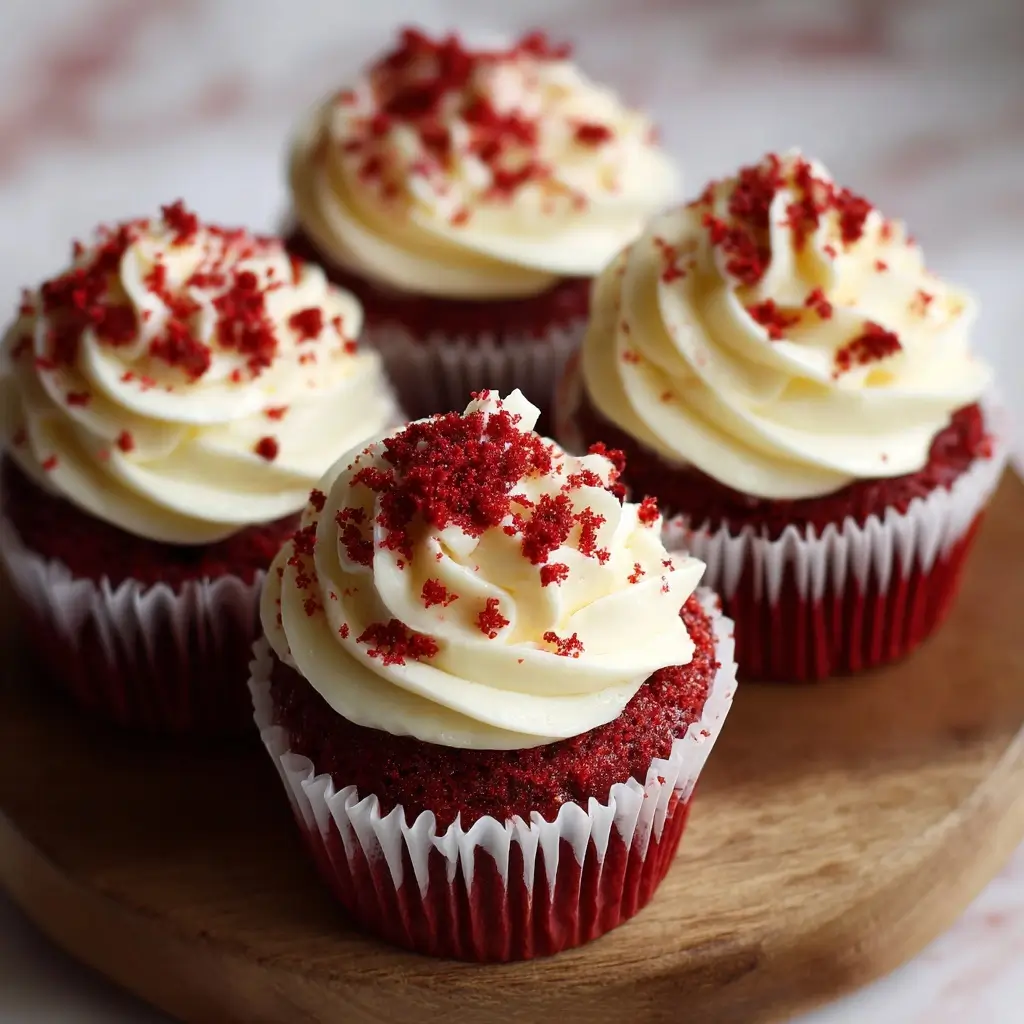
Red Velvet Cupcakes are a beloved classic in the world of desserts, combining the elegance of fine pastries with the comforting warmth of home-baked treats. With their vibrant red hue, delicate cocoa flavor, and luxuriously creamy frosting, these cupcakes have become a staple at celebrations ranging from birthdays and weddings to holiday gatherings and intimate dinner parties. Their popularity surged in the 20th century, but their roots run much deeper, steeped in culinary tradition and evolving with modern tastes. Whether you’re a seasoned baker or a curious beginner, mastering the art of Red Velvet Cupcakes offers not only a delicious reward but also a chance to connect with a rich dessert heritage that continues to captivate taste buds around the world.
The History
The origins of Red Velvet Cake—and by extension, Red Velvet Cupcakes—trace back to the early 1900s, though the exact beginnings remain shrouded in mystery and myth. One popular theory suggests that the cake originated in the kitchens of the Waldorf-Astoria Hotel in New York City, where it was served to elite guests and later became commercially promoted through cookbooks and marketing campaigns. Another narrative points to Southern American cuisine, where bakers used minimal amounts of cocoa alongside acidic ingredients like buttermilk and vinegar, which reacted with natural cocoa’s anthocyanin pigments to produce a subtle reddish tint. This chemical reaction gave the cake its characteristic rusty hue long before food coloring became commonplace.
The widespread use of bright red dye emerged during the mid-20th century, particularly after the Adams Extract company began promoting red food coloring by including a red velvet cake recipe in their promotional materials. The striking crimson color made the dessert visually captivating, enhancing its appeal for festive occasions. Over time, the recipe evolved: cream cheese frosting replaced traditional ermine or boiled milk icing, adding a tangy richness that perfectly complemented the cake’s mild chocolate notes. Today, Red Velvet Cupcakes are an iconic treat, symbolizing both indulgence and sophistication, enjoyed globally in bakeries, homes, and gourmet dessert shops alike.
Ingredients Breakdown
The magic of Red Velvet Cupcakes lies in the careful balance of ingredients that contribute to their signature texture, flavor, and appearance. Let’s explore each component and its role:
- All-Purpose Flour: Provides the structural foundation of the cupcakes, giving them a soft yet stable crumb.
- Cocoa Powder (Unsweetened): Adds a subtle chocolate flavor without overpowering the delicate profile. Use natural cocoa (not Dutch-processed) for optimal acidity to react with baking soda.
- Baking Soda & Baking Powder: Work together as leavening agents. Baking soda reacts with acidic ingredients (buttermilk, vinegar) to create lift, while baking powder ensures consistent rise.
- Salt: Enhances overall flavor and balances sweetness.
- Granulated Sugar: Sweetens the batter and contributes to moisture retention and browning.
- Vegetable Oil: Keeps the cupcakes moist and tender. Unlike butter, oil remains liquid at room temperature, preventing dryness.
- Eggs: Bind the ingredients together, add structure, and contribute to aeration during mixing.
- Buttermilk: Adds acidity, tenderness, and a slight tang. It activates the baking soda and enhances the red hue through pH interaction.
- Distilled White Vinegar: Boosts acidity, further reacting with baking soda for fluffiness and intensifying the red color when combined with cocoa.
- Vanilla Extract: Enhances flavor complexity with warm, aromatic notes.
- Red Food Coloring (Liquid or Gel): Gives the cupcakes their vivid red appearance. Gel coloring is more concentrated and provides deeper color with less liquid.
- Water: Adjusts batter consistency and helps distribute ingredients evenly.
For the frosting:
- Cream Cheese: Softened, full-fat cream cheese provides tanginess and body.
- Unsalted Butter: Adds richness and helps stabilize the frosting.
- Powdered Sugar (Confectioners’ Sugar): Sweetens and thickens the frosting. Sifted to avoid lumps.
- Vanilla Extract: Complements the cream cheese with depth of flavor.
- Salt (pinch): Balances sweetness and sharpens flavors.
Step-by-Step Recipe
- Preheat Oven & Prepare Pan: Preheat your oven to 350°F (175°C). Line a standard 12-cup muffin tin with cupcake liners or grease lightly if preferred.
- Mix Dry Ingredients: In a medium bowl, whisk together 1 ½ cups all-purpose flour, 2 tablespoons unsweetened cocoa powder, ½ teaspoon baking soda, 1 teaspoon baking powder, and ¼ teaspoon salt. Set aside.
- Cream Wet Ingredients: In a large mixing bowl, beat ¾ cup granulated sugar and ½ cup vegetable oil on medium speed until well combined. Add 2 large eggs, one at a time, beating well after each addition. Stir in 1 tablespoon vanilla extract.
- Combine Wet & Dry Mixtures: Gradually add the dry ingredients to the wet mixture, alternating with ½ cup buttermilk. Begin and end with the dry ingredients (dry-wet-dry-wet-dry) to ensure even incorporation. Mix on low speed just until blended—do not overmix.
- Add Acidic Components: In a small bowl, combine 1 teaspoon distilled white vinegar with 1 teaspoon red food coloring (use 1–2 tablespoons gel coloring for intense red). Stir this mixture into the batter along with ½ cup water. Mix gently until uniform in color and consistency.
- Fill Cupcake Liners: Divide the batter evenly among the 12 cupcake liners, filling each about ⅔ to ¾ full to allow room for rising.
- Bake: Place the pan in the preheated oven and bake for 18–22 minutes, or until a toothpick inserted into the center comes out clean or with a few moist crumbs.
- Cool: Allow cupcakes to cool in the pan for 5 minutes, then transfer them to a wire rack to cool completely before frosting.
- Prepare Cream Cheese Frosting: In a large bowl, beat 8 oz (one block) softened cream cheese and ½ cup softened unsalted butter on medium speed until smooth and fluffy (about 2–3 minutes). Gradually add 3 ½ cups sifted powdered sugar, 1 teaspoon vanilla extract, and a pinch of salt. Beat on low initially, then increase to medium until smooth and creamy. If too thin, add more powdered sugar; if too thick, add a teaspoon of milk or cream.
- Frost & Decorate: Once cupcakes are completely cooled, pipe or spread the frosting generously on top. Garnish with red sprinkles, chocolate shavings, or edible glitter for added flair.
Tips
- Use Room Temperature Ingredients: Ensure eggs, buttermilk, cream cheese, and butter are at room temperature to achieve a smooth, emulsified batter and frosting.
- Don’t Overmix: Overmixing the batter after adding flour can develop gluten, leading to dense cupcakes. Mix until just combined.
- Gel Food Coloring: For a deep, restaurant-quality red without altering the batter’s consistency, use gel-based red food coloring instead of liquid.
- Proper Cooling: Never frost warm cupcakes—they will melt the frosting and become soggy. Cool completely on a wire rack.
- Piping Techniques: Use a large open-star tip (like Wilton 1M) for a professional swirl. Chill frosted cupcakes for 15 minutes before serving for cleaner presentation.
- Storage: Store unfrosted cupcakes in an airtight container at room temperature for up to 2 days or freeze for up to 3 months. Frosted cupcakes should be refrigerated and brought to room temperature before serving.
- Altitude Adjustments: At high altitudes, reduce baking powder by ⅛ to ¼ teaspoon and increase liquid slightly to prevent drying.
Variations and Customizations
Red Velvet Cupcakes are incredibly versatile and can be adapted to suit different tastes, dietary needs, and creative inspirations:
- Mini Red Velvet Cupcakes: Use a mini muffin tin and reduce baking time to 10–14 minutes for bite-sized treats perfect for parties.
- Gluten-Free Version: Substitute all-purpose flour with a 1:1 gluten-free flour blend. Ensure cocoa powder and other ingredients are certified gluten-free.
- Dairy-Free Option: Replace buttermilk with almond or soy milk mixed with ½ tablespoon lemon juice or vinegar. Use vegan butter and dairy-free cream cheese for frosting.
- Low-Sugar or Keto-Friendly: Use erythritol or monk fruit sweetener in place of sugar and powdered erythritol in the frosting. Opt for almond or coconut flour blends.
- Flavor Infusions: Add espresso powder (½ teaspoon) to enhance chocolate depth, or orange zest for a citrus twist.
- Stuffed Cupcakes: Fill the center with white chocolate chunks, raspberry jam, or marshmallow fluff before baking.
- Seasonal Themes: Decorate with green sprinkles for Christmas, pink for Valentine’s Day, or pastels for Easter.
- Nutty Crunch: Top with chopped pecans or walnuts for added texture and flavor contrast.
- Alcohol-Infused: Add 1–2 tablespoons of bourbon, Kahlua, or Chambord to the batter or frosting for an adult twist.
Health Considerations and Nutritional Value
While undeniably delicious, Red Velvet Cupcakes are a dessert best enjoyed in moderation due to their sugar, fat, and calorie content. A typical homemade Red Velvet Cupcake (without excessive garnishes) contains approximately:
- Calories: 280–350 per cupcake (frosted)
- Total Fat: 14–18g (including 6–8g saturated fat from cream cheese and butter)
- Carbohydrates: 40–48g (mostly from sugar and refined flour)
- Sugars: 28–35g
- Protein: 3–4g
- Sodium: 200–300mg
Considerations:
- Sugar Content: High sugar levels may affect blood glucose, making these less suitable for diabetics unless modified.
- Dairy & Allergens: Contains eggs, milk, and wheat—common allergens. Vegan and gluten-free versions can address some restrictions.
- Artificial Dyes: Some red food colorings (especially Red #40) are synthetic and controversial. Natural alternatives like beet juice or red beet powder can be used, though they yield a more subdued color.
- Balanced Indulgence: Pair with fresh fruit or serve in smaller portions to balance the meal. Consider using Greek yogurt in frosting to reduce fat and boost protein.
Ingredients
For the Cupcakes:
- 1 ½ cups (190g) all-purpose flour
- 2 tablespoons (10g) unsweetened natural cocoa powder
- ½ teaspoon baking soda
- 1 teaspoon baking powder
- ¼ teaspoon salt
- ¾ cup (150g) granulated sugar
- ½ cup (120ml) vegetable oil (or canola oil)
- 2 large eggs, room temperature
- 1 tablespoon pure vanilla extract
- ½ cup (120ml) buttermilk, room temperature
- 1 teaspoon distilled white vinegar
- 1–2 tablespoons red food coloring (liquid or gel; adjust for desired intensity)
- ½ cup (120ml) water
For the Cream Cheese Frosting:
- 8 oz (225g) full-fat cream cheese, softened
- ½ cup (115g) unsalted butter, softened
- 3 ½ cups (420g) powdered sugar, sifted
- 1 teaspoon vanilla extract
- Pinch of salt
Directions
- Preheat oven to 350°F (175°C). Line a 12-cup muffin tin with cupcake liners.
- In a medium bowl, whisk together flour, cocoa powder, baking soda, baking powder, and salt. Set aside.
- In a large bowl, beat sugar and oil on medium speed until combined. Add eggs one at a time, beating well after each. Mix in vanilla.
- Gradually add the dry ingredients to the wet mixture, alternating with buttermilk. Begin and end with dry ingredients. Mix on low until just incorporated.
- In a small bowl, mix vinegar and red food coloring. Stir into the batter along with water. Mix gently until uniform.
- Divide batter evenly into the cupcake liners, filling each ⅔ to ¾ full.
- Bake for 18–22 minutes, or until a toothpick comes out clean.
- Cool in pan for 5 minutes, then transfer to a wire rack to cool completely.
- To make frosting: Beat cream cheese and butter until smooth and fluffy. Gradually add powdered sugar, vanilla, and salt. Beat until creamy.
- Frost cooled cupcakes using a piping bag or spatula. Decorate as desired.
- Store in the refrigerator if frosted; bring to room temperature before serving.
FAQ
Q: Why is my red velvet cupcake not red enough?
A: Natural cocoa and vinegar create only a faint reddish tint. For a bold red, you must use red food coloring—gel coloring is most effective without thinning the batter.
Q: Can I make red velvet cupcakes without food coloring?
A: Yes, but expect a brownish-pink or rust color. Using beet juice or puree can enhance natural red tones, though flavor and texture may slightly change.
Q: Why did my cupcakes sink in the middle?
A: Possible causes include underbaking, opening the oven too early, overmixing the batter, or inaccurate oven temperature. Always use an oven thermometer and avoid sudden temperature changes.
Q: Can I freeze red velvet cupcakes?
A: Absolutely. Unfrosted cupcakes freeze well for up to 3 months. Wrap individually and thaw at room temperature. Frost after thawing.
Q: How long do red velvet cupcakes last?
A: Unfrosted: 2 days at room temperature. Frosted: 5–7 days in the refrigerator. Always store in an airtight container.
Q: Can I use Dutch-process cocoa?
A: Not recommended. Dutch-process cocoa is less acidic and won’t react properly with baking soda, potentially resulting in a denser texture and duller color.
Q: Why is buttermilk important?
A: Buttermilk adds moisture, tenderness, and acidity, which activates leavening agents and enhances flavor. It cannot be fully substituted with regular milk unless acidified.
Summary
Red Velvet Cupcakes are a timeless dessert that blends subtle chocolate flavor with a tangy cream cheese frosting and a stunning red hue, making them perfect for any occasion. With attention to ingredient quality and technique, you can create moist, flavorful cupcakes that delight both the eyes and the palate.