Introduction
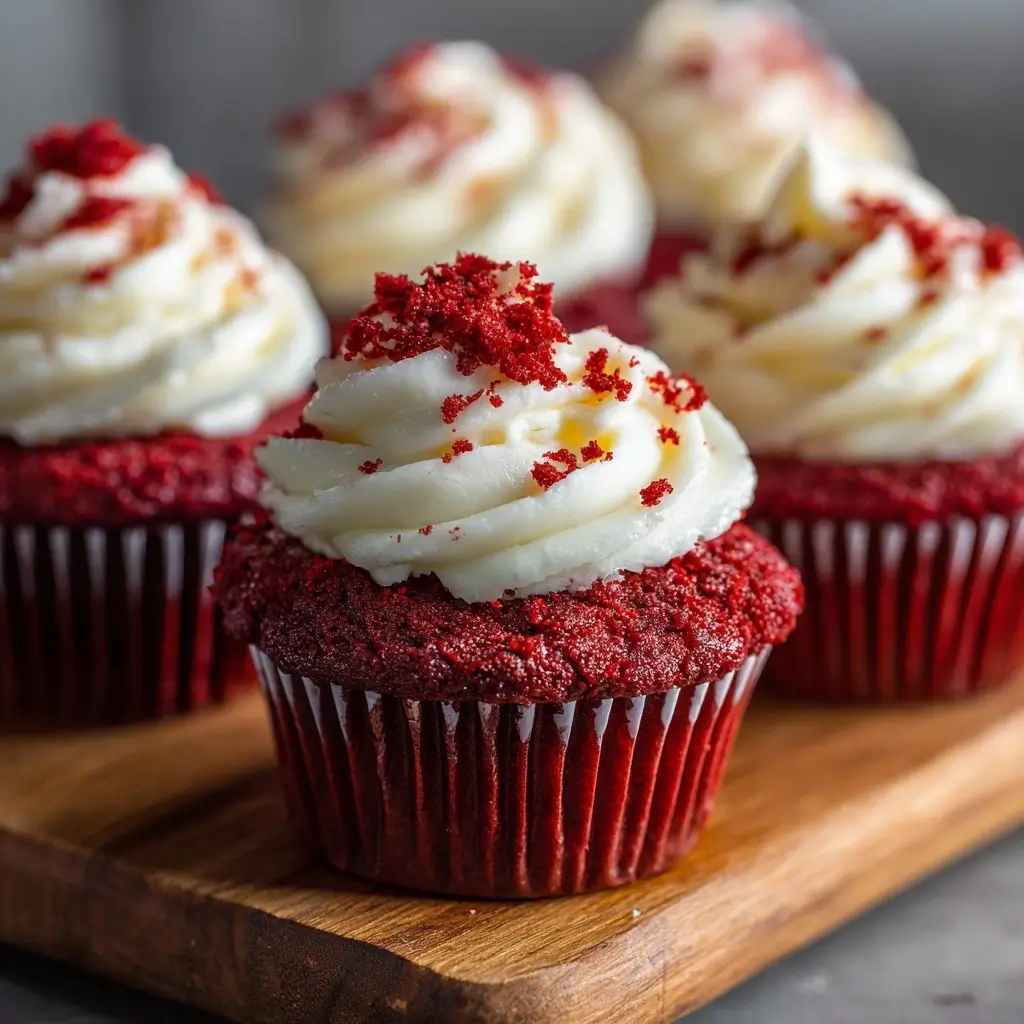
Red Velvet Cupcakes are a beloved classic in the world of desserts—offering a perfect balance of elegance, flavor, and visual appeal. With their rich crimson hue, light cocoa undertones, and creamy cream cheese frosting, these cupcakes have become a staple at celebrations ranging from birthdays and weddings to holiday gatherings and afternoon tea parties. Their velvety texture and subtle sweetness captivate taste buds and make them stand out from traditional chocolate or vanilla cupcakes. Whether you’re a seasoned baker or trying your hand at baking for the first time, Red Velvet Cupcakes offer an accessible yet impressive dessert that never fails to delight.
The History
The origins of Red Velvet Cake—and by extension, Red Velvet Cupcakes—are steeped in mystery and folklore, with roots believed to trace back to early 20th-century America. Some historians suggest that the cake originated in the Southern United States, where buttermilk, vinegar, and cocoa were commonly used in recipes to create a tender crumb. The distinctive red color originally came not from artificial food coloring, but from a reaction between natural cocoa powder (which contains anthocyanin, a pH-sensitive compound) and acidic ingredients like buttermilk and vinegar. This chemical reaction produced a reddish tint, giving rise to the “red velvet” name.
The term “velvet” referred to the fine, soft crumb structure of the cake, which was considered luxurious at the time. However, it wasn’t until the early 1900s that the modern version began gaining popularity. The Adams Extract Company is often credited with popularizing the recipe in the 1920s by distributing a Red Velvet Cake recipe along with their red food coloring to boost sales. Over time, artificial red dye became standard, enhancing the vibrant red appearance we now associate with the dessert.
The Waldorf-Astoria Hotel in New York City further cemented the cake’s fame when its version was allegedly requested by guests and later circulated as a “$100 recipe” (a myth possibly created for marketing). In recent decades, Red Velvet has evolved into various forms, including cupcakes, cheesecakes, milkshakes, and even ice cream. Today, Red Velvet Cupcakes are a cultural icon, symbolizing indulgence, romance, and celebration across the globe.
Ingredients Breakdown
To create perfect Red Velvet Cupcakes, each ingredient plays a crucial role in achieving the desired texture, flavor, and appearance. Here’s a detailed breakdown:
- All-Purpose Flour: Provides the structural base of the cupcakes. It gives them a soft yet sturdy crumb that holds up well under the weight of the frosting.
- Granulated Sugar: Adds sweetness and helps tenderize the crumb while contributing to browning during baking.
- Cocoa Powder (Unsweetened Natural): Imparts a mild chocolate flavor without overpowering the other ingredients. Natural cocoa is preferred over Dutch-processed because it reacts with acidic components to enhance the red hue.
- Baking Soda: Acts as a leavening agent, helping the cupcakes rise. It also reacts with the acid in buttermilk and vinegar for a tender texture.
- Salt: Balances and enhances all the flavors in the batter.
- Eggs (Large): Provide structure, richness, and help emulsify the batter. They also contribute to the golden crumb and stability of the final product.
- Vegetable Oil: Keeps the cupcakes moist and tender. Unlike butter, oil remains liquid at room temperature, resulting in a softer texture.
- Buttermilk: Adds acidity, tenderness, and moisture. Its tanginess complements the cream cheese frosting perfectly. The acid also activates the baking soda and interacts with cocoa to deepen the red tone.
- White Vinegar: Enhances the chemical reaction with baking soda and cocoa, improving rise and texture. It also intensifies the red color.
- Vanilla Extract: Adds a warm, aromatic background note that rounds out the flavor profile.
- Red Food Coloring (Liquid or Gel): Essential for achieving the signature bright red color. Gel food coloring is more concentrated and provides deeper color with less liquid added.
- Distilled Water: Helps adjust the consistency of the batter so it’s not too thick, ensuring even baking.
For the Cream Cheese Frosting:
- Cream Cheese (Full-Fat, Cold): Offers a tangy, rich base for the frosting. Full-fat ensures a creamy texture and robust flavor.
- Unsalted Butter (Softened): Adds smoothness and body to the frosting. Softening allows for proper creaming without lumps.
- Powdered Sugar (Confectioners’ Sugar): Sweetens and thickens the frosting, giving it the right spreadable consistency.
- Vanilla Extract: Enhances flavor and adds aromatic depth to the frosting.
- Salt (Pinch): Brings balance and prevents the frosting from tasting overly sweet.
Step-by-Step Recipe
- Preheat the Oven: Begin by preheating your oven to 350°F (175°C). Line a 12-cup muffin tin with cupcake liners or grease and flour the cups lightly if not using liners.
- Mix Dry Ingredients: In a medium bowl, sift together 1 ½ cups (190g) all-purpose flour, 1 cup (200g) granulated sugar, 2 tablespoons (10g) unsweetened natural cocoa powder, 1 teaspoon baking soda, and ½ teaspoon salt. Sifting ensures a lump-free, aerated mixture for a lighter cupcake.
- Whisk Wet Ingredients: In a large mixing bowl, whisk together 2 large eggs, ⅓ cup (80ml) vegetable oil, 1 teaspoon vanilla extract, and 1 tablespoon (15ml) red food coloring (gel recommended for intense color). Mix until smooth and uniformly colored.
- Add Buttermilk and Vinegar: Slowly pour in 1 cup (240ml) buttermilk while continuing to whisk. Then add 1 teaspoon white vinegar. The mixture may fizz slightly—this is normal and indicates the leavening process has begun.
- Combine Wet and Dry Mixtures: Gradually add the dry ingredients to the wet mixture, stirring gently with a spatula or handheld mixer on low speed. Mix just until combined; do not overmix to avoid tough cupcakes.
- Adjust Consistency: If the batter seems too thick, add 2–3 tablespoons of distilled water to achieve a smooth, pourable consistency.
- Fill Cupcake Liners: Divide the batter evenly among the 12 cupcake liners, filling each about ⅔ full to allow room for rising.
- Bake: Place the pan in the center of the preheated oven and bake for 18–22 minutes, or until a toothpick inserted into the center comes out clean or with a few moist crumbs.
- Cool Completely: Remove the cupcakes from the oven and let them cool in the pan for 5 minutes. Then transfer them to a wire rack to cool completely before frosting. Warm cupcakes will melt the frosting.
- Prepare Cream Cheese Frosting: In a large bowl, beat 8 oz (226g) cold cream cheese and ½ cup (113g) softened unsalted butter together on medium speed until smooth and creamy (about 2–3 minutes). Scrape down the sides as needed.
- Add Sweetener and Flavor: Gradually add 3 ½ cups (420g) powdered sugar, one cup at a time, beating on low speed to prevent sugar clouds. Add 1 ½ teaspoons vanilla extract and a pinch of salt. Once incorporated, increase speed to medium and beat for 2–3 minutes until fluffy and light.
- Frost the Cupcakes: Using a piping bag fitted with a star tip (Wilton 1M is ideal), pipe generous swirls of frosting onto each cooled cupcake. Alternatively, spread with a knife for a rustic finish.
- Garnish (Optional): Sprinkle with red velvet cake crumbs, edible glitter, white chocolate shavings, or a single red candy heart for decoration.
- Chill Before Serving: For best results, refrigerate the frosted cupcakes for 15–20 minutes to set the frosting before serving.
Tips
- Use Gel Food Coloring: Gel-based dyes provide a richer red hue without altering the batter’s consistency. Liquid coloring may require larger amounts, potentially making the batter too wet.
- Don’t Overmix: Overmixing develops gluten, leading to dense, chewy cupcakes. Stir only until the ingredients are combined.
- Room Temperature Eggs: While the cream cheese should be cold, eggs work best at room temperature—they incorporate more easily and create a smoother batter.
- Sift Ingredients: Always sift dry ingredients to eliminate lumps and ensure even distribution, especially important when working with cocoa powder.
- Check Oven Temperature: Use an oven thermometer to verify accuracy. An oven running too hot or too cold can ruin texture and rise.
- Avoid Opening the Oven: Resist the urge to open the oven door during baking—it can cause the cupcakes to collapse.
- Cool Completely: Never frost warm cupcakes. The heat will soften the frosting, causing it to slide off or become greasy.
- Chill Frosting First: If the frosting feels too soft, chill it for 10–15 minutes before piping. This makes it easier to hold shape.
- Store Properly: Keep cupcakes in an airtight container in the refrigerator for up to 5 days. Bring to room temperature before serving for optimal flavor and texture.
- Pipe Just Before Serving: For events, consider piping frosting shortly before presentation to maintain peak freshness and appearance.
Variations and Customizations
While classic Red Velvet Cupcakes are timeless, there are countless ways to customize them for different tastes and occasions:
- Gluten-Free Version: Substitute all-purpose flour with a high-quality gluten-free flour blend. Add ¼ teaspoon xanthan gum if not included in the mix.
- Dairy-Free Option: Use almond or oat milk with 1 tablespoon lemon juice instead of buttermilk. Choose vegan cream cheese and butter substitutes for the frosting.
- Mini Red Velvet Cupcakes: Use a mini muffin tin and reduce baking time to 10–12 minutes. Perfect for parties or sampling!
- Stuffed Cupcakes: Fill the center with white chocolate chips, raspberry jam, or a marshmallow core before baking.
- Boozy Twist: Add 1–2 tablespoons of bourbon or buttermilk-infused vodka to the batter for an adult version. You can also brush baked cupcakes with a simple syrup infused with spirits.
- Seasonal Themes: Decorate with green frosting and sprinkles for Christmas, pastel hues for Easter, or patriotic stars for the Fourth of July.
- Double Chocolate Red Velvet: Increase cocoa to ¼ cup and fold in semi-sweet chocolate chips for a deeper chocolate experience.
- Nutty Crunch: Top with chopped pecans or walnuts for added texture and flavor contrast.
- Velvet Pie Filling: Bake the batter in a pie crust for a Red Velvet Pie alternative.
- Red Velvet Cheesecake Swirl: Drop spoonfuls of cream cheese mixture into the cupcake batter before baking for a marbled effect.
- Color Variants: Use different food colors to create “Pink Velvet,” “Green Velvet,” or “Purple Velvet” cupcakes for themed events.
- Vegan Red Velvet: Replace eggs with flax eggs (1 tbsp ground flaxseed + 3 tbsp water per egg), use plant-based milk with vinegar, and opt for vegan sugar and frosting ingredients.
Health Considerations and Nutritional Value
While undeniably delicious, Red Velvet Cupcakes are a treat best enjoyed in moderation due to their sugar and fat content. Here’s a general nutritional estimate per cupcake (including frosting):
- Calories: ~380–420 kcal
- Total Fat: 18–22g (Saturated Fat: 8–10g)
- Carbohydrates: 55–60g (Sugars: 40–45g)
- Protein: 4–5g
- Sodium: 250–300mg
- Cholesterol: 50–60mg
Health Notes:
- High in refined sugars and saturated fats, particularly from butter, cream cheese, and oil. Frequent consumption may contribute to weight gain or increased risk of heart disease.
- The cocoa used contains antioxidants, though in small quantities due to the low amount in the recipe.
- Contains dairy and eggs, making it unsuitable for those with allergies or strict dietary restrictions unless modified.
- Gluten is present unless a gluten-free flour blend is used.
- To make a healthier version, consider reducing sugar by 25%, using applesauce or mashed banana to replace half the oil, and opting for low-fat cream cheese. However, this may affect texture and shelf life.
- Portion control is key—enjoy one cupcake occasionally rather than multiple in one sitting.
Ingredients
For the Cupcakes:
- 1 ½ cups (190g) all-purpose flour
- 1 cup (200g) granulated sugar
- 2 tablespoons (10g) unsweetened natural cocoa powder
- 1 teaspoon baking soda
- ½ teaspoon salt
- 2 large eggs, room temperature
- ⅓ cup (80ml) vegetable oil
- 1 cup (240ml) buttermilk
- 1 teaspoon white vinegar
- 1 teaspoon vanilla extract
- 1 tablespoon (15ml) red food coloring (gel preferred)
- 2–3 tablespoons distilled water (if needed)
For the Cream Cheese Frosting:
- 8 oz (226g) full-fat cream cheese, cold
- ½ cup (113g) unsalted butter, softened
- 3 ½ cups (420g) powdered sugar
- 1 ½ teaspoons vanilla extract
- Pinch of salt
Directions
- Preheat oven to 350°F (175°C). Line a 12-cup muffin tin with paper liners.
- In a medium bowl, sift together flour, sugar, cocoa powder, baking soda, and salt. Set aside.
- In a large bowl, whisk eggs, oil, vanilla, and red food coloring until smooth.
- Add buttermilk and vinegar; whisk to combine.
- Gradually add dry ingredients to wet ingredients, mixing until just combined. Avoid overmixing.
- If batter is too thick, stir in 2–3 tablespoons water for desired consistency.
- Divide batter evenly among cupcake liners, filling each ⅔ full.
- Bake for 18–22 minutes, until a toothpick comes out clean.
- Cool in pan for 5 minutes, then transfer to a wire rack to cool completely.
- For frosting, beat cream cheese and butter until smooth. Gradually add powdered sugar, then vanilla and salt. Beat until fluffy.
- Frost cooled cupcakes using a piping bag or knife.
- Refrigerate for 15–20 minutes before serving for firmer frosting.
FAQ
Why are my Red Velvet Cupcakes not red enough?
The intensity of the red color depends on the type and amount of food coloring. Natural cocoa and vinegar create a faint reddish tint, but vibrant red requires added dye. Use gel food coloring for a bold hue without affecting batter consistency.
Can I make Red Velvet Cupcakes without food coloring?
Yes, but they will be more brownish with a slight red tinge. For a natural alternative, try beetroot puree, though it alters flavor and texture slightly.
Why did my cupcakes sink in the middle?
Possible causes include underbaking, opening the oven too soon, overmixing the batter, or inaccurate oven temperature. Ensure your leavening agents are fresh and avoid sudden temperature changes.
Can I freeze Red Velvet Cupcakes?
Yes! Unfrosted cupcakes freeze well for up to 3 months. Wrap individually in plastic and store in an airtight container. Thaw at room temperature before frosting.
How long do they last?
Frosted cupcakes keep in the refrigerator for 4–5 days. Store in an airtight container to prevent drying and odor absorption.
Can I use Dutch-process cocoa?
It’s not recommended. Dutch-process cocoa is alkalized and less acidic, so it won’t react with vinegar and baking soda to produce the characteristic red tint and rise.
Why is my frosting too runny?
This usually happens if the cream cheese is too warm or too much liquid (like vanilla) was added. Chill the frosting for 15–20 minutes before re-beating. Ensure cream cheese is cold and butter is only softened, not melted.
Can I make the batter ahead of time?
It’s best to bake immediately after mixing, as the leavening agents start working upon contact with liquids. However, you can prepare dry and wet ingredients separately and combine just before baking.
Summary
Red Velvet Cupcakes are a decadent fusion of subtle chocolate flavor, tangy buttermilk richness, and striking red color, crowned with luscious cream cheese frosting. A timeless favorite for any occasion, they combine history, artistry, and irresistible taste in every bite.