Introduction
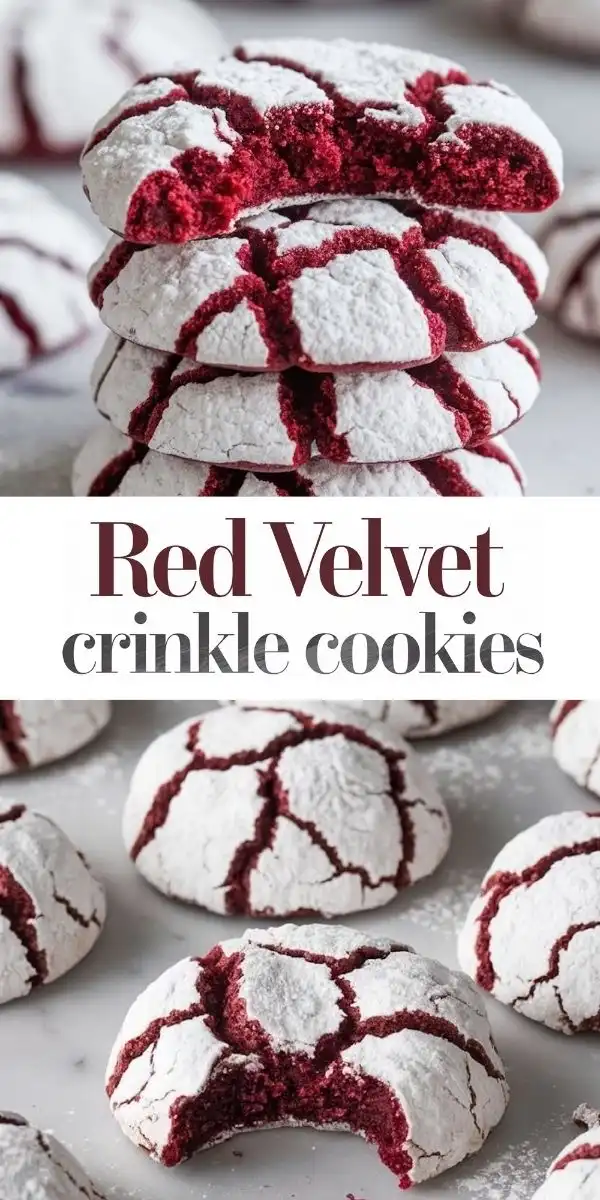
Red Velvet Crinkle Cookies are the dazzling, festive fusion of two beloved American classics: the velvety elegance of red velvet cake and the irresistible crackle-top charm of crinkle cookies. With their deep ruby-red hue, snowy dusting of powdered sugar, and a rich, fudgy-yet-tender crumb that melts luxuriously on the tongue, these cookies are more than just a treat—they’re an experience. Whether nestled on a holiday cookie platter, served at a Valentine’s Day soirée, or gifted in a festive tin tied with crimson ribbon, Red Velvet Crinkle Cookies instantly elevate any occasion with sophistication, whimsy, and undeniable decadence. Their signature “crinkle” isn’t just visual—it’s a promise of texture contrast: crisp, sugared edges giving way to a soft, moist, cocoa-kissed center infused with subtle tang and warmth.
The History
The origins of Red Velvet Crinkle Cookies are delightfully modern—a delicious evolution born from culinary cross-pollination rather than century-old tradition. Red velvet cake itself traces back to the early 20th century, gaining widespread popularity in the 1940s—especially after the Waldorf Astoria Hotel allegedly popularized its recipe (though historical evidence remains charmingly contested). Its hallmark red color originally came from the natural reaction between acidic buttermilk, vinegar, and non-Dutched cocoa, yielding a subtle rosy tint later amplified by food coloring for dramatic effect. Meanwhile, crinkle cookies—characterized by their cracked, powdered-sugar-dusted surfaces—emerged as a beloved variation of dense, fudgy drop cookies, likely inspired by brownies and molasses-based treats popular in mid-century American home baking.
Red Velvet Crinkle Cookies as we know them today began appearing in food blogs and gourmet bakeries in the late 2000s and early 2010s, riding the wave of red velvet mania—cupcakes, pancakes, cheesecakes, and even macarons. Bakers sought to capture the cake’s iconic flavor profile (cocoa, buttermilk tang, and mild sweetness) in a portable, shareable, visually striking cookie format. The crinkle technique proved ideal: the high-sugar, high-fat, low-flour batter naturally spreads and fissures during baking, while the powdered sugar coating both prevents sticking and enhances the festive, snow-draped aesthetic. Today, they’re a staple at holiday markets, bridal showers, and Southern-style dessert tables—honoring tradition while gleefully embracing playful innovation.
Ingredients Breakdown
Every extraordinary Red Velvet Crinkle Cookie begins with intention—each ingredient serving a precise structural, flavor, or textural role:
- Unsweetened Cocoa Powder (Dutch-processed preferred): Provides deep chocolate backbone and contributes to the signature red hue when combined with acid and food coloring. Dutch-processed offers smoother, milder bitterness and superior solubility—critical for a uniform, velvety crumb.
- Red Food Coloring (Gel or Concentrated Liquid): Not merely decorative—this intensifies the visual drama and subtly balances cocoa’s astringency. Gel coloring is highly recommended: it adds vibrant color without introducing excess liquid that could thin the batter or inhibit proper crinkling.
- Buttermilk (or DIY Buttermilk Substitute): The secret tang and tenderizing agent. Its acidity reacts with baking soda to lift the cookie *just enough*, while its fat and lactic acid soften gluten formation—yielding tenderness without sogginess. For best results, use cultured buttermilk—not acidified milk alone.
- White Vinegar: A double-duty powerhouse: boosts acidity for optimal cocoa bloom and leavening activation, and enhances the “velvet” mouthfeel by further inhibiting gluten development.
- Unsalted Butter (Brown Butter Optional but Highly Recommended): Browned butter transforms the entire flavor profile—adding nutty, caramelized depth that beautifully complements cocoa and red velvet’s inherent richness. If skipping browning, ensure butter is softened to cool room temperature (65–68°F) for ideal creaming.
- Granulated Sugar + Brown Sugar (Light or Dark): Granulated delivers crispness and structure; brown sugar contributes moisture, chew, and molasses nuance that echoes traditional red velvet’s complexity. A 1:1 ratio yields perfect balance—too much brown sugar risks spreading; too little sacrifices fudginess.
- Large Eggs (Room Temperature): Bind the batter, emulsify fats and liquids, and provide gentle lift. Room temperature eggs incorporate more evenly into the creamy butter-sugar mixture, preventing curdling and ensuring a homogenous, airy base.
- All-Purpose Flour (Spooned & Levelled): The structural scaffold—but used sparingly. Too much flour yields cakey or tough cookies; too little causes excessive spread. Measuring by weight (120g/cup) is strongly advised for precision.
- Instant Espresso Powder (Optional but Transformative): A tiny ½ tsp doesn’t make the cookies taste like coffee—it amplifies cocoa’s richness and deepens the overall flavor dimension, mimicking the complexity of high-end red velvet cakes.
- High-Quality White Chocolate or Cream Cheese Chips (Optional Swirl): For next-level luxury: pockets of creamy, tangy-sweet melt-in-your-mouth surprise that echo classic red velvet pairings.
- Confectioners’ Sugar (for Rolling): Must be ultra-fine and sifted! Lumps create uneven coating and inhibit proper crinkling. Use a generous amount—cookies are rolled *twice*: once before chilling, once right before baking—for maximum snow-draped drama.
Step-by-Step Recipe
- Prepare Your Workspace: Line two large baking sheets with parchment paper or silicone mats. Place 1 cup (120g) confectioners’ sugar into a shallow bowl. Chill this sugar bowl in the freezer for 10 minutes—cold sugar adheres better and minimizes melting during rolling.
- Brown the Butter (Optional but Recommended): In a light-colored saucepan over medium-low heat, melt 1 cup (227g) unsalted butter. Swirl constantly as it foams, then turns golden and emits a rich, nutty aroma (about 5–7 minutes). Immediately pour into a heatproof bowl, scraping in all browned bits. Cool to lukewarm (about 90°F)—do not refrigerate to solidify; it must remain fluid enough to cream.
- Cream Butter & Sugars: In a stand mixer fitted with the paddle attachment, beat browned (or softened) butter, 1 cup (200g) granulated sugar, and 1 cup (220g) packed light brown sugar on medium speed for 3–4 minutes until pale, fluffy, and completely smooth—no graininess. Scrape bowl thoroughly.
- Incorporate Wet Ingredients: Add 2 large room-temperature eggs and 1 large egg yolk (reserve whites for another use or discard). Beat on medium for 1 minute until fully emulsified and glossy. Then beat in ¼ cup (60ml) buttermilk and 1 tsp white vinegar until just combined—do not overmix.
- Whisk Dry Ingredients Separately: In a medium bowl, whisk together ¾ cup (65g) Dutch-processed cocoa powder, 1 ½ cups (180g) all-purpose flour, 1 tsp baking soda, ½ tsp fine sea salt, and ½ tsp instant espresso powder (if using). Sift this mixture once for absolute uniformity.
- Combine Dry & Wet: With mixer on low speed, gradually add dry ingredients to wet mixture in three additions, mixing only until *just* incorporated after each. Overmixing develops gluten = tough cookies. Batter will be thick, glossy, and slightly sticky—like chilled fudge.
- Add Color & Final Touch: Add 1 Tbsp (15ml) red gel food coloring (or 2 Tbsp liquid) and 1 tsp pure vanilla extract. Mix on low for 15 seconds until color is evenly distributed—batter should be a deep, saturated burgundy. Fold in ½ cup (85g) white chocolate chips or cream cheese chips (optional) by hand.
- Chill Thoroughly (Non-Negotiable Step): Cover bowl tightly and refrigerate for *at least 2 hours*, preferably 3–4 hours or overnight. This chills the butter, hydrates the flour, concentrates flavors, and firms the batter—essential for clean scooping and dramatic crinkling. Do not skip or shorten this step.
- Preheat & Prep for Baking: Position oven racks in upper and lower thirds. Preheat oven to 350°F (177°C). Ensure baking sheets are cool between batches.
- Portion & Roll: Using a 1.5-tablespoon cookie scoop (or level tablespoon), portion chilled dough into 1.5-inch balls. Working with 3–4 at a time, roll each firmly between palms into smooth spheres. Roll each ball generously in the chilled confectioners’ sugar until fully coated and opaque white. Place 3 inches apart on prepared sheets.
- Bake with Precision: Bake 1 sheet at a time for 11–13 minutes—until edges appear set and dry, centers look soft and slightly puffed, and signature deep cracks have formed across the surface. Rotate sheet halfway through for even baking. Cookies will look underdone—but they continue to set as they cool. Do not overbake!
- Cool & Set: Let cookies cool on baking sheets for 5 minutes—this allows structure to firm. Then carefully transfer to wire racks to cool completely (15–20 minutes). They’ll deepen in color and develop full fudgy texture as they cool.
Tips
- Sugar Temperature Matters: Always use chilled confectioners’ sugar—and chill your hands briefly under cold water before rolling if dough feels overly soft. Warm hands melt sugar and cause uneven coating.
- Measure Cocoa by Weight: Volume measurements for cocoa vary wildly. For consistency, use 65g (not “¾ cup”)—this prevents dry, bitter, or flat-tasting cookies.
- Don’t Skip the Vinegar: Even if you love tangy red velvet, omitting vinegar weakens the cocoa bloom and compromises tenderness. It’s foundational—not optional.
- Chill Between Batches: If baking multiple sheets, return unused dough balls to fridge for 10 minutes before rolling the next batch. Warm dough spreads excessively and won’t crinkle properly.
- Use Light-Colored Pans: Dark or nonstick sheets absorb more heat, causing undersides to overbrown before tops crinkle. Opt for heavy-gauge aluminum or air-insulated sheets.
- Rotate & Monitor: Ovens have hot spots. Rotate pans ½ turn at the 6-minute mark. Start checking at 10 minutes—even 30 seconds can mean the difference between fudgy perfection and dry crumbles.
- Freeze for Freshness: Portion and roll dough balls, freeze on a tray until solid, then store in airtight freezer bags for up to 3 months. Bake straight from frozen—add 1–2 minutes to bake time.
- Revive Stale Cookies: Place cooled cookies in an airtight container with a slice of plain white bread overnight—the bread’s moisture migrates, restoring softness without sogginess.
Variations and Customizations
These cookies are a stunning canvas for creativity—maintaining their core fudgy-crackly identity while welcoming bold personalization:
- Black Cocoa Version: Replace half the Dutch-processed cocoa with black cocoa (32g black + 33g Dutch) for an intense, almost charcoal-black cookie with profound Oreo-like depth and heightened red contrast.
- Orange-Infused Velvet: Add 1 Tbsp finely grated orange zest + 1 tsp orange extract with the vanilla. Pair with dark chocolate chunks instead of white chocolate for a bright, sophisticated twist reminiscent of classic red velvet’s citrus notes.
- Spiced Velvet Crinkles: Stir ½ tsp ground cinnamon, ¼ tsp ground cardamom, and a pinch of freshly grated nutmeg into dry ingredients. Serve with candied ginger crumbles on top.
- Decadent Swirl: After rolling in sugar, press a small disc of cream cheese (½ tsp, softened) into the center of each ball before baking—creates a molten, tangy heart.
- Vegan Velvet Crinkles: Substitute browned coconut oil for butter, flax eggs (2 Tbsp ground flax + 6 Tbsp water), oat milk + 1 tsp vinegar for buttermilk, and vegan white chocolate. Use beet powder (1 Tbsp) + 1 tsp gel color for natural red depth.
- Mini Crinkle Bites: Scoop 1-teaspoon portions, roll, and bake for 7–9 minutes. Perfect for elegant dessert tables or party favors—yields ~60 delicate bites.
- Gourmet Salted Caramel Drizzle: After cooling, drizzle with house-made salted caramel sauce and finish with flaky sea salt. Adds luxurious contrast and elevates gifting appeal.
- Gluten-Free Velvet: Use a 1:1 GF flour blend *with xanthan gum*, increase cocoa to 75g, and add 1 extra Tbsp buttermilk. Chill dough 4+ hours for optimal structure.
Health Considerations and Nutritional Value
While undeniably indulgent, Red Velvet Crinkle Cookies can be thoughtfully approached with awareness and mindful adaptations. A standard 2.5-inch cookie (approx. 35g) contains roughly 140–160 calories, 7–8g fat (4–5g saturated), 18–20g carbohydrates (14–16g sugars), and 1–1.5g protein. The cocoa content provides flavonoids linked to antioxidant activity and potential cardiovascular benefits—especially when using high-cacao, low-alkali Dutch-processed varieties. However, the refined sugars, butterfat, and food coloring warrant consideration for specific dietary needs.
Dietary Modifications:
- Reduced-Sugar Option: Replace ¼ cup granulated sugar with 3 Tbsp monk fruit-allulose blend (adds bulk and browning without aftertaste). Note: texture may be slightly less crisp; increase chilling time by 30 minutes.
- Lower-Fat Adaptation: Substitute ¼ cup applesauce + 6 Tbsp melted butter (instead of 1 cup butter). Expect slightly cakier texture—best paired with extra espresso powder to enhance richness.
- Allergen Notes: Naturally nut-free (unless adding nut-based chips). For dairy-free, use high-fat coconut milk yogurt + vinegar for buttermilk, and vegan butter. Always verify food coloring is allergen-free (many gel colors are corn-based and soy-free).
- Food Coloring Transparency: While FDA-approved, some prefer natural alternatives: 1 Tbsp concentrated beet juice powder + ½ tsp red gel yields vibrant color with added nutrients (folate, iron). Avoid liquid beet juice—it adds too much moisture.
- Portion Control Tip: Bake as mini cookies (12–14 per sheet) — visually satisfying, easier to moderate intake, and ideal for sharing without overindulgence.
As with all treats, enjoyment lies in balance: savoring these cookies mindfully, pairing them with herbal tea or sparkling water, and appreciating the craft and joy they embody—not just as dessert, but as edible celebration.
Ingredients
- 1 cup (227g) unsalted butter, browned and cooled to lukewarm (or softened)
- 1 cup (200g) granulated sugar
- 1 cup (220g) packed light brown sugar
- 2 large eggs + 1 large egg yolk, room temperature
- ¼ cup (60ml) cultured buttermilk
- 1 teaspoon white vinegar
- 1 tablespoon pure vanilla extract
- 1 tablespoon (15ml) red gel food coloring (or 2 tablespoons liquid)
- ¾ cup (65g) Dutch-processed cocoa powder
- 1 ½ cups (180g) all-purpose flour, spooned & leveled (or weighed)
- 1 teaspoon baking soda
- ½ teaspoon fine sea salt
- ½ teaspoon instant espresso powder (optional but recommended)
- ½ cup (85g) white chocolate chips or cream cheese chips (optional)
- 1 cup (120g) confectioners’ sugar, chilled and sifted (for rolling)
Directions
- Line two large baking sheets with parchment paper or silicone baking mats. Place 1 cup confectioners’ sugar in a shallow bowl; chill in freezer for 10 minutes.
- If browning butter: Melt butter in a light saucepan over medium-low heat, swirling constantly, until golden-brown and nutty (5–7 min). Pour into heatproof bowl, scraping in all browned bits. Cool to lukewarm (~90°F).
- In stand mixer with paddle attachment, beat browned (or softened) butter, granulated sugar, and brown sugar on medium speed 3–4 min until pale, fluffy, and smooth. Scrape bowl.
- Add eggs, yolk, buttermilk, and vinegar; beat 1 min until emulsified and glossy. Add vanilla and food coloring; mix 15 sec until uniform deep burgundy.
- In separate bowl, whisk cocoa, flour, baking soda, salt, and espresso powder. Sift once.
- With mixer on low, gradually add dry ingredients in three parts, mixing until *just* combined after each. Fold in chips by hand.
- Cover bowl tightly; refrigerate dough 3–4 hours or overnight (minimum 2 hours).
- Preheat oven to 350°F (177°C) with racks in upper/lower thirds.
- Scoop 1.5-Tbsp portions. Roll firmly into balls, then generously in chilled confectioners’ sugar until opaque white. Place 3″ apart on sheets.
- Bake one sheet at a time 11–13 min—until edges are set, centers soft and puffed, and deep cracks form. Rotate sheet at 6 min.
- Cool on sheets 5 min, then transfer to wire racks to cool completely (15–20 min). Store airtight at room temp up to 5 days—or freeze baked cookies up to 3 months.
FAQ
- Why didn’t my cookies crinkle?
- Most common causes: dough wasn’t chilled long enough (needs ≥2 hours), confectioners’ sugar wasn’t chilled, oven temperature was too low, or batter was overmixed. Also ensure you’re using *gel* food coloring—not liquid—which adds minimal moisture.
- Can I use natural cocoa instead of Dutch-processed?
- You can—but expect a sharper, more acidic chocolate note and potentially less vibrant red (since natural cocoa lacks the pH-neutralization that enhances color). Reduce vinegar to ½ tsp and add ¼ tsp baking powder for better lift.
- My cookies spread too much—what went wrong?
- Likely culprits: butter too warm during creaming, insufficient chilling time, using a dark baking sheet, or measuring flour by scooping (which packs it down—always spoon & level!). Also check expiration date on baking soda—it loses potency after 6 months.
- Can I make these ahead for holidays?
- Absolutely! Portioned, sugar-coated dough balls freeze beautifully for up to 3 months. Bake straight from frozen—add 1–2 minutes to bake time. Or bake cookies fully, cool completely, and freeze in single layers in airtight containers for up to 2 months.
- What’s the best way to ship these?
- Layer cooled cookies between parchment in a rigid tin or box. Fill gaps with crumpled parchment or tissue. Include a silica gel packet to prevent moisture absorption. Ship via 2-day delivery and avoid extreme temperatures.
- Are these safe for kids with food dye sensitivities?
- Yes—with modification. Use concentrated beet powder (1 Tbsp) + ½ tsp red gel for vivid, natural color. Or embrace the “rustic velvet” look—skip added color entirely. The cocoa + buttermilk + vinegar still yields a lovely dusky rose undertone.
- Can I use a hand mixer?
- Yes—cream butter and sugars 4–5 minutes on medium-high until very light and fluffy. Be patient; under-creaming leads to dense cookies. Scrape bowl frequently.
- How do I get the brightest red color?
- Use high-quality red gel (Wilton No-Taste or AmeriColor Super Red), Dutch-processed cocoa, and ensure your buttermilk is fresh and active. The vinegar + baking soda reaction also brightens the hue—don’t omit it!
Summary
Red Velvet Crinkle Cookies are a masterclass in festive baking—melding the luxurious tang and cocoa depth of red velvet cake with the textural magic of crackled, powdered-sugar-dusted cookies. With meticulous attention to ingredient quality, precise chilling, and controlled baking, each cookie delivers a showstopping visual and a profoundly fudgy, tender, melt-in-your-mouth experience that lingers long after the last crinkle is savored.
Whether you honor tradition with classic preparation or reimagine it through seasonal spices, vegan swaps, or gourmet swirls, these cookies remain a joyful, versatile, and deeply comforting celebration of flavor, color, and craft—proving that the most memorable desserts don’t just satisfy the palate, but spark wonder with every snowy, crimson-cracked bite.