Red Velvet Crinkle Cookies are a decadent fusion of classic holiday crinkle cookies and the beloved Southern red velvet cake. With their deep crimson hue, crackled tops, soft cocoa-laced interiors, and a generous dusting of powdered sugar, these cookies offer both visual drama and rich flavor in every bite. Perfect for holiday cookie exchanges, birthday parties, or cozy winter evenings with a glass of milk, Red Velvet Crinkle Cookies bring together the best of chocolate, vanilla, and festive charm in one irresistible treat.
The History
The origin of crinkle cookies dates back to mid-20th century American baking traditions, where their distinctive cracked appearance—achieved by rolling dough balls in powdered sugar before baking—earned them their name. These cookies were often associated with holiday baking due to their snow-dusted look, resembling little mounds of sugary frost. Over time, bakers began experimenting with flavors beyond the traditional chocolate version. Enter red velvet—a flavor that emerged from Southern U.S. cuisine, originally popularized by cakes made with buttermilk, cocoa, vinegar, and a hint of red coloring. The combination of red velvet’s subtle cocoa-vanilla profile with the crinkle cookie’s texture created a modern twist on two classics. Red Velvet Crinkle Cookies gained popularity in the 2000s, especially through food blogs and social media, becoming a staple in gourmet cookie assortments and seasonal dessert collections.
Ingredients Breakdown
Understanding each ingredient helps you appreciate how they contribute to the final texture, color, and taste of Red Velvet Crinkle Cookies:
- All-Purpose Flour: Provides structure and stability to the cookies. Too much can make them dry; too little can cause spreading.
- Cocoa Powder (Unsweetened): Gives the cookies their chocolatey depth and complements the red velvet flavor. Use natural or Dutch-process depending on preference—natural yields a sharper tang, while Dutch-process is smoother.
- Baking Powder & Baking Soda: Leavening agents that help the cookies rise slightly and create tender centers. Baking soda also reacts with acidic ingredients like vinegar and buttermilk (if used) for lift.
- Salt: Balances sweetness and enhances overall flavor complexity.
- Granulated Sugar: Sweetens the dough and contributes to texture. A moderate amount ensures richness without overpowering.
- Brown Sugar (Light or Dark): Adds moisture, chewiness, and a caramel-like note. Dark brown sugar intensifies the molasses flavor.
- Vegetable Oil or Melted Butter: Fats that keep the cookies moist. Oil produces a softer crumb, while butter adds richness and aroma.
- Eggs: Bind ingredients together, add structure, and contribute to leavening and moisture.
- Vanilla Extract: Enhances sweetness and rounds out the flavor profile, essential for authentic red velvet character.
- White Vinegar or Cream of Tartar: Adds slight acidity, which reacts with baking soda to create air bubbles, yielding a tender texture and mimicking traditional red velvet cake chemistry.
- Red Food Coloring (Liquid or Gel): Imparts the signature vibrant red hue. Gel coloring is more concentrated and provides deeper color with less liquid.
- Buttermilk (Optional): Sometimes added for extra tang and tenderness, though not always necessary if vinegar is already present.
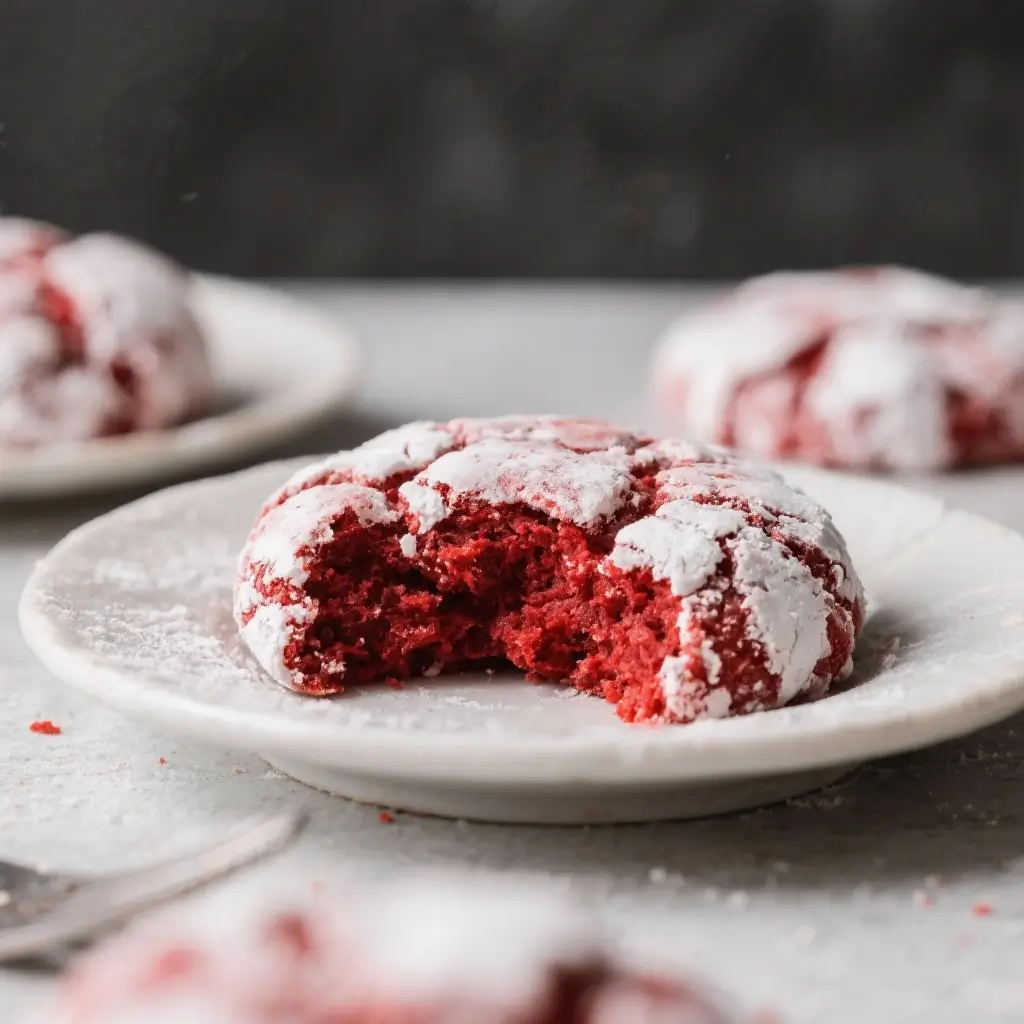
- Powdered Sugar (for Rolling): Creates the snowy, cracked exterior when the dough expands during baking. It also adds a sweet finish with every bite.
Step-by-Step Recipe
- Chill the Dough: In a large bowl, whisk together 1¾ cups all-purpose flour, ¼ cup unsweetened cocoa powder, 1 tsp baking powder, ½ tsp baking soda, and ¼ tsp salt. Set aside.
- Cream Sugars and Fat: In a separate bowl, beat ½ cup granulated sugar and ½ cup packed light brown sugar with ½ cup vegetable oil (or melted and cooled butter) until smooth. Add 2 large eggs one at a time, mixing well after each addition. Stir in 1 tbsp vanilla extract, 1 tsp white vinegar, and 1–2 tsp red gel food coloring (adjust for desired intensity).
- Combine Wet and Dry Ingredients: Gradually add the dry mixture to the wet ingredients, mixing just until combined. Do not overmix. Cover and refrigerate the dough for at least 2 hours (or up to 48 hours) to firm it up—this prevents excessive spreading and improves texture.
- Preheat Oven and Prepare Baking Sheets: Preheat oven to 350°F (175°C). Line baking sheets with parchment paper or silicone mats.
- Shape the Cookies: Place 1 cup powdered sugar in a small bowl. Scoop chilled dough into 1-inch balls using a cookie scoop or tablespoon. Roll each ball in powdered sugar until fully coated, then place on prepared sheets about 2 inches apart.
- Bake: Bake for 10–12 minutes. The cookies should appear set on the edges but still soft in the center. They will continue to cook slightly as they cool. Avoid overbaking to maintain a fudgy interior.
- Cool and Serve: Let cookies rest on the baking sheet for 5 minutes before transferring to a wire rack to cool completely. The cracks will deepen as they settle.
Tips
- Use Gel Food Coloring: For a bold red color without adding excess liquid, opt for gel-based food coloring. Liquid coloring may alter dough consistency.
- Chill Thoroughly: Never skip chilling! Cold dough holds its shape better and produces thicker, cakier cookies with pronounced cracks.
- Don’t Overbake: Remove cookies when the edges are just set and the center looks slightly underdone. They’ll firm up perfectly upon cooling.
- Roll Generously in Powdered Sugar: Replenish the powdered sugar as needed. A thick coating ensures the iconic snowy look post-bake.
- Uniform Sizing: Use a cookie scoop for consistent size and even baking. Aim for about 1.5 tablespoons of dough per cookie.
- Rotate Pans: For even baking, rotate the baking sheet halfway through if your oven has hot spots.
- Storage Tip: Store in an airtight container at room temperature for up to 5 days. They freeze beautifully—up to 3 months—either baked or unbaked (freeze dough balls on a tray, then transfer to a bag).
Variations and Customizations
- Gluten-Free Version: Substitute all-purpose flour with a high-quality gluten-free flour blend designed for baking. Add ½ tsp xanthan gum if not included in the mix.
- Vegan Adaptation: Replace eggs with flax eggs (2 tbsp ground flaxseed + 6 tbsp water), use plant-based butter or oil, and ensure powdered sugar is vegan (some brands use bone char).
- White Chocolate Drizzle: After cooling, drizzle melted white chocolate over the cookies for a bakery-style finish that enhances the red velvet contrast.
- Cream Cheese Swirl: Mix softened cream cheese with a bit of powdered sugar and vanilla, then swirl into each dough ball before rolling in sugar for a cheesecake-inspired surprise.
- Mini Crinkles: Make smaller versions using a teaspoon-sized scoop for bite-sized treats perfect for parties.
- Almond or Coconut Extract: Swap half the vanilla extract with almond or coconut for a unique flavor twist that pairs beautifully with red velvet.
- Dark Chocolate Crinkles: Increase cocoa powder to ⅓ cup and use dark food coloring for a richer, more intense chocolate experience.
- Festive Sprinkles: Before baking, gently press holiday sprinkles into the powdered sugar coating for a colorful, celebratory touch.
Health Considerations and Nutritional Value
While undeniably indulgent, Red Velvet Crinkle Cookies can be enjoyed in moderation as part of a balanced diet. Here’s a general nutritional breakdown per cookie (based on 1 batch yielding ~36 cookies):
- Calories: ~120–140 kcal
- Total Fat: 5–7g (including 1–2g saturated fat)
- Carbohydrates: 18–22g (includes 12–15g sugar)
- Protein: 1–2g
- Sodium: ~50–70mg
Considerations:
- Sugar Content: High in added sugars from granulated, brown, and powdered varieties. Those managing blood sugar levels should consume sparingly.
- Gluten and Allergens: Contains wheat, eggs, and dairy (unless substituted). Not suitable for individuals with related allergies unless modified.
- Portion Control: Their rich flavor means one or two cookies are often satisfying. Pair with tea or milk for a balanced snack.
- Healthier Swaps: Try reducing sugar by 25%, using coconut sugar, or incorporating whole wheat pastry flour for added fiber. However, changes may affect texture and spread.
- Food Dyes: Some people prefer natural alternatives like beet juice powder, though results may vary in color intensity and moisture balance.
Ingredients
- 1¾ cups (220g) all-purpose flour
- ¼ cup (20g) unsweetened cocoa powder
- 1 tsp baking powder
- ½ tsp baking soda
- ¼ tsp salt
- ½ cup (100g) granulated sugar
- ½ cup (100g) packed light brown sugar
- ½ cup (120ml) vegetable oil or melted and cooled unsalted butter
- 2 large eggs
- 1 tbsp vanilla extract
- 1 tsp white vinegar
- 1–2 tsp red gel food coloring (or more for deeper color)
- 1 cup (120g) powdered sugar (for rolling)
Directions
- In a medium bowl, sift together the flour, cocoa powder, baking powder, baking soda, and salt. Whisk to combine and set aside.
- In a large mixing bowl, beat the granulated sugar, brown sugar, and oil (or melted butter) together until smooth and slightly creamy.
- Add the eggs one at a time, beating well after each addition. Stir in the vanilla extract, white vinegar, and red food coloring until fully incorporated and uniformly colored.
- Gradually add the dry ingredients to the wet mixture, mixing on low speed or by hand just until no flour streaks remain. Do not overmix.
- Cover the bowl with plastic wrap and refrigerate for at least 2 hours, or preferably overnight, to allow the dough to firm and flavors to meld.
- When ready to bake, preheat the oven to 350°F (175°C). Line baking sheets with parchment paper or silicone mats.
- Place the powdered sugar in a shallow bowl. Scoop chilled dough into 1-inch (about 1.5 tbsp) balls. Roll each ball in powdered sugar until completely coated, then place on the baking sheet spaced about 2 inches apart.
- Bake for 10–12 minutes. The tops should be cracked and set around the edges, but the centers will still look soft. Do not overbake.
- Allow cookies to cool on the baking sheet for 5 minutes to finish setting, then transfer to a wire rack to cool completely.
- Once cooled, lightly sift additional powdered sugar on top if desired for extra elegance. Serve and enjoy!
FAQ
Q: Why aren’t my cookies cracking?
A: Cracks form due to rapid expansion in the oven. Ensure you’re rolling the dough balls generously in powdered sugar and not over-chilling them beyond 48 hours. Also, avoid overmixing the dough, which can develop gluten and reduce spread.
Q: Can I make the dough ahead of time?
A: Yes! The dough can be refrigerated for up to 48 hours or frozen for up to 3 months. If frozen, thaw in the fridge before scooping and baking.
Q: Why use vinegar in a cookie recipe?
A: Vinegar reacts with baking soda to create carbon dioxide, helping the cookies rise slightly and stay tender. It also mimics the tangy note found in red velvet cake.
Q: Can I use liquid red food coloring instead of gel?
A: You can, but gel is recommended because it’s more concentrated. Using too much liquid coloring can make the dough too wet, affecting texture and spread.
Q: How do I prevent flat cookies?
A: Make sure the dough is properly chilled, measure flour accurately (spoon and level, don’t scoop), and avoid over-creaming the sugars and oil.
Q: Are these cookies the same as red velvet cake in cookie form?
A: They capture the essence—color, mild cocoa flavor, and slight tang—but are denser and fudgier than cake. Think of them as a hybrid between a brownie and a spiced crinkle cookie with red velvet flair.
Q: Can I freeze baked cookies?
A: Absolutely. Freeze cooled cookies in an airtight container with parchment between layers. Thaw at room temperature. They retain texture well for up to 3 months.
Summary
Red Velvet Crinkle Cookies combine the beloved crackled texture of holiday crinkles with the luxurious flavor of Southern red velvet cake, resulting in soft, cocoa-rich cookies with a snowy powdered sugar crust. Visually stunning and irresistibly flavorful, they’re perfect for gifting, holidays, or treating yourself to a little edible luxury.