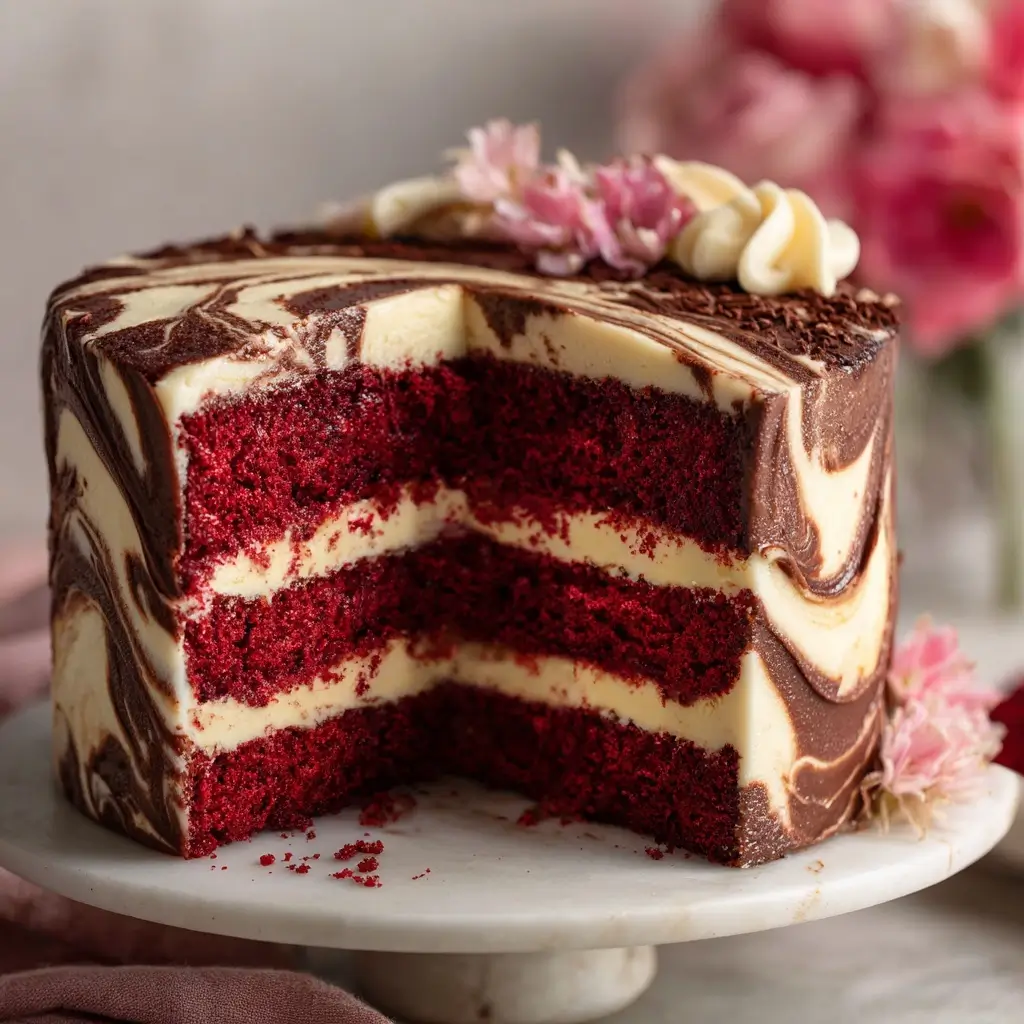
Red Velvet Chocolate Swirl Cake: A Decadent Delight
The Red Velvet Chocolate Swirl Cake is a luxurious fusion of two beloved desserts—classic red velvet cake and rich chocolate swirl. This stunning dessert marries the moist, tender crumb of red velvet with deep, velvety ribbons of chocolate that ripple throughout each slice, creating an eye-catching pattern and an unforgettable flavor experience. Whether you’re baking for a special occasion or simply indulging in your love for cakes, this masterpiece is sure to impress both visually and gastronomically.
The History of Red Velvet and Chocolate Swirl Cakes
The origins of red velvet cake trace back to the early 20th century, with roots believed to be in New York City’s Waldorf-Astoria Hotel. The cake’s signature red hue originally came from a reaction between natural cocoa powder and acidic ingredients like buttermilk and vinegar, which created a subtle reddish tint. Over time, food coloring was introduced to enhance the color, giving the cake its now-iconic crimson appearance. It gained widespread popularity during the Great Depression as bakers used small amounts of cocoa to justify using expensive ingredients like buttermilk and butter.
Chocolate swirl cakes, on the other hand, have long been a staple in American home baking traditions. Inspired by marble cakes from Europe—particularly Germany and England—these desserts feature alternating streaks of vanilla and chocolate batter, creating a marbled effect when baked. The technique evolved over decades, allowing bakers to experiment with contrasting flavors and textures within a single cake.
The Red Velvet Chocolate Swirl Cake is a modern interpretation that blends these two traditions into one harmonious creation. By incorporating a chocolate batter swirl into the iconic red velvet base, contemporary bakers elevate the dessert into a gourmet treat that balances tanginess, sweetness, and richness in every bite.
Ingredients Breakdown: What Makes This Cake Special?
The magic of the Red Velvet Chocolate Swirl Cake lies not just in its appearance but also in the careful selection and balance of ingredients. Each component plays a crucial role in achieving the perfect texture, moisture, and flavor profile.
- All-Purpose Flour: Provides structure to the cake. Sifted before use to ensure a light, airy crumb.
- Cocoa Powder (Unsweetened): Adds depth to the chocolate swirl layer. Natural cocoa works best due to its acidity, which complements the red velvet portion.
- Granulated Sugar: Sweetens both batters and helps create a soft, tender texture by retaining moisture.
- Baking Soda & Baking Powder: Leavening agents that work together to give the cake its rise. Baking soda reacts with acidic components (like buttermilk and vinegar), while baking powder provides additional lift.
- Salt: Enhances all the flavors and balances the sweetness.
- Eggs: Bind the ingredients and contribute to the cake’s structure and richness. Room temperature eggs blend more smoothly into the batter.
- Vegetable Oil: Keeps the cake incredibly moist. Unlike butter, oil remains liquid at room temperature, contributing to a softer texture.
- Buttermilk: Adds tenderness and a slight tang that defines red velvet’s unique taste. Its acidity activates the baking soda.
- Distilled White Vinegar: Reacts with baking soda for extra leavening and enhances the red color naturally.
- Vanilla Extract: Adds aromatic warmth and rounds out the flavor profile.
- Red Food Coloring (Gel Recommended): Gives the red velvet portion its vibrant hue. Gel coloring is preferred because it’s concentrated and doesn’t add excess liquid.
- Unsalted Butter (for chocolate swirl): Used in the chocolate batter to enrich the swirl and provide a creamy mouthfeel.
- Heavy Cream (for chocolate swirl): Adds silkiness and helps melt the chocolate smoothly.
- Semi-Sweet Chocolate (chopped or chips): Forms the heart of the chocolate swirl, offering a deep, slightly bitter contrast to the sweet red velvet.
- Confectioners’ Sugar (optional for glaze): Can be used to make a simple chocolate drizzle or frosting if desired.
Step-by-Step Recipe: How to Make the Perfect Red Velvet Chocolate Swirl Cake
Making this show-stopping cake requires attention to detail and a bit of patience, but the result is absolutely worth it. Follow these steps carefully to achieve bakery-quality results at home.
- Preheat Oven & Prepare Pan: Preheat your oven to 350°F (175°C). Grease and flour a 9-inch bundt pan or springform pan, ensuring every crevice is coated to prevent sticking. Alternatively, line the bottom with parchment paper for easy release.
- Mix Dry Ingredients: In a large mixing bowl, sift together 2 cups all-purpose flour, 1/2 cup unsweetened cocoa powder, 1 1/2 teaspoons baking soda, 1/2 teaspoon baking powder, 1/2 teaspoon salt, and 1 3/4 cups granulated sugar. Whisk until thoroughly combined.
- Combine Wet Ingredients: In another bowl, whisk 2 large eggs until smooth. Add 1 cup vegetable oil, 1 cup buttermilk, 2 teaspoons vanilla extract, 1 tablespoon distilled white vinegar, and 2 tablespoons red gel food coloring. Mix until fully incorporated and uniformly colored.
- Create Red Velvet Batter: Gradually pour the wet mixture into the dry ingredients. Stir gently with a spatula or hand mixer on low speed until just combined. Do not overmix—this can lead to a dense cake. Set aside.
- Prepare Chocolate Swirl Mixture: In a small saucepan over low heat, combine 1/2 cup heavy cream and 1/4 cup unsalted butter. Heat until butter melts and mixture begins to simmer. Remove from heat and stir in 4 ounces chopped semi-sweet chocolate until completely melted and smooth. Let cool slightly.
- Swirl Technique Setup: Transfer about one-third of the red velvet batter into the prepared pan, spreading evenly with a spatula. Spoon dollops of the warm chocolate mixture over the red velvet layer. Use a knife or skewer to gently swirl the chocolate into the batter using figure-eight motions—do not over-swirl, or the layers will blend too much.
- Repeat Layers: Add another third of red velvet batter, followed by more chocolate dollops and swirling. Repeat one final time with the remaining batter and chocolate. Finish with a few gentle swirls across the top to create a beautiful marbled surface.
- Bake the Cake: Place the pan in the center of the preheated oven. Bake for 45–55 minutes, or until a toothpick inserted into the center comes out clean or with a few moist crumbs. Avoid opening the oven door during the first 30 minutes to prevent collapse.
- Cool Properly: Allow the cake to cool in the pan on a wire rack for 20 minutes. Then, carefully invert it onto the rack to cool completely before slicing or decorating.
- Optional Glaze: For added decadence, prepare a chocolate glaze by melting 1/2 cup semi-sweet chocolate with 2 tablespoons heavy cream and 1 tablespoon confectioners’ sugar. Drizzle over the cooled cake.
Tips for Baking Success
- Use Room Temperature Ingredients: Cold eggs or buttermilk can cause the batter to seize or result in uneven mixing. Take them out 30 minutes before baking.
- Sift Your Dry Ingredients: Prevents lumps and ensures even distribution of leaveners and cocoa powder.
- Don’t Overmix: Once flour is added, mix only until combined. Overmixing develops gluten, leading to a tough cake.
- Gel Food Coloring Is Best: Liquid food coloring may alter the consistency of the batter; gel provides intense color without affecting texture.
- Chill the Chocolate Mixture Slightly: If the chocolate is too hot when swirled, it may sink or bleed through the batter. Let it cool to warm room temperature.
- Swirl Gently: Use a thin knife or chopstick and make minimal passes to preserve distinct layers.
- Check Doneness Early: Ovens vary—start checking at 40 minutes. Insert a toothpick near the center; if it comes out clean, it’s done.
- Cool Completely Before Slicing: Cutting into a warm cake can cause crumbling. Wait at least 1–2 hours.
- Store Properly: Keep covered at room temperature for up to 2 days or refrigerate for up to 5 days. Bring to room temperature before serving.
Variations and Customizations
This recipe is highly adaptable—feel free to personalize it based on dietary needs, flavor preferences, or seasonal themes.
- Gluten-Free Version: Substitute all-purpose flour with a high-quality gluten-free flour blend containing xanthan gum. Test brands like Bob’s Red Mill or King Arthur for best results.
- Dairy-Free Option: Replace buttermilk with almond milk + 1 tbsp lemon juice (let sit 5 minutes), use dairy-free chocolate, and substitute butter and cream with coconut oil and full-fat coconut milk.
- Lower Sugar Alternative: Swap granulated sugar with coconut sugar or monk fruit sweetener. Note: texture and browning may differ slightly.
- Alcohol Infusion: Add 1–2 tablespoons of bourbon or Kahlua to the chocolate swirl for a sophisticated twist.
- Frosting Varieties: Instead of a glaze, top with cream cheese frosting, whipped ganache, or mascarpone frosting for extra richness.
- Add-ins: Fold chopped pecans, walnuts, or white chocolate chips into the red velvet batter for crunch and contrast.
- Mini Versions: Bake in muffin tins for individual cupcakes or use a loaf pan for a smaller cake. Adjust baking time accordingly (cupcakes: 18–22 mins).
- Seasonal Themes: Add peppermint extract and crushed candy canes during holidays, or top with fresh berries in summer.
Health Considerations and Nutritional Value
While undeniably delicious, the Red Velvet Chocolate Swirl Cake is a dessert best enjoyed in moderation. Understanding its nutritional content can help you make informed choices.
Nutrition Facts (per slice, approximately 1/12th of cake):
- Calories: ~380–420
- Total Fat: 20–24g (Saturated Fat: 8–10g)
- Cholesterol: 60–70mg
- Sodium: 250–300mg
- Total Carbohydrates: 48–52g (Dietary Fiber: 2g, Sugars: 32–36g)
- Protein: 4–5g
Key Considerations:
- High in Sugar and Fat: Due to oil, sugar, and chocolate content, this cake should be considered an occasional treat rather than part of a daily diet.
- Low in Fiber and Protein: Not nutritionally balanced—pair with fruit or yogurt if serving as a brunch item.
- Gluten and Dairy Content: Contains wheat and dairy; not suitable for those with allergies unless modified.
- Artificial Coloring Concerns: Some people prefer natural alternatives like beet juice or pomegranate concentrate, though they yield a less vibrant color.
- Potential Allergens: Eggs, milk, wheat, soy (in chocolate), and nuts (if added) are common allergens present.
To make it slightly healthier:
- Reduce sugar by 1/4 cup and increase vanilla for sweetness perception.
- Replace half the oil with unsweetened applesauce or mashed banana.
- Use dark chocolate (70%+) in the swirl to reduce sugar and boost antioxidants.
- Serve smaller slices with fresh strawberries or Greek yogurt on the side.
Complete Ingredient List
For the Red Velvet Batter:
- 2 cups (250g) all-purpose flour
- 1 3/4 cups (350g) granulated sugar
- 1/2 cup (40g) unsweetened natural cocoa powder
- 1 1/2 tsp baking soda
- 1/2 tsp baking powder
- 1/2 tsp salt
- 2 large eggs, room temperature
- 1 cup (240ml) vegetable oil (or canola oil)
- 1 cup (240ml) buttermilk, room temperature
- 2 tsp pure vanilla extract
- 1 tbsp distilled white vinegar
- 2 tbsp red gel food coloring (adjust for intensity)
For the Chocolate Swirl:
- 4 oz (115g) semi-sweet chocolate, finely chopped
- 1/2 cup (120ml) heavy cream
- 1/4 cup (57g) unsalted butter
Optional Glaze:
- 1/2 cup (85g) semi-sweet chocolate chips
- 2 tbsp heavy cream
- 1 tbsp confectioners’ sugar
Detailed Directions
- Preparation: Preheat oven to 350°F (175°C). Generously grease and flour a 9-inch bundt pan or 9×3 inch springform pan. Tap out excess flour. Set aside.
- Dry Mix: In a large bowl, sift together flour, cocoa powder, sugar, baking soda, baking powder, and salt. Whisk for 30 seconds to aerate and blend.
- Wet Mix: In a medium bowl, whisk eggs lightly. Add oil, buttermilk, vanilla, vinegar, and red gel coloring. Beat with a fork or hand mixer until smooth and uniformly red.
- Combine: Pour wet ingredients into dry ingredients. Stir with a rubber spatula or mixer on low speed until no streaks of flour remain. Stop as soon as it’s mixed—overmixing causes toughness.
- Melt Chocolate Base: In a small saucepan, heat heavy cream and butter over medium-low until butter melts and mixture simmers. Remove from heat, add chocolate, and stir until glossy and smooth. Cool for 5–7 minutes.
- Layering Process: Spoon 1/3 of red velvet batter into the pan. Drop 1/3 of chocolate mixture in spoonfuls over the batter. Using a knife, gently swirl in a figure-eight motion. Repeat two more times, ending with a lightly swirled top.
- Baking: Place in center rack. Bake 45–55 minutes. Rotate pan halfway through for even baking. Cake is done when a toothpick comes out clean and edges pull slightly from the sides.
- Cooling: Cool in pan 20 minutes. Loosen edges with a knife, then invert onto wire rack. Cool completely (1–2 hours) before glazing or slicing.
- Glazing (Optional): Warm cream and stir into chocolate and confectioners’ sugar until smooth. Drizzle over cooled cake. Let set 15 minutes before serving.
- Serving: Slice with a sharp serrated knife dipped in hot water for clean cuts. Serve plain or with whipped cream and berries.
Frequently Asked Questions (FAQ)
Q: Can I use cake flour instead of all-purpose flour?
A: Yes, cake flour will produce a more delicate, tender crumb. Use 2 1/4 cups cake flour in place of 2 cups all-purpose flour.
Q: Why did my cake sink in the middle?
A: Common causes include underbaking, opening the oven too early, overmixing the batter, or inaccurate oven temperature. Use an oven thermometer to verify heat accuracy.
Q: Can I make this cake ahead of time?
A: Absolutely! Bake and cool completely, then wrap tightly in plastic wrap. Store at room temperature for 2 days or freeze for up to 3 months.
Q: Can I use liquid food coloring?
A: You can, but you’ll need more, which adds extra liquid and may affect texture. Gel coloring is more efficient and stable.
Q: How do I store leftovers?
A: Cover with a cake dome or wrap slices individually. Refrigerate for longer storage (up to 5 days). Bring to room temperature before serving.
Q: Is there a substitute for buttermilk?
A: Yes—mix 1 cup milk with 1 tbsp lemon juice or white vinegar. Let sit 5–10 minutes until slightly curdled.
Q: Can I bake this in a different pan?
A: Yes—use two 9-inch round pans for layered cake (reduce time to 30–35 mins) or a 9×13” pan (bake 35–40 mins).
Q: Why isn’t my swirl visible?
A: You may have over-swirled or poured all the red velvet first before adding chocolate. Always alternate layers and swirl gently.
Q: Can I make this vegan?
A: Yes—with flax eggs (2 tbsp ground flax + 5 tbsp water), plant-based buttermilk, dairy-free chocolate, and non-hydrogenated margarine. Results may vary slightly.
Q: Can I freeze the cake?
A: Yes—wrap unglazed cake tightly in plastic and foil. Thaw overnight in the fridge, then bring to room temperature before serving.
Summary
The Red Velvet Chocolate Swirl Cake is a breathtaking dessert that combines the classic tangy sweetness of red velvet with luxurious ribbons of rich chocolate, creating a visually stunning and deeply flavorful treat. Perfect for celebrations or indulgent weekends, this cake delivers moistness, elegance, and irresistible taste in every slice.