Red Velvet Chocolate Cups: A Decadent Delight
The History of Red Velvet Chocolate Cups
The origins of red velvet can be traced back to the early 20th century, with its roots deeply embedded in Southern American baking traditions. Initially, the term “red velvet” referred to a soft, cocoa-infused cake that gained its subtle reddish hue from the natural reaction between acidic ingredients like buttermilk and vinegar with non-alkalized (natural) cocoa powder. This chemical interaction caused the anthocyanin in the cocoa to turn slightly red, giving the cake its signature tint.
However, it wasn’t until the early 1900s that the Waldorf-Astoria Hotel in New York popularized the red velvet cake, adding more vibrant color using beet juice or food coloring. Over time, as artificial red food coloring became more accessible and affordable, especially during the mid-20th century, the vivid crimson version we know today became standard. The cake’s luxurious texture, mild chocolate flavor, and striking appearance made it a favorite for special occasions.
Fast forward to the modern era, and bakers began experimenting with new formats—cupcakes, cake pops, and even bite-sized confections. Enter the Red Velvet Chocolate Cups: a fusion dessert that combines the elegance of red velvet cake with the indulgence of chocolate ganache or truffle fillings. These treats are essentially miniaturized versions of red velvet desserts encased in a smooth chocolate shell, resembling chocolate truffles or petit fours. They offer the perfect balance between rich cocoa, tangy buttermilk notes, and creamy sweetness—ideal for dessert tables, holiday gifts, or gourmet party favors.
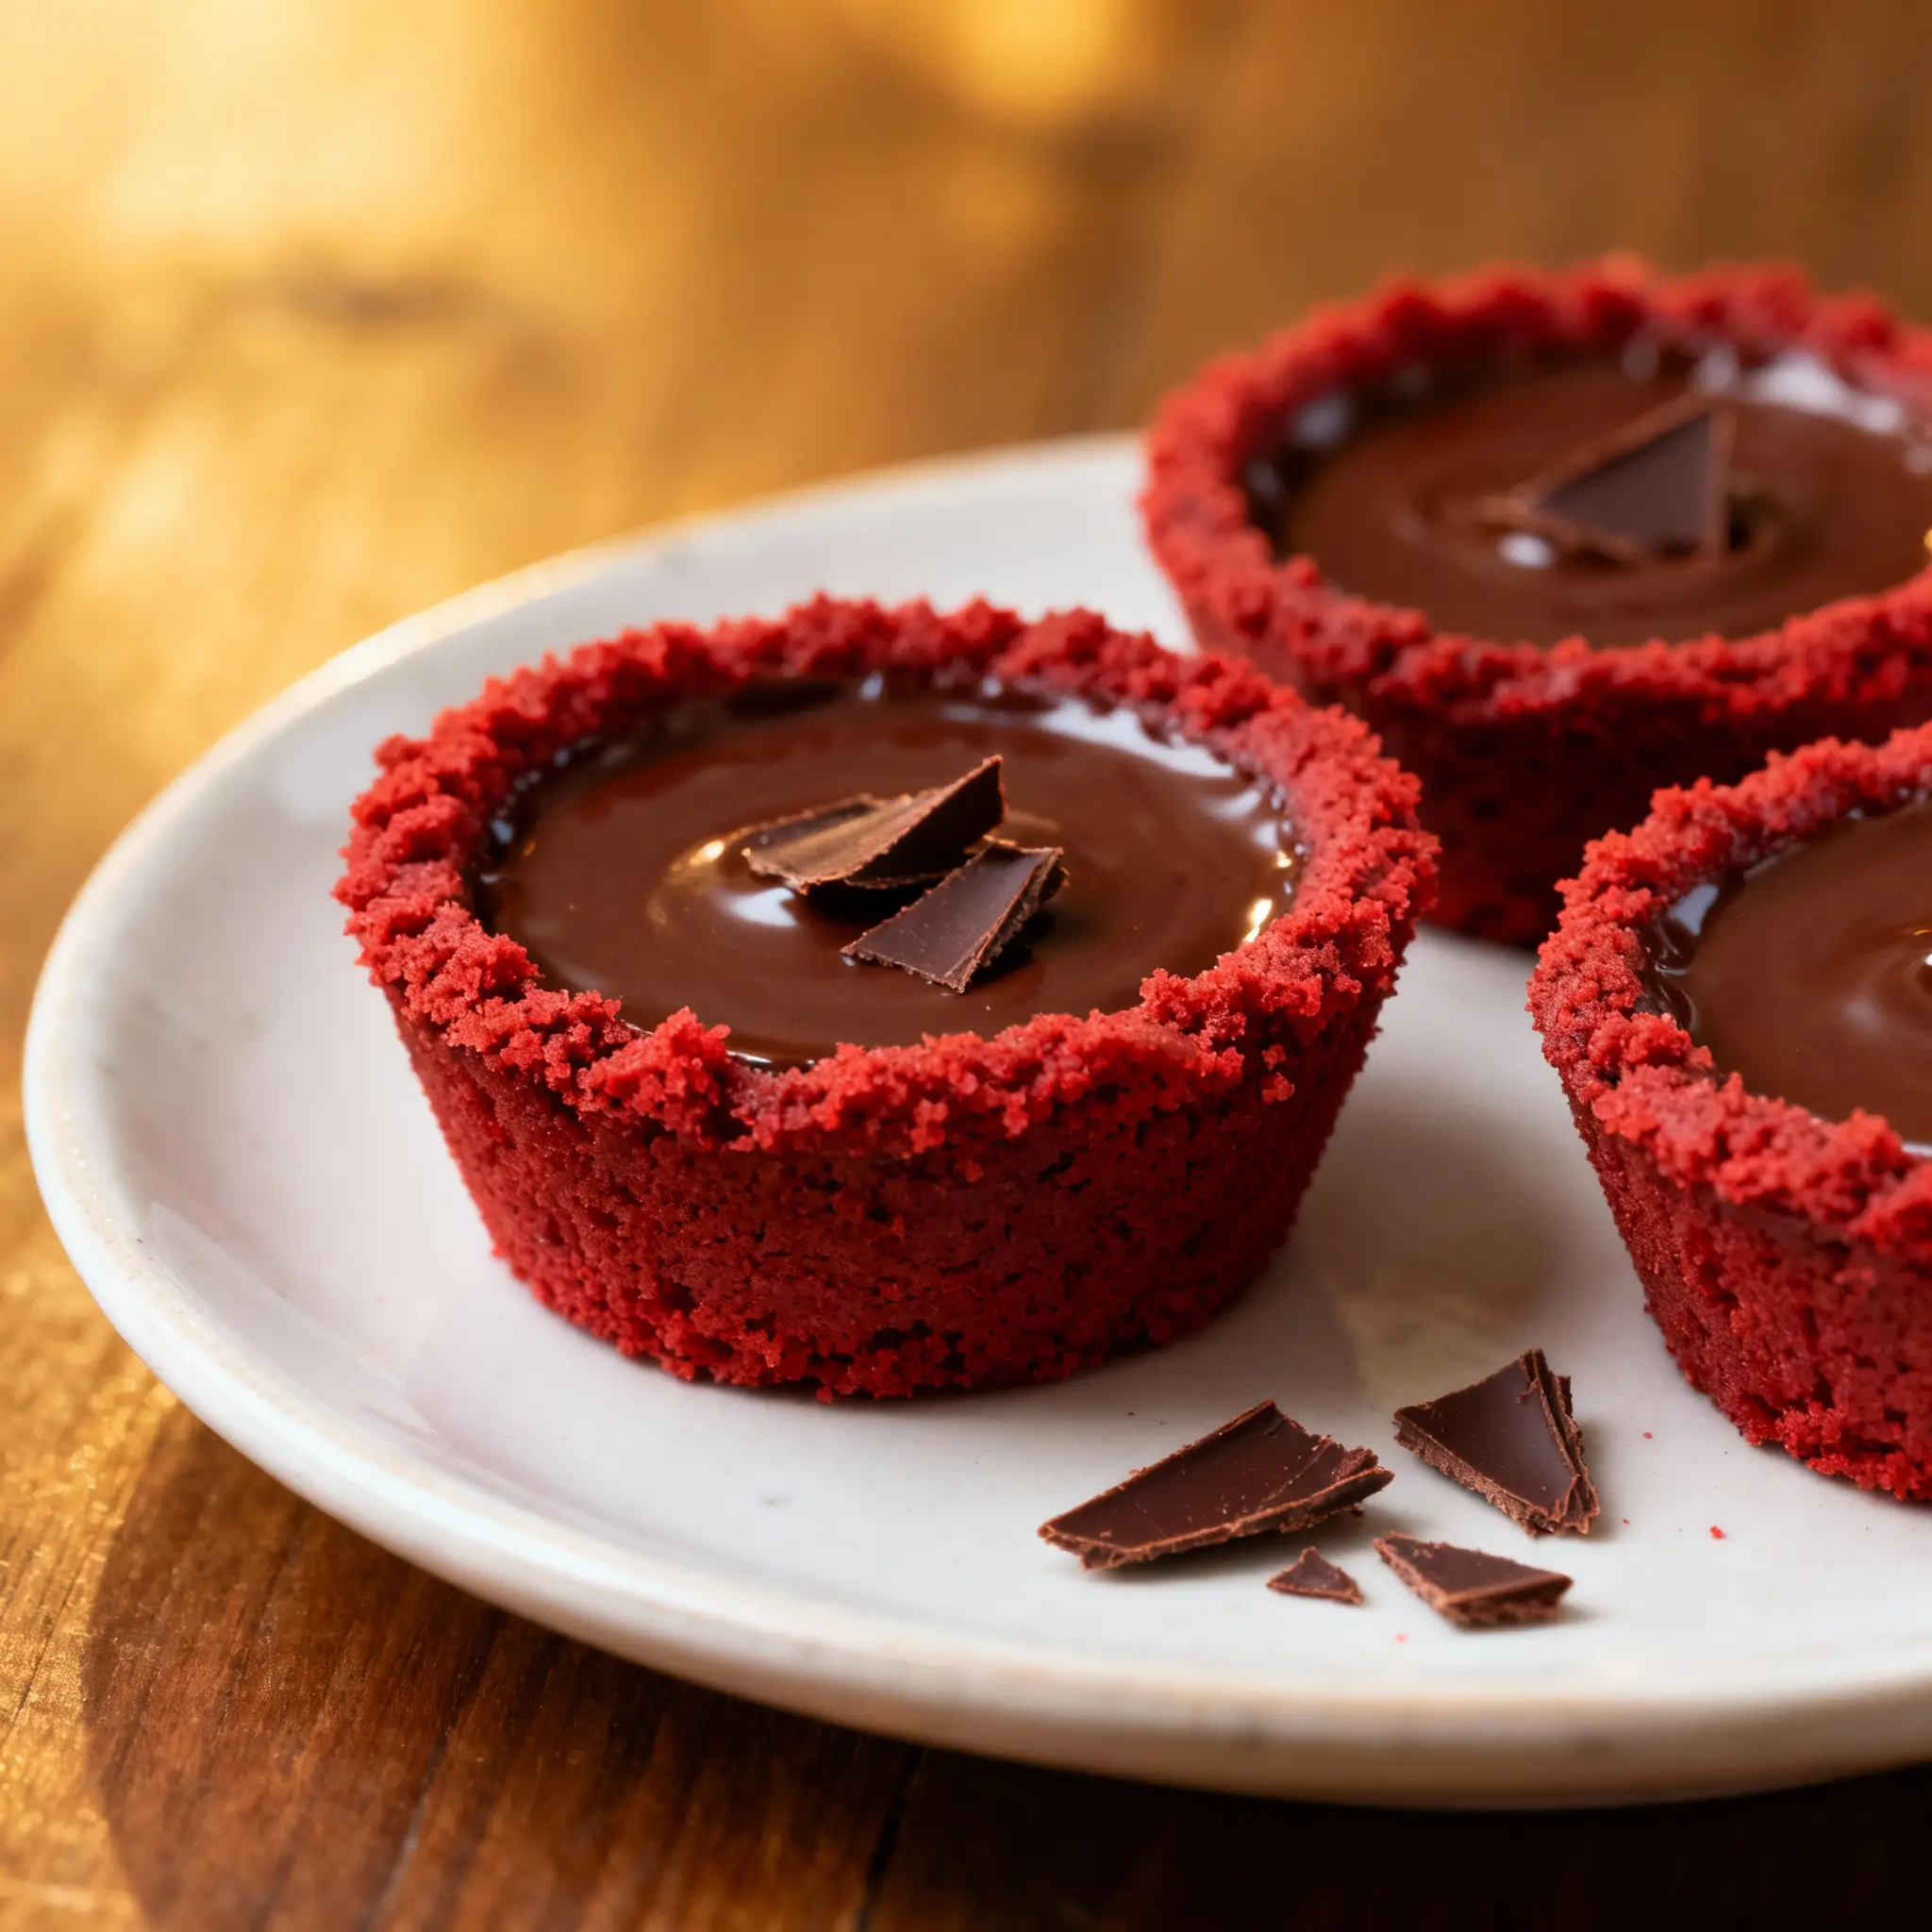
Today, Red Velvet Chocolate Cups are celebrated not only for their stunning visual appeal—deep red interiors peeking through glossy chocolate coatings—but also for their complex yet harmonious flavor profile. Whether served at weddings, baby showers, or Valentine’s Day gatherings, they symbolize sophistication and decadence in every bite.
Ingredients Breakdown
To create authentic and delicious Red Velvet Chocolate Cups, you need a carefully balanced combination of dry and wet ingredients that deliver both structure and flavor. Below is a detailed breakdown of each component and its role in the recipe:
Dry Ingredients:
- All-Purpose Flour: Provides the base structure for the cake-like filling. It ensures a soft, tender crumb without being too dense.
- Natural Cocoa Powder: Adds a subtle chocolate flavor and contributes to the slight acidity needed for the classic red velvet chemistry. Avoid Dutch-processed cocoa as it lacks the necessary acidity.
- Baking Soda: Reacts with acidic components (like buttermilk and vinegar) to leaven the mixture, creating a light texture.
- Salt: Enhances overall flavor by balancing sweetness and highlighting other taste elements.
- Granulated Sugar: Sweetens the mixture while helping retain moisture and contributing to tenderness.
Wet Ingredients:
- Buttermilk: A key player in red velvet chemistry. Its acidity activates baking soda and reacts with cocoa to enhance color and flavor. Also adds moisture and richness.
- Distilled White Vinegar: Boosts acidity further, ensuring optimal rise and color development. Also helps tenderize gluten strands.
- Eggs: Bind ingredients together, add structure, and contribute to leavening and emulsification.
- Vegetable Oil: Keeps the interior moist and extends shelf life compared to butter-based recipes.
- Vanilla Extract: Adds aromatic depth and complements the mild chocolate notes.
- Red Food Coloring (Liquid or Gel): Gives the signature vibrant red hue. Gel coloring is preferred for intense color without altering consistency.
For the Chocolate Coating:
- Semi-Sweet or Dark Chocolate Chips: Form the outer shell. Offers a rich contrast to the sweet-tangy center.
- Cocoa Butter or Coconut Oil (optional): Added to improve tempering and give a snappy, glossy finish when cooled.
- White Chocolate Melts (for drizzle or decoration): Optional for aesthetic appeal and added sweetness.
For the Cream Cheese Filling (Optional Enhancement):
- Cream Cheese: Cold, full-fat cream cheese adds tanginess and creaminess, mimicking traditional red velvet frosting.
- Unsalted Butter: Softened, enhances spreadability and richness.
- Powdered Sugar: Sweetens and thickens the filling.
- Vanilla Extract: Reinforces flavor continuity.
Step-by-Step Recipe
Follow this detailed guide to make flawless Red Velvet Chocolate Cups from scratch. This method yields approximately 18–24 bite-sized treats, depending on mold size.
Part 1: Prepare the Red Velvet Cake Mixture
- Preheat your oven to 350°F (175°C). Line a muffin tin with paper liners or grease lightly if using silicone molds.
- In a large mixing bowl, sift together 1 cup all-purpose flour, 2 tablespoons natural cocoa powder, ½ teaspoon baking soda, and a pinch of salt. Sifting prevents lumps and aerates the dry mix.
- Add ¾ cup granulated sugar to the dry ingredients and whisk thoroughly.
- In another bowl, combine ½ cup buttermilk, 1 large egg, ¼ cup vegetable oil, 1 teaspoon vanilla extract, and 1 tablespoon distilled white vinegar. Whisk until fully blended.
- Pour the wet ingredients into the dry ingredients. Mix gently with a spatula until just combined—do not overmix.
- Add 1–2 teaspoons of red gel food coloring (or more for deeper color) and stir until evenly distributed. The batter should be smooth and uniformly red.
- Divide the batter evenly among the muffin cups, filling each about two-thirds full.
- Bake for 15–18 minutes, or until a toothpick inserted into the center comes out clean.
- Allow the cupcakes to cool completely in the pan, then transfer to a wire rack. Once cool, use a small spoon or melon baller to hollow out the center of each cup, creating a cavity for filling.
Part 2: Make the Cream Cheese Filling (Optional)
- In a medium bowl, beat 4 oz softened cream cheese and 2 tbsp softened unsalted butter until smooth and creamy.
- Gradually add 1 cup powdered sugar and continue beating until light and fluffy.
- Mix in ½ teaspoon vanilla extract. Taste and adjust sweetness if needed.
- Spoon the filling into a piping bag fitted with a small round tip. Pipe a small amount into each hollowed cup. Alternatively, use a teaspoon for a rustic look.
Part 3: Create the Chocolate Shell
- Prepare a double boiler by placing a heat-safe bowl over a pot of simmering water (ensure the bottom doesn’t touch the water).
- Add 12 oz semi-sweet chocolate chips (and 1 tbsp coconut oil or cocoa butter for shine and snap) to the bowl. Stir continuously until melted and smooth.
- Remove from heat and let cool slightly (to around 88–90°F for dark chocolate).
- Dip the tops of each filled cup into the melted chocolate, swirling to coat evenly. Alternatively, spoon chocolate over the top to cover.
- Place the coated cups on a parchment-lined tray. If desired, drizzle with melted white chocolate for decorative effect.
- Refrigerate for 15–20 minutes to set the chocolate completely.
Final Assembly:
Once set, gently peel away paper liners if used. Store in an airtight container in the refrigerator until ready to serve. For best texture, allow them to sit at room temperature for 5–10 minutes before serving.
Tips for Perfect Red Velvet Chocolate Cups
- Use Gel Food Coloring: Liquid coloring may alter the batter’s consistency and require larger quantities. Gel provides intense color with minimal volume.
- Don’t Overbake: Even 1–2 extra minutes can dry out the tiny cakes. Check early and often.
- Cool Completely Before Filling: Warm cupcakes will melt the cream cheese filling and destabilize the chocolate coating later.
- Temper the Chocolate (Optional): For a professional-grade snap and shine, temper the chocolate by seeding or tabling methods. However, adding coconut oil simplifies the process for home bakers.
- Uniform Size Matters: Use a cookie scoop or measuring spoon to portion batter evenly for consistent baking and presentation.
- Chill Before Dipping: If the filling is very soft, chill the filled cups briefly (5–10 mins) before dipping to prevent slippage.
- Avoid Water in Chocolate: Even a drop of water can cause chocolate to seize. Ensure all utensils are completely dry.
- Customize Presentation: Sprinkle with edible gold dust, crushed pecans, or freeze-dried raspberry powder for added flair.
Variations and Customizations
Red Velvet Chocolate Cups are incredibly versatile. Here are some creative twists to suit different tastes and occasions:
1. Vegan Version
Replace eggs with flax eggs (1 tbsp ground flaxseed + 3 tbsp water per egg), use plant-based buttermilk (soy milk + vinegar), dairy-free chocolate, and vegan cream cheese. Opt for coconut oil instead of butter.
2. Gluten-Free Option
Substitute all-purpose flour with a high-quality gluten-free flour blend containing xanthan gum. Test for texture adjustments—some blends absorb more liquid.
3. Mini Cupcake Style
Skip the chocolate coating and bake the red velvet mixture in mini muffin tins. Fill centers with cream cheese frosting and top with a tiny chocolate disc or candy heart.
4. Alcohol-Infused Flavor
Add 1 tsp bourbon or Chambord to the cream cheese filling for an adult twist. Great for holiday parties or romantic dinners.
5. Stuffed Center Variations
Instead of cream cheese, fill centers with raspberry jam, salted caramel, peanut butter ganache, or marshmallow fluff for unexpected flavor contrasts.
6. White Chocolate Exterior
Use white chocolate instead of dark for a sweeter, creamier shell. Pair with a tart filling to balance the sweetness.
7. Seasonal Themes
Dye the chocolate coating green for Christmas, pastel shades for Easter, or pink for Valentine’s Day. Add themed sprinkles or edible glitter accordingly.
8. Protein-Packed Version
Incorporate protein powder into the dry mix (reduce flour proportionally) and use Greek yogurt instead of buttermilk for a fitness-friendly treat.
Health Considerations and Nutritional Value
While undeniably indulgent, Red Velvet Chocolate Cups can be enjoyed in moderation as part of a balanced diet. Here’s a nutritional overview per serving (assuming 20 pieces per batch, one piece = ~80–100 calories):
- Calories: ~90 kcal
- Total Fat: 6g (Saturated: 3.5g)
- Cholesterol: 15mg
- Sodium: 50mg
- Carbohydrates: 10g (Sugars: 7g)
- Protein: 1.5g
- Fiber: 0.5g
Dietary Notes:
- Sugar Content: Relatively high due to multiple sweetened components. Consider reducing sugar in filling or using monk fruit sweetener for lower glycemic impact.
- Dairy and Eggs: Contains common allergens. Always label clearly if serving to guests.
- Caffeine: Minimal—cocoa contains trace amounts, but not enough to affect most individuals.
- Portion Control: Their small size makes them ideal for mindful eating. One or two satisfy a chocolate craving without excess.
Healthier Modifications:
- Use blackstrap molasses instead of some sugar—it adds iron and a deeper flavor.
- Opt for avocado oil instead of vegetable oil for healthier fats.
- Reduce chocolate quantity and use high-cocoa (70%+) chocolate to increase antioxidants and reduce sugar.
- Boost fiber by adding a tablespoon of oat flour or almond flour to the dry mix.
Ingredients
For the Red Velvet Cups:
- 1 cup all-purpose flour
- 2 tablespoons natural unsweetened cocoa powder
- ½ teaspoon baking soda
- Pinch of salt
- ¾ cup granulated sugar
- ½ cup buttermilk
- 1 large egg
- ¼ cup vegetable oil
- 1 teaspoon vanilla extract
- 1 tablespoon distilled white vinegar
- 1–2 teaspoons red gel food coloring (adjust for desired intensity)
For the Cream Cheese Filling:
- 4 oz full-fat cream cheese, softened
- 2 tablespoons unsalted butter, softened
- 1 cup powdered sugar
- ½ teaspoon vanilla extract
For the Chocolate Coating:
- 12 oz semi-sweet chocolate chips
- 1 tablespoon coconut oil or cocoa butter (optional, for shine)
- White chocolate melts (optional, for drizzling)
Directions
- Preheat oven to 350°F (175°C). Line a 12-cup muffin tin with paper liners or use silicone molds.
- Sift flour, cocoa powder, baking soda, and salt into a large bowl. Whisk in sugar.
- In a separate bowl, whisk buttermilk, egg, oil, vanilla, and vinegar until smooth.
- Pour wet ingredients into dry ingredients. Gently fold until just combined.
- Add red gel food coloring and mix until uniform in color.
- Divide batter evenly among muffin cups (about 2–3 tablespoons each).
- Bake for 15–18 minutes, until a toothpick comes out clean.
- Cool completely in pan, then transfer to a cooling rack.
- Hollow out centers with a small spoon or melon baller to create a well.
- In a medium bowl, beat cream cheese and butter until smooth. Gradually add powdered sugar and vanilla. Beat until fluffy.
- Transfer filling to a piping bag and fill each cup. Alternatively, use a teaspoon.
- Set up a double boiler. Melt chocolate chips and coconut oil, stirring constantly until smooth.
- Remove from heat and cool slightly. Dip the tops of each filled cup into the chocolate, or spoon to coat.
- Place on parchment paper. Drizzle with white chocolate if desired.
- Refrigerate for 15–20 minutes until chocolate is firm.
- Peel off liners, store in an airtight container in the fridge, and enjoy within 5 days.
FAQ
Can I make Red Velvet Chocolate Cups ahead of time?
Yes! Bake and fill the cups up to 2 days in advance and refrigerate. Dip in chocolate the day you plan to serve for the freshest appearance.
Can I freeze them?
Absolutely. Freeze undipped filled cups on a tray, then transfer to a freezer bag. Thaw in the fridge before dipping. Fully assembled cups can be frozen for up to 1 month—thaw in the fridge before serving.
Why is my red velvet not red enough?
Natural cocoa alone gives only a faint red tint. You need food coloring for vibrancy. Use gel coloring for best results without thinning the batter.
Can I use butter instead of oil?
You can, but oil keeps the interior moister and more tender. Butter may result in a slightly drier texture.
Is buttermilk essential?
Yes—it’s crucial for flavor, texture, and the acid-base reaction. Substitute with ½ cup milk + ½ tbsp vinegar if necessary, but real buttermilk is best.
Can I make these without cream cheese?
Yes. Skip the filling or replace with jam, custard, or a simple powdered sugar glaze.
Why did my chocolate crack?
This happens if the filling is too cold or the chocolate cools too fast. Let cups come closer to room temperature before dipping, and ensure chocolate isn’t overheated.
Are Red Velvet Chocolate Cups safe for kids?
Yes, though they contain sugar and chocolate. Use natural food coloring if concerned about artificial dyes.
Summary
Red Velvet Chocolate Cups are an elegant fusion of Southern-inspired red velvet cake and luxurious chocolate truffles, featuring a soft cocoa-vanilla crumb, tangy cream cheese center, and glossy chocolate shell.
Perfect for gifting, celebrations, or satisfying chocolate cravings, these bite-sized delights combine rich flavor, stunning visuals, and endless customization possibilities in one irresistible treat.