Introduction
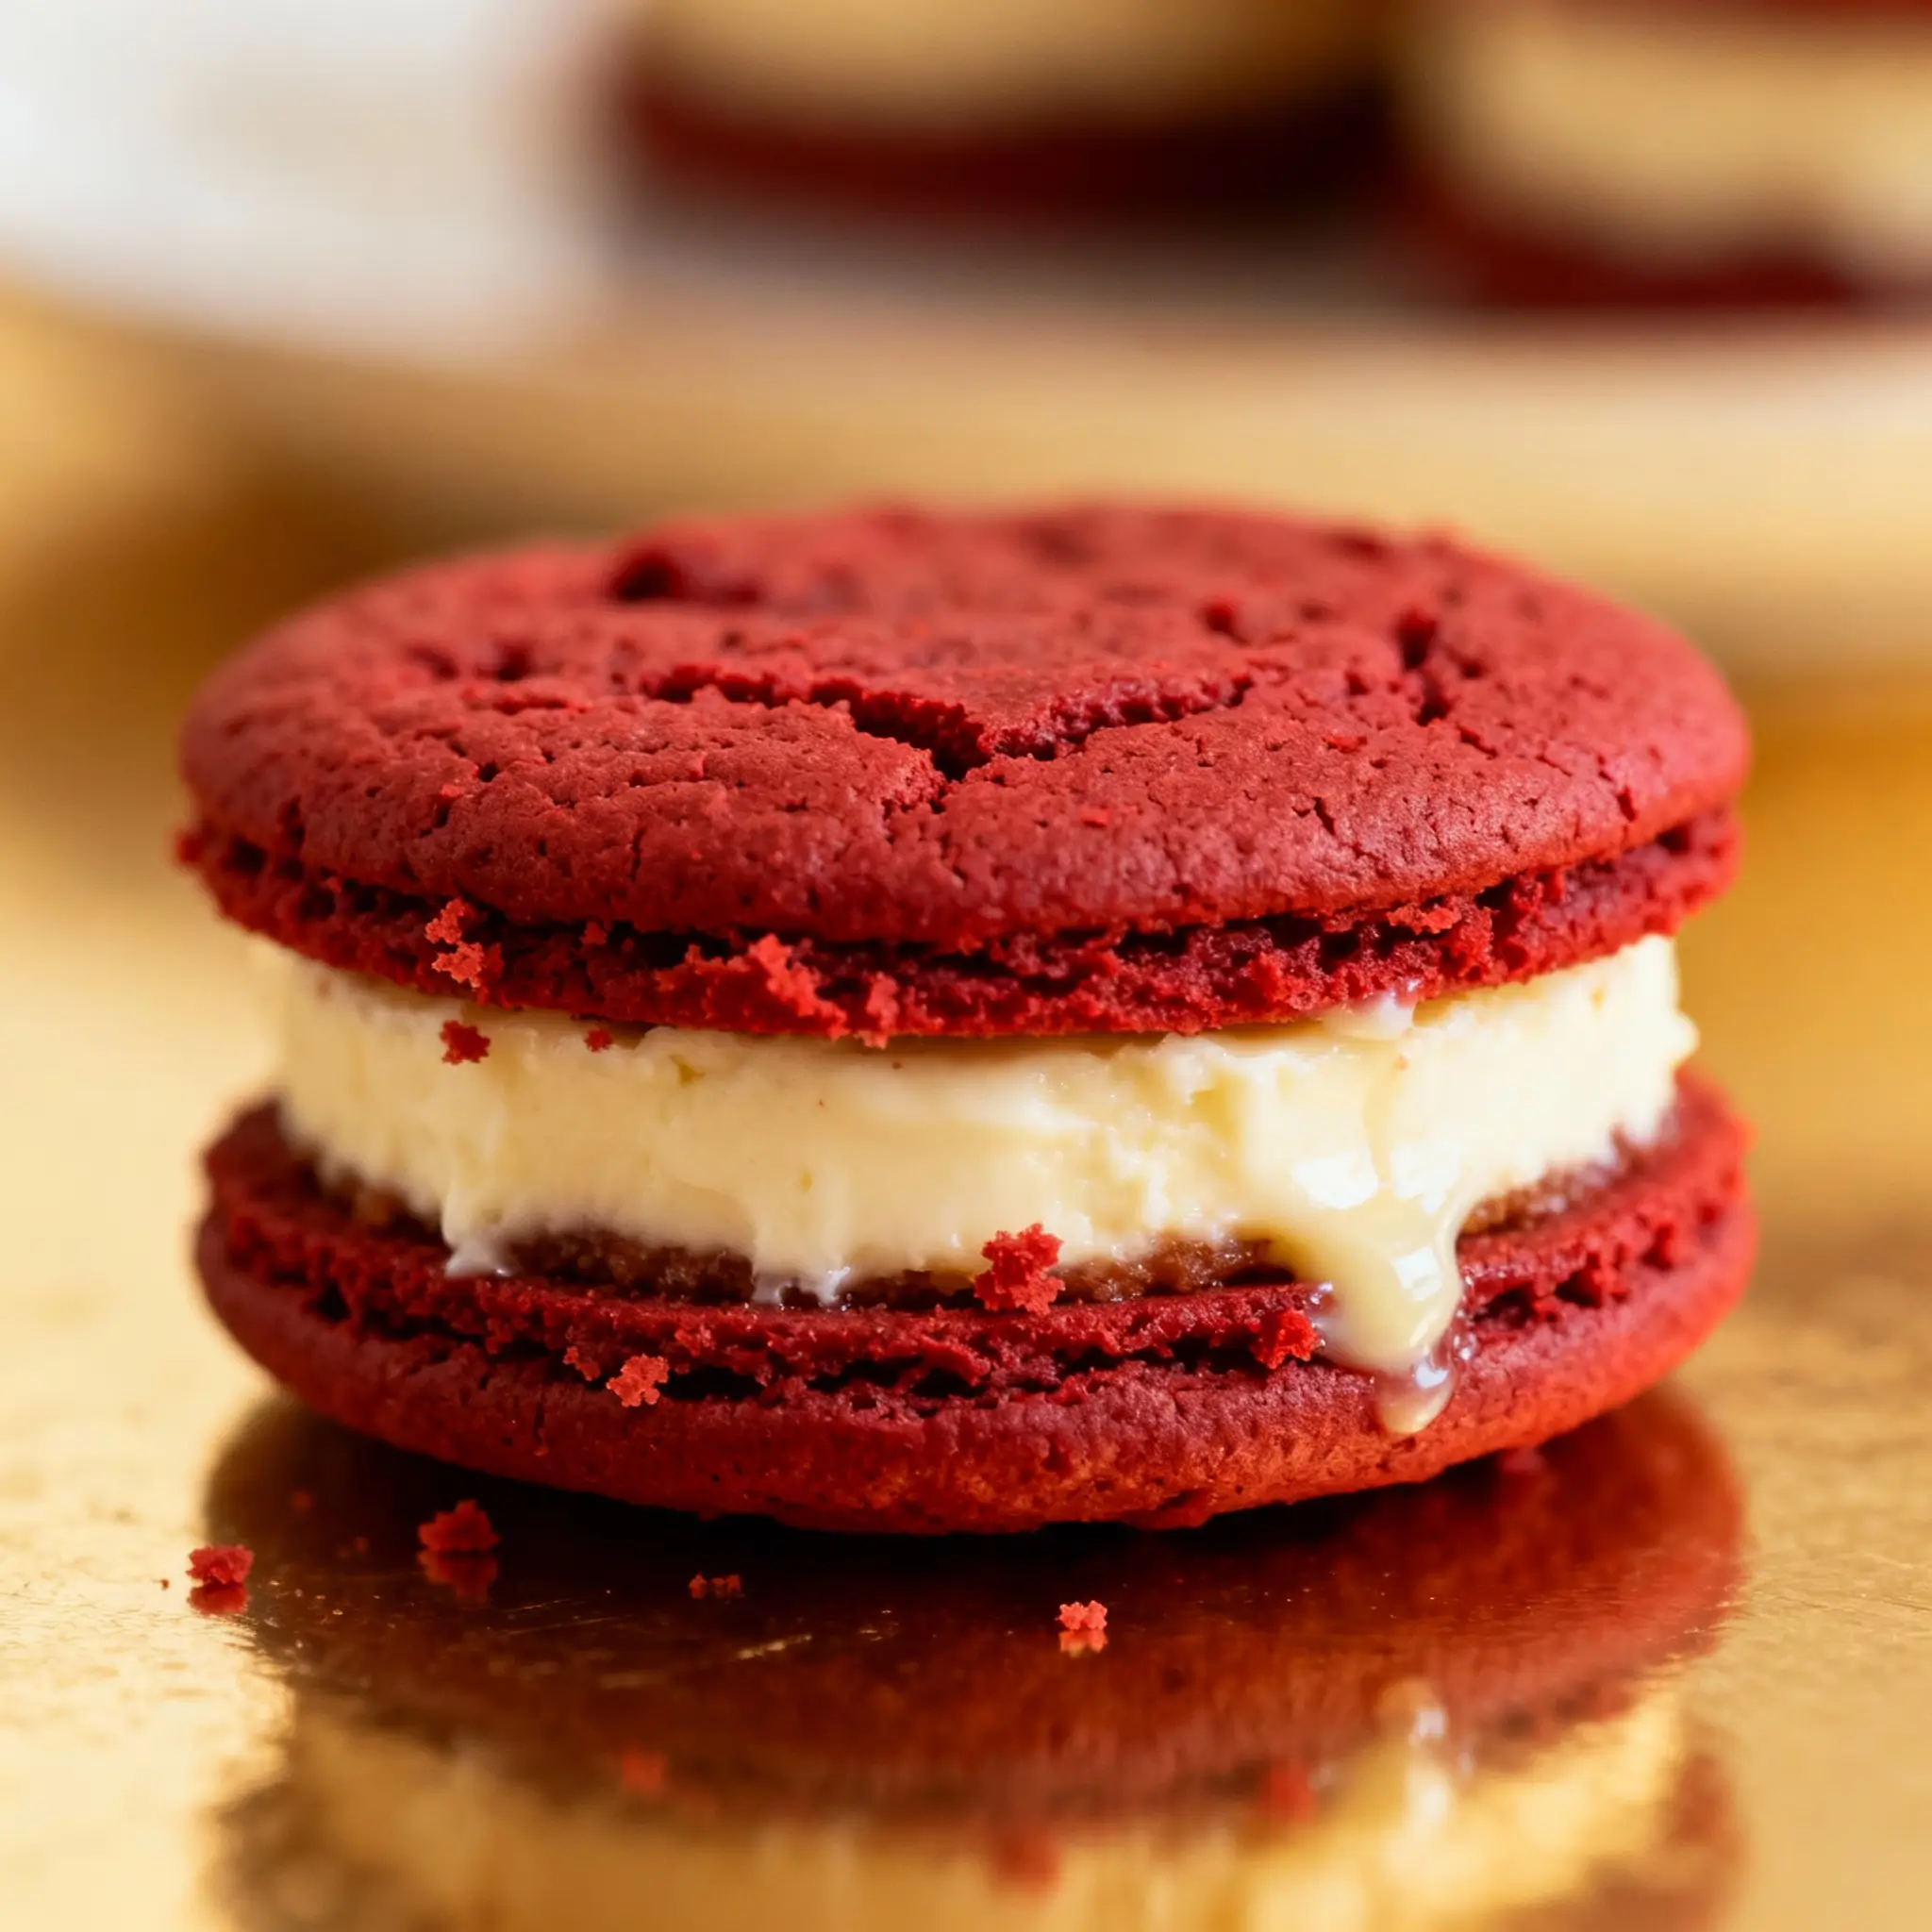
Indulge in the luxurious fusion of two beloved desserts with these Red Velvet Cheesecake Sandwich Cookies. Imagine the rich, velvety texture of red velvet cake meeting the creamy decadence of cheesecake, all sandwiched between two soft, buttery cookies. These treats are perfect for special occasions, holiday gatherings, or simply when you’re craving something extravagantly sweet. With their striking crimson hue and elegant cream cheese filling, they’re as much a feast for the eyes as they are for the palate. Whether you’re a seasoned baker or trying your hand at dessert innovation, this recipe promises to elevate your baking game to new heights.
The History
The origins of the Red Velvet Cheesecake Sandwich Cookies trace back through the histories of its two iconic components: red velvet cake and cheesecake. Red velvet cake first gained popularity in the early 20th century, particularly during the 1920s at the Waldorf-Astoria Hotel in New York City, where it became a symbol of elegance and indulgence. The cake’s distinctive red color originally came from a reaction between natural cocoa (rich in anthocyanin) and acidic ingredients like buttermilk and vinegar—though today, food coloring is typically used to achieve the vibrant look.
On the other hand, cheesecake has ancient roots, dating back to the Greeks who served it to athletes during the first Olympic Games. Over centuries, it evolved across Europe and into American cuisine, culminating in the beloved New York-style cheesecake known for its dense, creamy texture.
The marriage of these two classics into a cookie format is a modern culinary innovation, likely born in the era of gourmet dessert trends around the 2010s. Bakers began experimenting with hybrid desserts—cupcake truffles, cake-stuffed donuts, cookie sandwiches—and thus, the Red Velvet Cheesecake Sandwich Cookie emerged as a decadent, portable delight that combines the best of both worlds. It’s now a favorite at bakeries, food blogs, and festive tables across the country.
Ingredients Breakdown
To create the perfect Red Velvet Cheesecake Sandwich Cookies, each ingredient plays a vital role in flavor, texture, and appearance. Here’s an in-depth look at what goes into these irresistible treats:
- All-Purpose Flour: Provides structure to the cookie base. Sifted to ensure a light, tender crumb.
- Cocoa Powder (Unsweetened): Adds subtle chocolate flavor without overpowering the red velvet character. Use natural, not Dutch-processed, for proper pH balance.
- Baking Soda: Reacts with acidic ingredients to help the cookies rise slightly while maintaining a soft texture.
- Salt: Enhances overall flavor and balances sweetness.
- Butter (Unsalted, Room Temperature): Gives richness and contributes to a melt-in-your-mouth quality. Crucial for creaming with sugar.
- Granulated Sugar: Sweetens the dough and helps create a delicate crisp edge while keeping the center soft.
- Brown Sugar: Adds moisture and a hint of caramel-like depth due to molasses content.
- Eggs (Large, Room Temperature): Bind the ingredients together and add structure and tenderness.
- Vanilla Extract: Complements the cocoa and enhances the overall aroma.
- Red Food Coloring (Liquid or Gel): Imparts the signature red velvet look. Gel coloring is preferred for intense color without altering consistency.
- Buttermilk: Adds acidity, which reacts with baking soda and cocoa, yielding a fine crumb and slight tang—essential for authentic red velvet flavor.
For the Cheesecake Filling:
- Cream Cheese (Full-Fat, Room Temperature): The star of the filling—must be softened to avoid lumps and ensure smoothness.
- Butter (Unsalted, Softened): Adds silkiness and helps the filling hold its shape when chilled.
- Powdered Sugar (Confectioners’ Sugar): Sweetens and thickens the filling; sifted to prevent clumping.
- Vanilla Extract: Deepens flavor complexity.
- Salt (Pinch): Balances the sweetness and highlights the cream cheese taste.
Optional Garnishes:
- Chopped pecans or walnuts (for texture contrast)
- White chocolate drizzle
- Edible gold flakes (for luxury presentation)
- Crushed red velvet cake crumbs (for extra thematic flair)
Step-by-Step Recipe
- Prepare the Cookie Dough: In a medium bowl, whisk together 2 cups all-purpose flour, 2 tablespoons unsweetened cocoa powder, 1/2 teaspoon baking soda, and 1/4 teaspoon salt. Set aside.
- Cream the Butter and Sugars: In a large mixing bowl, beat 3/4 cup (1.5 sticks) unsalted butter with 3/4 cup granulated sugar and 1/4 cup packed brown sugar until light and fluffy (about 3–4 minutes).
- Add Wet Ingredients: Beat in 1 large egg and 1 teaspoon vanilla extract until fully incorporated. Mix in 1 tablespoon red food coloring (gel recommended), followed by 2 tablespoons buttermilk. Scrape down the sides as needed.
- Incorporate Dry Ingredients: Gradually add the dry mixture to the wet ingredients, mixing on low speed just until combined. Do not overmix. Cover the dough and chill in the refrigerator for at least 1 hour (up to 2 days).
- Preheat Oven & Prepare Baking Sheets: Preheat oven to 350°F (175°C). Line baking sheets with parchment paper or silicone mats.
- Shape the Cookies: Scoop chilled dough using a small cookie scoop (about 1 tablespoon per ball). Roll into smooth spheres and place 2 inches apart on baking sheets. Use the bottom of a glass dipped in sugar to lightly flatten each cookie.
- Bake: Bake for 8–10 minutes, or until edges are set but centers still appear soft. Avoid overbaking—cookies will firm up as they cool. Let rest on baking sheet for 5 minutes before transferring to wire racks to cool completely.
- Make the Cheesecake Filling: In a clean bowl, beat 16 oz (2 blocks) softened cream cheese with 1/2 cup softened butter until smooth. Graditionally beat in 2 cups sifted powdered sugar, 1 teaspoon vanilla extract, and a pinch of salt. Whip for 3–4 minutes until light, airy, and spreadable.
- Filling Tip: For stiffer filling (ideal for piping), chill for 20–30 minutes after mixing.
- Assemble the Sandwich Cookies: Once cookies are completely cooled, pipe or spread a generous amount of filling onto the flat side of one cookie. Top with another cookie, pressing gently to create a “sandwich.” Repeat with remaining cookies.
- Final Touch: Optional: dip edges in chopped nuts, drizzle with white chocolate, or dust with cocoa powder for an elegant finish.
- Chill Before Serving: Refrigerate assembled cookies for at least 30 minutes to set the filling and enhance flavor harmony.
Tips
- Dough Chilling is Crucial: Skipping this step may result in flat, greasy cookies. Cold dough spreads less and holds shape better.
- Use Gel Food Coloring: Liquid coloring can alter dough consistency. A little gel goes a long way—start with 1 tsp and adjust for vibrancy.
- Room Temperature Ingredients: Especially important for cream cheese and butter in the filling. Cold ingredients lead to lumpy frosting.
- Don’t Overbake: Remove cookies when centers still look slightly underdone—they’ll continue cooking on the hot tray.
- Uniform Size = Uniform Baking: Use a cookie scoop to ensure even size and consistent bake time.
- Piping vs. Spreading: For professional results, use a piping bag with a star tip. For casual treats, a butter knife works fine.
- Storage Tip: Assembled cookies can be frozen for up to 2 months. Thaw in the fridge overnight.
- Flatten Gently: Pressing too hard will make cookies spread too thin. Just enough to create a flat surface for filling.
Variations and Customizations
- Gluten-Free Version: Substitute all-purpose flour with a 1:1 gluten-free baking blend. Ensure cocoa powder and food coloring are certified GF.
- Vegan Option: Replace butter with plant-based sticks, eggs with flax eggs (1 tbsp ground flax + 3 tbsp water per egg), cream cheese with vegan cream cheese, and buttermilk with almond milk + 1/2 tsp vinegar.
- Mini Cookies: Make bite-sized versions using a teaspoon of dough. Bake for 6–7 minutes and fill with a small dollop of filling—perfect for parties.
- Seasonal Themes: Add peppermint extract and green-tinted filling for Christmas, pastel colors for Easter, or orange filling for Halloween.
- Nutty Twist: Fold 1/2 cup finely chopped pecans into the cookie dough or roll sandwich edges in crushed nuts.
- Chocolate Dipped: Melt dark, milk, or white chocolate and dip half of each sandwich. Let harden on parchment.
- Spiced Red Velvet: Add 1/2 tsp cinnamon or pumpkin spice to the dry ingredients for a warm, autumnal variation.
- Alcohol Infusion: Soak the filling with 1–2 tsp bourbon or Kahlúa for an adult twist.
- Cookie Crumb Variation: Crush some baked cookies and mix into the filling for added texture and flavor intensity.
Health Considerations and Nutritional Value
While undeniably delicious, Red Velvet Cheesecake Sandwich Cookies are a treat best enjoyed in moderation due to their high sugar, fat, and calorie content. Each sandwich cookie (approximate serving size) contains roughly:
- Calories: 280–320
- Total Fat: 18–22g (mostly from butter and cream cheese)
- Saturated Fat: 10–12g
- Cholesterol: 50–60mg
- Sodium: 150–200mg
- Total Carbohydrates: 30–35g
- Sugars: 20–25g
- Protein: 3–4g
These values may vary based on ingredient brands and portion sizes.
Health Notes:
- Sugar Content: High in refined sugars. Diabetics should consume sparingly or explore sugar substitutes like erythritol or monk fruit in both dough and filling.
- Lactose Sensitivity: Contains dairy (butter, buttermilk, cream cheese). Lactose-free alternatives are available for most ingredients.
- Portion Control: Serve one cookie per person as a dessert finale rather than multiple servings.
- Balanced Indulgence: Pair with fresh berries or a green salad if serving at a meal to offset richness.
- Occasional Treat: Not suitable for daily consumption but safe for most individuals in moderation.
Ingredients
For the Red Velvet Cookies:
- 2 cups (250g) all-purpose flour
- 2 tablespoons (10g) unsweetened natural cocoa powder
- 1/2 teaspoon baking soda
- 1/4 teaspoon salt
- 3/4 cup (1.5 sticks or 170g) unsalted butter, room temperature
- 3/4 cup (150g) granulated sugar
- 1/4 cup (50g) packed brown sugar
- 1 large egg, room temperature
- 1 teaspoon vanilla extract
- 1 tablespoon red gel food coloring (or liquid, adjust as needed)
- 2 tablespoons buttermilk
For the Cheesecake Filling:
- 16 oz (450g) full-fat cream cheese, softened
- 1/2 cup (1 stick or 113g) unsalted butter, softened
- 2 cups (240g) powdered sugar, sifted
- 1 teaspoon vanilla extract
- Pinch of salt
Optional Garnishes:
- Chopped pecans or walnuts
- Melted white chocolate
- Cocoa powder or edible glitter
Directions
- In a medium bowl, whisk together flour, cocoa powder, baking soda, and salt. Set aside.
- In a large bowl, using a hand mixer or stand mixer, cream butter, granulated sugar, and brown sugar on medium speed until light and fluffy (3–4 minutes).
- Beat in egg, vanilla extract, and red food coloring until smooth. Stir in buttermilk.
- Gradually add dry ingredients, mixing on low until just combined. Do not overmix.
- Cover dough and refrigerate for at least 1 hour (or up to 48 hours).
- Preheat oven to 350°F (175°C). Line baking sheets with parchment paper.
- Roll dough into 1-tablespoon balls and place on sheets, spacing 2 inches apart. Flatten slightly with a sugared glass bottom.
- Bake for 8–10 minutes. Cool on sheet for 5 minutes, then transfer to wire racks to cool completely.
- While cookies cool, prepare filling: Beat cream cheese and butter until smooth. Gradually add powdered sugar, vanilla, and salt. Whip until fluffy (3–4 minutes).
- Once cookies are cooled, pipe or spread filling onto the flat side of half the cookies. Top with remaining cookies to form sandwiches.
- Chill filled cookies in the refrigerator for 30 minutes to set.
- Optional: drizzle with melted white chocolate or roll edges in chopped nuts.
- Serve cold or at room temperature. Store in airtight container in fridge for up to 1 week.
FAQ
Q: Can I make the dough ahead of time?
A: Yes! The dough can be refrigerated for up to 2 days or frozen for up to 3 months. Thaw in the fridge before baking.
Q: Why are my cookies spreading too much?
A: Likely causes include warm dough, butter that was too soft, or skipping the chilling step. Always chill the dough thoroughly.
Q: Can I use cake flour instead of all-purpose?
A: Yes, cake flour will yield a more tender cookie, but you may need to adjust quantity slightly (use 2 Tbsp less per cup).
Q: How do I store leftover cookies?
A: Keep in an airtight container in the refrigerator for up to 7 days. For longer storage, freeze for up to 2 months.
Q: Can I freeze the assembled cookies?
A: Absolutely. Place unfrosted cookies in a single layer in a freezer-safe container. Freeze filling separately. Assemble after thawing.
Q: Is there a way to reduce the sweetness?
A: You can reduce powdered sugar in the filling by 1/4 cup and add 1–2 tsp lemon juice for balance. Reduce granulated sugar in dough by 1–2 Tbsp if desired.
Q: Can I bake these as bars instead?
A: Yes! Press dough into a lined 8×8 pan, bake at 350°F for 20–25 minutes, let cool, then top with filling and chill. Cut into squares.
Q: Are these safe for nut allergies?
A: Yes, as written, the recipe is nut-free. Just ensure all ingredients (especially food coloring and vanilla) are processed in nut-free facilities if severe allergy exists.
Summary (in two lines)
Red Velvet Cheesecake Sandwich Cookies combine the moist, rich flavor of red velvet cake with creamy cheesecake filling, all nestled between soft, buttery cookies—creating a show-stopping dessert perfect for celebrations.
With make-ahead ease, endless customization options, and unforgettable taste, these indulgent treats are sure to become a cherished favorite in your baking repertoire.