Introduction
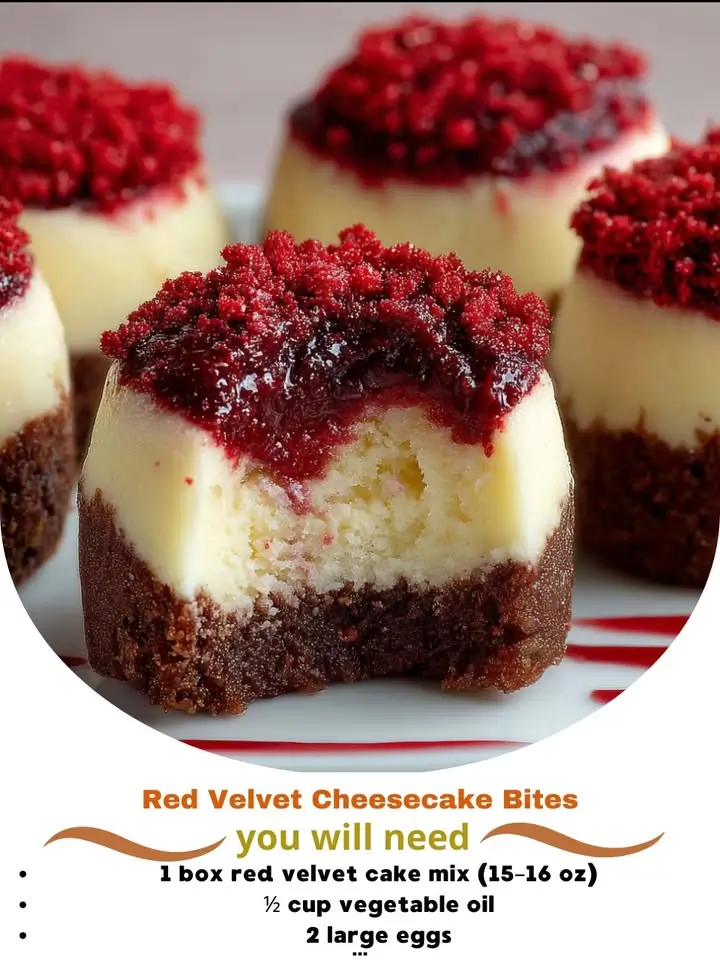
Red Velvet Cheesecake Bites are the ultimate fusion dessert—elegantly marrying the velvety richness of classic red velvet cake with the luxuriously creamy tang of New York–style cheesecake, all perfectly portioned into irresistible, bite-sized morsels. These miniature delights are more than just a trendy treat; they’re a celebration of texture, color, and flavor harmony—featuring a tender cocoa-infused crumb, vibrant crimson hue, subtle buttermilk tang, and a dense, silky cheesecake center that yields with a gentle press. Whether served at holiday gatherings, bridal showers, baby showers, or as an elevated after-dinner indulgence, these bites deliver restaurant-quality sophistication in every single nibble—no fork required, no slicing necessary, and absolutely no compromise on depth or decadence.
The History
The origin story of Red Velvet Cheesecake Bites is a delicious evolution spanning nearly a century—rooted in two iconic American desserts with distinct cultural lineages. Red velvet cake traces its earliest documented appearances to the early 1900s, gaining widespread popularity in the 1920s–30s, particularly through the Waldorf Astoria Hotel’s legendary (though historically contested) recipe. Its signature red color originally came from a natural reaction between acidic ingredients (like buttermilk and vinegar) and non-Dutched cocoa—a process known as anthocyanin oxidation—which yielded a subtle russet tint. The modern, vivid crimson we associate with red velvet emerged post-WWII with the advent of affordable, reliable red food coloring. Meanwhile, cheesecake boasts ancient origins (dating back to Greece circa 2000 BCE), but the American “New York” style—dense, rich, and baked with cream cheese—solidified in the early 20th century, especially through Jewish bakeries in Brooklyn and Manhattan. The fusion concept—layering or embedding cheesecake into red velvet—began appearing in Southern and Midwestern home baking circles in the 1980s and 1990s, often as sheet cakes or cupcakes. However, the *bite-sized* iteration didn’t gain mainstream traction until the late 2000s and early 2010s, propelled by Pinterest, food blogs, and viral social media videos showcasing their photogenic swirls, clean cuts, and party-perfect portability. Today, Red Velvet Cheesecake Bites stand as a hallmark of contemporary American dessert innovation—honoring tradition while embracing convenience, visual appeal, and experiential eating.
Ingredients Breakdown
Every exceptional Red Velvet Cheesecake Bite begins with intentional, high-quality components—each playing a precise role in structure, moisture, acidity, color, richness, and balance. Below is a comprehensive functional analysis:
- Unsweetened Natural Cocoa Powder: Provides deep chocolate notes without bitterness; essential for the authentic red velvet reaction when paired with acid. Dutch-processed cocoa is avoided—it neutralizes acidity and dulls the color development.
- Distilled White Vinegar & Buttermilk: Together, they activate baking soda, generate lift, and create the signature tender crumb. Their acidity also enhances cocoa’s red hue and balances the sweetness of both cake and filling.
- High-Quality Red Food Coloring (Liquid or Gel): While traditionalists may argue for “old-fashioned” red velvet, achieving the iconic bold crimson in a bite-sized format requires concentrated, consistent coloring—gel-based is preferred for intensity without thinning batter. Beet powder offers a natural alternative but yields a muted, earthy pink and may alter flavor and texture.
- Cream Cheese (Full-Fat, Brick-Style, Room Temperature): The cornerstone of the cheesecake layer. Must be full-fat (not low-fat or spreadable) and fully softened to prevent lumps and ensure ultra-smooth incorporation. Cold cream cheese leads to overmixing, which introduces air and causes cracking or graininess.
- Sour Cream & Heavy Cream: Sour cream adds tang, moisture, and stability; heavy cream enriches mouthfeel and contributes to a melt-in-your-mouth finish. Both help prevent the cheesecake layer from drying out during baking.
- Real Vanilla Extract (Not Imitation): Imparts warm, complex aromatic depth—especially critical since the small size means fewer flavor layers to rely on. Bourbon-vanilla or Madagascar bean extract elevates the profile further.
- Granulated Sugar (for Cake) & Light Brown Sugar (for Cheesecake Layer): Granulated sugar ensures proper aeration and structure in the red velvet base; light brown sugar in the cheesecake adds subtle molasses warmth and improves moisture retention.
- Unsalted Butter (Melted & Cooled): Adds richness and tenderness to the cake layer without weighing it down. Salted butter is discouraged due to inconsistent sodium levels.
- Eggs (Large, Room Temperature): Act as emulsifiers and binders—critical for both batters. Cold eggs can cause batter separation and temperature shock in the cheesecake mixture.
- Sea Salt (Fine Grain): Not just for seasoning—enhances all other flavors, reduces perceived sweetness, and strengthens gluten formation subtly in the cake layer.
- Optional Flavor Enhancers: A pinch of espresso powder (not coffee—just to deepen cocoa), ¼ tsp almond extract (to complement vanilla), or a splash of red wine vinegar (for brighter acidity) can add nuanced complexity without overpowering.
Step-by-Step Recipe
- Prep & Pre-Chill: Line a standard 12-cup muffin tin with high-quality silicone or parchment liners (do not use paper-only—they may tear during unmolding). Chill liners in freezer for 10 minutes. Meanwhile, position oven rack in center third and preheat to 325°F (163°C). This lower temperature prevents doming, cracking, and over-browning—essential for delicate bites.
- Make the Red Velvet Cake Batter: In a medium bowl, whisk together ¾ cup (94g) all-purpose flour, 2 tbsp (10g) natural unsweetened cocoa powder, ½ tsp baking soda, and ¼ tsp fine sea salt. In a large mixing bowl, combine ½ cup (113g) melted & cooled unsalted butter, ½ cup (100g) granulated sugar, and 1 large egg (room temp); beat with hand mixer on medium for 90 seconds until pale and slightly fluffy. Add 1 tsp pure vanilla extract and mix 15 seconds. Alternate adding dry ingredients and ½ cup (120ml) buttermilk, beginning and ending with dry mix—mix only until just combined after each addition. Stir in 1 tsp distilled white vinegar and 1–1½ tsp high-pigment red gel food coloring until uniformly deep red (add color gradually; too much can impart bitterness). Do not overmix—batter will be thick but pourable. Set aside.
- Prepare the Cheesecake Filling: In a clean large bowl, beat 8 oz (227g) full-fat brick cream cheese (room temp) with hand mixer on medium for 45 seconds until creamy and lump-free. Add ¼ cup (50g) light brown sugar and 2 tbsp (25g) granulated sugar; beat 1 minute until smooth and glossy. Scrape bowl. Add 1 large egg (room temp) and 1 yolk (for extra richness and stability); beat on low 30 seconds, then medium 45 seconds until fully incorporated—do not overbeat. Add ¼ cup (60g) full-fat sour cream, 2 tbsp (30ml) heavy cream, and 1 tsp pure vanilla; mix on low until homogenous. Fold gently with spatula once or twice to eliminate streaks. Transfer to a piping bag fitted with a ½-inch round tip—or use a resealable plastic bag with corner snipped.
- Layer & Swirl: Spoon 1 heaping tablespoon (≈22g) of red velvet batter into each chilled liner—smooth top lightly with damp fingertip or mini offset spatula. Pipe or spoon 1 generous tablespoon (≈30g) of cheesecake filling directly into center of each cupcake liner, covering ~80% of surface. Using a toothpick or fine skewer, gently drag from center outward in a “C” shape three times per bite to create subtle marbling—not over-swirling, which causes bleeding and loss of definition.
- Bake with Steam Control: Place muffin tin on center rack. Place a small, heatproof ramekin filled with ½ cup hot water on bottom oven rack *before* closing door—this creates gentle ambient steam, preventing surface fissures and promoting even rise. Bake 22–26 minutes: edges should be set, centers slightly jiggly (like Jell-O) but not sloshing. A toothpick inserted ¼ inch from edge should come out clean; center should show slight resistance. Rotate pan halfway through for even browning.
- Cool & Chill Strategically: Remove from oven and let sit in tin on wire rack for 15 minutes—this allows structural setting. Carefully lift each bite by liner edges and transfer to rack to cool completely (~60 minutes). Once fully cooled, refrigerate uncovered for *minimum 6 hours*, preferably overnight. This step is non-negotiable: chilling firms the cheesecake layer, intensifies flavor melding, prevents smearing during handling, and transforms texture from soft-set to luxuriously dense and sliceable.
- Unmold & Finish: Gently peel away liners. For flawless presentation, dip bottom of each bite briefly in warm water (1–2 sec), then pat dry—this loosens any residual stickiness. Optional finishing touches: dust with freeze-dried raspberry powder, drizzle with white chocolate ganache, garnish with edible gold flakes, or top with a single crystallized violet.
Tips
- Room Temperature Is Non-Negotiable: All dairy and eggs must be truly room temperature (68–72°F / 20–22°C)—take them out 2+ hours ahead. Cold ingredients cause curdling, uneven emulsification, and dense textures.
- Weigh Your Ingredients: Use a digital kitchen scale for precision—especially flour and cocoa. Scooping flour directly from the bag compacts it and leads to dry, crumbly cake layers.
- Color Timing Matters: Add red gel coloring *after* mixing wet and dry ingredients—but *before* adding vinegar. Adding it with vinegar can cause temporary speckling that won’t fully incorporate.
- No Overmixing—Ever: Mix cake batter only until no dry streaks remain. Overmixing develops gluten, resulting in toughness rather than tenderness.
- Steam Is Your Secret Weapon: That ramekin of hot water isn’t optional—it mimics a professional steam oven and reduces cracking by up to 90%. Skip it, and you risk fissured tops.
- Chill Before Baking (Optional but Recommended): After assembling unbaked bites, refrigerate tin for 20 minutes. This solidifies butter in batter and firms filling, minimizing spreading and improving layer distinction.
- Freeze for Long-Term Storage: Fully chilled bites freeze beautifully for up to 3 months. Place on parchment-lined tray, freeze solid (2 hrs), then transfer to airtight container with parchment between layers. Thaw overnight in fridge—never at room temperature—to preserve texture.
- Perfect Piping Consistency: If cheesecake filling feels too stiff to pipe, let it sit at room temp 2–3 minutes—*never* microwave. If too runny, chill 5 minutes. Ideal consistency holds soft peaks when lifted with spatula.
- Uniform Sizing = Uniform Baking: Use a spring-release #24 cookie scoop (1.5 tbsp capacity) for cake batter and a #30 scoop (1 tbsp) for cheesecake layer—guarantees even bake time and professional appearance.
- Resting Post-Bake Is Critical: Don’t rush cooling. Cutting or unmolding before full cooling + chilling guarantees collapse, smearing, or broken layers.
Variations and Customizations
Red Velvet Cheesecake Bites serve as a versatile canvas for seasonal, dietary, and creative reinterpretation—without sacrificing integrity or texture:
- Gluten-Free Version: Substitute 1:1 gluten-free all-purpose flour blend (with xanthan gum included) and verify cocoa and food coloring are GF-certified. Add ½ tsp psyllium husk powder to batter for improved binding and moisture retention.
- Vegan Adaptation: Replace butter with refined coconut oil, eggs with flax eggs (1 tbsp ground flax + 2.5 tbsp water per egg), buttermilk with almond milk + 1 tsp lemon juice, and cream cheese with soaked cashew-based “cheesecake” (blended cashews, coconut cream, lemon juice, maple syrup, and probiotic powder for tang). Note: texture leans softer; best served chilled, not frozen.
- Black Cocoa “Midnight Velvet” Edition: Swap natural cocoa for black cocoa (Dutched to pH 7) for dramatic matte-black cake layers with intense, almost Oreo-like depth—pair with white chocolate–infused cheesecake and edible silver luster dust.
- Spiced Chai Velvet: Infuse buttermilk with 1 chai tea bag (steep 10 min, cool completely), add ½ tsp ground cardamom + ¼ tsp ground ginger to dry ingredients, and swirl in a date-caramel ripple before baking.
- Boozy Decadence: Add 1 tbsp bourbon or amaretto to cheesecake filling and ½ tsp orange zest to cake batter—top with candied orange peel.
- White Chocolate–Raspberry Swirl: Fold 2 tbsp seedless raspberry jam into cheesecake filling, then pipe dollops of white chocolate ganache (cooled to 85°F) over top before baking—creates stunning jewel-toned marbling.
- Mini Bundt Pan Variation: Use a 24-cavity nonstick mini bundt pan (greased & floured). Fill cavities ⅔ full with cake batter, add cheesecake, swirl, and bake 18–21 mins. Unmold while warm for elegant ridged shapes.
- No-Bake Refrigerator Version: Skip oven entirely: prepare no-bake red velvet “cake” layer (crushed Oreos + butter + cocoa + food coloring), press into mini muffin cups, top with no-bake cheesecake (cream cheese + powdered sugar + whipped cream + lemon), chill 8 hours. Softer texture, ideal for summer or novice bakers.
- Protein-Powered: Add 2 scoops unflavored collagen peptides to dry cake ingredients and 1 scoop whey isolate to cheesecake filling—increases protein without altering taste or texture significantly.
- Everything Bagel Surprise (Savory-Sweet Fusion): Add 1 tsp everything bagel seasoning to cake batter and swirl in scallion-infused cream cheese filling with crumbled crispy bacon—served with crème fraîche drizzle. Yes, it works—and it’s extraordinary.
Health Considerations and Nutritional Value
While Red Velvet Cheesecake Bites are inherently indulgent, mindful preparation can enhance nutritional intelligence without compromising pleasure. A single standard bite (approx. 45g, made with full ingredients) contains roughly 185–210 calories, 12–14g total fat (7–9g saturated), 18–22g carbohydrates (14–16g sugars), 3–4g protein, and less than 100mg sodium. Key health-conscious strategies include:
- Sugar Optimization: Reduce granulated sugar in cake batter by 15% (to ¾ cup) and brown sugar in filling by 20% (to ⅓ cup)—most palates won’t detect difference due to cocoa and cream cheese’s natural richness.
- Fat Quality Matters: Choose grass-fed, organic cream cheese and butter when possible—higher in omega-3s and conjugated linoleic acid (CLA), linked to anti-inflammatory benefits.
- Functional Add-Ins: Stir 1 tbsp ground flaxseed or chia seeds into cake batter for fiber and ALA omega-3s; fold 1 tsp matcha powder into cheesecake for antioxidants and calm energy.
- Natural Color Alternatives: Though less vibrant, beetroot powder (1 tsp) or hibiscus extract (½ tsp) offer polyphenols and zero artificial dyes—ideal for children or sensitive individuals.
- Gut-Friendly Fermentation: Substitute cultured buttermilk or kefir for regular buttermilk—adds live probiotics and enhances digestibility of lactose.
- Portion Discipline: Their miniature size supports intuitive portion control—studies show people consume 22% less when desserts are presented in smaller, visually complete units versus larger shared servings.
- Allergen Transparency: Always label if containing nuts (e.g., almond extract), dairy, eggs, or gluten—even when absent, cross-contact risk exists in shared kitchens.
- Mindful Enjoyment: Serve bites at cool room temperature (not fridge-cold) to fully appreciate aroma and mouthfeel—slowing consumption increases satiety signaling and reduces likelihood of overeating.
Note: Individuals managing diabetes, hypertension, or dairy sensitivities should consult a registered dietitian before regular consumption. These bites are not intended as functional foods—but rather as joyful, occasional nourishment rooted in real ingredients and culinary respect.
Ingredients
For the Red Velvet Cake Layer:
- ¾ cup (94 g) all-purpose flour, spooned & leveled
- 2 tablespoons (10 g) natural unsweetened cocoa powder (non-alkalized)
- ½ teaspoon baking soda
- ¼ teaspoon fine sea salt
- ½ cup (113 g) unsalted butter, melted and cooled to room temperature
- ½ cup (100 g) granulated sugar
- 1 large egg, room temperature
- 1 teaspoon pure vanilla extract
- ½ cup (120 ml) cultured buttermilk, room temperature
- 1 teaspoon distilled white vinegar
- 1–1½ teaspoons high-pigment red gel food coloring (e.g., AmeriColor Super Red or Chefmaster Ruby Red)
For the Cheesecake Filling:
- 8 ounces (227 g) full-fat brick-style cream cheese, room temperature
- ¼ cup (50 g) light brown sugar, firmly packed
- 2 tablespoons (25 g) granulated sugar
- 1 large egg, room temperature
- 1 large egg yolk, room temperature
- ¼ cup (60 g) full-fat sour cream
- 2 tablespoons (30 ml) heavy cream (36–40% fat)
- 1 teaspoon pure vanilla extract
For Assembly & Finishing (Optional):
- High-quality parchment or silicone cupcake liners (12 count)
- Freeze-dried raspberry powder, for dusting
- White chocolate ganache (½ cup white chocolate + 3 tbsp heavy cream, heated & emulsified)
- Edible gold leaf or luster dust
- Fresh mint or edible flowers, for garnish
Directions
- Preheat oven to 325°F (163°C). Position rack in center third. Place a small oven-safe ramekin (4 oz capacity) filled with ½ cup hot water on the lowest oven rack—do not close oven door yet.
- Prepare muffin tin: Line a standard 12-cup metal muffin tin with parchment or silicone liners. Chill in freezer for 10 minutes.
- Make cake batter: In medium bowl, whisk flour, cocoa, baking soda, and salt. In large bowl, beat melted butter, granulated sugar, and egg with hand mixer on medium 90 sec until pale. Beat in vanilla 15 sec. Alternate adding dry mixture and buttermilk in 3 additions, beginning and ending with dry—mix only until just combined. Stir in vinegar, then add food coloring gradually until deep, even red. Set aside.
- Make cheesecake filling: In clean large bowl, beat cream cheese on medium 45 sec until smooth. Add brown and granulated sugars; beat 1 min until glossy. Add egg and yolk; beat on low 30 sec, then medium 45 sec until fully blended. Add sour cream, heavy cream, and vanilla; mix on low until smooth. Fold once with spatula. Transfer to piping bag with ½-inch round tip.
- Fill liners: Spoon 1 heaping tbsp (22g) red velvet batter into each chilled liner. Smooth tops. Pipe or spoon 1 generous tbsp (30g) cheesecake filling into center of each. Drag toothpick in 3 gentle “C” swirls per bite.
- Bake: Place tin on center rack. Close oven door. Bake 22–26 minutes—edges set, centers slightly jiggly (like firm Jell-O). Rotate pan halfway through.
- Cool: Let sit in tin 15 min on wire rack. Gently lift bites by liner edges onto rack. Cool completely (~60 min).
- Chill: Refrigerate uncovered for minimum 6 hours—or preferably overnight (12+ hrs).
- Unmold & serve: Peel liners. For clean release, briefly dip bottom of each bite in warm water (1–2 sec), then pat dry. Garnish as desired. Store covered in fridge up to 5 days or freeze up to 3 months.
FAQ
- Can I make these ahead of time?
- Absolutely—and highly recommended. They taste best after 24 hours of chilling, as flavors mature and textures harmonize. Baked and chilled bites freeze exceptionally well for up to 3 months. Thaw overnight in refrigerator before serving.
- Why did my cheesecake layer crack?
- Most commonly caused by rapid temperature change (opening oven too soon), overbaking (center fully set instead of slightly jiggly), or omitting the water bath/steam element. Also check if cream cheese was cold or overbeaten—both introduce air bubbles that expand and collapse during cooling.
- Can I use liquid food coloring instead of gel?
- You can—but expect weaker color intensity and potential thinning of batter, leading to spreading. You’ll likely need 1–2 tsp, which may dilute flavor and affect texture. Gel is strongly preferred for vibrancy and control.
- My bites stuck to the liners. What went wrong?
- Liners may have been low-quality or improperly chilled. Silicone liners perform best. Also, ensure full cooling + chilling before unmolding. A quick warm-water dip on the bottom solves 95% of sticking issues.
- Can I bake these in a regular cake pan instead?
- Yes—make a Red Velvet Cheesecake Swirl Bar version: line 8×8 pan with parchment, layer batters as directed, swirl, and bake at 325°F for 45–55 minutes. Chill thoroughly before cutting into 24 squares.
- Is there a way to reduce the red food coloring?
- Yes—try “old-fashioned” method: replace 1 tbsp cocoa with 1 tbsp black cocoa, increase buttermilk to ⅔ cup, and use 1 tsp apple cider vinegar. The natural reaction yields a sophisticated rosy-brown. Still beautiful—and far less artificial.
- What’s the best way to transport these?
- Use a divided, lidded food carrier with non-slip mat. Place chilled bites upright in compartments, cover with parchment, and keep chilled with gel ice packs until 15 minutes before serving.
- Can I substitute Greek yogurt for sour cream?
- Plain, full-fat Greek yogurt works in a 1:1 swap—but stir in 1 tsp cornstarch to prevent excess whey separation during baking. Avoid low-fat versions—they lack necessary fat for richness and stability.
- Why does my red velvet taste bitter?
- Overuse of red food coloring (especially cheaper brands) or excessive cocoa can cause bitterness. Also verify your baking soda is fresh—expired leaveners yield metallic off-notes. Always measure coloring with toothpick tip for first batch.
- Are these suitable for Passover or other religious observances?
- Not traditionally—due to flour, dairy, and leavening. However, certified kosher-for-Passover versions exist using potato starch, matzo cake meal, and kosher-certified cream cheese. Always verify certification with your rabbinic authority.
Summary
Red Velvet Cheesecake Bites are a masterclass in balanced indulgence—where velvety cocoa cake, vibrant natural acidity, and luxuriously dense cheesecake converge in a single, perfectly portioned, visually stunning bite.
With meticulous attention to ingredient temperature, controlled baking science, strategic chilling, and endless customization potential, they transform from festive treat into a timeless, shareable expression of modern dessert craftsmanship—equally at home on a holiday table, wedding dessert buffet, or quiet Tuesday night self-care ritual.