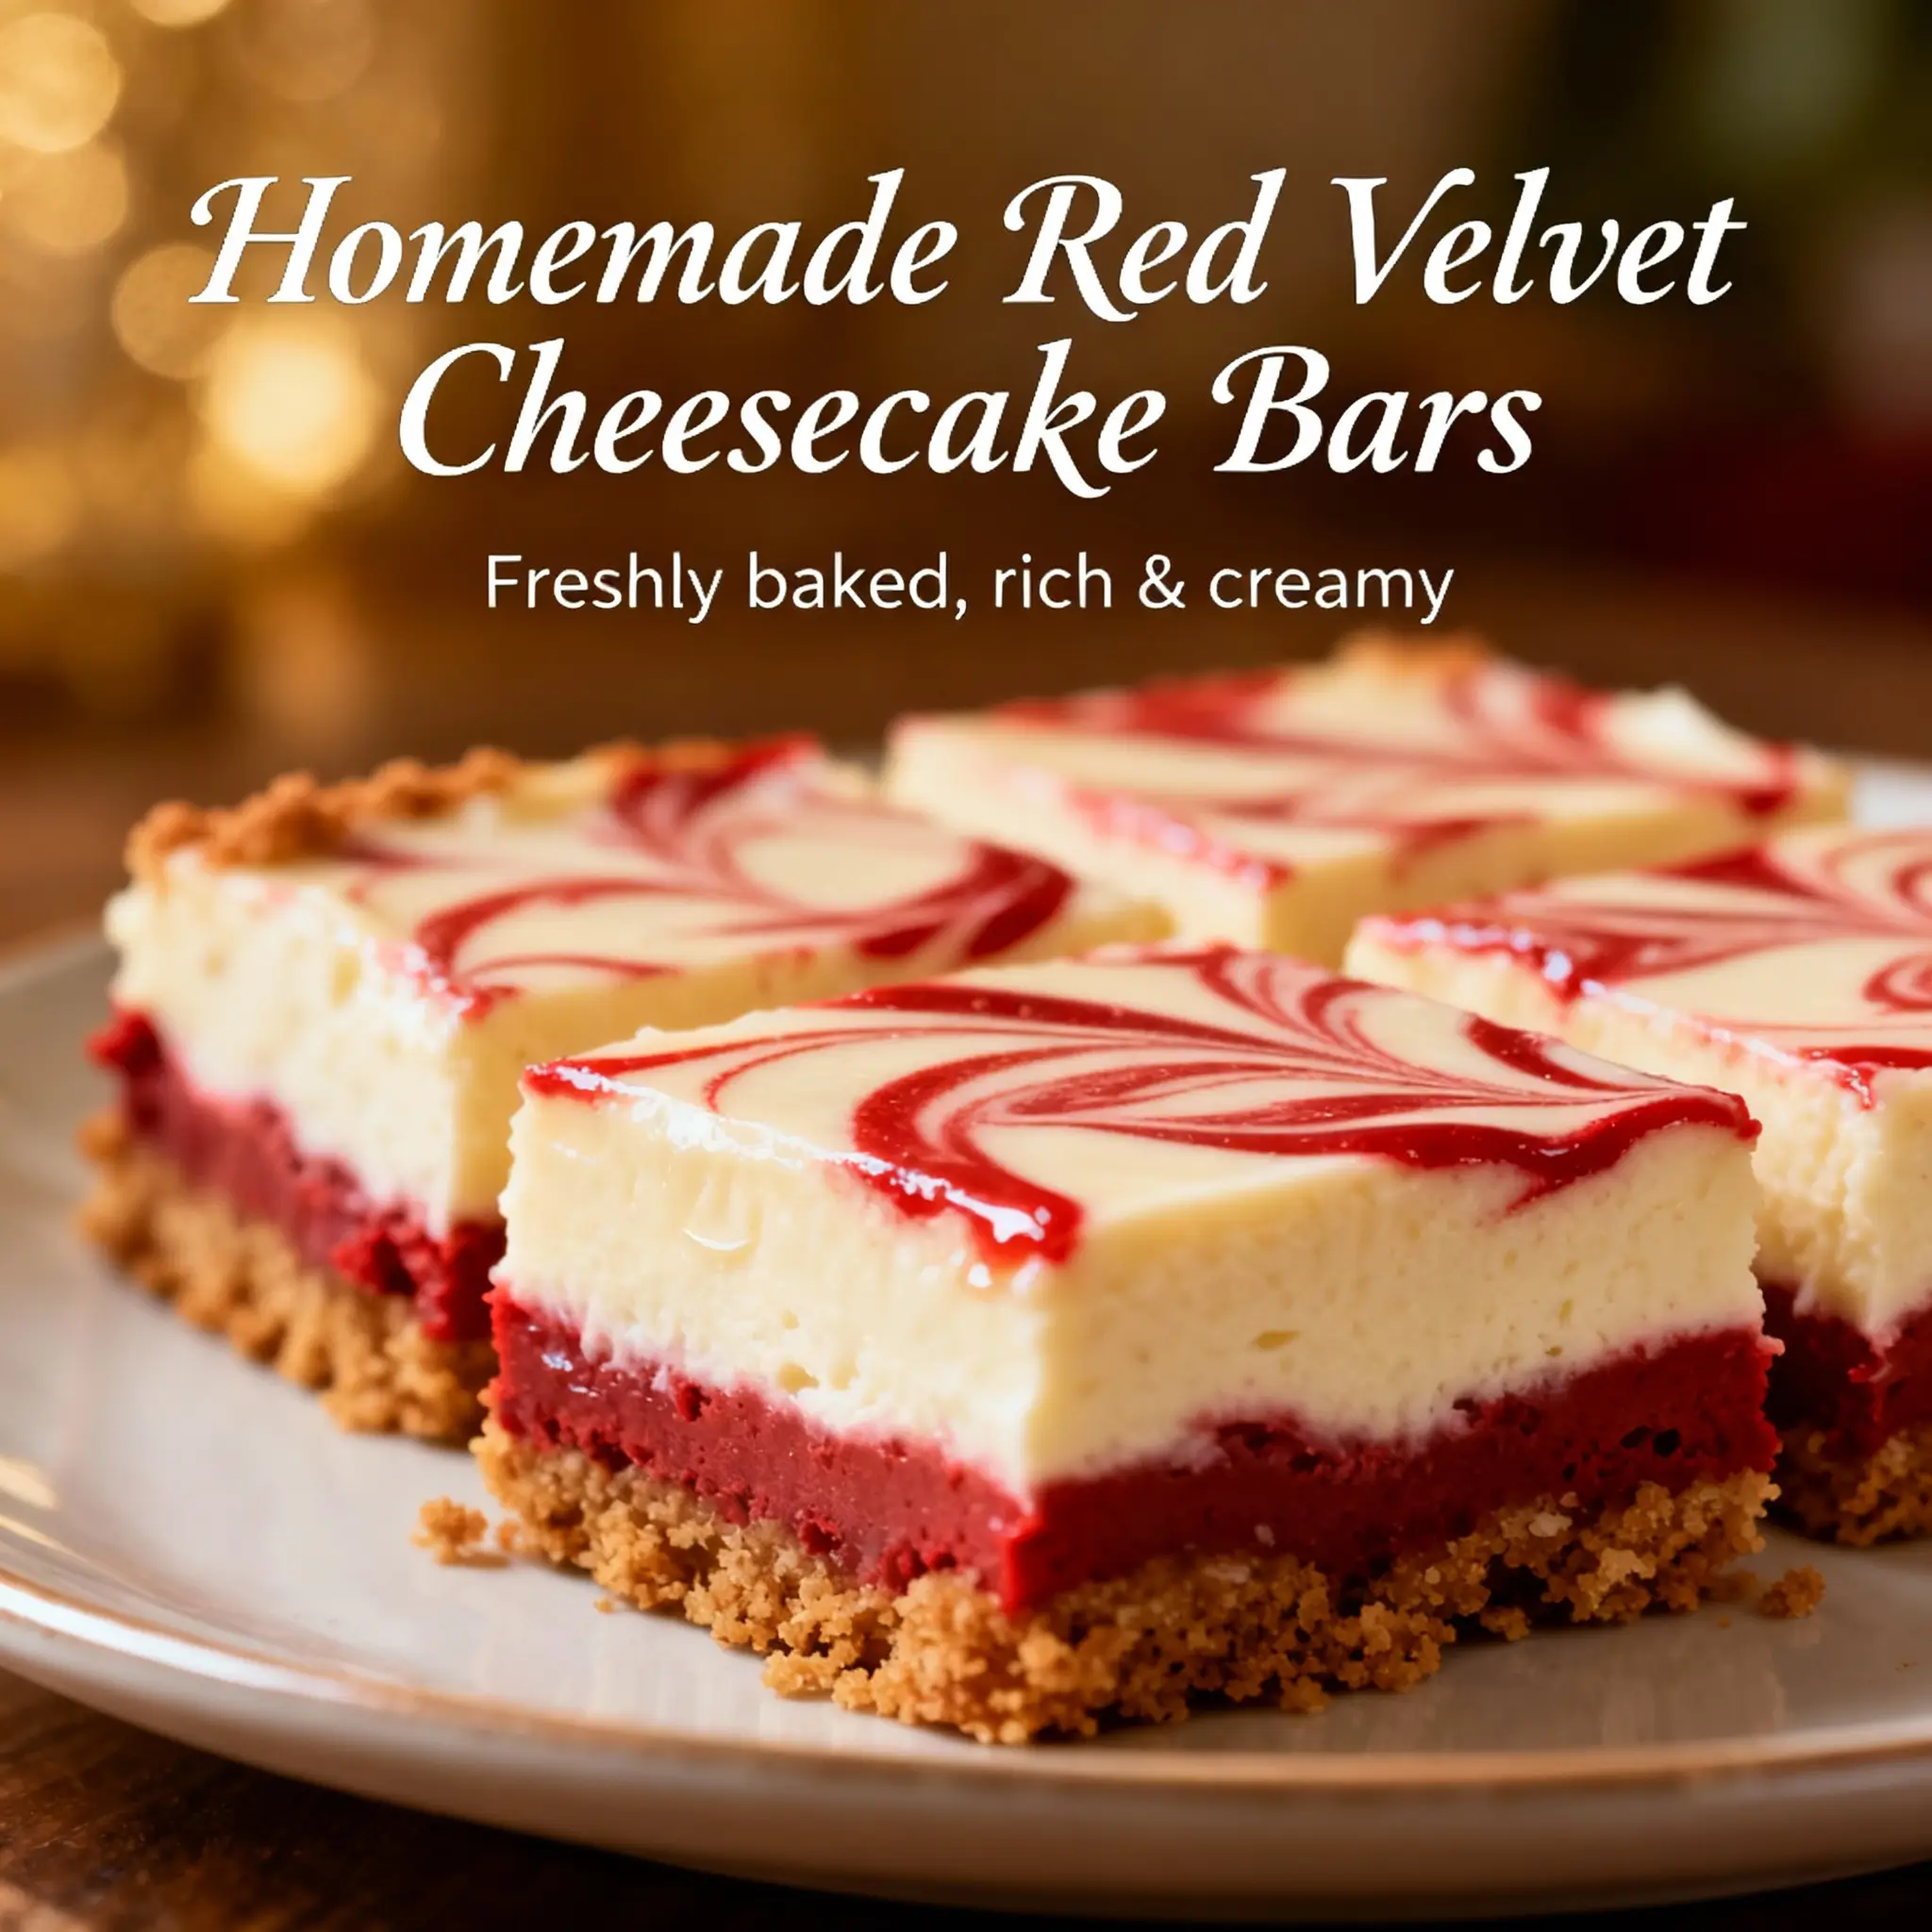
Red Velvet Cheesecake Bars: A Decadent Fusion of Flavors
Indulge in the luxurious blend of rich red velvet cake and creamy cheesecake with these luscious Red Velvet Cheesecake Bars. With their velvety texture, vibrant color, and perfectly balanced sweetness, these bars are a showstopper at any gathering. Whether you’re preparing for a holiday party, a birthday celebration, or simply treating yourself to something special, these bars deliver a dessert experience that’s both elegant and comforting. Easy to make yet impressive in presentation, they combine the best of two beloved desserts into one irresistible treat.
The History Behind the Treat
The story of Red Velvet Cheesecake Bars begins with the legacy of red velvet cake, a dessert shrouded in myth and culinary evolution. Originating in the early 20th century, red velvet cake gained popularity through its unique cocoa-infused batter and striking crimson hue. While some believe the red color came naturally from a chemical reaction between acidic cocoa and baking soda, others credit the modern version to food coloring introduced in the 1920s by companies like Adams Extract, who used it as a marketing tool.
Cheesecake, on the other hand, dates back to ancient Greece and has evolved across cultures into countless variations. The fusion of red velvet and cheesecake emerged in the late 20th century as bakers began experimenting with layered desserts, combining textures and flavors to create hybrid treats. Red Velvet Cheesecake Bars, specifically, became popular in the 2000s, especially around holidays like Valentine’s Day and Christmas, when their bold red color added festive flair. These bars offer a convenient, portable alternative to traditional layered cakes, making them a favorite among home bakers and dessert lovers alike.
Ingredients Breakdown: What Makes These Bars Irresistible?
The magic of Red Velvet Cheesecake Bars lies in the thoughtful combination of ingredients that contribute to flavor, texture, and appearance. Each component plays a crucial role in achieving the perfect balance between cakey softness and creamy richness.
- All-Purpose Flour: Provides structure to the red velvet layer, ensuring a tender crumb without being too dense.
- Cocoa Powder: Adds depth and subtle chocolate flavor without overpowering the dessert—use natural unsweetened cocoa for authenticity.
- Granulated Sugar: Sweetens both layers and helps create a smooth texture in the batter.
- Baking Soda & Baking Powder: Work together to leaven the red velvet layer, giving it a light rise while maintaining moisture.
- Salt: Enhances overall flavor and balances sweetness.
- Butter (Unsalted): Adds richness and contributes to a moist texture; softened butter blends easily for a uniform batter.
- Eggs: Bind ingredients together and provide lift and stability to both the cake and cheesecake layers.
- Buttermilk: Reacts with cocoa and baking soda to produce the signature slight tang and tender texture of red velvet.
- Vanilla Extract: Complements the cocoa and enhances the overall aroma of the dessert.
- Red Food Coloring: Traditionally liquid or gel-based, this gives the cake its iconic red hue. Gel coloring is preferred for a more vibrant result without altering consistency.
- Cream Cheese (Full-Fat): The star of the cheesecake layer—must be softened for smooth blending and a lump-free filling.
- Sour Cream: Adds creaminess and a slight tang that cuts through the sweetness, improving mouthfeel.
- Powdered Sugar: Sweetens the cheesecake layer gently and helps stabilize the mixture.
- White Chocolate Chips (Optional): Often sprinkled on top or mixed into the cheesecake layer for added decadence and visual appeal.
Together, these ingredients form a harmonious dessert where no single flavor dominates, but each complements the other in a symphony of taste and texture.
Step-by-Step Recipe: How to Make Perfect Red Velvet Cheesecake Bars
Follow this detailed guide to create bakery-quality Red Velvet Cheesecake Bars at home. With careful attention to technique, you’ll achieve clean layers, a crack-free cheesecake top, and a satisfying bite every time.
- Preheat Oven & Prepare Pan: Preheat your oven to 350°F (175°C). Line a 9×13-inch baking pan with parchment paper, leaving overhang on two sides for easy removal. Lightly grease the paper and edges.
- Make the Red Velvet Crust: In a medium bowl, whisk together 2 cups all-purpose flour, 1 cup granulated sugar, 2 tablespoons unsweetened cocoa powder, 1 teaspoon baking soda, ½ teaspoon baking powder, and ¼ teaspoon salt.
- Cream Butter and Eggs: In a large mixing bowl, beat ½ cup (1 stick) softened unsalted butter with 2 large eggs until light and fluffy (about 2–3 minutes).
- Add Wet Ingredients: Mix in 1 teaspoon vanilla extract, 1 cup buttermilk, and 1–2 tablespoons red food coloring (gel recommended) until well combined.
- Combine Dry and Wet: Gradually add the dry ingredients to the wet mixture, mixing on low speed until just incorporated. Do not overmix. Pour the batter into the prepared pan and spread evenly with a spatula.
- Prepare Cheesecake Layer: In another bowl, beat 3 (8-oz) packages of softened cream cheese until smooth. Add ¾ cup granulated sugar and mix until creamy. Beat in 2 large eggs one at a time, then stir in ⅓ cup sour cream and 1 teaspoon vanilla extract.
- Layer the Cheesecake: Carefully pour the cheesecake mixture over the red velvet base. Use a knife or offset spatula to swirl gently, creating a marbled effect if desired, or leave distinct layers for clean slicing.
- Bake: Place in the preheated oven and bake for 40–45 minutes, or until the edges are set and the center jiggles slightly when nudged. Avoid overbaking to prevent cracks.
- Cool Gradually: Turn off the oven, crack the door open, and let the bars cool inside for 30 minutes. This prevents sudden temperature changes that cause cracking.
- Chill: Transfer to the refrigerator and chill for at least 4 hours, preferably overnight, for clean cuts and firm texture.
- Cut and Serve: Lift the bars out using the parchment overhang. Use a hot, clean knife (dipped in warm water and wiped dry between cuts) to slice into even squares.
Garnish with white chocolate shavings, powdered sugar, or a dollop of whipped cream before serving for an elegant finish.
Tips for Success: Mastering the Art of Red Velvet Cheesecake Bars
Even experienced bakers can encounter challenges with layered desserts. Here are professional tips to ensure flawless results every time:
- Use Room Temperature Ingredients: Cold cream cheese or eggs can lead to lumpy cheesecake filling. Take all dairy items out 1–2 hours before baking.
- Avoid Overmixing: Once flour is added, mix only until combined. Overmixing develops gluten, resulting in a tough cake layer.
- Choose Gel Food Coloring: It delivers intense color with minimal liquid, preserving the batter’s consistency.
- Don’t Skip the Buttermilk: Its acidity reacts with cocoa and leaveners to create the authentic red velvet texture and flavor.
- Prevent Cracks: Bake in a water bath (optional but effective) by placing the pan in a larger roasting tray filled with hot water halfway up the sides. Alternatively, cool gradually as instructed.
- Chill Thoroughly: Patience pays off. Chilling sets the layers and makes cutting much easier.
- Sharp Knife is Key: Wipe the knife after each cut to maintain clean edges and avoid smearing.
- Line the Pan Well: Parchment paper ensures effortless removal and prevents sticking, especially important with dense bars.
Variations and Customizations: Make It Your Own
These Red Velvet Cheesecake Bars are highly adaptable. Try these creative twists to suit different tastes, dietary needs, or seasonal themes:
- Gluten-Free Version: Substitute all-purpose flour with a 1:1 gluten-free baking blend. Ensure cocoa powder and other ingredients are certified gluten-free.
- Low-Sugar Option: Replace granulated sugar with erythritol or monk fruit sweetener in both layers. Use sugar-free red food coloring and check labels on cocoa powder.
- Dairy-Free Adaptation: Use plant-based butter, coconut milk yogurt instead of sour cream, and vegan cream cheese alternatives. Opt for almond or oat milk mixed with vinegar as buttermilk substitute.
- Mini Bars or Cupcakes: Bake in a muffin tin lined with cupcake liners for individual portions. Reduce baking time to 20–25 minutes.
- Fruity Twist: Swirl in raspberry jam or fresh berries before baking for a tart contrast.
- Chocolate Lover’s Dream: Add a layer of melted dark chocolate between the red velvet and cheesecake, or sprinkle chocolate chips throughout.
- Peppermint Variation: Add ½ teaspoon peppermint extract to the cheesecake layer and crush candy canes on top for a holiday twist.
- Almond Infusion: Replace half the vanilla with almond extract for a nutty complexity that pairs beautifully with cocoa.
- Boozy Upgrade: Stir 1 tablespoon of bourbon or Kahlua into the cheesecake layer for an adult-friendly version.
Health Considerations and Nutritional Value
While undeniably indulgent, understanding the nutritional profile of Red Velvet Cheesecake Bars can help you enjoy them mindfully. Here’s an approximate breakdown per serving (based on 24 bars):
- Calories: 320–360 kcal
- Total Fat: 20–24g (Saturated Fat: 12–15g)
- Carbohydrates: 35–40g (Sugars: 25–30g)
- Protein: 5–6g
- Cholesterol: 80–100mg
- Sodium: 200–250mg
Key Considerations:
- High in Saturated Fat: Due to butter, cream cheese, and eggs. Those monitoring heart health may want to limit portion size or opt for reduced-fat dairy (though texture may be affected).
- Sugar Content: Significant due to multiple sources. Diabetics should consume sparingly or explore sugar substitutes.
- Gluten and Dairy: Contains both, so not suitable for those with celiac disease or severe lactose intolerance unless modified.
- Energy Density: High-calorie density means small portions can be satisfying. Aim for a 1×2-inch bar rather than a full square for moderation.
- Nutrient Gaps: Lacks fiber, vitamins, and minerals. Pair with fresh fruit or a side salad to balance the meal.
Enjoy these bars occasionally as part of a balanced diet. Their rich flavor means a little goes a long way!
Ingredients
Makes 24 bars
For the Red Velvet Layer:
- 2 cups (250g) all-purpose flour
- 1 cup (200g) granulated sugar
- 2 tablespoons (10g) unsweetened cocoa powder
- 1 teaspoon baking soda
- ½ teaspoon baking powder
- ¼ teaspoon salt
- ½ cup (113g / 1 stick) unsalted butter, softened
- 2 large eggs, room temperature
- 1 cup (240ml) buttermilk
- 1–2 tablespoons red food coloring (gel preferred)
- 1 teaspoon vanilla extract
For the Cheesecake Layer:
- 3 (8-oz) packages (680g total) cream cheese, softened
- ¾ cup (150g) granulated sugar
- 2 large eggs, room temperature
- ⅓ cup (80g) sour cream
- 1 teaspoon vanilla extract
Optional Garnishes:
- White chocolate shavings
- Whipped cream
- Crushed pecans or walnuts
- Light dusting of powdered sugar
- Raspberry coulis or fresh berries
Directions
- Preheat and Prepare: Preheat oven to 350°F (175°C). Line a 9×13-inch baking pan with parchment paper, greasing lightly.
- Mix Dry Ingredients: In a bowl, whisk flour, sugar, cocoa powder, baking soda, baking powder, and salt.
- Cream Butter and Eggs: In a large bowl, beat softened butter and 2 eggs until fluffy (2–3 minutes).
- Add Liquids: Mix in vanilla, buttermilk, and red food coloring until smooth.
- Combine: Gradually add dry ingredients to wet, mixing until just blended. Spread evenly in the pan.
- Make Cheesecake Filling: Beat cream cheese and sugar until creamy. Add eggs one at a time, then sour cream and vanilla.
- Layer: Pour cheesecake mixture over red velvet base. Swirl gently with a knife for marbling, or keep layers distinct.
- Bake: Bake 40–45 minutes until edges are set and center slightly jiggles.
- Cool: Turn off oven, open door, and let cool inside for 30 minutes.
- Chill: Refrigerate at least 4 hours or overnight.
- Slice and Serve: Lift out using parchment. Cut with a warm, clean knife into 24 bars. Garnish as desired.
FAQ
Can I make these bars ahead of time?
Yes! They keep well refrigerated for up to 5 days or frozen for up to 3 months. Thaw overnight in the fridge.
Why did my cheesecake layer crack?
Cracking is usually due to overbaking, rapid cooling, or overmixing. Cool gradually and avoid opening the oven during baking.
Can I use cake mix instead of homemade red velvet?
Yes. Substitute the red velvet layer with a prepared red velvet cake mix, following package instructions for a 9×13 pan, then top with cheesecake filling.
How do I store leftovers?
Cover tightly and refrigerate. For longer storage, freeze individually wrapped bars.
Can I make them egg-free?
Eggs are essential for structure. For egg substitutes, try flax eggs (1 tbsp ground flax + 3 tbsp water per egg), though texture may vary.
Is there a way to reduce the fat content?
You can use low-fat cream cheese and butter substitutes, but expect a less creamy texture and potential dryness.
What’s the best way to transport these bars?
Use an airtight container with parchment between layers. Keep chilled until serving.
Can I add chocolate chips?
Absolutely! Fold ½ cup white or semi-sweet chocolate chips into the cheesecake layer before baking.
Summary
Red Velvet Cheesecake Bars blend the moist, cocoa-kissed charm of red velvet cake with the luxuriously smooth richness of cheesecake into one unforgettable dessert. Easy to customize and perfect for sharing, they’re a crowd-pleasing treat that’s as beautiful as it is delicious.