Red Velvet Cannoli: A Decadent Fusion of Italian Tradition and Southern Flair
The History
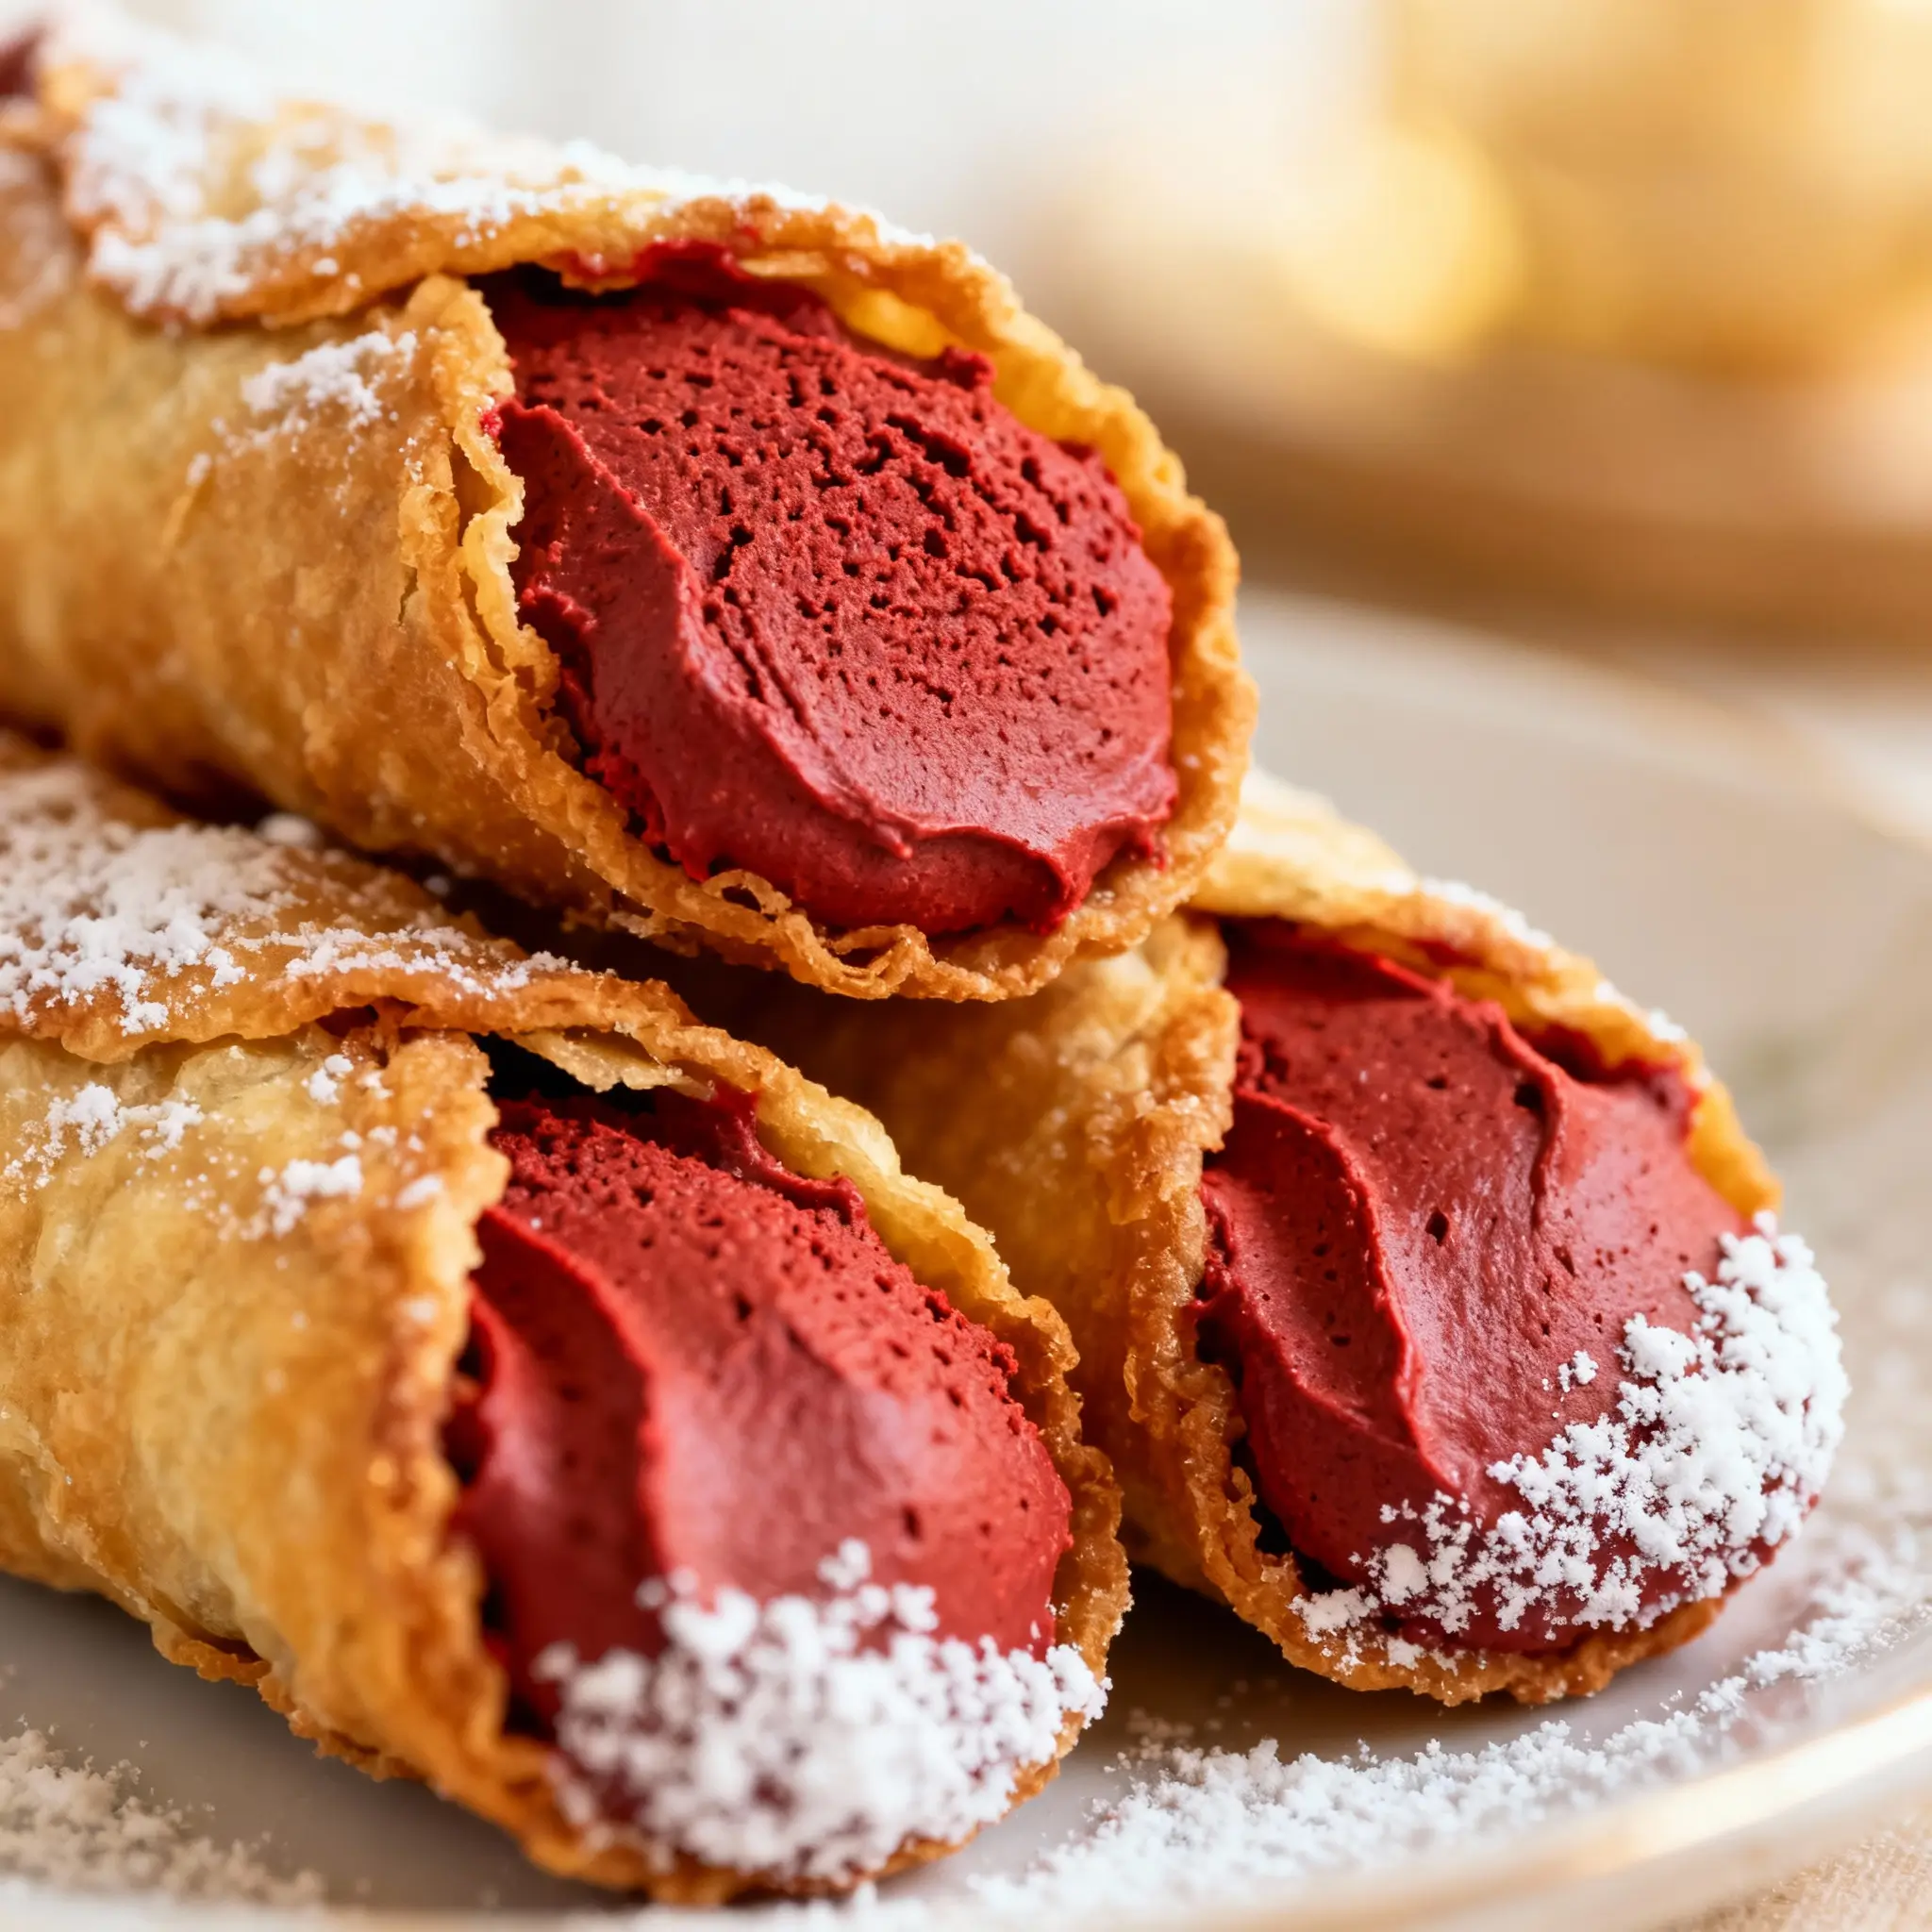
The Red Velvet Cannoli is a modern culinary masterpiece born from the creative fusion of two beloved dessert traditions: the classic Italian cannoli and the iconic American red velvet cake. While the origins of the traditional cannoli trace back to Sicily, Italy—where they were originally made as festive treats during Carnival season—the red velvet component has its roots in early 20th-century America, particularly in the Southern United States. The striking red hue, rich cocoa flavor, and cream cheese filling of red velvet cake have made it a staple at celebrations for generations.
The idea of merging these two desserts likely emerged in the early 2010s, as chefs and home bakers alike began experimenting with hybrid desserts to satisfy evolving palates. Inspired by the creamy texture of cannoli filling and the velvety richness of red velvet, food innovators began crafting versions that incorporated red food coloring, cocoa powder, and buttermilk into cannoli shells or fillings. Over time, this evolved into fully realized red velvet cannoli—crisp shells tinted crimson and filled with spiced cream cheese mixtures reminiscent of red velvet cake batter. Today, red velvet cannoli are celebrated in bakeries across the U.S., especially around holidays like Valentine’s Day, Christmas, and Easter, where their vibrant color and indulgent taste make them a show-stopping dessert.
Ingredients Breakdown
To create authentic yet innovative red velvet cannoli, every ingredient plays a pivotal role in balancing flavor, texture, and visual appeal. Below is a detailed breakdown of each component:
- For the Red Velvet Cannoli Shells:
- All-Purpose Flour: Provides structure and crispness. High-gluten content ensures the shell holds its shape when fried.
- Cocoa Powder (Unsweetened): Adds depth of chocolate flavor without overpowering sweetness—essential for mimicking red velvet’s signature taste.
- Granulated Sugar: Enhances browning and adds subtle sweetness to the dough.
- Salt: Balances flavors and enhances overall taste perception.
- Baking Soda: Acts as a leavening agent, giving slight lift to the dough for a delicate crunch.
- Unsalted Butter (Cold, Cubed): Creates flakiness and richness in the finished shell.
- White Vinegar: Reacts with baking soda to produce carbon dioxide bubbles, aiding in lightness.
- Red Food Coloring (Gel-Based Preferred): Gives the shell its bold red hue. Gel coloring is recommended over liquid to avoid altering dough consistency.
- Ice Water: Binds ingredients while keeping fats cold, crucial for achieving a shatteringly crisp texture after frying.
- Vegetable Oil (for Frying): Neutral-flavored oil with a high smoke point, ideal for deep-frying without imparting off-flavors.
- For the Cream Cheese Filling:
- Cream Cheese (Full-Fat, Room Temperature): The base of the filling—smooth, tangy, and rich. Full-fat ensures luxurious mouthfeel.
- Confectioners’ Sugar (Powdered Sugar): Sweetens and stabilizes the mixture; sifted to prevent lumps.
- Heavy Whipping Cream: Lightens the filling and improves pipeability.
- Vanilla Extract: Complements the cocoa and cream cheese with warm aromatic notes.
- Red Food Coloring (Optional, for Enhanced Color): Can be added to intensify the pinkish-red tone of the filling.
- Pinch of Salt: Elevates all other flavors and prevents cloying sweetness.
- For Decoration and Garnish:
- Mini Chocolate Chips or White Chocolate Chips: Mixed into the filling or sprinkled on ends for texture contrast.
- Crushed Pistachios: Adds nuttiness and vibrant green color contrast.
- Dutch-Process Cocoa Powder: Dusting for presentation and an extra hint of chocolate aroma.
- Powdered Sugar (for Dusting): Final flourish before serving.
- Edible Gold Leaf or Sprinkles (Optional): For special occasions and elevated aesthetics.
Step-by-Step Recipe
- Prepare the Dough: In a large mixing bowl, whisk together 2 cups all-purpose flour, 2 tablespoons unsweetened cocoa powder, 1 tablespoon granulated sugar, ¼ teaspoon salt, and ½ teaspoon baking soda. Cut in ½ cup cold unsalted butter using a pastry cutter or fork until the mixture resembles coarse crumbs.
- Add Wet Ingredients: Stir in 1 teaspoon white vinegar and 2–3 drops of red gel food coloring. Gradually add ice water, one tablespoon at a time (about 4–6 tbsp), mixing just until the dough comes together. Do not overwork.
- Rest the Dough: Form the dough into a ball, wrap in plastic wrap, and refrigerate for at least 1 hour (up to 24 hours). This allows gluten to relax and fats to re-chill, ensuring easier rolling and crispier results.
- Roll and Cut: On a lightly floured surface, roll the dough out to about ⅛-inch thickness. Using a round cutter (approximately 4 inches in diameter), cut into circles. Re-roll scraps as needed.
- Shape Around Tubes: Dampen the surface of cannoli tubes (metal or silicone) slightly. Place a dough circle over each tube and wrap snugly, sealing the edge with a bit of water or egg wash. Ensure there are no gaps.
- Fry the Shells: Heat vegetable oil in a deep pot or fryer to 350°F (175°C). Carefully lower wrapped tubes into hot oil, cooking 2–3 at a time. Fry for 3–4 minutes, turning occasionally, until golden brown and crisp. Remove with tongs and drain on paper towels. Let cool completely before sliding off tubes.
- Make the Filling: In a stand mixer fitted with a paddle attachment, beat 16 oz softened cream cheese on medium speed for 2 minutes. Add 1 cup sifted confectioners’ sugar, 1 teaspoon vanilla extract, and a pinch of salt. Mix until smooth. Gradually add ¼ cup heavy cream and continue beating until fluffy and spreadable (about 3 more minutes). If desired, add a few drops of red food coloring to match the red velvet theme.
- Chill the Filling: Transfer to a piping bag, seal, and refrigerate for at least 1 hour. Chilling firms the filling for cleaner piping and better structural integrity inside the shell.
- Fill the Cannoli: Fit a piping bag with a wide star tip (Wilton 1M or plain round tip). Insert the tip into one end of the cooled shell and gently squeeze to fill halfway. Repeat from the opposite end to ensure even distribution. Avoid overfilling to prevent cracking.
- Garnish and Serve: Immediately dip both ends into a bowl of mini chocolate chips and crushed pistachios. Dust lightly with powdered sugar and cocoa powder. For best texture, serve within 1–2 hours of filling to maintain shell crispness.
Tips
- Use Gel Food Coloring: Liquid food coloring contains water, which can alter the dough’s consistency. Gel-based coloring delivers intense color without affecting texture.
- Keep Ingredients Cold: When making the dough, use chilled butter and ice water to prevent premature melting, which leads to tough shells.
- Don’t Overfill: Overfilling stresses the shell and increases the risk of breakage. Fill just enough to feel substantial but not strained.
- Fill Just Before Serving: Cannoli shells absorb moisture quickly from the filling. To preserve crunch, fill no more than 2 hours before serving.
- Double-Tube Technique: For sturdier frying, slide a second metal rod through the center of the wrapped dough to prevent collapsing during frying.
- Temperature Control: Maintain oil temperature between 345°F and 355°F. Too hot = burnt exterior, raw interior; too cool = greasy, soggy shells.
- Freeze Extras: Unfilled shells can be stored in an airtight container at room temperature for up to 1 week or frozen for up to 3 months. Re-crisp in oven at 300°F for 3–5 minutes if needed.
- Flavor Infusion: Add a splash of buttermilk or a drop of almond extract to the filling for a deeper red velvet essence.
Variations and Customizations
The beauty of red velvet cannoli lies in its versatility. Here are several ways to customize your creation:
- Gluten-Free Version: Substitute regular flour with a 1:1 gluten-free baking blend containing xanthan gum. Test small batches first for optimal texture.
- Chocolate-Dipped Ends: Melt dark, milk, or white chocolate and dip one or both ends of the filled cannoli for elegance and added flavor.
- Seasonal Themes: Use green-tinted filling with mint extract for St. Patrick’s Day, pastel colors for Easter, or peppermint swirls for Christmas.
- Vegan Red Velvet Cannoli: Replace butter with vegan shortening, cream cheese with dairy-free alternative (e.g., cashew-based), and use plant-based heavy cream. Ensure food coloring is vegan-certified.
- Baked Instead of Fried: For a lighter version, brush dough-wrapped tubes with oil and bake at 400°F for 12–15 minutes until crisp. Texture will be less shattery but still delicious.
- Mini Cannoli Bites: Make smaller shells using 2-inch cutters and fill with a teaspoon of mixture for party-friendly desserts.
- Spiked Filling: Add 1–2 tablespoons of liqueur such as Chambord, amaretto, or Baileys Irish Cream to the cream cheese mixture for adult-only gatherings.
- Stuffed with Cake Crumbs: Fold crumbled red velvet cake into the filling for a textural surprise and intensified flavor profile.
Health Considerations and Nutritional Value
While undeniably indulgent, red velvet cannoli should be enjoyed in moderation due to their high calorie, fat, and sugar content. A typical filled cannoli (based on a 4-inch shell with standard filling) contains approximately:
- Calories: 320–380 kcal
- Total Fat: 20–25g (including 12g saturated fat)
- Carbohydrates: 35–40g (with 25–30g sugars)
- Protein: 4–6g
- Sodium: 180–220mg
Key considerations include:
- Saturated Fat: Primarily from butter, cream cheese, and frying oil. Frequent consumption may impact heart health.
- Sugar Content: High levels from confectioners’ sugar, red food coloring (some brands contain corn syrup), and optional chocolate garnishes. Diabetics should exercise caution.
- Food Coloring: Artificial dyes (like Red #40) are common in gel colors. Natural alternatives include beet juice powder or pomegranate extract, though color intensity may vary.
- Lactose Sensitivity: Contains dairy in multiple forms. Lactose-intolerant individuals may opt for lactose-free cream cheese and butter substitutes.
- Portion Control: Limit intake to 1–2 cannoli per sitting. Pair with fresh fruit or herbal tea to balance the meal.
Healthier modifications include baking instead of frying, reducing sugar by 25%, using low-fat cream cheese (though texture suffers), and incorporating whole wheat pastry flour for added fiber.
Ingredients
Red Velvet Cannoli Shells:
- 2 cups all-purpose flour
- 2 tbsp unsweetened cocoa powder
- 1 tbsp granulated sugar
- ½ tsp baking soda
- ¼ tsp salt
- ½ cup cold unsalted butter, cubed
- 1 tsp white vinegar
- 2–3 drops red gel food coloring
- 4–6 tbsp ice water
- Vegetable oil, for frying
Cream Cheese Filling:
- 16 oz full-fat cream cheese, softened
- 1 cup confectioners’ sugar, sifted
- ¼ cup heavy whipping cream
- 1 tsp vanilla extract
- Pinch of salt
- Optional: 2–3 drops red gel food coloring
Garnishes:
- ½ cup mini chocolate chips
- ¼ cup finely crushed pistachios
- Powdered sugar, for dusting
- Dutch-process cocoa powder, for dusting
Directions
- In a large bowl, combine flour, cocoa powder, sugar, baking soda, and salt. Cut in cold butter until mixture resembles coarse meal.
- Mix in vinegar and red food coloring. Gradually add ice water, 1 tablespoon at a time, until dough forms a cohesive ball.
- Wrap in plastic and refrigerate for 1 hour.
- Roll dough to ⅛-inch thickness and cut into 4-inch circles.
- Wrap each circle around a greased cannoli tube, sealing with water or egg wash.
- Heat oil to 350°F. Fry shells 2–3 at a time for 3–4 minutes until golden. Drain and cool.
- Beat cream cheese until smooth. Add sugar, vanilla, salt, and cream. Beat until fluffy. Optional: tint with red coloring.
- Chill filling for 1 hour.
- Transfer filling to piping bag. Fill cooled shells from both ends.
- Dip ends into chocolate chips and pistachios. Dust with powdered sugar and cocoa.
- Serve immediately or store unfilled components separately.
FAQ
- Can I make red velvet cannoli ahead of time?
- You can prepare the dough and filling up to 2 days in advance and store them separately—dough chilled, filling refrigerated. However, assemble only a few hours before serving to maintain shell crispness.
- Why are my cannoli shells soft?
- Soft shells usually result from underfrying, incorrect oil temperature, or filling too far in advance. Ensure oil is at 350°F and fill close to serving time.
- Can I bake the shells instead of frying?
- Yes! Brush dough-wrapped tubes with oil and bake at 400°F for 12–15 minutes. They’ll be less crispy but still tasty and lighter.
- Is red food coloring safe?
- Most commercial gel colors are FDA-approved. For natural options, try beet powder or pomegranate extract, though results may be more maroon than bright red.
- Can I freeze filled cannoli?
- No—freezing causes condensation upon thawing, making shells soggy. Freeze only unfilled shells for later use.
- What can I use instead of cannoli tubes?
- Aluminum foil can be rolled into sturdy cylinders, or stainless steel rods used for cake decorating work well. Silicone molds are also available.
- How do I keep the red color vibrant?
- Use high-quality gel coloring and avoid over-mixing the dough. Exposure to heat may cause slight fading, so don’t leave fried shells in warm areas.
Summary
Red velvet cannoli blend the creamy elegance of Italian cannoli with the bold, velvety charm of Southern red velvet cake—resulting in a visually stunning, flavor-packed dessert perfect for celebrations.
With crisp crimson shells, luscious cream cheese filling, and festive garnishes, this fusion treat delights the senses and showcases the magic of culinary creativity.