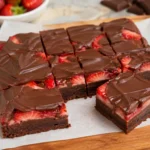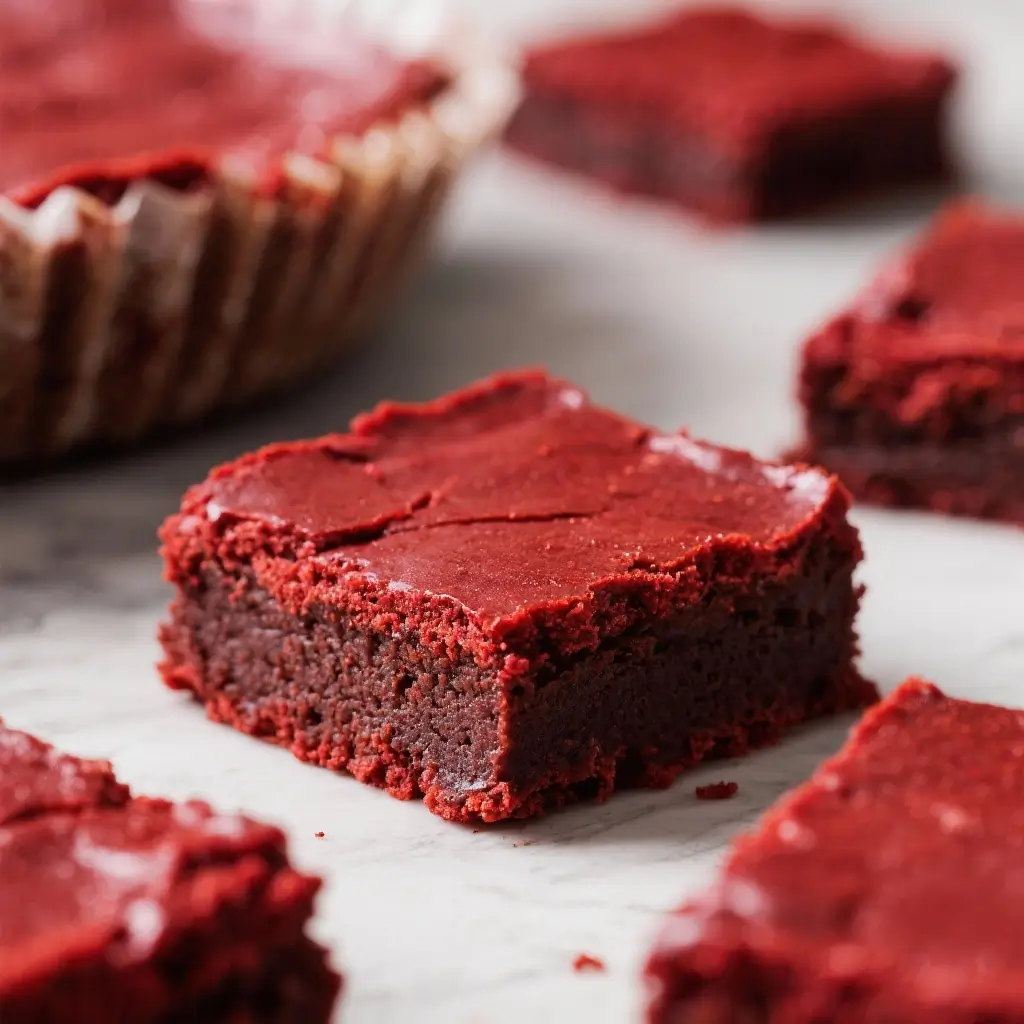
Red Velvet Brownies: A Decadent Fusion of Cake and Fudge
If you’ve ever found yourself torn between the moist, rich indulgence of a brownie and the elegant allure of red velvet cake, then Red Velvet Brownies are your dessert soulmate. These luscious treats seamlessly blend the deep cocoa flavor of brownies with the signature crimson hue and subtle tang of red velvet, resulting in a dessert that’s both familiar and excitingly unique. Perfect for holidays, birthdays, or just because, Red Velvet Brownies offer a visual spectacle and a taste sensation all in one. Whether you’re baking for a crowd or treating yourself to a sweet escape, these brownies deliver on every level—flavor, texture, and presentation.
The History Behind the Crimson Cravings
The origins of red velvet lie shrouded in culinary lore, with roots tracing back to the early 20th century. The color was originally a natural byproduct of a reaction between cocoa powder and acidic ingredients like buttermilk or vinegar. This chemical interaction created a reddish tint, which bakers later enhanced with food coloring for a more dramatic effect. The legend of the red velvet cake gained momentum when it became associated with the Waldorf-Astoria Hotel in New York, where guests would reportedly pay top dollar for the recipe after tasting it.
Over time, red velvet transcended its cake form and began appearing in cupcakes, cheesecakes, milkshakes, and even ice cream. Enter the Red Velvet Brownie—a modern twist that marries the dense, fudgy texture of a classic brownie with the sophisticated flavor profile of red velvet. While not as historically documented as its cake counterpart, the Red Velvet Brownie emerged in the late 2000s, gaining popularity through social media, food blogs, and gourmet bakeries. It represents the evolution of dessert culture: innovative, visually striking, and unapologetically delicious.
Ingredients Breakdown: What Makes Red Velvet Brownies So Special?
The magic of Red Velvet Brownies lies in their carefully balanced ingredients, each playing a crucial role in achieving the perfect texture, flavor, and color. Let’s break them down:
- Unsalted Butter: Provides richness and moisture while helping create a tender crumb. Using unsalted butter allows you to control the salt content precisely.
- Granulated Sugar: Sweetens the batter and contributes to the crackly crust on top—a hallmark of a well-baked brownie.
- Dark Chocolate (Chopped or Chips): The heart of any brownie, dark chocolate lends depth and a luxurious melt-in-your-mouth quality. Opt for at least 60% cacao for optimal flavor.
- Large Eggs: Bind the ingredients together and provide structure. They also contribute to the slight lift and chewiness in the crumb.
- Vanilla Extract: Enhances overall flavor with its warm, aromatic notes, balancing the cocoa and acidity.
- All-Purpose Flour: Gives the brownies structure without making them cakey. Too much flour can lead to dryness, so precise measurement is key.
- Cocoa Powder (Unsweetened): Adds intense chocolate flavor. Dutch-processed cocoa works best due to its smoother, less acidic profile.
- Baking Powder: A small amount helps achieve a slightly risen center while maintaining density—this isn’t a cake, after all!
- Salt: Balances sweetness and heightens other flavors. Even a pinch makes a noticeable difference.
- Buttermilk: Introduces the characteristic tang of red velvet and keeps the brownies ultra-moist. Its acidity also reacts with cocoa for enhanced color development.
- Red Food Coloring (Liquid or Gel): The star of the show. Gel coloring provides a deeper, more vibrant red without altering the batter consistency. Classic red velvet hues range from deep burgundy to bright crimson.
- White Chocolate Chunks or Cream Cheese Swirl (Optional): For an extra layer of luxury, many bakers add white chocolate chips or swirl in a creamy cheesecake mixture. This complements the tanginess and adds textural contrast.
Step-by-Step Recipe: How to Make Perfect Red Velvet Brownies
Follow this detailed guide to create bakery-quality Red Velvet Brownies right in your kitchen. Precision and patience are your allies here.
- Preheat & Prepare: Preheat your oven to 350°F (175°C). Line a 9×9-inch baking pan with parchment paper, leaving overhang on two sides for easy removal. Lightly grease the paper and pan to prevent sticking.
- Melt Butter & Chocolate: In a heatproof bowl set over a pot of simmering water (double boiler method), melt 1 cup (2 sticks) of unsalted butter with 8 ounces of chopped dark chocolate. Stir frequently until smooth. Remove from heat and let cool slightly.
- Whisk in Sugar & Eggs: Gradually whisk in 1 ½ cups granulated sugar into the chocolate mixture. Add 3 large eggs, one at a time, whisking well after each addition until the mixture is glossy and thickened. Stir in 1 teaspoon vanilla extract.
- Combine Dry Ingredients: In a separate bowl, sift together ¾ cup all-purpose flour, ⅓ cup unsweetened cocoa powder, ½ teaspoon baking powder, and ¼ teaspoon salt. Sifting prevents lumps and ensures even distribution.
- Mix Wet & Dry: Gently fold the dry ingredients into the chocolate mixture using a spatula. Do not overmix—just stir until no streaks of flour remain.
- Add Buttermilk & Color: Stir in ¼ cup buttermilk until fully incorporated. Then, add 1–2 tablespoons of red gel food coloring (adjust to desired intensity). Mix until the batter is uniformly colored. The vibrant red will deepen as it bakes.
- Pour & Bake: Pour the batter into the prepared pan, spreading evenly with the spatula. For a decadent twist, sprinkle 1 cup white chocolate chunks over the top or drop spoonfuls of cream cheese mixture (4 oz softened cream cheese + ¼ cup sugar + 1 egg + ½ tsp vanilla) and swirl with a knife.
- Bake to Perfection: Bake for 30–35 minutes, or until a toothpick inserted into the center comes out with moist crumbs (not wet batter). Avoid overbaking to preserve the fudgy interior.
- Cool Completely: Allow the brownies to cool in the pan on a wire rack for at least 2 hours. This step is crucial for clean slicing. For cleaner edges, chill in the refrigerator for 1 hour before cutting.
- Serve & Store: Use the parchment overhang to lift the brownies out. Cut into squares with a sharp, hot knife (wipe between cuts for neat edges). Serve plain or dusted with powdered sugar, or topped with whipped cream or vanilla ice cream.
Expert Tips for Flawless Red Velvet Brownies
- Use Gel Food Coloring: Liquid coloring can alter the batter’s consistency and result in a weaker hue. Gel coloring is concentrated and won’t affect texture.
- Don’t Overmix: Once flour is added, mix only until combined. Overmixing develops gluten, leading to tough brownies.
- Cool Before Cutting: Warm brownies will crumble. Patience rewards you with clean, professional-looking squares.
- Quality Chocolate Matters: Use high-quality dark chocolate. It melts better and tastes richer, elevating the entire dessert.
- Check Oven Temperature: An oven thermometer ensures accuracy. Baking at the wrong temperature can cause uneven cooking or dryness.
- Double the Batch: These disappear fast! Consider making two pans—one to enjoy now, one to freeze for later.
- Swirl Like a Pro: For a marbled effect, drop spoonfuls of cream cheese mixture on top and drag a skewer or knife in figure-eight motions.
Variations and Customizations
Red Velvet Brownies are wonderfully adaptable. Here are some creative twists to suit different tastes and occasions:
- Cream Cheese Stuffed: Create a core of sweetened cream cheese filling in the center of each brownie for a surprise inside.
- Gluten-Free Version: Substitute all-purpose flour with a 1:1 gluten-free baking blend. Ensure cocoa powder and food coloring are certified gluten-free.
- Vegan Red Velvet Brownies: Replace butter with coconut oil, eggs with flax eggs (3 tbsp ground flaxseed + 9 tbsp water), dairy chocolate with vegan chocolate, and buttermilk with almond milk + 1 tsp vinegar. Use plant-based food coloring.
- Mini Muffin Tin Brownies: Bake in lined muffin tins for 18–22 minutes. Perfect for parties or portion control.
- Peppermint Twist: Add crushed candy canes or peppermint extract for a festive holiday version.
- Boozy Brownies: Stir in 1–2 tablespoons of bourbon or Kahlúa for an adult-only treat. The alcohol cooks off, leaving behind complex flavor notes.
- Nutty Crunch: Fold in ½ cup chopped walnuts or pecans for added texture and earthy flavor.
- Frosted Top: After cooling, spread a layer of cream cheese frosting and drizzle with white chocolate for a red velvet cupcake effect.
Health Considerations and Nutritional Value
While undeniably indulgent, understanding the nutritional profile of Red Velvet Brownies can help you enjoy them mindfully. On average, one square (1/16 of a 9×9 pan) contains approximately:
- Calories: 220–260
- Fat: 14–18g (mostly from butter and chocolate)
- Saturated Fat: 8–10g
- Carbohydrates: 25–30g
- Sugars: 18–22g
- Protein: 2–3g
- Fiber: 1–2g
- Sodium: 80–120mg
These brownies are high in sugar and fat, so moderation is key—especially for those managing diabetes, heart conditions, or weight. However, dark chocolate contains antioxidants like flavonoids, which may support heart health in moderation. To make a slightly healthier version:
- Reduce sugar by ¼ cup and use a natural sweetener like coconut sugar.
- Replace half the butter with unsweetened applesauce (though texture will be less fudgy).
- Use whole wheat pastry flour for added fiber.
- Serve smaller portions with fresh berries to balance sweetness.
Full Ingredient List
- 1 cup (2 sticks / 227g) unsalted butter
- 8 oz (225g) high-quality dark chocolate, chopped
- 1 ½ cups (300g) granulated sugar
- 3 large eggs, room temperature
- 1 teaspoon pure vanilla extract
- ¾ cup (95g) all-purpose flour
- ⅓ cup (30g) unsweetened cocoa powder (Dutch-processed preferred)
- ½ teaspoon baking powder
- ¼ teaspoon salt
- ¼ cup (60ml) buttermilk
- 1–2 tablespoons red gel food coloring (adjust to preference)
- 1 cup (175g) white chocolate chunks (optional)
- Cream cheese swirl (optional): 4 oz cream cheese, ¼ cup sugar, 1 egg, ½ tsp vanilla
Detailed Directions
Reiterating the full process with precision for foolproof results:
- Preheat oven to 350°F (175°C). Grease and line a 9×9-inch baking pan with parchment paper.
- Melt butter and dark chocolate together using a double boiler. Stir until smooth. Remove from heat and cool for 5 minutes.
- Whisk in sugar until well combined. Add eggs one at a time, mixing thoroughly after each. Stir in vanilla.
- In a separate bowl, sift flour, cocoa powder, baking powder, and salt.
- Fold dry ingredients into wet mixture until just combined.
- Stir in buttermilk, followed by red food coloring until uniform in color.
- If using, fold in white chocolate chunks or prepare cream cheese swirl: beat cream cheese, sugar, egg, and vanilla until smooth, then drop spoonfuls onto batter and swirl.
- Pour batter into pan and smooth the top.
- Bake for 30–35 minutes. Center should be set with a few moist crumbs on a tester.
- Cool completely in pan before lifting out and slicing.
- Store in an airtight container at room temperature for up to 4 days, or refrigerate for up to 1 week. Freeze for up to 3 months.
Frequently Asked Questions (FAQ)
Q: Why are my Red Velvet Brownies cakey instead of fudgy?
A: Overmixing the batter or using too much flour can lead to a cake-like texture. Also, overbaking dries them out. Stick to the recommended time and avoid excessive stirring after adding flour.
Q: Can I make these without buttermilk?
A: Yes! Make a substitute by adding ½ tablespoon lemon juice or vinegar to ¼ cup milk and letting it sit for 5 minutes. The acidity mimics buttermilk.
Q: Why use gel food coloring instead of liquid?
A: Gel coloring is more concentrated, so you need less, and it won’t introduce extra liquid that could throw off the batter’s balance.
Q: Can I use milk instead of buttermilk?
A: You can, but you’ll lose the signature tang and some moisture. The red velvet character will be milder.
Q: How do I get clean cuts?
A: Chill the brownies first, then use a sharp knife dipped in hot water and wiped dry between cuts.
Q: Can I add nuts or other mix-ins?
A: Absolutely! Walnuts, pecans, or even sprinkles work well. Just don’t exceed 1 cup total to maintain structure.
Q: Are Red Velvet Brownies supposed to be red after baking?
A: Yes, though the color may darken slightly. If they look brown, you likely didn’t use enough food coloring. Gel helps retain vibrancy.
Q: Can I make these ahead of time?
A: Definitely. Bake, cool, and store in an airtight container. They often taste better the next day as flavors meld.
Summary
Red Velvet Brownies are the ultimate hybrid dessert—rich, fudgy brownies infused with the iconic flavor and color of red velvet cake. With a moist crumb, vibrant hue, and optional cream cheese swirl, they’re sure to impress at any gathering.
Easy to customize and always a crowd-pleaser, these brownies blend tradition and innovation into one unforgettable treat that satisfies chocolate lovers and cake enthusiasts alike.