Introduction
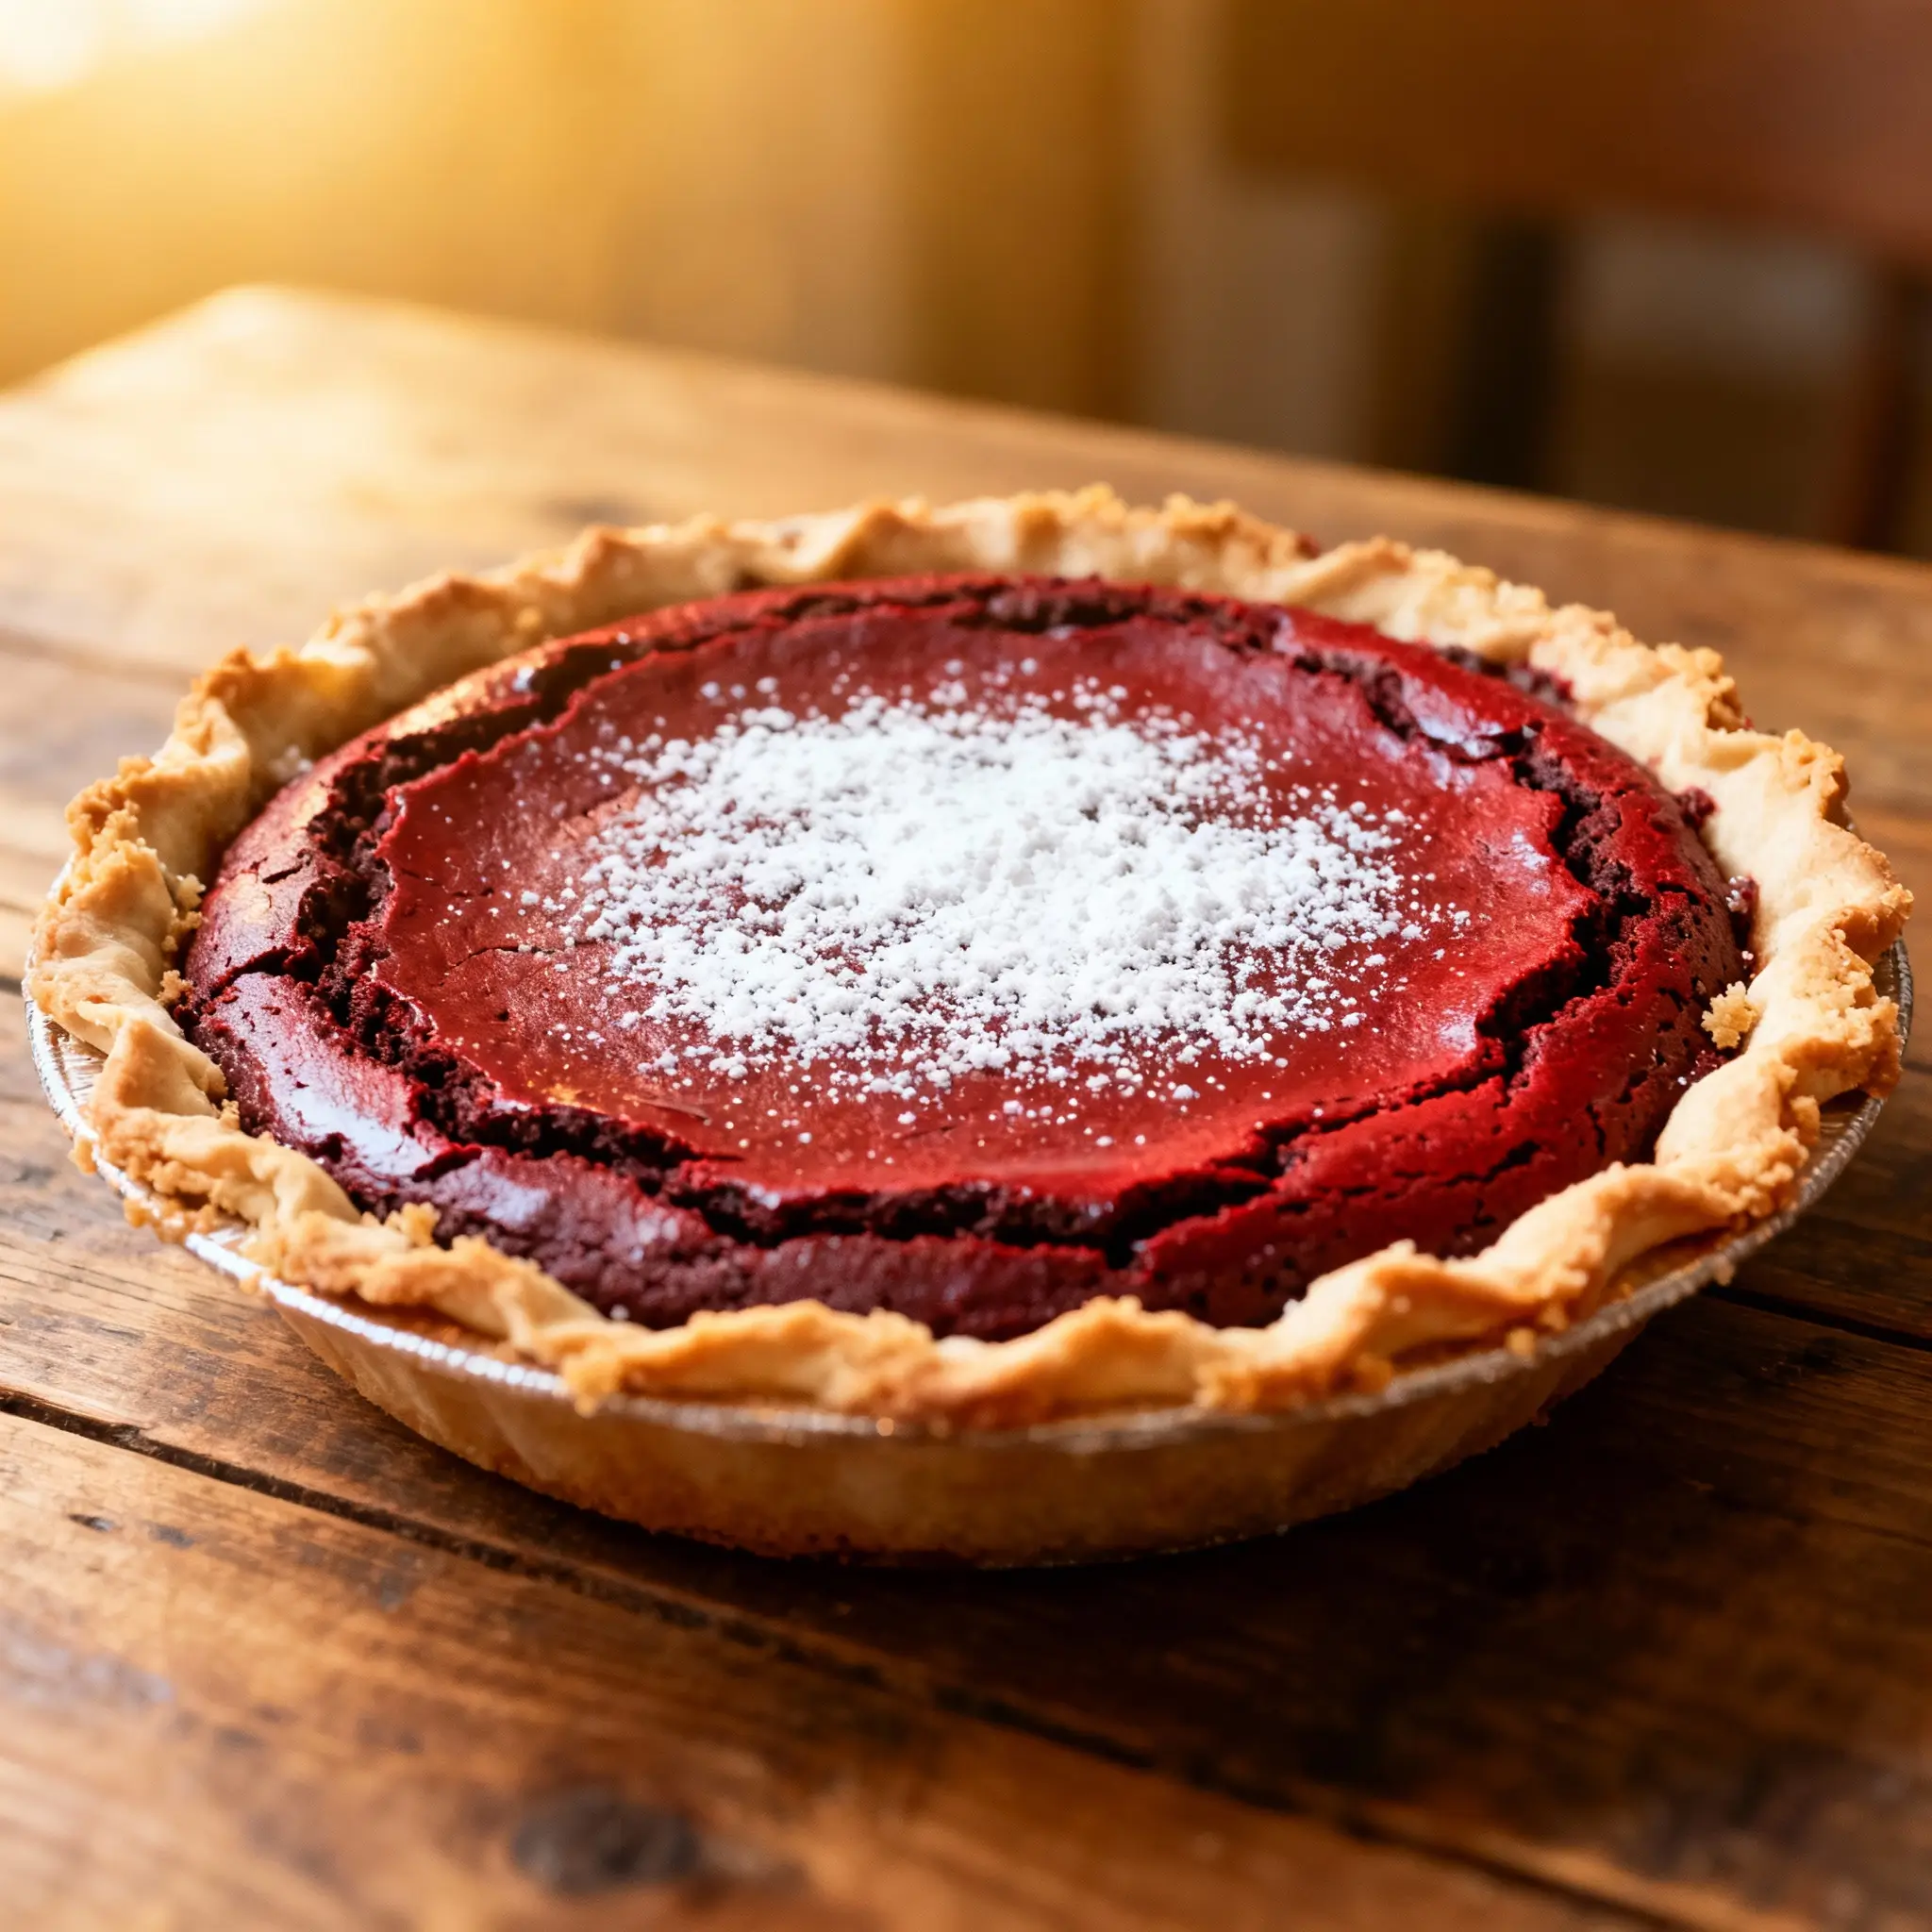
Red Velvet Brownie Pie is a decadent, show-stopping dessert that masterfully bridges the gap between two beloved American classics: the rich, fudgy depth of brownies and the romantic, velvety elegance of red velvet cake. This hybrid creation delivers the dense, chewy crumb of a premium brownie layered over—or seamlessly integrated with—the signature crimson hue, subtle cocoa tang, and buttermilk-tinged tenderness of red velvet. Topped with a cloud-like cream cheese swirl or crowned with classic red velvet frosting, it’s more than a pie—it’s an experience. Whether served at holiday gatherings, Valentine’s Day soirées, birthday celebrations, or simply as a luxurious weeknight indulgence, Red Velvet Brownie Pie captivates with its striking visual appeal, complex flavor harmony, and textural contrast: crisp edges, moist center, creamy topping, and just a whisper of tang to cut through the sweetness. Its growing popularity across food blogs, bakery menus, and viral social media reels reflects a cultural craving for nostalgic reinvention—where tradition meets innovation in every bite.
The History
The origins of Red Velvet Brownie Pie are delightfully modern and grassroots—born not from a single inventor or historic cookbook, but from the dynamic cross-pollination of baking trends in the early 2010s. To understand its lineage, we must first trace its two foundational pillars. Red velvet cake traces its roots to the early 20th century, with documented recipes appearing as early as 1896 in Fannie Farmer’s *Boston Cooking-School Cookbook*, though its iconic red color didn’t become standard until the 1930s–40s, when anthocyanin-rich beet juice was replaced by synthetic red food coloring—often amplified by the acid-cocoa reaction (natural cocoa + vinegar + buttermilk) that yields a subtle reddish tint. The Waldorf Astoria’s legendary claim to fame in the 1940s further cemented its status as a luxury dessert. Meanwhile, brownies emerged in the 1890s—first recorded in the 1896 *Boston Cooking-School Cookbook* as “brownie’s” (a dense, molasses-based bar), evolving into the chocolate-forward, fudgy or cakey versions we know post-1920s. The “pie” format gained traction as home bakers sought elevated presentations—transforming sheet pan desserts into elegant, sliceable centerpieces. Red Velvet Brownie Pie began surfacing organically on Pinterest and food forums around 2012–2013, initially as “red velvet brownie bars in a pie crust” or “swirled red velvet brownie tart.” By 2016, major publications like *Bon Appétit*, *Food & Wine*, and *Southern Living* featured refined iterations—often crediting Southern bakeries and Midwest recipe developers who fused regional preferences (cream cheese frosting, pecan crusts, bourbon accents) with national red velvet mania. Today, it stands as a hallmark of contemporary comfort baking: deeply rooted in history, yet boldly reimagined for today’s palate and aesthetic sensibilities.
Ingredients Breakdown
Every exceptional Red Velvet Brownie Pie hinges on precise ingredient synergy—not just quantity, but quality, function, and interaction. Below is a comprehensive, chef-level analysis:
- All-Purpose Flour (1 ¼ cups): Provides essential gluten structure. Too much leads to toughness; too little yields collapse. Sifted flour ensures even distribution and prevents lumps in the batter. For gluten-free adaptation, a 1:1 GF blend with xanthan gum is recommended—but expect slight density shifts.
- Natural Unsweetened Cocoa Powder (¾ cup): Non-alkalized (natural) cocoa is critical—it reacts with acidic ingredients (buttermilk, vinegar) to enhance both red color development and bright, fruity acidity. Dutch-process cocoa lacks this reactivity and will mute color and tang.
- Granulated Sugar (1 ½ cups): Not only sweetens but tenderizes and aids in crust formation and aeration during mixing. Fine-grain sugar dissolves more readily for smoother texture.
- Brown Sugar (½ cup, packed): Adds moisture, caramel notes, and chewiness—key for brownie-like density. Dark brown sugar intensifies molasses depth; light brown offers milder warmth.
- Unsalted Butter (1 cup, melted and cooled): Fat carrier for flavor and mouthfeel. Melted (not hot) butter integrates smoothly without cooking eggs. European-style butter (82–85% fat) yields richer, less greasy results.
- Eggs (3 large, room temperature): Act as emulsifiers, leaveners, and binders. Room temperature ensures uniform incorporation and optimal volume. Extra yolks (optional add-in) boost richness and fudginess.
- Buttermilk (½ cup): The cornerstone of red velvet tang and tenderness. Its acidity activates baking soda, enhances cocoa’s red hue, and tenderizes gluten. If unavailable, make a substitute: ½ cup whole milk + ½ tbsp white vinegar or lemon juice, rested 5 minutes.
- Distilled White Vinegar (1 tsp): Amplifies acidity for maximum color development and balances sweetness. Apple cider vinegar may impart off-notes; distilled is neutral and reliable.
- Red Food Coloring (2–3 tbsp liquid or 1–1½ tsp gel): Gel coloring is strongly preferred—it delivers intense, vibrant red without thinning batter or diluting flavor. Liquid coloring requires larger volumes, risking altered texture and muted hue. “No-dye” versions using beet powder exist but yield earthier tones and less consistency.
- Vanilla Extract (2 tsp, pure): Deepens aroma and rounds out chocolate/cocoa notes. Avoid imitation—its harsh alcohol notes clash with delicate red velvet nuances.
- Baking Soda (1 tsp): Reacts instantly with buttermilk and vinegar to create carbon dioxide bubbles—lifting the batter slightly while preserving dense crumb. Must be fresh (replace every 6 months).
- Salt (1 tsp, fine sea or kosher): Enhances all flavors and tempers sweetness. Coarse salt must be dissolved fully to avoid briny pockets.
- Cream Cheese Swirl (Optional but Recommended): 8 oz full-fat brick cream cheese (room temp), ⅓ cup granulated sugar, 1 large egg, 1 tsp vanilla, pinch of salt. Whisked until completely smooth—no lumps—to prevent sinking or curdling during baking.
- Pie Crust (Homemade or High-Quality Store-Bought): A flaky, buttery shortcrust (not graham cracker) provides structural contrast and savory balance. Blind-baked for 15–18 minutes at 375°F ensures crispness beneath the moist filling. A chocolate graham crust or toasted pecan-oat variation adds nuance.
Step-by-Step Recipe
- Preheat & Prep: Position oven rack in center position. Preheat oven to 350°F (175°C). Lightly grease a 9-inch deep-dish pie plate (glass or ceramic preferred for even heating) and line the bottom with parchment paper for foolproof release. If using a pie crust, prepare or thaw according to package instructions.
- Blind-Bake the Crust (if using): Fit chilled pie dough into dish, trim and crimp edges. Prick base thoroughly with fork. Line with parchment and fill with pie weights or dried beans. Bake at 375°F for 15 minutes. Carefully remove weights and parchment; bake 3–5 more minutes until lightly golden. Cool completely on wire rack—warm crust will melt butter in batter.
- Mix Dry Ingredients: In a medium bowl, whisk together flour, natural cocoa powder, baking soda, and salt. Ensure no cocoa lumps remain—press through sieve if needed. Set aside.
- Cream Wet Base: In a large heatproof bowl, combine melted (cooled to lukewarm) butter, granulated sugar, and brown sugar. Whisk vigorously for 2–3 minutes until glossy and slightly thickened—this incorporates air for subtle lift. Add eggs one at a time, whisking fully after each addition until emulsified and smooth. Stir in vanilla.
- Incorporate Acids & Color: Whisk in buttermilk and vinegar until fully combined and slightly frothy. Immediately add red food coloring—start with 2 tbsp liquid or 1 tsp gel—and whisk until uniformly dispersed. Batter will deepen in color instantly.
- Combine Wet & Dry: Gradually add dry ingredients to wet mixture in three additions, folding gently with a silicone spatula after each. Do NOT overmix—stop as soon as no streaks remain. Overmixing develops excess gluten, leading to toughness. Batter should be thick, glossy, and pourable—but not runny.
- Prepare Cream Cheese Swirl (Optional): While batter rests 5 minutes, beat softened cream cheese, sugar, egg, vanilla, and salt with electric mixer on medium until ultra-smooth (2–3 min). Scrape bowl thoroughly. Transfer to piping bag fitted with wide round tip or zip-top bag with corner snipped.
- Fill & Swirl: Pour brownie batter into cooled pie crust, spreading evenly with offset spatula. Pipe or dollop cream cheese mixture in 6–8 evenly spaced mounds over surface. Use a toothpick or skewer to drag through batters in figure-eight or zigzag motions—creating gentle marbling. Avoid over-swirling, which causes blending and loss of contrast.
- Bake with Precision: Place pie on center rack. Bake 45–55 minutes. Begin checking at 45 minutes: edges should be set and slightly pulled away from pan; center should jiggle *just slightly* (like firm Jell-O) when gently shaken—do not overbake. A toothpick inserted 1 inch from edge should come out with moist crumbs; center insertion should have a few damp crumbs (not wet batter). Rotate pan halfway through for even baking.
- Cool Completely: Remove from oven and place on wire rack. Cool *undisturbed* for at least 2 hours at room temperature—this allows structure to set and prevents cracking. For cleanest slices, refrigerate uncovered for 4+ hours or overnight. This firms the cream cheese swirl and intensifies flavor melding.
- Finishing Touches: Before serving, run thin knife under hot water and wipe dry between cuts for pristine slices. Garnish with dusting of cocoa, crushed red velvet cake crumbs, white chocolate curls, or a drizzle of cream cheese glaze (4 oz cream cheese + 1 cup powdered sugar + 1 tbsp milk + ½ tsp vanilla, whisked smooth).
Tips
- Temperature Is Non-Negotiable: All dairy (butter, eggs, buttermilk, cream cheese) must be at true room temperature (68–72°F). Cold ingredients cause seizing, curdling, and uneven mixing—especially critical for the cream cheese swirl.
- Gel Coloring Wins Every Time: Liquid food coloring adds unwanted water, diluting flavor and altering batter viscosity. Invest in high-quality gel (Wilton, AmeriColor, or Chefmaster) for vivid, consistent color without compromise.
- Don’t Skip the Rest: Letting batter rest 5–10 minutes before baking allows flour to fully hydrate and air bubbles to settle—resulting in denser, more uniform crumb and reduced surface cracks.
- Oven Thermometer Required: Built-in oven thermostats are notoriously inaccurate. A standalone oven thermometer ensures your 350°F is truly 350°F—critical for proper rise and set.
- Underbake Slightly: It’s far better to pull the pie out when the center is *almost* set than risk dryness. Carryover cooking continues for 10–15 minutes post-oven. Err on the side of caution.
- Cooling Is Part of Baking: Rushing cooling causes steam to condense, making crust soggy and texture gummy. Patience = perfect texture.
- Use a Light-Colored Pan: Dark metal pans absorb heat aggressively, causing over-browned, hard edges. Glass or light ceramic distributes heat gently and evenly.
- Measure Flour Correctly: Spoon flour into measuring cup and level with straight edge—never scoop directly from bag (compacts flour, adding up to 25% extra). Better yet, weigh: 1 ¼ cups AP flour = 160g.
- Chill Your Cream Cheese Mixture: After swirling, refrigerate unbaked pie for 15 minutes before baking. This prevents the cream cheese from immediately sinking during initial oven spring.
- Freeze for Future Joy: Fully cooled, unglazed pie freezes beautifully for up to 3 months—wrap tightly in plastic + foil. Thaw overnight in fridge, then bring to room temp 30 minutes before serving.
Variations and Customizations
Red Velvet Brownie Pie is a canvas for creativity—adaptable to dietary needs, seasonal ingredients, and personal flair. Explore these inspired riffs:
- Gluten-Free Version: Substitute 1:1 gluten-free flour blend (Bob’s Red Mill or King Arthur) + ½ tsp xanthan gum (if not included). Add 1 tbsp ground flaxseed + 3 tbsp water (let sit 5 min) for binding insurance. Expect slightly denser, moister crumb—reduce bake time by 3–5 minutes.
- Vegan Red Velvet Brownie Pie: Replace butter with refined coconut oil (for neutral taste) or vegan butter; eggs with flax eggs (3 tbsp ground flax + 9 tbsp water); buttermilk with almond milk + 1 tsp vinegar; cream cheese swirl with soaked cashew-based “cream cheese” (cashews + lemon juice + nutritional yeast + maple syrup, blended ultra-smooth). Use beet powder for natural color.
- Boozy Brownie Pie: Infuse sophistication with 2 tbsp bourbon or amaretto added to buttermilk mixture. Complement with toasted pecan crust and bourbon-spiked cream cheese swirl (add 1 tbsp bourbon to swirl mixture).
- White Chocolate Swirl: Replace cream cheese swirl with melted high-quality white chocolate (8 oz) + 2 tbsp heavy cream + ½ tsp vanilla. Drizzle over batter and marble gently—creates a luxurious, sweet-contrast ribbon.
- Peppermint Red Velvet: Add ½ tsp peppermint extract + ¼ tsp crushed candy cane to batter. Top with crushed candy canes and dark chocolate shavings after cooling. Perfect for Christmas.
- Strawberry Swirl: Fold ½ cup finely chopped fresh strawberries (patted dry) into batter. Swirl with strawberry-infused cream cheese (blend ¼ cup puréed, strained strawberries into swirl mixture).
- Espresso-Enhanced: Add 1 tbsp instant espresso powder to dry ingredients—deepens chocolate notes without adding bitterness. Pair with dark chocolate crust.
- Nutty Crunch Crust: Pulse 1 cup toasted walnuts or pecans with 1 ½ cups graham cracker crumbs, 3 tbsp brown sugar, and 6 tbsp melted butter. Press into pan and blind-bake as directed.
- Mini Tartlets: Scale down into lined muffin tin (makes 12). Reduce bake time to 22–28 minutes. Ideal for parties and portion control.
- Double-Layer Decadence: Bake half the batter as base layer for 20 minutes. Cool 10 minutes, then spread remaining batter + swirl. Bake additional 25–35 minutes. Yields dramatic cross-section reveal.
Health Considerations and Nutritional Value
While Red Velvet Brownie Pie is unequivocally a celebratory treat—not a health food—understanding its nutritional profile empowers mindful enjoyment. A standard slice (1/12th of a 9-inch pie, including crust and cream cheese swirl) contains approximately:
- Calories: 420–480 kcal
- Total Fat: 24–28g (14–17g saturated)
- Carbohydrates: 48–54g (36–40g sugars)
- Protein: 5–7g
- Fiber: 1.5–2g
- Sodium: 280–340mg
Key Considerations:
- Sugar Content: Primarily from refined sucrose and brown sugar. Natural alternatives (coconut sugar, monk fruit blends) alter texture and browning—test in small batches first.
- Saturated Fat: Comes from butter, cream cheese, and cocoa butter. Using grass-fed butter or reducing butter by 1 tbsp (replacing with applesauce) cuts ~25g sat fat per pie—but may impact richness.
- Artificial Dyes: Traditional red food coloring (Red #40) is FDA-approved but controversial for sensitive individuals. Organic beet juice powder or concentrated cherry/pomegranate juice offer natural alternatives—though color is less vibrant and flavor subtly shifts.
- Flour Choices: Whole wheat pastry flour (substitute 50%) adds fiber and nutrients but yields drier, heavier texture. Almond flour is unsuitable alone due to lack of structure—best used in combination with starches.
- Dietary Accommodations: Naturally nut-free and soy-free (with careful label-checking on chocolate and food coloring). Easily made kosher or halal with certified ingredients.
- Mindful Indulgence Tips: Serve smaller portions (1/16th slice); pair with fresh berries or unsweetened whipped cream to balance richness; enjoy as part of a balanced meal—not on an empty stomach; savor slowly to enhance satisfaction with less.
Remember: Nutrition is holistic. Occasional enjoyment of deeply pleasurable foods supports psychological well-being, social connection, and culinary joy—cornerstones of sustainable, joyful eating.
Ingredients
- 1 (9-inch) unbaked or pre-baked pie crust (flaky butter or graham cracker)
- 1 ¼ cups (160g) all-purpose flour, spooned & leveled
- ¾ cup (65g) natural unsweetened cocoa powder
- 1 ½ cups (300g) granulated sugar
- ½ cup (100g) packed light brown sugar
- 1 cup (227g) unsalted butter, melted and cooled to lukewarm
- 3 large eggs, room temperature
- 2 tsp pure vanilla extract
- ½ cup (120ml) buttermilk, room temperature
- 1 tsp distilled white vinegar
- 2–3 tbsp liquid red food coloring OR 1–1½ tsp high-quality red gel food coloring
- 1 tsp baking soda
- 1 tsp fine sea salt
- Cream Cheese Swirl (Optional but Highly Recommended):
- 8 oz (227g) full-fat brick cream cheese, room temperature
- ⅓ cup (67g) granulated sugar
- 1 large egg, room temperature
- 1 tsp pure vanilla extract
- Pinch of fine sea salt
Directions
- Preheat oven to 350°F (175°C). Prepare pie crust: if homemade, chill dough-lined pie plate for 30 minutes. Blind-bake at 375°F for 15 minutes with weights, then 4–5 minutes uncovered. Cool completely.
- In a medium bowl, whisk together flour, cocoa powder, baking soda, and salt. Set aside.
- In a large bowl, whisk melted butter, granulated sugar, and brown sugar for 2–3 minutes until glossy. Add eggs one at a time, whisking thoroughly after each. Stir in vanilla.
- Whisk in buttermilk and vinegar until frothy. Immediately stir in red food coloring until uniform.
- Gradually fold dry ingredients into wet mixture in three parts, mixing just until no dry streaks remain. Do not overmix.
- For cream cheese swirl: Beat cream cheese, sugar, egg, vanilla, and salt with electric mixer until completely smooth (2–3 min). Scrape bowl well.
- Pour brownie batter into cooled crust. Dollop cream cheese mixture evenly over top. Swirl gently with toothpick in figure-eights.
- Bake 45–55 minutes, until edges are set and center jiggles slightly. Rotate pan halfway through.
- Cool on wire rack for 2 hours minimum. For cleanest slices, refrigerate uncovered 4+ hours or overnight.
- Cut with hot, dry knife. Serve at cool room temperature. Store covered in fridge up to 5 days.
FAQ
- Can I make this without food coloring?
- Yes—but the result won’t be “red velvet” in appearance or full flavor profile. Natural alternatives like 2–3 tbsp beet purée or 1 tbsp beet powder will lend a rosy-pink hue and earthy sweetness, requiring slight reduction of buttermilk (by 1–2 tbsp) to compensate for added moisture.
- Why did my pie crack on top?
- Cracking usually stems from rapid temperature change (opening oven too soon), overmixing batter, or overbaking. Ensure gradual cooling, avoid opening oven before 40 minutes, and pull pie when center still has gentle jiggle.
- Can I use Dutch-process cocoa?
- Technically yes—but you’ll lose the signature red hue and bright acidity. Dutch-process is alkalized, neutralizing the acid reaction needed for color development and tang. Stick with natural cocoa for authentic red velvet character.
- My cream cheese swirl sank! What went wrong?
- Sinking occurs when cream cheese mixture is too warm or too thin, or when batter is overmixed beneath it. Ensure cream cheese is cool (not cold), batter is thick enough to support swirl, and swirl gently—don’t overwork.
- Can I bake this in a springform pan?
- Avoid springform unless tightly wrapped in foil—brownie batter is too fluid and will leak. A standard 9-inch pie plate or cake pan with parchment sling is safest.
- How do I store leftovers?
- Cover tightly with plastic wrap or place in airtight container. Refrigerate up to 5 days. Freeze (unfrosted) up to 3 months—wrap in plastic + foil. Thaw overnight in fridge, then sit at room temp 30 minutes before serving.
- Can I double the recipe for a 13×9 pan?
- Absolutely! Double all ingredients and bake in greased, parchment-lined 13×9-inch pan at 350°F for 50–65 minutes. Check doneness with toothpick at center—it should have moist crumbs, not wet batter.
- Is there a way to reduce the sugar?
- You can reduce granulated sugar by ¼ cup (to 1 ¼ cups) without major texture impact—but further reduction risks dryness and poor browning. Never reduce brown sugar—it’s vital for moisture and chew.
- What if I don’t have buttermilk?
- Make “faux buttermilk”: ½ cup whole milk + ½ tbsp white vinegar or lemon juice. Let sit 5 minutes until slightly curdled. Do not skip—its acidity is irreplaceable for color and tenderness.
- Can kids help make this?
- Yes! They’ll love measuring, whisking wet ingredients, swirling the cream cheese, and decorating. Assign age-appropriate tasks: pouring, sprinkling, piping, or garnishing. Always supervise near oven and with knives.
Summary
Red Velvet Brownie Pie is a masterclass in dessert alchemy—melding the fudgy soul of brownies with the elegant tang and crimson allure of red velvet cake, all anchored by a crisp, buttery crust and crowned with a luxuriously swirled cream cheese finish.
With meticulous attention to ingredient quality (especially natural cocoa and gel food coloring), precise temperature control, and patient cooling, this pie delivers unforgettable texture, nuanced flavor, and showstopping beauty—making every slice a celebration of craft, nostalgia, and pure, unapologetic joy.