
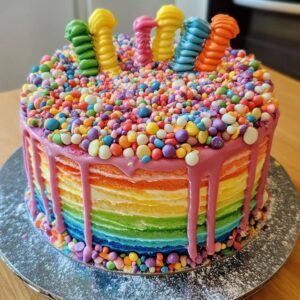
The Rainbow Crown Jewel Cake is a dazzling dessert masterpiece that blends visual spectacle with rich, buttery flavor and a surprise-filled core, making it the star of any celebration. With its majestic layers of vivid colors, a sparkling candy-filled center, and luxurious buttercream frosting, this cake is not only a feast for the eyes but also a sweet experience that brings joy, wonder, and excitement to birthdays, festive occasions, or any gathering where you want to make a lasting impression. Its radiant appearance, reminiscent of royal gems and magical moments, makes it a modern showstopper, embodying creativity, celebration, and pure delight in every bite.
The History of the Rainbow Crown Jewel Cake
While traditional rainbow cakes have been around since at least the mid-20th century, the Rainbow Crown Jewel Cake is a relatively modern innovation that draws inspiration from a few key baking trends. The original rainbow cake was popularized with the rise of food coloring and layer cakes in the 1950s and ’60s, and gained viral momentum in the 2000s with the rise of visually-driven social media platforms. The concept of a “crown jewel” dessert, often used in reference to bright Jell-O salads or gelatin molds studded with fruit, was reinterpreted by modern bakers into this layered cake with a hidden, sparkling candy center. This cake fuses the nostalgia of the crown jewel concept with the Instagram-era aesthetics of rainbow baking. The combination of layered color, piñata-style surprise fillings, and elegant decoration has made the Rainbow Crown Jewel Cake a must-have centerpiece for everything from birthday parties to pride celebrations to gender reveals and holiday feasts.
Ingredients Breakdown
For the Cake Layers:
Cooking spray (for greasing pans)
4 1/2 cups cake flour
1 1/2 tablespoons baking powder
1 teaspoon fine salt
3 cups granulated sugar
3 sticks (1 1/2 cups) unsalted butter, at room temperature
8 large egg yolks
2 cups whole milk
1 tablespoon vanilla extract
6 teaspoons gel food coloring (1 teaspoon per color; red, orange, yellow, green, blue, purple)
For the American Buttercream (yields about 6 cups):
1 pound (2 cups) unsalted butter, at room temperature
7 to 8 cups powdered sugar
2 tablespoons heavy cream or milk
2 teaspoons vanilla extract
For the Filling and Topping:
About 2 cups of edible sprinkles or candy-coated chocolates, such as:
Wilton Gold Pearlized Sprinkles Mix
Wilton Pearlized Sugar Food Decorative, Gold
Wilton Edible Glitter, Gold Stars
Step-by-Step Recipe
Day 1: Bake the Cake Layers
Start by preparing your cake pans. Line two to three 9-inch round pans with parchment paper and coat with cooking spray. Preheat your oven to 350°F and position a rack in the middle. In a large bowl, whisk together cake flour, baking powder, and salt. In the bowl of a stand mixer fitted with a paddle attachment, cream the butter and sugar on medium speed until light and fluffy, about 5 minutes. Scrape down the sides of the bowl, then reduce the speed to low and add egg yolks one at a time, ensuring each is fully mixed before the next addition. Pause again to scrape the bowl. In a measuring cup, combine milk and vanilla extract. Add the dry ingredients to the butter mixture in three parts, alternating with the milk mixture in two additions, scraping the bowl in between each. Beat the batter on medium speed for 5 minutes until smooth.
Divide the batter into six equal portions, about 12 1/2 ounces or 2 cups each. In separate bowls, tint each with a different gel food coloring. Pour each colored batter into prepared cake pans and bake two or three at a time for 15 to 20 minutes, or until a toothpick inserted into the center comes out clean. Cool on a rack for 30 minutes, then remove from pans with parchment attached and wrap in plastic wrap while still slightly warm. Repeat the process until all six layers are baked, cooled, and wrapped. Store wrapped layers at room temperature for up to one day.
Day 2: Make Frosting and Assemble the Cake
To make the buttercream, beat the softened butter in a stand mixer until smooth. Gradually add 7 cups of powdered sugar on low speed. Once combined, increase speed to medium-low until fully incorporated. Add the cream or milk and vanilla extract, mixing on low until blended. Beat on medium speed until the frosting is smooth and creamy. If needed, add more powdered sugar for a firmer consistency and beat until fluffy.
Unwrap all cake layers and decide on their order, reserving green and yellow for the center. Start with purple as the base. Place a small amount of frosting on a cake board and position the purple layer. Frost with 3/4 cup of buttercream. Repeat with blue layer, stacking and aligning carefully. For the green layer, use a 3-inch cutter to remove the center, invert it onto the blue layer, and frost the ring only, avoiding the center. Repeat this step for the yellow layer, but this time also frost the inside of the ring. Fill the cavity created by the green and yellow rings with sprinkles and edible glitter until packed to the top. Continue stacking the orange and then red layers, frosting between each with 3/4 cup of buttercream.
To crumb coat, spread a thin layer of frosting over the top and sides using half the remaining buttercream. Chill for 1 hour to set. After chilling, apply the final layer of frosting, smoothing it evenly across the cake. Decorate with additional sprinkles, edible glitter, or candy pearls for an extra crown jewel effect. Chill again for at least 1 hour, or overnight, before serving. When ready to cut, use a sharp knife and expect some resistance from the candy core—each slice will reveal a burst of color and sparkle.
Tips for the Perfect Rainbow Crown Jewel Cake
Use gel food coloring for vibrant layers without watering down the batter. Weigh your batter for even layers and consistent baking. Wrap each cake layer while slightly warm to keep them moist. Chill layers before assembling to prevent crumbling. Cut cake holes precisely and use a round cutter for clean edges. Don’t overfill the sprinkle cavity to avoid bulging. Chill between crumb coat and final frost for best stability. Use a bench scraper and offset spatula for clean, professional frosting edges. Allow cake to rest before slicing for clean presentation.
Variations and Customizations
Swap food coloring for natural vegetable dyes or pastel versions for a softer look. Add flavor extracts to each layer to match the colors—lemon for yellow, strawberry for red, etc. Fill the center with custom candies for themed events (e.g., pink and blue for a gender reveal). Use cream cheese or chocolate ganache frosting instead of buttercream for a richer taste. Top with sugar crystals or edible flowers for a more elegant aesthetic. Create ombré layers or even a galaxy-inspired pattern for a unique twist.
Health Considerations and Nutritional Value
Rainbow Crown Jewel Cake is an indulgent dessert, rich in sugar, butter, and refined flour. A single slice can contain between 600–800 calories, primarily from fat and carbohydrates. To lighten it up, consider using less frosting, swapping butter for a lower-fat alternative in the cake or frosting, and opting for reduced-sugar candies in the filling. Natural food dyes may reduce exposure to artificial coloring. Whole milk can be swapped with a plant-based alternative, and gluten-free flour can be used for dietary restrictions. This cake is best enjoyed occasionally as a celebratory treat, not as an everyday dessert.
FAQ
Can I make this cake ahead of time? Yes, you can bake the layers up to two days in advance and store them wrapped at room temperature or freeze for longer storage. Assemble the day before serving for best results.
What kind of food coloring works best? Gel food coloring is ideal because it produces vibrant colors without thinning the batter.
Can I use boxed cake mix? Absolutely. Use white cake mix for bright colors and prepare according to the package, then divide and color.
What can I use instead of buttercream? Cream cheese frosting, whipped frosting, or ganache can be used as alternatives depending on flavor preference.
How do I cut through the sprinkle core? Use a long, sharp knife and cut slowly. Expect some resistance as you pass through the candy-filled center.
Is it possible to make it vegan or gluten-free? Yes. Use plant-based butter and milk, egg replacers, and gluten-free flour blends to make a suitable version.
How do I store leftovers? Store the cake in an airtight container in the refrigerator for up to 5 days. Bring to room temperature before serving.
Rainbow Crown Jewel Cake
Ingredients
- 1 package orange-flavored gelatin
- 1 package cherry-flavored gelatin
- 1 package lime-flavored gelatin
- 3 cups hot water
- 1 ½ cups cold water
- 1 cup pineapple juice
- ¼ cup granulated sugar
- 1 package lemon-flavored gelatin
- 1 ¾ cups graham cracker crumbs gluten-free vanilla wafer crumbs can be used as a substitute
- ¼ cup unsalted butter melted
- 2 cups heavy whipping cream
- 1 cup additional heavy whipping cream optional, sweetened with ¼ cup powdered sugar
Instructions
- Prepare the orange, cherry, and lime gelatin in separate bowls, using 1 cup of hot water and ½ cup of cold water for each flavor. Pour each mixture into individual 8x8x2-inch pans and refrigerate until fully set.
- In a separate bowl, combine the graham cracker crumbs with the melted butter and stir until evenly mixed. Press this mixture firmly into the bottom of a 9-inch springform pan to form a smooth crust. Bake at 350°F for 10 minutes, then remove from the oven and allow it to cool completely.
- In a small saucepan, heat the pineapple juice with the granulated sugar until the sugar dissolves completely. Take it off the heat and stir in the lemon gelatin until fully dissolved, then add the remaining ½ cup of cold water. Place this mixture in the refrigerator and chill until it reaches a syrup-like consistency.
- Meanwhile, whip the 2 cups of heavy cream until soft peaks form. Gently fold the syrupy lemon gelatin mixture into the whipped cream.
- Cut the set orange, cherry, and lime gelatin into ½-inch cubes. For best results, dip a sharp knife in hot water before each cut. Run the warm knife around the edges of each pan and use a wide spatula dipped in hot water to carefully lift out the gelatin. The cubes should separate easily and hold their shape. Gently fold these colorful cubes into the whipped cream and lemon gelatin mixture, being careful not to break them. Pour this entire mixture into the cooled crust.
- Refrigerate for at least 8 hours or overnight until fully set. When ready to serve, remove only the sides of the springform pan. If you like, whip the additional 1 cup of cream with ¼ cup powdered sugar and use it to frost the sides of the cake. Alternatively, pipe decorative swirls on top using a pastry bag fitted with a 1M tip.