Introduction
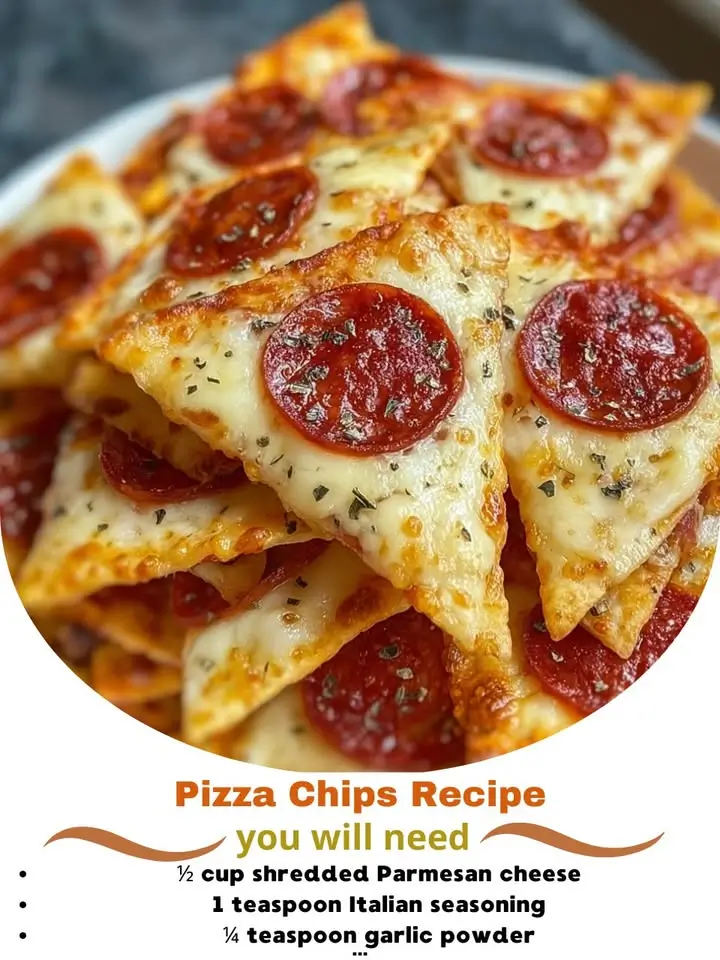
Pizza chips are a delicious, fun, and innovative twist on everyone’s favorite comfort food—pizza! These crispy, cheesy, and savory snacks bring together the bold flavors of traditional pizza in a crunchy, bite-sized form that’s perfect for parties, game nights, after-school treats, or even a quick midnight snack. Imagine all the goodness of melted mozzarella, tangy tomato sauce, fresh basil, and aromatic herbs—but transformed into a chip format that’s easy to eat, share, and love. Whether you’re feeding a crowd or just satisfying your own cravings, pizza chips are guaranteed to be a hit. They’re essentially mini flatbreads or crackers loaded with classic pizza toppings, baked (or sometimes fried) until golden and crisp. This recipe guide dives deep into every aspect of making perfect pizza chips at home—from their origins to variations, nutritional insights, and pro tips—so you can master this mouthwatering snack from scratch.
The History
While pizza itself has ancient roots dating back to civilizations like the Greeks and Egyptians who topped flatbreads with oils and herbs, the modern concept of pizza as we know it originated in Naples, Italy, in the 18th century. However, pizza chips are a much more recent culinary invention, emerging in the late 20th century as part of the broader trend of snack innovation in North America. The rise of convenience foods and the popularity of flavored tortilla chips paved the way for creative hybrids like pizza chips. Brands such as Cape Cod, Ruffles, and Late July began producing commercial versions in the early 2000s, offering shelf-stable snacks that mimicked the taste of pepperoni, cheese, and marinara sauce. But true food enthusiasts soon realized they could make something far superior at home—fresh, customizable, and free from preservatives. Homemade pizza chips allow for control over ingredients, textures, and flavor intensity, transforming a processed snack into a gourmet experience. Today, pizza chips are celebrated not only for their bold taste but also for their versatility, appearing on appetizer platters, charcuterie boards, and even as edible bases for mini nachos or dips.
Ingredients Breakdown
Creating perfect pizza chips starts with selecting high-quality ingredients that deliver both flavor and texture. Each component plays a crucial role:
- Flatbread or Tortillas: Use small flour tortillas, pita bread rounds, naan, or pre-made flatbreads. These form the base and should be sturdy enough to hold toppings without becoming soggy.
- Pizza Sauce: A rich, seasoned tomato sauce made from crushed tomatoes, garlic, oregano, and basil. You can use store-bought marinara or make your own for fresher flavor.
- Mozzarella Cheese: Freshly shredded low-moisture mozzarella melts beautifully and creates that signature gooey layer. Avoid pre-shredded cheese if possible, as it contains anti-caking agents that hinder melting.
- Parmesan Cheese: Adds a sharp, salty depth. Finely grated Parmigiano-Reggiano enhances umami and browning.
- Pepperoni Slices: Thinly sliced pepperoni adds spice and smokiness. Opt for natural or nitrate-free varieties for better quality.
- Olive Oil: Used to brush the base for crispiness and to help seasonings adhere.
- Garlic Powder & Onion Powder: Provide savory background notes without raw garlic’s bite.
- Dried Oregano & Basil: Classic Italian herbs that evoke authentic pizza flavor.
- Red Pepper Flakes: For a touch of heat (optional).
- Fresh Basil: Added after baking for a pop of freshness and aroma.
- Salt & Black Pepper: To enhance overall flavor balance.
You can also include extras like diced bell peppers, mushrooms, olives, or cooked sausage based on preference. The key is layering flavors while maintaining structural integrity during baking.
Step-by-Step Recipe
- Preheat Oven: Set your oven to 400°F (200°C). Line a large baking sheet with parchment paper or lightly grease it to prevent sticking.
- Prepare the Base: Lay out 8–10 small tortillas or cut pita/flatbread into triangles or circles. Arrange them in a single layer on the baking sheet, leaving space between each for even cooking.
- Brush with Olive Oil: Lightly brush each piece with olive oil on both sides. This helps them crisp up and improves browning.
- Season the Base: Sprinkle a pinch of garlic powder, onion powder, salt, black pepper, and dried oregano over each piece. This builds foundational flavor.
- Add Pizza Sauce: Using a small spoon or piping bag, dot about 1 teaspoon of warm pizza sauce onto each chip. Spread gently to cover most of the surface, leaving a small border to prevent sogginess.
- Layer Cheese: Evenly distribute shredded mozzarella over the sauced pieces. Follow with a light sprinkle of grated Parmesan for extra richness.
- Add Toppings: Place 1–2 small slices of pepperoni on each chip. You can also add other toppings like chopped veggies or cooked ground meat if desired.
- Final Seasoning: Dust lightly with red pepper flakes and another pinch of dried basil for enhanced aroma.
- Bake: Place in the preheated oven and bake for 8–12 minutes, or until the edges are golden brown, the cheese is fully melted, and slightly bubbly or starting to brown in spots.
- Cool Slightly: Remove from oven and let rest for 2–3 minutes. This allows the cheese to set slightly and prevents burns.
- Garnish: Top with fresh torn basil leaves for brightness and color contrast.
- Serve Warm: Transfer to a serving platter and enjoy immediately while hot and crispy!
Tips
- Uniform Size: Cut all bases to the same size and thickness to ensure even baking.
- Don’t Overload: Too much sauce or cheese can make chips soggy. Less is more when it comes to toppings.
- Use Freshly Grated Cheese: Pre-shredded cheese contains cellulose, which doesn’t melt as smoothly.
- Warm the Sauce: Cold sauce straight from the fridge can lower the temperature of the base and lead to uneven cooking.
- Bake on Middle Rack: Ensures balanced heat distribution and prevents burning.
- Watch Closely: Baking time varies by oven and thickness of base. Check frequently after 8 minutes.
- Double Crisp (Optional): For extra crunch, flip the chips halfway through baking and return to oven for 2–3 minutes.
- Use Convection Mode: If available, convection baking promotes even crisping and faster browning.
- Cool on Wire Rack: Prevents steam buildup underneath, keeping the bottom crisp.
- Serve Immediately: Like regular chips, these lose crispness over time. Best eaten fresh.
Variations and Customizations
Pizza chips are incredibly versatile and can be adapted to suit any dietary need or flavor preference:
- Veggie Lover’s: Skip meat and top with sautéed mushrooms, spinach, diced tomatoes, and black olives.
- White Pizza Chips: Omit tomato sauce and use ricotta, mozzarella, garlic, and spinach for a creamy alternative.
- BBQ Chicken Style: Swap marinara for BBQ sauce, add shredded cooked chicken, red onions, and cilantro.
- Meat Lovers: Add crumbled cooked bacon, sausage, ham, and extra pepperoni.
- Mediterranean Twist: Use feta cheese, sun-dried tomatoes, artichoke hearts, and a drizzle of tzatziki.
- Gluten-Free: Use gluten-free flatbreads or corn tortillas as the base.
- Dairy-Free: Substitute with plant-based cheeses and skip Parmesan.
- Keto-Friendly: Use almond flour flatbreads or cloud bread rounds, load up on cheese and meats, and minimize sauce.
- Breakfast Pizza Chips: Top with scrambled eggs, crumbled sausage, cheddar, and green onions.
- Dessert Pizza Chips: Sweet version with Nutella, banana slices, mini marshmallows, and a dusting of cinnamon-sugar.
- Mini Bagel Chips: Use small bagels sliced thin and toasted for a chewy-crisp hybrid.
- Spicy Arrabbiata: Use spicy arrabbiata sauce and extra red pepper flakes for heat lovers.
Health Considerations and Nutritional Value
While pizza chips are undeniably tasty, it’s important to consider their nutritional profile. A typical serving (about 3–4 chips) contains approximately:
- Calories: 150–200 kcal
- Total Fat: 8–12g (including saturated fat from cheese and pepperoni)
- Carbohydrates: 12–18g (mainly from the tortilla base)
- Protein: 6–9g (from cheese and meat toppings)
- Sodium: 300–500mg (can be higher with processed meats and cheeses)
- Fiber: 1–2g (more if whole wheat or veggie-loaded)
To make a healthier version:
- Use whole grain or cauliflower-based flatbreads for added fiber and nutrients.
- Opt for low-fat cheese or reduce the amount used.
- Choose lean proteins like grilled chicken instead of pepperoni.
- Make homemade sauce with no added sugar or preservatives.
- Limit portion sizes and serve with a side salad or raw vegetables.
- Avoid frying; stick to baking for lower fat content.
For those managing sodium, look for low-sodium tomato sauce and cheeses. Diabetics should monitor carbohydrate intake and pair with protein-rich dips like Greek yogurt-based ranch.
Ingredients
- 10 small flour tortillas or pita bread rounds
- 1 cup pizza sauce (homemade or organic store-bought)
- 1 ½ cups shredded mozzarella cheese
- ¼ cup grated Parmesan cheese
- 20–30 slices pepperoni (or turkey pepperoni for a lighter option)
- 2 tablespoons olive oil
- 1 teaspoon garlic powder
- 1 teaspoon onion powder
- 1 teaspoon dried oregano
- ½ teaspoon dried basil
- ¼–½ teaspoon red pepper flakes (adjust to taste)
- Salt and freshly ground black pepper to taste
- Fresh basil leaves, for garnish
Directions
- Preheat oven to 400°F (200°C). Prepare a baking sheet with parchment paper.
- Lay out tortillas or cut pitas into 3-inch rounds or triangles.
- Brush both sides lightly with olive oil.
- Sprinkle each with garlic powder, onion powder, oregano, basil, salt, and pepper.
- Spread 1 teaspoon of warmed pizza sauce evenly over each base.
- Top with mozzarella, then Parmesan, distributing evenly.
- Place 2–3 pepperoni slices per chip.
- Lightly sprinkle with red pepper flakes.
- Bake for 8–12 minutes until golden, crispy, and cheese is bubbly and slightly browned.
- Remove and let cool 2–3 minutes.
- Garnish with fresh basil.
- Serve warm with extra sauce, ranch, or marinara for dipping.
FAQ
Can I make pizza chips ahead of time?
Yes, but they’re best served fresh. You can prep the components in advance and assemble just before baking. Fully baked chips can be reheated in a toaster oven for 3–5 minutes to restore crispness.
Can I freeze pizza chips?
Freezing is not recommended as the texture becomes soggy upon thawing. However, unbaked assembled chips can be frozen on a tray, then stored in a bag and baked from frozen (add 3–5 minutes to baking time).
Why are my pizza chips soggy?
This usually happens due to too much sauce, under-baking, or using cold sauce. Always use room-temperature sauce, apply sparingly, and bake until deeply golden.
Can I air fry pizza chips?
Absolutely! Air frying at 375°F for 5–7 minutes gives excellent results—crispy outside, melty inside. Spray lightly with oil for better browning.
Are pizza chips kid-friendly?
Yes! Kids love the fun shape and familiar pizza flavors. Customize with milder toppings and involve them in assembling for a fun kitchen activity.
What can I dip pizza chips in?
Try marinara, ranch, garlic aioli, hummus, or even a spicy sriracha mayo. For dessert versions, pair with chocolate sauce or fruit dip.
Can I use English muffins or bagels?
Yes! Split and toast English muffins or thinly slice bagels for a heartier chip with more chew.
How many servings does this recipe make?
Approximately 8–10 servings (3–4 chips per person as an appetizer).
Summary
Pizza chips are a creative, crowd-pleasing fusion of crispy flatbread and classic pizza flavors, perfect for snacking or entertaining. Easy to customize and bursting with cheesy, savory goodness, they bring the joy of pizza to a whole new crunchy dimension.