Introduction:
Peanut Butter and Jelly Cookies combine two of the most nostalgic and beloved flavors into one delightful treat, merging the creamy richness of peanut butter with the fruity sweetness of jelly in a soft, chewy cookie that evokes memories of childhood lunches while offering a fun, modern twist on a classic sandwich. These cookies are perfect for everything from lunchboxes and bake sales to cozy afternoon snacks and family gatherings, delivering both comfort and joy in every bite.
The History of Peanut Butter and Jelly Cookies:
The iconic peanut butter and jelly sandwich dates back to the early 20th century, gaining widespread popularity in the U.S. during the 1940s thanks to its affordability and convenience during wartime. As peanut butter and jelly became a staple in American homes, bakers began to experiment with new ways to enjoy the duo, and thus, the peanut butter and jelly cookie was born. This sweet creation is a playful evolution of the sandwich, combining the comfort of familiar flavors with the indulgence of baked goods, and it continues to grow in popularity as a nostalgic, yet innovative dessert.
Ingredients Breakdown:
- Peanut Butter (creamy or chunky): The base of the cookie, offering a rich, nutty flavor and soft texture.
- Granulated Sugar and Brown Sugar: These provide sweetness, moisture, and contribute to the cookie’s chewy texture.
- Egg: Acts as a binder and helps create structure.
- All-Purpose Flour: Forms the base of the dough and gives the cookie body.
- Baking Soda: A leavening agent that ensures the cookies rise slightly and don’t become too dense.
- Salt: Balances the sweetness and enhances the flavor of the peanut butter.
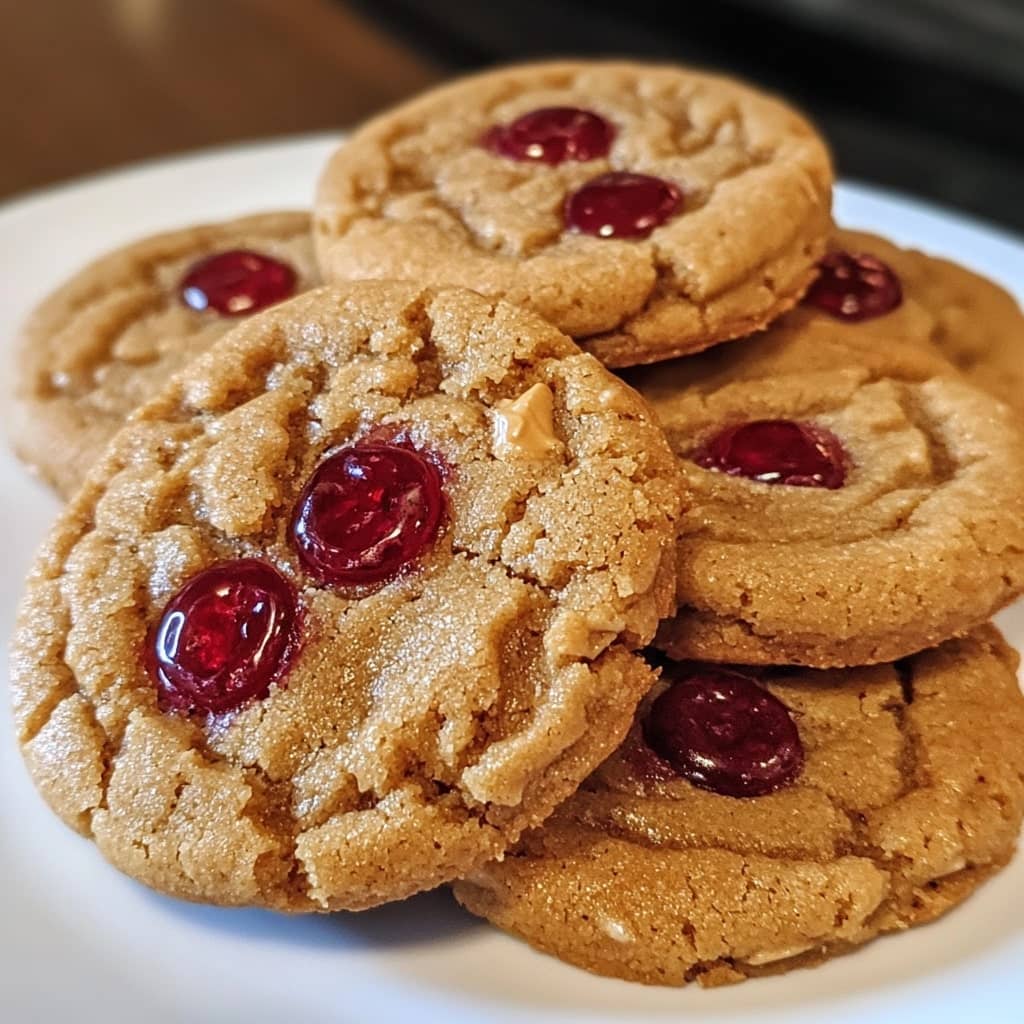
- Jelly or Jam (grape, strawberry, raspberry, or your favorite): The sweet, fruity counterpart to the rich peanut butter, traditionally spooned into an indent in the center of the cookie before or after baking.
Step-by-Step Recipe:
- Preheat your oven to 350°F (175°C) and line a baking sheet with parchment paper.
- Cream together the peanut butter, brown sugar, and granulated sugar in a mixing bowl until smooth and fluffy.
- Add the egg and mix well until fully incorporated.
- In a separate bowl, whisk together the flour, baking soda, and salt.
- Gradually add the dry ingredients to the wet mixture, stirring until a soft dough forms.
- Roll the dough into tablespoon-sized balls and place them on the prepared baking sheet.
- Use your thumb or the back of a spoon to press an indent into the center of each cookie.
- Fill each indent with about ½ teaspoon of jelly of your choice.
- Bake for 10 to 12 minutes, or until the edges are lightly golden and the centers are set.
- Cool on the baking sheet for 5 minutes before transferring to a wire rack to cool completely.
Tips for the Perfect Peanut Butter and Jelly Cookies:
Use natural peanut butter for a deeper nutty flavor, but be aware it may result in a slightly crumblier dough—if so, chill it before shaping. Chill the dough for 30 minutes if it’s too sticky to handle easily. Don’t overfill the centers with jelly or it may overflow during baking. Let the cookies cool fully before stacking or storing to avoid smudging the jelly. For uniform cookies, use a cookie scoop to portion the dough.
Variations and Customizations:
Try almond butter or cashew butter instead of peanut butter for a unique twist. Swap jelly for chocolate ganache, lemon curd, or marshmallow fluff for creative flavor profiles. Add chopped peanuts, oats, or mini chocolate chips to the dough for texture and extra indulgence. Make sandwich cookies by placing two peanut butter cookies together with jelly in between for a double-layered treat.
Health Considerations and Nutritional Value:
While these cookies are a delicious indulgence, they do contain sugars and fats that should be enjoyed in moderation. Opt for low-sugar or fruit-only jam and natural peanut butter with no added sugar to make a healthier version. Each cookie typically ranges from 150 to 200 calories, with protein and healthy fats from the peanut butter, but also includes added sugars from both the dough and the jelly. For gluten-free options, use certified gluten-free flour blends, and for vegan versions, replace the egg with a flaxseed egg and choose plant-based jam.
Frequently Asked Questions (FAQ):
Q: Can I use crunchy peanut butter? A: Yes, it adds texture and a bit of crunch to the cookies, which many people enjoy.
Q: How should I store these cookies? A: Store them in an airtight container at room temperature for up to 4 days or refrigerate for a week.
Q: Can I freeze the dough or baked cookies? A: Yes, both freeze well—freeze the dough balls before baking or the cooled cookies for up to 2 months.
Q: My jelly melted too much, how can I prevent this? A: Try adding the jelly after baking or using a thicker jam to prevent it from spreading too much.
Q: Can I make these cookies nut-free? A: Substitute sunflower seed butter or another nut-free spread, though the taste and texture may vary slightly.

Peanut Butter and Jelly Cookies
Ingredients
- ▢ 1 stick 113 grams of unsalted butter
- ▢ 1 cup 270 grams of creamy natural peanut butter*, thoroughly stirred to ensure even consistency
- ▢ 1 cup 200 grams of packed light brown sugar
- ▢ 3/4 cup 150 grams of granulated sugar
- ▢ 2 ¾ cups 349 grams of bleached all-purpose flour**
- ▢ 3/4 teaspoon of baking soda
- ▢ 1/2 teaspoon of baking powder
- ▢ 1/2 teaspoon of fine sea salt
- ▢ 2 large eggs brought to room temperature
- ▢ 1 tablespoon of milk
- ▢ 2 teaspoons of pure vanilla extract
- ▢ 3/4 cup 240 grams of chilled strawberry jam or jelly
- * Be sure to use a natural peanut butter that is well stirred with no oil separation, for the best texture.
- ** Using bleached all-purpose flour helps achieve a more tender cookie crumb.
Instructions
- Preheat the oven to 350°F and line large rimmed baking sheets with parchment paper. In a large microwave-safe bowl, melt the butter in 20-second intervals in the microwave. Once melted, add the peanut butter and stir until fully combined. Mix in the sugars and whisk until smooth. Set the mixture aside to cool until it’s just warm.
- In a medium bowl, whisk together the flour, baking soda, baking powder, and salt, then set aside.
- Add the eggs, milk, and vanilla to the butter mixture, whisking thoroughly until everything is well incorporated. Gradually add the dry ingredients and stir with a sturdy spatula until combined.
- Using a large spring-loaded cookie scoop, form dough into 3-tablespoon-sized rounds. Roll the dough between your palms to smooth the balls, then use your thumb to create a well in the center of each. Add about 1 heaping teaspoon of preserves into the well, partially sealing it with dough. Leave some of the jam peeking through and gently roll the dough back into a ball. This part can be a bit messy, but have fun with it! Place the dough balls on the prepared baking sheet, ensuring the jam side is facing up. Space the dough balls about 3 inches apart.
- Bake for about 14 minutes, or until the cookies are puffed up and lightly golden around the edges.
- Allow the cookies to cool on the baking sheet for 5 minutes before transferring them to a cooling rack to cool completely.
- Store the cookies in an airtight container for up to two days. They will become softer as they sit longer.