Introduction
Welcome to a decadent, deeply nostalgic, and unapologetically Southern take on a classic — Paula Deen’s “Not Yo’ Mama’s Banana Pudding”. This isn’t your grandmother’s light-and-airy, stovetop-custard version served in a glass dish at Sunday potlucks (though we love that one too). No, sir — this is Paula Deen at her most gloriously indulgent: rich, creamy, layered with buttery vanilla wafers, crowned with clouds of whipped cream, and finished with a caramelized torch-kissed meringue that crackles under your spoon. It’s a showstopper dessert that balances tradition with audacious flair — equal parts comfort food and culinary theater. Whether you’re hosting a holiday gathering, surprising guests after a soul-food dinner, or simply treating yourself to a moment of pure, buttery bliss, this pudding delivers on every promise: sweetness, texture, nostalgia, and just the right amount of Southern sass.
The History
Paula Deen didn’t invent banana pudding — that honor belongs to generations of Southern cooks who turned overripe bananas, pantry staples, and resourcefulness into something magical. But she *redefined* it for a new era. Emerging from her iconic Savannah restaurant, The Lady & Sons, in the late 1990s and gaining national fame through her Food Network shows and bestselling cookbooks (especially It Ain’t All About the Cookin’ and Paula Deen’s Southern Cooking Bible), “Not Yo’ Mama’s Banana Pudding” became an instant sensation — not just for its taste, but for its bold name and even bolder execution. The title itself is a playful, affectionate jab — a wink to the generational evolution of Southern desserts. Where “Mama’s” version might rely on boiled custard, boxed pudding mix, or a simple meringue broiled until golden, Paula’s iteration doubles down: using real egg yolks *and* whole eggs for custard depth, folding in real whipped cream *plus* stabilized meringue, layering wafers so generously they soften into cake-like ribbons, and finishing with a blowtorch-seared meringue that’s as dramatic as it is delicious. It reflects Paula’s philosophy: “Cook with love, serve with pride, and never apologize for extra butter.” Over the years, this recipe has inspired countless copycat versions, viral TikTok recreations, wedding dessert tables across the Southeast, and even competitive entries at state fairs — all testaments to its cultural staying power and joyful, unpretentious spirit.
Ingredients Breakdown
Every ingredient in Paula Deen’s “Not Yo’ Mama’s Banana Pudding” plays a precise, non-negotiable role — no shortcuts, no substitutions without consequence. Let’s break them down with chef-level insight:
- Whole Milk (4 cups): Not skim, not 2%. Full-fat milk provides the necessary fat content for a luscious, velvety custard base that coats the back of a spoon without splitting. Paula insists on pasteurized, homogenized whole milk — never ultra-pasteurized (UHT), as it can impart a slightly cooked flavor and reduce thickening power.
- Granulated Sugar (1¼ cups, divided): Used in three stages — 1 cup for the custard, 2 tablespoons for the meringue, and 2 tablespoons for the caramelized topping. The fine crystals dissolve cleanly and provide structural integrity to both custard and meringue.
- Cornstarch (⅓ cup): The secret weapon behind the pudding’s luxurious, spoon-standing thickness. Cornstarch creates a glossy, stable gel that holds up under layers of wafers and bananas without weeping. Paula warns against substituting flour (it turns cloudy and pasty) or arrowroot (it breaks down with acid from bananas).
- Salt (¼ teaspoon): A tiny but vital pinch that heightens sweetness, balances richness, and prevents the dessert from tasting cloying. Never omit — it’s the quiet conductor of the flavor orchestra.
- Egg Yolks (6 large, room temperature): The soul of the custard. Rich, fatty, and emulsifying, they deliver incomparable depth, silkiness, and golden hue. Using only yolks (not whole eggs) ensures no rubbery texture — though Paula *does* use whole eggs in the meringue for added stability.
- Vanilla Extract (2 teaspoons, pure): Not imitation. Real Madagascar bourbon vanilla adds floral warmth and complexity. For maximum impact, Paula recommends adding half at the end of cooking (to preserve volatile aromatics) and half when folding into whipped cream.
- Unsalted Butter (½ cup, cubed, cold): Swirled in off-heat to create a glossy, satiny finish and add mouth-coating richness. Cold butter melts slowly into the hot custard, creating a seamless emulsion. Salted butter is discouraged — salt levels are carefully calibrated elsewhere.
- Ripe Bananas (6–7 medium, sliced ¼-inch thick): Must be speckled — not green, not brown-mushy. The natural pectin and sugars in perfectly ripe bananas lend subtle tang and help stabilize the custard layers. Slicing them uniformly ensures even distribution and prevents soggy pockets.
- Nilla Wafers (2 (11.5 oz) boxes, ~90 wafers): Non-negotiable brand. Nabisco Nilla Wafers have the exact balance of vanilla, sweetness, and crisp-yet-sandy texture needed to soften *just enough* without disintegrating. Generic brands lack the proprietary leavening and shortening blend critical for proper layer integrity.
- Heavy Whipping Cream (1½ cups, cold): Used for the “cloud layer” — folded into the cooled custard for airy lightness *and* piped on top. Must be at least 36% fat and chilled thoroughly (bowl and beaters, too) for maximum volume and stability.
- Powdered Sugar (¼ cup, sifted): Added to whipped cream for sweetness and stabilization. The cornstarch in powdered sugar helps prevent weeping and gives the cream body that holds up under meringue and storage.
- Large Egg Whites (4, room temperature): The foundation of the signature torched meringue. Room temp whites whip faster and higher. Paula stresses *zero trace of yolk or grease* in the bowl — even a speck will inhibit volume.
- Cream of Tartar (½ teaspoon): The acid that stabilizes egg whites, encourages rapid whipping, and prevents collapse. A true Southern pantry essential — no substitute.
- Granulated Sugar (2 tbsp, for meringue): Added gradually during whipping to build structure and shine. Too much sugar makes meringue brittle; too little yields soft peaks that won’t hold torching.
- Optional Garnish: Caramel Drizzle & Toasted Walnuts: While not in the original, Paula often adds these at The Lady & Sons for elevated texture contrast — a house-made bourbon caramel and coarsely chopped walnuts toasted in brown butter.
Step-by-Step Recipe
This is not a rushed dessert — it’s a labor of love, best prepared with patience, presence, and maybe a glass of sweet tea nearby. Follow each step precisely for guaranteed success:
- Prep Your Station: Gather 3 large mixing bowls (one metal for whipping cream, one glass for meringue, one heatproof for custard), silicone spatula, fine-mesh strainer, whisk, heavy-bottomed saucepan (3-qt), electric hand mixer or stand mixer, 13×9-inch glass baking dish (not ceramic or metal), parchment paper, and a kitchen torch (or broiler as backup).
- Make the Custard Base: In a heavy-bottomed saucepan, whisk together 1 cup sugar, cornstarch, and salt. Gradually whisk in cold milk until smooth and lump-free. Place over medium heat. Cook, stirring constantly with a whisk in a figure-eight motion, until mixture begins to thicken and steam rises (~8–10 minutes). Do NOT let it boil yet.
- Temper the Egg Yolks: In a separate bowl, whisk egg yolks until pale and slightly frothy. Slowly ladle 1 cup of the hot milk mixture into yolks while whisking vigorously (this prevents scrambling). Once tempered, pour yolk mixture back into saucepan.
- Thicken to Perfection: Return to medium-low heat. Cook, whisking *without pause*, until mixture reaches a full, rolling boil and thickens dramatically — it should coat the back of a spoon thickly and hold a clear line when you run your finger through it (~3–4 minutes after returning to boil). Remove immediately from heat.
- Finish the Custard: Whisk in cold butter, one cube at a time, until fully melted and glossy. Stir in 1 teaspoon vanilla. Strain custard through a fine-mesh sieve into a clean bowl to remove any tiny lumps or cooked bits. Press plastic wrap directly onto surface to prevent skin formation. Refrigerate uncovered for 30 minutes — just until lukewarm (not cold), to avoid shocking the bananas later.
- Prepare Components: While custard chills: slice bananas and toss gently with 1 tsp lemon juice (optional, for color only); arrange Nilla wafers in a single layer covering the bottom of your 13×9 dish; whip 1½ cups cold heavy cream with sifted powdered sugar and remaining 1 tsp vanilla to stiff peaks. Fold ⅔ of whipped cream gently into lukewarm custard until uniform. Reserve remaining ⅓ for topping.
- First Layer: Spread half the custard-cream mixture evenly over the wafer base. Arrange half the banana slices in a tight, overlapping layer. Sprinkle with 2 tbsp granulated sugar (this aids caramelization later).
- Second Layer: Add remaining wafer layer — press gently to adhere. Spread remaining custard-cream mixture evenly. Top with remaining bananas. Sprinkle again with 2 tbsp sugar.
- Chill & Set: Refrigerate uncovered for 1 hour — this allows wafers to soften and layers to meld, but keeps bananas fresh and custard pliable for meringue.
- Make the Meringue: In a spotless, grease-free glass or metal bowl, combine egg whites and cream of tartar. Beat on medium speed until foamy. Gradually add 2 tbsp sugar, 1 tsp at a time, beating on high until stiff, glossy peaks form (about 5–7 minutes). Do NOT overbeat — meringue should hold its shape but remain moist-shiny, not dry or grainy.
- Apply & Torch: Spoon meringue over chilled pudding. Using an offset spatula, swirl generously to cover every inch — build peaks and valleys for dramatic torching. Use a kitchen torch on medium flame, moving steadily 4–6 inches above surface, until peaks are deep golden brown and delicately blistered (approx. 2–3 minutes total). If using broiler: place rack 6 inches below element, broil 1–2 minutes watching *constantly* — it goes from perfect to burnt in seconds.
- Final Chill & Serve: Refrigerate *uncovered* for at least 30 minutes before serving — this sets the meringue and chills the entire dessert to ideal temperature. Serve with a sharp knife and a sense of occasion.
Tips
Paula Deen’s team at The Lady & Sons shares these hard-won, tested-in-the-trenches tips — the difference between good and legendary:
- Room Temp Eggs, Cold Cream: Egg whites whip highest at room temperature, but heavy cream whips best ice-cold. Prep accordingly — pull eggs out 30 min ahead; chill bowl/beaters/cream 15 min prior.
- Whisk Like Your Reputation Depends On It: During custard cooking, constant, vigorous whisking prevents scorching on the bottom and ensures even thickening. Pause = lumps + burnt spots.
- Strain Without Skipping: Even if your custard looks perfect, straining removes microscopic starch clumps and ensures velvet-smooth texture. It takes 30 seconds — worth every millisecond.
- Don’t Rush the Chill: Putting hot custard directly on bananas = mush. Lukewarm is key. Likewise, don’t skip the 1-hour set before meringue — warm pudding melts meringue; cold pudding makes it slide off.
- Torch Technique Matters: Hold torch at a 45-degree angle, move continuously in small circles. Focus on peaks first, then fill valleys. Burnt sugar tastes bitter — aim for amber, not black.
- Wafers First, Always: Always lay wafers *before* any custard. They act as a moisture barrier, preventing sogginess at the bottom. Press gently — don’t crush.
- Banana Timing is Everything: Slice bananas no more than 15 minutes before layering. Toss with a whisper of lemon juice *only* if making ahead — too much acid can thin the custard.
- Reserve Whipped Cream: That final ⅓ of whipped cream isn’t optional garnish — it’s structural insurance. It adds lift to the meringue layer and prevents it from “sweating” during chilling.
- Serve Immediately After Torching: For peak drama and texture, serve within 2 hours. The meringue stays crisp longest when chilled *after* torching, not before.
- Clean Bowl = Happy Meringue: Wash your meringue bowl with vinegar or lemon juice, then rinse with hot water and dry *thoroughly*. Any oil residue = flat meringue.
Variations and Customizations
While Paula’s original is sacred, her philosophy embraces joyful adaptation — “Cook it how *your* family loves it.” Here are beloved, tested variations — all approved by Southern dessert purists:
- Boozy Banana: Add 2 tbsp dark rum, bourbon, or banana liqueur to the lukewarm custard before folding in whipped cream. Enhances depth without overpowering — especially divine with toasted pecans.
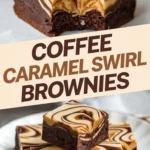
- Chocolate Swirl: Melt 4 oz semi-sweet chocolate with 1 tbsp butter. Cool slightly, then drizzle in ribbons over each custard layer before adding bananas. Creates stunning marbled effect and rich contrast.
- Coconut Dream: Replace 1 cup milk with full-fat coconut milk; fold in ½ cup toasted coconut with the whipped cream; top with extra toasted coconut before torching.
- Maple-Brown Butter: Brown ½ cup butter until nutty and golden, cool slightly, then whisk into custard instead of regular butter. Add 2 tbsp pure maple syrup with the vanilla.
- Gluten-Free Glory: Use certified GF vanilla wafers (like Kinnikinnick or Glutino) and ensure cornstarch is GF-certified. Texture remains remarkably close — just verify labels meticulously.
- Vegan Victory (Deen-Inspired Spirit): Use coconut milk + oat milk blend, cornstarch, turmeric (for color), flax “eggs” for custard, aquafaba for meringue, and vegan butter. Requires recipe overhaul but honors the spirit — rich, layered, celebratory.
- Mini Mason Jar Magic: Portion into 8-oz wide-mouth mason jars: wafer base → custard → banana → wafer → custard → banana → meringue → torch. Perfect for parties, gifts, or portion control (sort of).
- “Savannah Sunrise” Fruit Twist: Layer alternating slices of banana and fresh Georgia peaches or strawberries — adds bright acidity and seasonal charm.
- Smoked Meringue (Advanced): Torch meringue *over* a smoking box with applewood chips for a subtle, sophisticated campfire note — a favorite at The Lady & Sons’ summer brunches.
Health Considerations and Nutritional Value
Let’s be candid, in true Paula fashion: “Not Yo’ Mama’s Banana Pudding” is a celebration dessert — not a health food. But understanding its nutritional profile empowers mindful enjoyment. Based on a standard 13×9 recipe yielding 16 generous servings:
- Calories: ~420–460 per serving (varies with banana ripeness, cream fat %, and meringue thickness)
- Total Fat: ~22–25g (14–16g saturated fat from butter, cream, and egg yolks)
- Carbohydrates: ~52–58g (44–48g sugars — naturally occurring from bananas + added from sugar, wafers, and meringue)
- Protein: ~5–7g (from eggs, milk, and minimal whey in wafers)
- Fiber: ~1.5–2g (primarily from bananas — modest but beneficial)
- Sodium: ~180–220mg (moderate, mostly from butter and wafers)
- Vitamins & Minerals: Good source of Vitamin B12 (eggs/milk), Calcium (milk), Potassium (bananas), and Vitamin A (cream/butter). Bananas also contribute magnesium and vitamin C.
Considerations: High in added sugars and saturated fat — enjoy occasionally as part of a balanced diet. Those managing diabetes should monitor portions closely and consider pairing with a protein-rich main course to blunt glycemic response. For reduced sugar, cut granulated sugar by ¼ cup (custard only) and rely on ripe bananas’ sweetness — but know this affects texture and shelf life. Reduced-fat dairy is strongly discouraged — it causes watery, unstable custard and flat meringue. Paula’s view? “Life’s too short for low-fat pudding. Savor it, share it, and walk extra steps tomorrow!”
Ingredients
Makes 16 servings
- 4 cups whole milk (not ultra-pasteurized)
- 1¼ cups granulated sugar, divided
- ⅓ cup cornstarch
- ¼ teaspoon fine sea salt
- 6 large egg yolks, room temperature
- 2 teaspoons pure vanilla extract, divided
- ½ cup unsalted butter, cubed and cold
- 6–7 medium ripe bananas, peeled and sliced ¼-inch thick
- 2 (11.5 oz) boxes Nabisco Nilla Wafers (~90 wafers)
- 1½ cups heavy whipping cream, very cold
- ¼ cup powdered sugar, sifted
- 4 large egg whites, room temperature
- ½ teaspoon cream of tartar
Directions
- In a heavy-bottomed 3-quart saucepan, whisk together 1 cup sugar, cornstarch, and salt. Gradually whisk in cold milk until completely smooth and free of lumps.
- Place over medium heat. Cook, whisking constantly in a figure-eight motion, until mixture steams and begins to thicken slightly, about 8–10 minutes. Do not boil.
- In a separate bowl, whisk egg yolks until pale and frothy. Slowly whisk in 1 cup of the hot milk mixture. Then, whisk yolk mixture back into saucepan.
- Return to medium-low heat. Cook, whisking constantly and vigorously, until mixture reaches a full, rolling boil and thickens to coat the back of a spoon thickly (about 3–4 minutes after boiling). Remove from heat immediately.
- Whisk in cold butter, one cube at a time, until fully incorporated and glossy. Stir in 1 teaspoon vanilla. Strain through a fine-mesh sieve into a clean bowl. Press plastic wrap directly onto surface. Refrigerate uncovered for 30 minutes, until lukewarm (not cold).
- Meanwhile, slice bananas and set aside. Line bottom of a 13×9-inch glass baking dish with a single layer of Nilla Wafers, slightly overlapping.
- In a chilled metal bowl, whip heavy cream, powdered sugar, and remaining 1 teaspoon vanilla to stiff peaks. Gently fold ⅔ of whipped cream into lukewarm custard until fully combined. Reserve remaining ⅓ for topping.
- Spread half the custard-cream mixture over wafer layer. Arrange half the banana slices in an even layer. Sprinkle with 2 tablespoons granulated sugar.
- Add second layer of Nilla Wafers, pressing gently. Spread remaining custard-cream mixture evenly. Top with remaining bananas. Sprinkle again with 2 tablespoons granulated sugar.
- Refrigerate uncovered for 1 hour to allow layers to set and wafers to soften.
- Preheat oven broiler if not using torch. In a spotless, grease-free glass or metal bowl, beat egg whites and cream of tartar on medium speed until foamy. Gradually add remaining 2 tablespoons sugar, 1 teaspoon at a time, beating on high until stiff, glossy peaks form (5–7 minutes).
- Spoon meringue over chilled pudding, covering completely. Use an offset spatula to create dramatic peaks and swirls.
- Using a kitchen torch, carefully torch meringue until peaks are deep golden brown and delicately blistered (2–3 minutes). If broiling: place dish on top rack, 6 inches below element, and broil 60–90 seconds, watching constantly.
- Refrigerate uncovered for at least 30 minutes before serving. Cut with a sharp knife and serve immediately for optimal texture and presentation.
FAQ
- Can I make this ahead of time?
- Absolutely — and it’s recommended! Assemble the pudding (through banana layer) up to 1 day ahead. Cover tightly and refrigerate. Add meringue and torch no more than 2 hours before serving for best texture. Do NOT torch and refrigerate overnight — meringue weeps and loses crispness.
- Why does my custard have lumps?
- Lumps usually mean either: (1) Cornstarch wasn’t fully dissolved before heating (whisk longer!), (2) Heat was too high causing premature starch gelation, or (3) You stopped whisking. Always strain — it’s your safety net.
- Can I use a different cookie?
- You *can*, but you won’t get “Not Yo’ Mama’s.” Vanilla wafers have specific starch, fat, and leavening ratios. Grahams make it too dense; shortbread too rich; Oreos too dominant. If essential, try GF Nilla-style wafers — but expect subtle textural shifts.
- My meringue collapsed! What went wrong?
- Top culprits: traces of grease/yolk in bowl, overbeating (until dry/grainy), or adding sugar too fast. Also, humidity sabotages meringue — make it same-day, and torch immediately after piping.
- Can I freeze banana pudding?
- Not recommended. Bananas turn brown and mushy; custard separates; meringue becomes rubbery. The magic is in the fresh layers and texture contrast.
- What’s the best way to store leftovers?
- Loosely cover with plastic wrap (don’t press on meringue) and refrigerate up to 2 days. The meringue softens but remains delicious — think “banana pudding crème brûlée.” Stir gently before serving if layers separate.
- Is there a lower-sugar version?
- You can reduce sugar in the custard by ¼ cup, but do not reduce meringue sugar — it’s structural. Ripe bananas help, but significant reduction impacts thickness, stability, and shelf life. Consider smaller portions instead.
- Can I use instant pudding mix?
- Paula would gently say, “Honey, this is *Not Yo’ Mama’s* for a reason.” Instant mix lacks the depth, richness, and textural integrity of cooked custard. It’s a different (and quicker!) dessert entirely — but not *this* one.
- Why do I need cream of tartar?
- It’s the meringue’s secret weapon — lowering pH to strengthen egg white proteins, allowing faster whipping, greater volume, and resistance to weeping or collapse. Skip it, and your meringue may be fragile and dull.
- Can I skip the torch and just broil?
- Yes — but broiling is less precise. Use the lowest broiler setting, watch like a hawk, and rotate the dish for even browning. Torch gives superior control and that coveted crackly top.
Summary
Paula Deen’s “Not Yo’ Mama’s Banana Pudding” is a masterclass in Southern decadence — a luxuriously thick, vanilla-kissed custard layered with buttery Nilla wafers and ripe bananas, crowned with ethereal whipped cream and a dramatic, torch-kissed meringue that shatters with every spoonful.
It’s more than dessert — it’s heritage reimagined with confidence, technique honed over decades at The Lady & Sons, and a joyful reminder that the best traditions aren’t preserved in amber, but boldly, lovingly, and deliciously remade.