Introduction
Looking for a show-stopping dessert that perfectly captures the spirit of Halloween? These Oreo Layered Halloween Brownies are the ultimate treat for spooky season—rich, fudgy brownies layered with creamy Oreo filling and topped with crushed cookies for a ghoulishly good look. Whether you’re hosting a Halloween party, preparing treats for trick-or-treaters, or simply indulging in seasonal sweets, this decadent dessert combines classic chocolate flavor with the nostalgic crunch of Oreos in every bite. Visually striking and irresistibly delicious, these layered brownies are as fun to make as they are to eat.
The History
Brownies have been a beloved American dessert since their accidental creation in the late 19th century, reportedly first baked at the Palmer House Hotel in Chicago for the 1893 World’s Columbian Exposition. Over time, bakers have experimented with countless variations, adding nuts, caramel, fruit, and even candy bars. The Oreo cookie, introduced by Nabisco in 1912, quickly became one of America’s favorite snacks. Its iconic black-and-white design and creamy center made it a natural pairing for desserts. In the 1990s and 2000s, Oreo-based recipes exploded in popularity—from milkshakes to cheesecakes. Combining Oreos with brownies is a modern twist that gained traction through social media, baking blogs, and holiday-themed recipe collections. The idea of layering Oreo elements into brownies evolved into a festive staple, especially around Halloween when creativity in the kitchen knows no bounds. Today, Oreo Layered Halloween Brownies represent the perfect fusion of nostalgia, innovation, and seasonal celebration.
Ingredients Breakdown
The magic of these Oreo Layered Halloween Brownies lies in the careful balance of ingredients that create layers of texture and flavor. Let’s break down what goes into this haunted masterpiece:
- Granulated Sugar: Provides sweetness and helps create a crisp top on the brownies.
- Butter (Unsalted): Adds richness and moisture; using unsalted allows control over salt content.
- Semi-Sweet Chocolate Chips: Melted into the batter for deep chocolate flavor without overpowering bitterness.
- Eggs: Bind the ingredients together and contribute to the fudgy texture.
- Vanilla Extract: Enhances the overall flavor profile with a warm, aromatic note.
- All-Purpose Flour: Gives structure while keeping the brownies tender.
- Cocoa Powder (Dutch-processed preferred): Boosts chocolate intensity and contributes to a dark, luxurious color—perfect for Halloween.
- Salt: Balances sweetness and enhances all other flavors.
- Baking Powder (optional, small amount): For slight lift while maintaining density.
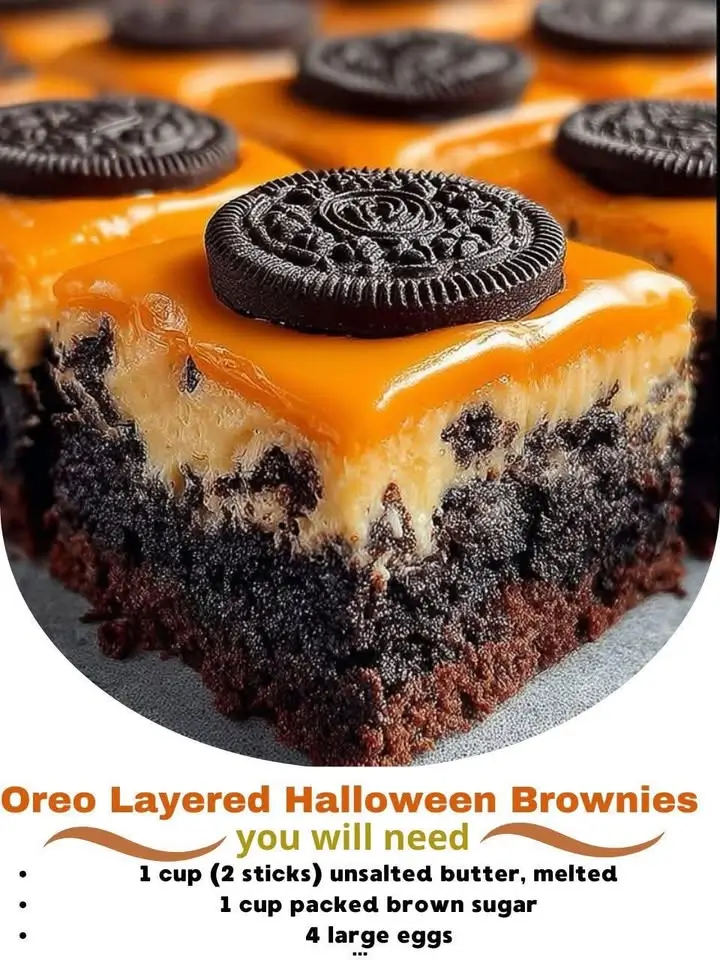
- Oreo Cookies (Classic): Used both whole and crushed—creates the signature layer and adds crunch.
- Cream Cheese or White Chocolate (for filling variation): Optional creamy middle layer for extra decadence.
- Vegetable Oil (small amount): Keeps brownies moist during baking.
- Heavy Cream (if making ganache topping): For glossy chocolate drizzle.
For decoration: additional crushed Oreos, orange and black sprinkles, edible googly eyes, or Halloween-themed candies like gummy worms or candy corn can be added for maximum spook factor.
Step-by-Step Recipe
- Preheat Oven & Prepare Pan: Preheat your oven to 350°F (175°C). Line a 9×13-inch baking pan with parchment paper, leaving an overhang on two sides for easy removal. Lightly grease any exposed sides.
- Melt Butter & Chocolate: In a medium saucepan over low heat, melt 1 cup (2 sticks) of unsalted butter with 1 cup of semi-sweet chocolate chips, stirring frequently until smooth. Remove from heat and let cool slightly.
- Mix Wet Ingredients: In a large mixing bowl, whisk together 1 ½ cups granulated sugar and the melted chocolate mixture. Add 4 large eggs, one at a time, whisking well after each addition. Stir in 1 tablespoon vanilla extract.
- Add Dry Ingredients: Sift in ¾ cup all-purpose flour, ½ cup cocoa powder, ¼ teaspoon salt, and a pinch of baking powder. Gently fold with a spatula until just combined—do not overmix.
- First Brownie Layer: Pour half of the brownie batter into the prepared pan and spread evenly with a spatula.
- Create Oreo Layer: Take 16–20 regular Oreo cookies and remove the cream filling. Crush the chocolate wafers (you can use a food processor or place them in a zip-top bag and roll with a rolling pin). Sprinkle the crushed wafers evenly over the first brownie layer.
- Add Creamy Middle (Optional): In a separate bowl, beat 4 oz softened cream cheese with ¼ cup powdered sugar and ½ teaspoon vanilla until smooth. Alternatively, melt ½ cup white chocolate with 2 tablespoons heavy cream for a sweet contrast. Carefully dollop and spread this layer over the Oreos.
- Top with Remaining Batter: Carefully pour the remaining brownie batter over the middle layer. Use a spatula to gently spread it into an even layer, sealing the edges.
- Decorative Touches: Press whole Oreos or halved ones into the surface in a pattern. Sprinkle generously with more crushed Oreos mixed with black and orange sprinkles for a festive Halloween effect.
- Bake: Bake for 30–35 minutes, or until a toothpick inserted into the center comes out with moist crumbs (not wet batter). Avoid overbaking to keep brownies fudgy.
- Cool Completely: Allow brownies to cool in the pan on a wire rack for at least 2 hours. For clean cuts, refrigerate for 1 hour before slicing.
- Garnish (Optional): Drizzle with chocolate ganache (melt ½ cup chocolate chips with ¼ cup heavy cream), add candy spiders, or attach edible eyes for a creepy-cute finish.
Tips
- Use Room Temperature Eggs: They incorporate better into the batter, resulting in a smoother texture.
- Don’t Overmix: Once flour is added, mix only until combined to avoid developing gluten, which can make brownies cakey.
- Cool Chocolate Before Adding Eggs: If the chocolate-butter mix is too hot, it can cook the eggs and cause curdling.
- Parchment Paper is Key: Ensures easy lifting and clean slicing without sticking.
- Cut with a Hot Knife: Dip a sharp knife in hot water and wipe dry between cuts for neat, professional-looking squares.
- Chill Before Cutting: Refrigerating the cooled brownies firms up the layers, especially if you’ve added a cream cheese or white chocolate layer.
- Double the Recipe for a Crowd: These disappear fast! Use a 12×18-inch sheet pan and double all ingredients (adjust baking time to 35–40 minutes).
- Storage Tip: Keep in an airtight container at room temperature for up to 3 days, or refrigerate for up to 1 week.
Variations and Customizations
These Oreo Layered Halloween Brownies are incredibly versatile. Here are some creative ways to customize them for different tastes and occasions:
- Spooky Spider Brownies: After cooling, pipe white icing legs from mini chocolate candies to resemble spiders.
- Pumpkin Spice Version: Add 1 tsp pumpkin spice and ¼ cup canned pumpkin puree to the batter for a fall twist.
- Peppermint Oreo: Substitute regular Oreos with Peppermint Oreos and add crushed candy canes on top—great for holiday parties beyond Halloween.
- Double Stuffed Oreos: Use Double Stuffed Oreos for an even creamier texture in the layers.
- Gluten-Free Option: Use gluten-free all-purpose flour and gluten-free chocolate sandwich cookies (available in many stores).
- Vegan Version: Replace butter with vegan margarine, eggs with flax eggs (1 tbsp ground flax + 3 tbsp water per egg), and use dairy-free chocolate chips.
- Red Velvet Twist: Replace cocoa powder with red velvet cake mix and use red velvet Oreos for a vibrant, eerie look.
- Cookie Butter Layer: Swirl in Biscoff or cookie butter between layers for a nutty, spiced flavor.
- Boozy Brownies: Add 1–2 tablespoons of Baileys, Kahlua, or orange liqueur to the batter for an adult-only treat.
- Monster Mash Topper: Decorate with gummy worms, sour belts as “bandages,” or marshmallow ghosts.
Health Considerations and Nutritional Value
While undeniably indulgent, it’s important to enjoy these Oreo Layered Halloween Brownies in moderation. Here’s a general nutritional breakdown per serving (based on 12 servings):
- Calories: ~380–420 kcal
- Total Fat: 22–26g (Saturated Fat: 10–13g)
- Carbohydrates: 48–52g (Sugars: 30–34g)
- Protein: 3–4g
- Fiber: 2–3g
- Sodium: 200–250mg
Considerations:
- High Sugar Content: Due to both the brownie base and Oreos, these are high in added sugars. Diabetics or those managing blood sugar should consume sparingly.
- Saturated Fat: Butter, chocolate, and cream fillings contribute to saturated fat levels. Opt for lower-fat substitutes where possible, though this may affect texture.
- Allergens: Contains wheat, dairy, eggs, and soy (in most chocolate and Oreos). Always check labels if serving individuals with allergies.
- Portion Control: Cut into smaller squares (e.g., 2-inch pieces) to satisfy cravings without overindulging.
- Balanced Pairing: Serve with fresh fruit, a side of Greek yogurt, or a green salad if part of a larger meal to offset richness.
Ingredients
- 1 cup (2 sticks) unsalted butter
- 1 cup semi-sweet chocolate chips
- 1 ½ cups granulated sugar
- 4 large eggs
- 1 tablespoon pure vanilla extract
- ¾ cup all-purpose flour
- ½ cup cocoa powder (preferably Dutch-process)
- ¼ teaspoon salt
- Pinch of baking powder (optional)
- 2 tablespoons vegetable oil (for ultra-moist texture)
- 16–20 regular Oreo cookies, separated (filling removed and reserved if desired)
- Optional: 4 oz cream cheese + ¼ cup powdered sugar (for filling)
- Optional: ½ cup white chocolate chips + 2 tbsp heavy cream (alternative filling)
- Additional crushed Oreos and Halloween sprinkles for topping
- Chocolate ganache (½ cup chocolate chips + ¼ cup heavy cream) for drizzling
Directions
- Preheat oven to 350°F (175°C). Grease and line a 9×13-inch baking pan with parchment paper.
- Melt butter and chocolate chips in a saucepan over low heat. Stir until smooth, then remove from heat and cool for 5 minutes.
- In a large bowl, combine sugar and chocolate mixture. Whisk in eggs one at a time, then add vanilla.
- Sift in flour, cocoa powder, salt, and baking powder. Fold gently until just combined. Stir in vegetable oil.
- Pour half the batter into the pan and spread evenly.
- Sprinkle crushed Oreo wafers over the batter.
- If using, prepare cream cheese or white chocolate filling and spread carefully over the Oreos.
- Pour remaining batter on top and smooth with a spatula.
- Decorate surface with whole or halved Oreos and a generous sprinkle of crushed cookies and colored sprinkles.
- Bake for 30–35 minutes until top is cracked and center is set but still slightly soft.
- Cool completely in pan on a wire rack. Chill for 1 hour for cleaner slices.
- Lift out using parchment overhang, slice, and optionally drizzle with ganache or decorate further.
- Serve at room temperature or slightly warmed for gooey perfection.
FAQ
Can I make these brownies ahead of time?
Yes! Bake and cool completely, then store covered at room temperature for up to 2 days or refrigerate for up to 1 week. Bring to room temperature before serving.
Can I freeze Oreo Layered Halloween Brownies?
Absolutely. Wrap individual pieces or the entire slab in plastic wrap and foil, then freeze for up to 3 months. Thaw in the refrigerator overnight.
Why are my brownies too cakey?
This usually happens from overmixing the batter or adding too much flour. Stick to gentle folding and measure flour accurately (spoon and level, don’t scoop).
Can I use a boxed brownie mix?
Yes, for a shortcut. Prepare one box of fudge brownie mix according to package instructions, then layer with crushed Oreos and optional filling as described.
How do I make them extra fudgy?
Add ½ cup sour cream or replace one egg with an extra yolk. You can also reduce flour by 1–2 tablespoons.
Are there nut-free options?
Yes—Oreos are naturally nut-free (though manufactured in facilities with peanuts), and this recipe contains no nuts. Always verify labels if allergies are a concern.
Can I use other cookies instead of Oreos?
Sure! Try chocolate Teddy Grahams, Milano cookies, or generic sandwich cookies. Just ensure they complement the chocolate flavor.
What size pan should I use?
A 9×13-inch pan gives the ideal thickness. For thicker brownies, use an 8×8-inch pan and increase baking time by 5–10 minutes.
Summary
These Oreo Layered Halloween Brownies are a decadent, eye-catching dessert that blends rich chocolate brownies with crunchy Oreo layers and festive decorations—perfect for haunting your holiday table. Easy to customize and impossible to resist, they’re the ultimate treat to scream “trick or treat” with every bite.