Oreo Ice Cream Cake Delight: A Decadent Dessert for Every Occasion
The Oreo Ice Cream Cake Delight is more than just a dessert—it’s an experience. With its rich layers of creamy ice cream, crunchy chocolate cookie crust, and generous swirls of crushed Oreos, this frozen treat has captured the hearts (and taste buds) of dessert lovers across the globe. Whether you’re celebrating a birthday, hosting a summer barbecue, or simply craving something indulgent, this no-bake masterpiece delivers cool, creamy satisfaction in every bite. Simple to make and always impressive, the Oreo Ice Cream Cake Delight combines convenience with gourmet flair, making it a favorite in homes, bakeries, and restaurants alike.
The History of Oreo Ice Cream Cake Delight
The origins of the Oreo Ice Cream Cake Delight can be traced back to the mid-20th century, when home cooks began experimenting with no-bake desserts using readily available ingredients like cookies, whipped toppings, and ice cream. The iconic Oreo cookie, first introduced by Nabisco in 1912, quickly became a staple in American pantries. By the 1970s and 80s, as frozen treats gained popularity, creative bakers started layering softened vanilla ice cream with crushed Oreos and using Oreo crumbs as a base for easy-to-assemble cakes.
These early versions were often made in pie tins or springform pans and required minimal effort—just mix, press, freeze, and serve. Over time, the recipe evolved into what we now know as the Oreo Ice Cream Cake Delight, gaining widespread recognition through community cookbooks, television cooking segments, and later, social media platforms. Today, countless variations exist—from gourmet restaurant renditions to viral TikTok recipes—but the core concept remains unchanged: a harmonious blend of cold, creamy texture and sweet, chocolatey crunch that pays homage to one of America’s most beloved cookies.
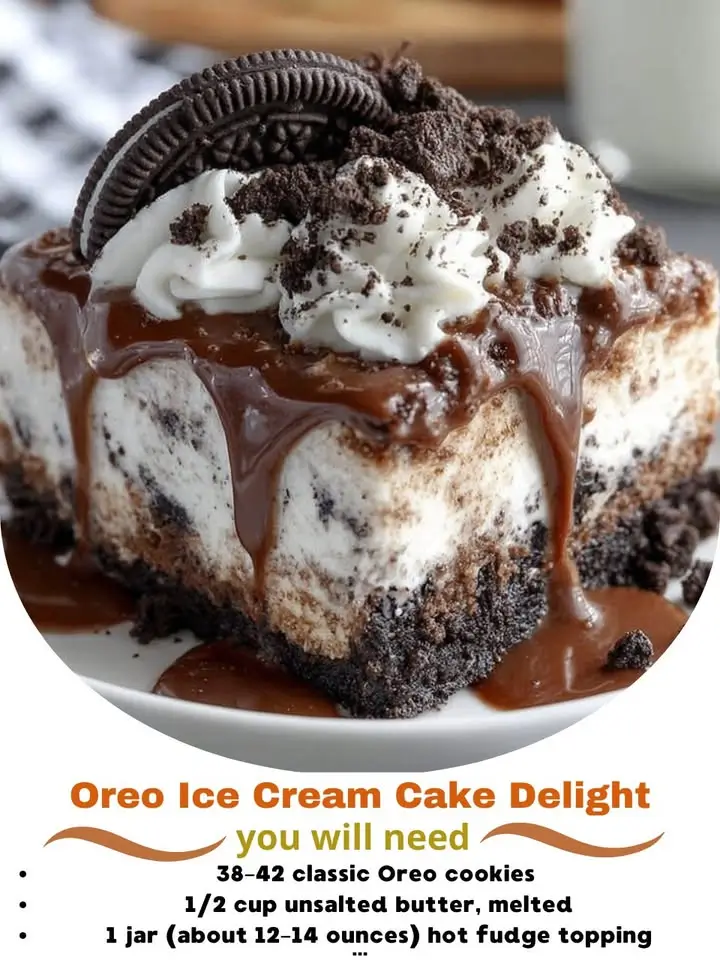
Ingredients Breakdown
To create the perfect Oreo Ice Cream Cake Delight, each ingredient plays a vital role in building flavor, texture, and structure. Here’s a detailed look at what goes into this luscious dessert:
- Oreo Cookies (48–50 cookies): These are the star of the show. Used both whole and crushed, they provide a crisp chocolate base and delightful chunks throughout the ice cream layers. While classic Oreos work best, any variation (Double Stuf, Golden, Mint, etc.) can be used for customization.
- Vanilla Ice Cream (3 pints / ~48 oz): High-quality premium vanilla ice cream ensures a rich, creamy texture. It should be slightly softened before mixing to allow for easy folding and layering.
- Heavy Whipping Cream (1 ½ cups): This adds extra richness and helps stabilize the ice cream layers, preventing them from becoming too icy during freezing.
- Confectioners’ Sugar (½ cup): Adds sweetness and helps the whipped cream hold its shape when combined.
- Vanilla Extract (1 teaspoon): Enhances the overall flavor profile, deepening the vanilla notes in the ice cream.
- Optional Add-ins: Chocolate syrup, caramel drizzle, peanut butter, or even sprinkles can elevate your cake with personalized flair.
Using real ingredients without artificial fillers ensures the best possible taste and mouthfeel. For dietary preferences, substitutions such as dairy-free ice cream, gluten-free Oreos, or low-sugar alternatives can be incorporated successfully.
Step-by-Step Recipe
- Prepare Your Pan: Begin by selecting a 9-inch springform pan or a deep cake pan. Lightly grease the sides with non-stick spray or line it with parchment paper for easy removal after freezing.
- Make the Crust: Crush about 24 Oreo cookies (including the filling) in a food processor or place them in a sealed plastic bag and roll with a rolling pin until fine crumbs form. Mix the crumbs with 4 tablespoons of melted unsalted butter to help bind the crust. Press this mixture firmly into the bottom of the pan, using the back of a spoon or a flat-bottomed glass to create an even, compact layer. Freeze for 15 minutes to set.
- Whip the Cream Layer: In a large mixing bowl, combine the heavy whipping cream, confectioners’ sugar, and vanilla extract. Using a hand mixer or stand mixer, whip on high speed until stiff peaks form—this will take about 5–7 minutes. Set aside.
- Soften the Ice Cream: Remove the vanilla ice cream from the freezer and let it sit at room temperature for 15–20 minutes until soft but not melted. Stir occasionally to ensure uniform consistency.
- Fold in Crushed Oreos: Gently crush another 24 Oreo cookies, leaving some pieces chunky for texture. Fold half of these into the softened ice cream until evenly distributed.
- Add Whipped Cream to Ice Cream: Take about one-third of the whipped cream and fold it into the Oreo-ice cream mixture to lighten it. Then gently fold in the remaining whipped cream until fully incorporated and fluffy.
- Layer the Cake: Remove the crust from the freezer. Pour half of the ice cream mixture over the crust and spread it evenly. Sprinkle a handful of remaining crushed Oreos on top. Add the second half of the ice cream mixture and smooth the surface with a spatula.
- Chill Thoroughly: Cover the pan tightly with plastic wrap and freeze for at least 6 hours, preferably overnight, to allow the cake to firm up completely.
- Final Decorations: Before serving, remove the cake from the freezer and let it sit for 5–10 minutes for easier slicing. Carefully run a warm knife around the edges if using a springform pan, then release the clasp. Decorate the top with whole Oreos, chocolate drizzle, whipped cream rosettes, or additional cookie crumbs.
Tips for Perfect Results
- Don’t Rush Softening the Ice Cream: Letting it come to room temperature slowly prevents melting and maintains a smooth texture. If it becomes too runny, chill it briefly in the refrigerator.
- Use Full-Fat Ingredients: Low-fat ice creams or substitutes may result in a grainy or icy texture. Stick to premium brands for the creamiest outcome.
- Freeze Layers Gradually (Optional): For distinct layers, freeze each section for 1 hour before adding the next. This creates beautiful strata when sliced.
- Smooth Top Surface: After pouring the final layer, use an offset spatula dipped in warm water to achieve a clean, professional finish.
- Easy Slicing: Dip a sharp knife in hot water and wipe dry before each cut for clean slices without cracking the cake.
- Avoid Frosting Sweat: Do not cover the cake with plastic wrap directly touching the surface—use toothpicks to tent the wrap above the cake to prevent condensation.
Variations and Customizations
The beauty of the Oreo Ice Cream Cake Delight lies in its versatility. Once you’ve mastered the classic version, feel free to experiment with exciting twists:
- Flavor Twists: Swap vanilla ice cream for mint chocolate chip, cookies and cream, chocolate, or even coffee-flavored ice cream for a unique twist.
- Different Cookie Bases: Try using chocolate graham crackers, Nutter Butters, or chocolate wafers instead of Oreos for the crust.
- Swirled Sauces: Add ribbons of hot fudge, caramel, raspberry sauce, or peanut butter between layers for added decadence.
- Themed Cakes
: Make holiday editions with red-and-green sprinkles for Christmas, pastel colors for Easter, or spooky decorations for Halloween.
- Mini Versions: Use muffin tins or mason jars to create individual portions—perfect for parties or gifts.
- Alcohol-Infused Version: For adult gatherings, add a splash of Kahlua, Baileys, or amaretto to the ice cream mixture.
- Gluten-Free & Vegan Options: Use certified gluten-free Oreos and dairy-free ice cream made from coconut or almond milk. Substitute butter with vegan margarine for a fully plant-based dessert.
Health Considerations and Nutritional Value
While undeniably delicious, the Oreo Ice Cream Cake Delight is a high-calorie, sugar-dense dessert best enjoyed in moderation. A typical slice (1/10th of the cake) contains approximately:
- Calories: 380–450
- Total Fat: 20–25g (with 12g saturated fat)
- Carbohydrates: 45–55g (including 30g of sugar)
- Protein: 4–6g
- Sodium: 200–300mg
Due to its high sugar and fat content, individuals managing diabetes, heart conditions, or weight should consume this dessert sparingly. However, healthier modifications can reduce the impact:
- Use light ice cream or low-sugar frozen yogurt.
- Opt for reduced-fat Oreos or homemade chocolate sandwich cookies with less sugar.
- Replace confectioners’ sugar with a natural alternative like erythritol or monk fruit sweetener.
- Reduce portion sizes and serve with fresh berries to balance sweetness.
Despite its indulgence, this dessert brings joy and comfort—important elements of emotional well-being. Enjoying it occasionally as part of a balanced diet is perfectly acceptable and even encouraged for special moments.
Ingredients
- 48–50 Oreo cookies, divided
- 4 tablespoons unsalted butter, melted (optional, for crust binding)
- 3 pints (48 oz total) premium vanilla ice cream
- 1 ½ cups heavy whipping cream
- ½ cup confectioners’ sugar
- 1 teaspoon pure vanilla extract
- Chocolate syrup or caramel (optional, for drizzling)
- Whipped cream (optional, for topping)
Directions
- Prepare a 9-inch springform pan by greasing the sides or lining with parchment paper.
- Crumble 24 Oreo cookies into fine crumbs. Mix with melted butter and press firmly into the bottom of the pan to form the crust. Freeze for 15 minutes.
- In a large bowl, whip heavy cream, confectioners’ sugar, and vanilla extract until stiff peaks form. Set aside.
- Allow ice cream to soften at room temperature for 15–20 minutes. Stir until smooth.
- Crumble 24 additional Oreos (leave some chunky). Fold half into the softened ice cream.
- Gently fold one-third of the whipped cream into the ice cream to lighten, then fold in the rest until fully combined and airy.
- Pour half the mixture over the chilled crust. Sprinkle with some crushed Oreos. Add the remaining ice cream mixture and smooth the top.
- Cover with plastic wrap (using toothpicks to keep it from touching the surface) and freeze for at least 6 hours or overnight.
- Before serving, let the cake sit at room temperature for 5–10 minutes. Release the springform pan and decorate as desired.
- Slice with a warm knife and serve immediately. Store leftovers covered in the freezer for up to 2 weeks.
FAQ
Can I make this cake ahead of time?
Yes! This cake actually improves with time. Make it 1–3 days in advance and store it covered in the freezer.
How do I prevent ice crystals?
Ensure the ice cream is only softened, not melted, and minimize air exposure by sealing tightly with plastic wrap.
Can I use store-bought whipped cream?
You can, but it may deflate faster and lack stability. Homemade whipped cream gives better texture and longevity.
What if I don’t have a springform pan?
Use a regular cake pan lined with parchment paper overhanging the sides to lift the cake out easily.
Is this recipe suitable for kids?
Absolutely! Children love the fun, playful nature of this dessert. Just supervise portion sizes due to sugar content.
Can I add mix-ins like nuts or candy?
Of course! Chopped peanuts, M&M’s, brownie bits, or marshmallows all make excellent additions.
Summary
The Oreo Ice Cream Cake Delight is a crowd-pleasing, no-bake dessert that combines creamy vanilla ice cream, a chocolate Oreo crust, and crunchy cookie chunks for maximum indulgence. Easy to customize and perfect for any celebration, it’s a frozen masterpiece that never goes out of style.