Introduction
The Oreo Dump Cake is the ultimate no-fuss, low-effort, high-reward dessert that has taken home bakers—and even novice cooks—by storm. With its irresistible combination of crunchy chocolate wafers, rich vanilla or chocolate cake flavor, and gooey, caramelized topping, this dessert delivers bakery-quality decadence without requiring mixing bowls, electric mixers, or even precise measuring (though we recommend it for best results!). As a quintessential “dump cake,” it lives up to its name: you literally dump the ingredients into a pan and bake—no stirring, no folding, no fuss. It’s comfort food reimagined for the modern, time-crunched kitchen: nostalgic, indulgent, and effortlessly impressive.
The History
Dump cakes trace their roots back to mid-20th-century American home cooking—born from the post-war era’s embrace of convenience foods, canned goods, and packaged baking aids. The concept gained national traction in the 1960s and ’70s with the rise of Jell-O and Duncan Hines marketing campaigns promoting “5-ingredient” or “15-minute prep” desserts. While traditional dump cakes often featured canned fruit pie fillings topped with yellow cake mix and butter, the Oreo variation emerged organically in the early 2000s as social media platforms like Pinterest and food blogs exploded with creative twists on classic formulas. Bakers began swapping in crushed Oreos—not just as a garnish, but as a foundational layer—realizing their cream filling melted into a luscious, fudgy strata while the wafer edges crisped into delicate shards. By the 2010s, the Oreo Dump Cake had cemented itself as a viral staple at potlucks, school bake sales, and holiday gatherings—often tagged with #OreoMagic and praised for its uncanny resemblance to a cross between a chocolate lava cake, a cookie crumble, and a warm chocolate fondue. Its enduring popularity lies not only in its simplicity but in its emotional resonance: Oreos evoke childhood, nostalgia, and shared joy—making this cake as much about memory as it is about dessert.
Ingredients Breakdown
This recipe proudly features just five core ingredients—no substitutions required for the base version, though optional enhancements are noted later. Each one plays a distinct, non-negotiable role in building texture, structure, moisture, sweetness, and that signature Oreo magic:
- Oreo Cookies (Family Size, 14.3 oz): Approximately 28–30 standard Oreos (about 3 cups coarsely crushed, including cream filling). The wafers provide crunch and cocoa depth; the sweet, vanilla-tinged creme melts during baking to create pockets of creamy richness and natural binding. Do not use “Double Stuf” or “Mega Stuf” for the base version—they add excess fat and moisture, risking a greasy or soggy center. Regular Oreos deliver the ideal balance.
- Yellow or Vanilla Cake Mix (15.25 oz box): A classic, moist-style boxed mix—no pudding-added or extra-moist varieties unless specified in variations. It contributes structure, lightness, and subtle sweetness while absorbing the butter and releasing steam to lift the top layer. The leavening agents react with the Oreos’ acidity and residual milk solids for gentle rise and tender crumb.
- Unsalted Butter (1 cup / 2 sticks / 227g): Melted and slightly cooled. Butter is the essential “glue” and moisture carrier—it coats the crumbs and cake mix, triggers Maillard browning, and creates golden, crisp edges. Unsalted ensures full control over sodium levels and prevents accidental over-salting.
- Milk (½ cup / 120ml): Whole milk is strongly recommended for optimal richness and tenderness. It activates the cake mix’s dry ingredients, adds steam for lift, and balances the intense sweetness. Lower-fat milks (2%, 1%) may yield a drier or less cohesive crumb; non-dairy alternatives like oat or soy milk can work but may subtly alter browning and texture.
- Vanilla Extract (1 teaspoon): Pure, not imitation. This small but mighty ingredient enhances the Oreo’s vanilla creme notes, rounds out the chocolate bitterness, and adds aromatic complexity that elevates the entire dessert beyond “just sweet.” It also helps mask any raw flour or artificial aftertaste from the cake mix.
Note: While technically five ingredients, many bakers consider the Oreos as “one component”—even though they’re multi-part (wafer + creme). No eggs, oil, water, or additional sugar are needed—the Oreos and cake mix supply all necessary fats, sugars, and leaveners.
Step-by-Step Recipe
Follow these precise, tested steps for foolproof results every time—no guesswork, no last-minute panic:
- Preheat & Prep: Position oven rack in the center. Preheat oven to 350°F (175°C). Generously grease a 9×13-inch metal baking pan with butter or non-stick spray—be thorough, especially in corners and along the rim. Avoid glass or ceramic pans for first-time bakers; metal ensures even heat distribution and proper crust formation.
- Crush the Oreos: Place Oreos (creme and all) in a large zip-top bag. Use a rolling pin, meat mallet, or bottom of a heavy skillet to crush into coarse, uneven pieces—think “pea-sized chunks with some fine dust.” Do not process into powder; texture contrast is vital. Transfer to a large mixing bowl.
- Add Dry Ingredients: Pour the entire box of cake mix over the crushed Oreos. Add the vanilla extract. Gently stir with a spatula or fork just until combined—do not overmix. You want visible Oreo shards and streaks of cake mix, not a homogenous paste.
- Incorporate Wet Ingredients: Slowly drizzle in the melted, slightly cooled butter while gently folding. Once mostly absorbed, add the ½ cup milk in two additions, folding lightly after each. The mixture will be thick, shaggy, and clumpy—not smooth or pourable. That’s perfect.
- Transfer & Smooth: Spoon the mixture into the prepared pan. Use an offset spatula or the back of a spoon to spread evenly, pressing down lightly to eliminate large air pockets—but do not compact it. Leave the surface slightly rustic and textured.
- Bake with Precision: Place pan in preheated oven. Bake for 45–52 minutes, rotating pan front-to-back at 25 minutes for even baking. Done when the top is deeply golden brown, edges are crisp and slightly pulled away from the pan, and a toothpick inserted 1 inch from the edge comes out with moist crumbs (not wet batter). The center may look soft—that’s intentional and will set as it cools.
- Cool & Set: Remove pan from oven and place on a wire rack. Let cool completely—at least 2 hours, ideally 3–4. This rest period allows residual heat to finish cooking the center, the butter to resolidify for clean slicing, and the Oreo creme to re-emulsify into creamy ribbons. Cutting too soon yields a molten, crumbly mess.
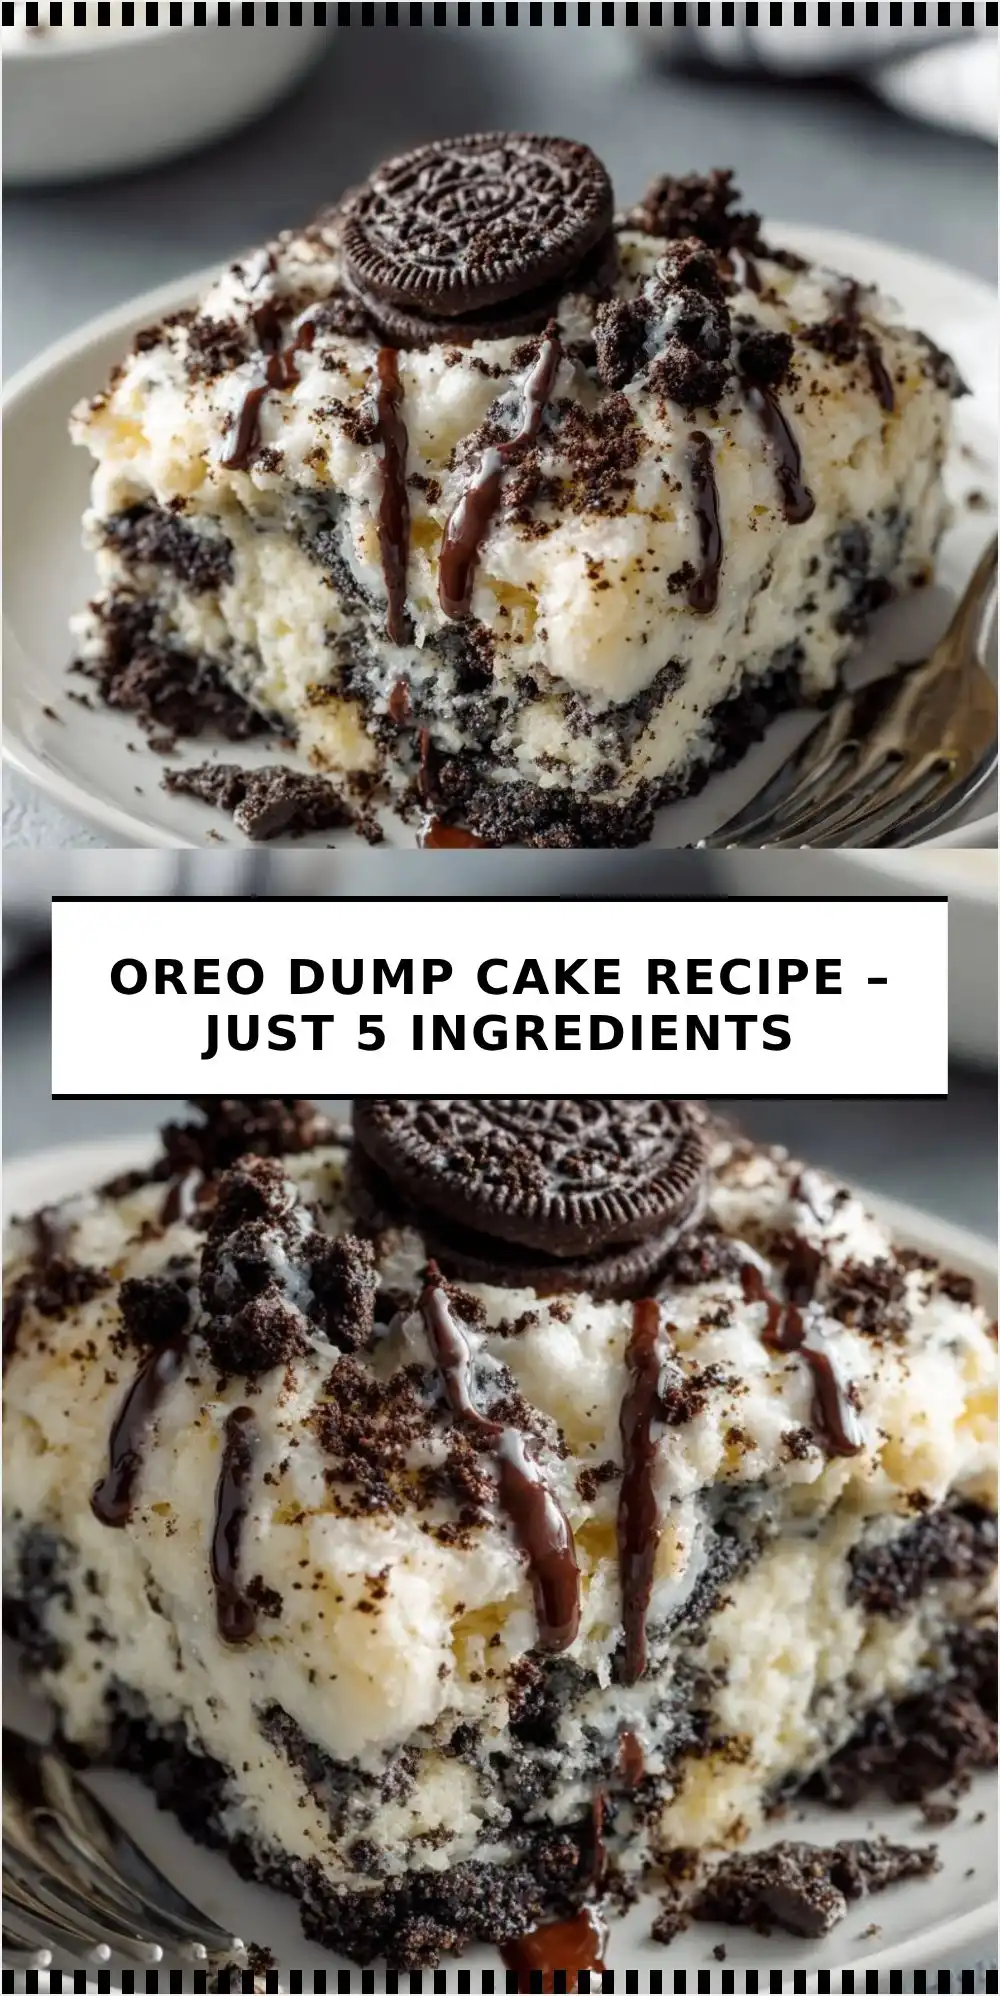
- Serve: Cut into 12–15 rectangular bars using a sharp, hot knife (dip blade in hot water and wipe dry between cuts). Serve at room temperature for ideal texture contrast: crisp top, tender-yet-chewy middle, and cool, creamy Oreo pockets.
Tips
- Crushing Matters: Under-crushed Oreos lead to hard, unyielding chunks; over-crushed become dusty and lose structural integrity. Aim for “rustic”—some whole wafer bits, some creme blobs, and plenty of medium shards.
- Butter Temperature is Key: Melted butter must be cooled to lukewarm (about 100–110°F). Too hot = cake mix “cooks” prematurely and clumps; too cold = butter solidifies and won’t distribute evenly.
- No Overmixing Zone: Stir only until ingredients are *just* combined. Overworking develops gluten in the cake mix, resulting in toughness instead of tenderness.
- Pan Choice Impacts Outcome: Metal conducts heat faster → crisper edges, better rise. Glass retains heat longer → risk of over-baked perimeter and under-set center. If using glass, reduce temp to 325°F and add 5–8 minutes to bake time.
- Oven Thermometer Recommended: Many ovens run hot or cold. An inexpensive oven thermometer ensures your 350°F is truly 350°F—critical for consistent browning and doneness.
- Cooling Is Non-Negotiable: This cake transforms during cooling. Skipping or shortening rest time sacrifices texture, sliceability, and flavor integration. Patience rewards you with layered complexity.
- Storage Hack: Leftovers keep beautifully! Store covered at room temperature for up to 2 days, or refrigerate for up to 5 days. Re-warm individual bars at 300°F for 8–10 minutes for near-fresh quality.
- Freezing Friendly: Wrap tightly in plastic wrap + foil and freeze for up to 3 months. Thaw overnight in fridge, then bring to room temp before serving.
Variations and Customizations
While the 5-ingredient original is beloved, endless delicious adaptations exist—each preserving the dump cake’s spirit while adding flair. All variations maintain the “dump-and-bake” ethos unless otherwise noted:
- Double Chocolate Oreo: Swap yellow cake mix for chocolate fudge cake mix. Adds deeper cocoa notes and intensifies the Oreo pairing. Optional: Sprinkle ¼ cup mini chocolate chips over batter before baking.
- Peppermint Crunch: Add ½ teaspoon peppermint extract with the vanilla. Top with ½ cup crushed Andes mints or peppermint candies during the last 5 minutes of baking.
- PB&Oreo Swirl: Before baking, dollop ⅓ cup creamy peanut butter over batter and drag a knife through to create swirls. No extra mixing—just visual and textural delight.
- Golden Oreo Version: Substitute Golden Oreos (vanilla creme + golden wafer) and use white cake mix. Results in a lighter, buttery-sweet, almost “blondie meets shortbread” profile. Add ¼ tsp almond extract for nuance.
- Espresso Kick: Dissolve 1 tablespoon instant espresso powder in the milk before adding. Enhances chocolate depth without bitterness—perfect for coffee lovers.
- Gluten-Free Adaptation: Use certified GF vanilla cake mix + GF Oreos (like Kinnikinnick or Glutino brands). Ensure butter and milk are GF-certified. Texture remains remarkably close.
- Vegan Version: Use vegan Oreos (check labels—many U.S. Oreos are accidentally vegan), vegan yellow cake mix, vegan butter (e.g., Miyoko’s), unsweetened almond milk, and omit vanilla or confirm it’s alcohol-free/vegan. Bake time may increase by 3–5 minutes.
- Mini-Muffin Tin Edition: Divide batter among greased standard muffin tins (fill ¾ full). Bake at 350°F for 22–26 minutes. Yields ~24 single-serve cakes—ideal for parties or portion control.
- Gourmet Garnish Trio: After cooling, top with: (1) flaky sea salt sprinkles, (2) a drizzle of homemade Oreo ganache (melt ½ cup heavy cream + 4 oz chopped Oreos), and (3) toasted pecan halves.
Health Considerations and Nutritional Value
Let’s be transparent: the Oreo Dump Cake is a dessert, designed for celebration, comfort, and joy—not daily nutrition. That said, understanding its composition empowers mindful enjoyment:
- Caloric Profile: A standard 2×2-inch serving contains approximately 320–360 calories, depending on Oreo count and butter absorption. Most calories come from carbohydrates (Oreo sugars + cake mix starch) and fats (butter + Oreo oils).
- Sugar Content: One serving averages 38–42g total sugar, of which ~30g are added sugars (from Oreos’ corn syrup, cake mix’s dextrose/sucrose, and butter’s natural lactose). This exceeds the American Heart Association’s recommended daily limit of 25g added sugar for women and 36g for men.
- Fat Breakdown: ~14–16g fat per serving, with ~8g saturated fat (primarily from butter and palm oil in Oreos). Contains zero trans fat (as of current U.S. Oreo formulation).
- Protein & Fiber: Modest—only ~2–3g protein (from milk, cake mix, and trace Oreo soy) and <1g dietary fiber. Not a source of significant micronutrients, though Oreos contribute small amounts of iron and calcium from fortified wheat flour.
- Allergen Alert: Contains wheat (gluten), dairy (milk, butter), soy (in Oreos and cake mix), and eggs (in most cake mixes—check label). Not nut-free unless verified (Oreos are made in facilities with peanuts/tree nuts).
- Mindful Enjoyment Tips:
- Pair with fresh berries or a scoop of low-sugar Greek yogurt to add fiber, protein, and tartness that balances sweetness.
- Use smaller serving sizes—cut into 18 servings instead of 12 for ~200 calories each.
- Opt for reduced-fat butter alternative (e.g., Smart Balance) to trim ~2g saturated fat per serving—though texture may soften slightly.
- Consider this dessert as part of a balanced day—not as a nutrient source, but as a joyful, intentional treat rooted in presence and pleasure.
Ingredients
- 28–30 regular Oreo cookies (14.3 oz family-size pack), coarsely crushed (creme and all)
- 1 box (15.25 oz) yellow or vanilla cake mix (standard, not pudding or extra-moist)
- 1 cup (2 sticks / 227g) unsalted butter, melted and cooled to lukewarm
- ½ cup (120ml) whole milk
- 1 teaspoon pure vanilla extract
Directions
- Preheat oven to 350°F (175°C). Grease a 9×13-inch metal baking pan thoroughly with butter or non-stick spray.
- In a large bowl, crush Oreos in a zip-top bag until coarsely broken—pea-sized chunks with visible creme streaks.
- Add cake mix and vanilla extract. Stir gently with a spatula until just combined.
- Drizzle in melted, cooled butter while folding. Then add milk in two parts, folding lightly after each. Mixture will be thick and shaggy—not smooth.
- Transfer to prepared pan. Spread evenly with a spatula; press down lightly but do not compact.
- Bake 45–52 minutes, rotating pan halfway through, until top is deep golden and edges pull away from sides. A toothpick 1″ from edge should show moist crumbs (not wet batter).
- Cool completely in pan on a wire rack—minimum 2 hours, ideally 3–4 hours—for optimal texture and clean slicing.
- Cut into bars with a hot, clean knife. Serve at room temperature.
FAQ
- Can I use Double Stuf Oreos?
- Not recommended for the base recipe—they contain more creme and oil, which can cause greasiness, pooling, or uneven baking. Reserve them for swirl or topping variations.
- Why did my cake sink in the center?
- Most commonly due to underbaking, opening the oven too early (causing temperature shock), or insufficient cooling time. Ensure a toothpick shows *moist crumbs*, not wet batter—and always cool fully before cutting.
- Can I make this ahead of time?
- Absolutely! Assemble the batter up to 1 day ahead—cover and refrigerate unbaked. Bring to room temp 30 minutes before baking, then add 3–5 minutes to bake time.
- Is there a way to reduce sweetness?
- Yes—substitute half the Oreos with plain chocolate wafers (like Nabisco Chocolate Newtons) or graham crackers. Or use a spice cake mix for warm complexity that offsets sugar.
- My top layer is too hard/crispy—what went wrong?
- Likely overbaking or using a dark non-stick pan (which absorbs more heat). Next time, tent loosely with foil at 35 minutes and check early. Also verify oven temperature with a thermometer.
- Can I add fruit?
- Yes—but it changes the recipe beyond 5 ingredients. For best results, fold in 1 cup fresh raspberries or sliced strawberries *after* mixing but *before* baking. Expect slight juice release and softer texture.
- What if I don’t have a 9×13 pan?
- You can use two 9-inch square pans (reduce bake time to 35–40 min) or a 10×15 jelly roll pan (bake 38–42 min). Avoid smaller pans—they’ll overflow or bake unevenly.
- Can I use margarine instead of butter?
- Technically yes, but margarine’s higher water content can create steaming and a gummy texture. Stick with real butter for superior flavor and structure.
- Why does the recipe say “no eggs” when cake mix usually needs them?
- Traditional cake mixes require eggs + oil + water. Here, the Oreo creme provides fat/emulsifiers, the butter replaces oil, and the milk + Oreo moisture replaces water—so eggs become redundant and would over-enrich, causing density.
- How do I store leftovers?
- Cover tightly with plastic wrap or store in an airtight container at room temperature up to 2 days, or refrigerate up to 5 days. Re-warm at 300°F for 8–10 minutes before serving.
Summary
The Oreo Dump Cake is a brilliantly simple, five-ingredient marvel that transforms pantry staples into a rich, texturally dynamic dessert—crisp edges, tender crumb, and pockets of melty Oreo creme—all achieved with zero mixing and zero stress. It’s nostalgic, shareable, endlessly adaptable, and proof that extraordinary flavor doesn’t require extraordinary effort.
Bake it for birthdays, surprise guests, or quiet Sunday nights—it delivers consistent joy, guaranteed satisfaction, and the kind of warm, chocolatey hug that only Oreos and butter can provide.