
Ooey Gooey Caramel Brownies are the ultimate indulgence for dessert lovers, combining rich chocolate, velvety caramel, and a fudgy texture that melts in your mouth. These brownies are a celebration of decadence, offering the perfect balance between sweet, salty, and buttery flavors, all wrapped in a soft, chewy bite. Whether served warm with a scoop of ice cream or enjoyed as a standalone treat, these brownies are sure to satisfy every craving. Perfect for bake sales, parties, or simply a night-in treat, they are a hit with both kids and adults alike. Their luxurious texture and rich flavor make them an all-time favorite among dessert enthusiasts and a staple recipe for anyone with a sweet tooth.
The History of Caramel Brownies
The origins of brownies date back to the late 19th century in the United States, with the first printed recipe appearing in the Sears, Roebuck catalog in 1897. Traditional brownies started off as a cross between a cake and a cookie, with a dense and chewy texture. The idea of combining brownies with caramel came later as bakers began experimenting with new flavors and textures. Caramel, which dates back to the 17th century, became increasingly popular in the 20th century thanks to mass production of sugar and the availability of sweetened condensed milk. By the 1970s, home bakers began swirling homemade or store-bought caramel into brownie batter, creating the ooey-gooey version we now love. Since then, caramel brownies have become a classic American treat, appearing in cookbooks, food blogs, and bakeries across the world.
Ingredients Breakdown
- Unsalted Butter: Adds richness and contributes to the moist, dense texture. Using unsalted butter allows you to control the saltiness of the dessert.
- Granulated Sugar & Brown Sugar: Granulated sugar gives structure, while brown sugar adds depth of flavor and chewiness due to its molasses content.
- Eggs: Act as a binder and provide moisture and richness. Room-temperature eggs blend more easily into the batter.
- Vanilla Extract: Enhances the chocolate and caramel flavors, giving a warm aromatic undertone.
- All-Purpose Flour: Provides structure. Be careful not to overmix to avoid cakey brownies.
- Cocoa Powder: Use high-quality unsweetened cocoa powder for a rich chocolate flavor. Dutch-processed cocoa will give a deeper color.
- Salt: Balances sweetness and enhances flavor. A pinch of sea salt on top also complements the caramel.
- Semi-Sweet Chocolate Chips: Melted into the batter and/or added as chunks, these deepen the chocolate profile.
- Caramel Sauce or Chewy Caramels: The star of the show. Use homemade or high-quality store-bought caramel for best results.
- Heavy Cream (if making homemade caramel): Helps achieve that smooth, pourable consistency.
Optional additions: espresso powder (to intensify the chocolate), chopped nuts (for texture), or a sprinkle of flaky sea salt.
Step-by-Step Recipe
- Preheat the Oven: Set your oven to 175°C (350°F) and line an 8×8 or 9×9-inch baking pan with parchment paper, leaving a bit of overhang to lift the brownies out later.
- Prepare the Brownie Batter: In a medium saucepan, melt the butter over low heat. Once melted, remove from heat and stir in granulated and brown sugar until dissolved. Let it cool slightly, then whisk in the eggs one at a time, followed by vanilla extract.
- Mix the Dry Ingredients: In a separate bowl, sift together the flour, cocoa powder, and salt. Gradually fold the dry mixture into the wet ingredients until just combined.
- Add Chocolate Chips: Gently fold in the chocolate chips. This adds texture and extra richness to the brownies.
- Layer the Caramel: Pour half of the brownie batter into the prepared pan and spread evenly. Drizzle a generous layer of caramel sauce over the batter. Use a spatula to spread it evenly. Then add the remaining brownie batter on top, smoothing it carefully to avoid mixing the caramel too much into the batter.
- Swirl for Style (optional): Use a knife or skewer to create decorative swirls with the caramel for a marbled effect.
- Bake: Place the pan in the oven and bake for 30-35 minutes. Check for doneness by inserting a toothpick—it should come out with a few moist crumbs but not raw batter.
- Cool and Set: Let the brownies cool in the pan for at least 20 minutes. For neater slices, refrigerate for an hour before cutting.
- Serve: Cut into squares and enjoy as-is or topped with ice cream, whipped cream, or a sprinkle of sea salt.
Tips for the Perfect Brownies
- Don’t Overmix: Stir the batter just until the dry ingredients are incorporated to avoid cakey brownies.
- Use Quality Ingredients: Real butter, pure vanilla extract, and good cocoa powder make a huge difference.
- Line Your Pan: Parchment paper ensures easy removal and clean edges.
- Don’t Overbake: Slightly underbaked brownies will set as they cool and maintain that gooey texture.
- Chill Before Cutting: Refrigerating the brownies before slicing helps you get clean, sharp edges.
- Double the Batch: These disappear fast. Make a double batch and freeze leftovers.
Variations and Customizations
- Nutty Caramel Brownies: Add toasted pecans or walnuts for crunch and a nutty flavor that pairs beautifully with caramel.
- Salted Caramel: Use a salted caramel sauce or sprinkle sea salt flakes over the top before baking for a sweet-salty twist.
- Espresso Caramel Brownies: Add 1 tsp of espresso powder to the batter to enhance the chocolate flavor and give a subtle coffee note.
- Peanut Butter Caramel Brownies: Swirl in a mix of caramel and peanut butter for a delicious nutty variation.
- Stuffed Brownies: Layer Rolos, soft caramels, or even mini Twix bars between layers of batter for pockets of melted caramel throughout.
- Gluten-Free Version: Substitute with a 1:1 gluten-free baking flour blend. The texture may be slightly different but still rich and gooey.
- Dairy-Free Option: Use plant-based butter, dairy-free chocolate, and coconut milk caramel.
Health Considerations and Nutritional Value
Ooey Gooey Caramel Brownies are a treat meant to be enjoyed in moderation. A single brownie (depending on size and ingredients) can contain 250–400 calories, with a high content of sugar, fats, and carbohydrates. The butter and chocolate provide saturated fats, while caramel adds sugars and potentially more fat if made with cream. If you’re watching your intake, consider reducing the sugar by 10–15%, using dark chocolate instead of milk chocolate, or substituting some of the butter with applesauce for lower fat content. You can also use whole wheat pastry flour for added fiber. While not a health food, these brownies can fit into a balanced diet when consumed occasionally. For those with allergies, be mindful of gluten, dairy, and nuts in the original or customized recipes.
Frequently Asked Questions (FAQ)
Q: Can I use store-bought caramel?
A: Yes! High-quality store-bought caramel works just fine and saves time. Look for one that’s thick and creamy.
Q: How do I store leftover brownies?
A: Store them in an airtight container at room temperature for up to 3 days or refrigerate for up to a week. They can also be frozen for up to 3 months.
Q: Can I make these in advance?
A: Absolutely. They’re even better the next day as the flavors develop.
Q: Can I double the recipe?
A: Yes. Use a 9×13-inch pan and adjust baking time to around 40–45 minutes.
Q: My brownies turned out too dry—why?
A: Likely overbaking. Check earlier next time and remove them when the edges are set but the center is still slightly soft.
Q: Can I make them egg-free?
A: Yes. Try substituting each egg with 1/4 cup unsweetened applesauce or a flaxseed egg (1 tbsp flaxseed meal + 2.5 tbsp water).
Ooey Gooey Caramel Brownies
Ingredients
Brownie Layer
- 200 g 7 oz unsalted butter
- 200 g 7 oz dark chocolate or semi-sweet chocolate chips (see Note 1)
- 1 cup brown sugar
- 3 eggs lightly beaten
- 1 teaspoon vanilla extract or essence
- 1/2 cup all-purpose plain flour
- 1/4 cup unsweetened cocoa powder
- 1/8 teaspoon salt
Salted Caramel Filling
- 395 g 14 oz can sweetened condensed milk
- 2 tablespoons golden syrup or maple syrup see Note 2
- 60 g 2 oz unsalted butter
- 1 teaspoon salt
Instructions
- Preparation Instructions for Salted Caramel Brownies
Preheat and Prepare the Pan
- Preheat your oven to 180°C (350°F), suitable for all oven types. Lightly butter a 20 cm (8-inch) square baking tin, then line it with parchment or baking paper, ensuring the paper extends up the sides for easy removal later.
Make the Salted Caramel
- Place all the caramel ingredients—sweetened condensed milk, golden syrup (or maple syrup), butter, and salt—into a small saucepan set over medium-high heat. Stir occasionally for the first minute to help the butter melt and everything combine. As the mixture warms and you begin to see wisps of steam rising, switch to whisking gently but continuously for 7 minutes. Don’t whisk too hard—just enough to keep the mixture smooth and to prevent it from catching or burning on the bottom of the pan. The caramel should develop a pale golden hue by the end.
- Once done, remove the saucepan from the heat and continue whisking for another 30 seconds. Cover with a lid to keep the caramel warm and set it aside.
Prepare the Brownie Batter
- Place the chopped dark chocolate (or semi-sweet chocolate chips) and unsalted butter in a microwave-safe mixing bowl. Microwave on high in three 30-second bursts, stirring between each interval until the mixture is melted, smooth, and glossy.
- Stir in the brown sugar, followed by the lightly whisked eggs and vanilla extract. Mix well until fully combined and slightly thickened.
- Next, sift in the flour, cocoa powder, and salt. Gently fold everything together until the batter is smooth and uniform.
Layer and Swirl
- Scoop out 1/2 cup of the brownie batter and set it aside for the top layer. Pour the remaining brownie batter into the prepared tin and spread it out evenly using a spatula.
- Take your warm salted caramel and pour it over the brownie layer, trying to distribute it as evenly as possible since it won’t spread easily once poured. If the caramel has thickened too much to pour, reheat it gently on the stove for about 1 minute to loosen it.
- Now, take the reserved 1/2 cup of brownie batter and spoon it randomly over the caramel layer. Using a knife or skewer, swirl the top gently. These swirls won’t be very visible once baked, but they help to distribute the brownie over the caramel and add a nice layered texture.
Bake to Perfection
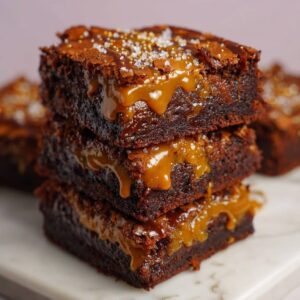
- Place the pan in the oven and bake for 30 minutes if you want a very gooey, molten-center brownie (as pictured), or up to 35 minutes for a more structured but still incredibly moist result. Avoid overbaking to maintain the signature fudgy texture.
Cool and Slice
- Remove the brownies from the oven and let them cool in the pan for 10 minutes. Then, use the parchment paper overhang to lift the entire brownie slab out and transfer it to a wire rack. Allow it to cool for another 20 minutes before slicing. Note: the caramel layer will still be soft when warm, but it firms up as it cools, allowing you to achieve clean, neat slices.
Notes
-
Chocolate
Be sure to use baking chocolate, which is specifically designed for melting and incorporating into recipes. You’ll find it in the baking aisle of most supermarkets. Avoid using regular eating chocolate, even if it’s dark chocolate, as it doesn’t melt or mix the same way. (Although yes, you can snack on baking chocolate too—no judgment! 😉) -
Golden Syrup
Golden syrup is a thick, amber-colored sweetener with a flavor somewhere between honey and light molasses. It adds a subtle richness and helps give the caramel a beautiful golden hue. However, it’s not essential in this recipe—if you don’t have it, you can easily substitute it with maple syrup or even omit it entirely without significantly affecting the result. -
Caramel Cooking Caution
Sweetened condensed milk tends to stick and burn quickly at the bottom of the pan if not stirred properly. To avoid this, whisk continuously once the mixture starts steaming. If some golden flecks form from slight sticking, don’t worry—they won’t affect the flavor and will hardly be noticeable once the brownies are baked. Just be sure to keep the heat moderate and the whisk moving to prevent burning. -
Baking Time
This recipe takes slightly longer to bake than a standard brownie due to the added caramel layer, which slows down the setting process. Don’t be tempted to remove it too early—follow the suggested baking time and check with a toothpick if needed. -
Measuring Tips
Cup and tablespoon measurements can vary slightly between countries. Fortunately, for this recipe, the differences aren’t significant enough to affect the final result. It has been tested using both US and Australian standard measures with identical outcomes. The one exception is Japan—Japanese measuring cups are significantly smaller, so please use the provided weight measurements for accuracy.