Introduction
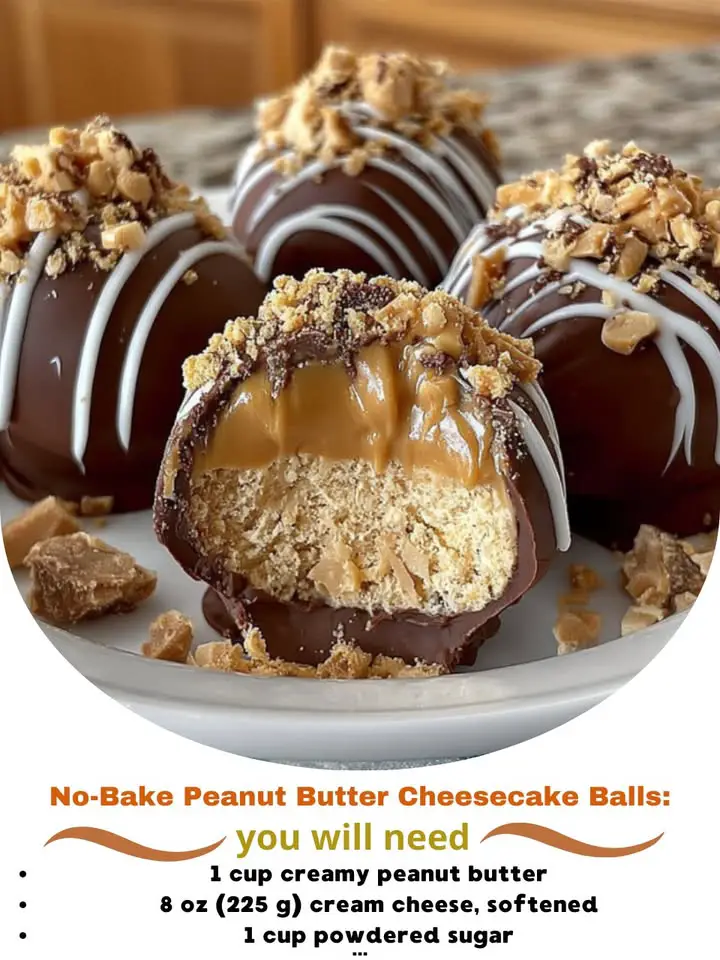
Imagine a dessert that’s rich, creamy, deeply nutty, and irresistibly decadent—yet requires zero oven time, no fancy equipment, and barely any cleanup. Enter the No-Bake Peanut Butter Cheesecake Balls: bite-sized spheres of pure bliss that blend the luscious tang of cream cheese with the robust, salty-sweet depth of natural peanut butter, all enrobed in glossy chocolate and finished with a whisper of sea salt. These aren’t just energy bites or protein balls—they’re sophisticated, dessert-worthy morsels designed to satisfy cravings with elegance and ease. Whether you’re hosting last-minute guests, packing school lunches, meal-prepping for the week, or simply treating yourself after a long day, these cheesecake balls deliver restaurant-quality indulgence from your kitchen counter in under 30 minutes.
The History
The origin of no-bake cheesecake balls traces back to mid-20th-century American home kitchens, where resourceful bakers began transforming classic no-bake cheesecake fillings—traditionally chilled in springform pans—into portable, portion-controlled treats. The rise of refrigerated cream cheese (popularized by Philadelphia Cream Cheese in the 1920s) and the post-war boom in pantry staples like graham crackers and powdered sugar laid the foundation. However, it wasn’t until the 2010s that peanut butter entered the spotlight in this format—fueled by the clean-eating movement, paleo and keto adaptations, and viral social media trends celebrating “healthy-ish” desserts. Influencers, food bloggers, and dietitians alike began riffing on the concept: swapping graham cracker crumbs for oat or almond flour, using dates instead of refined sugar, and incorporating collagen or protein powder for functional benefits. Today, the No-Bake Peanut Butter Cheesecake Ball stands as a cultural hybrid—a nostalgic nod to retro dessert bars, a modern response to mindful snacking, and a testament to how simplicity, when executed with intention, becomes extraordinary.
Ingredients Breakdown
Every ingredient in this recipe plays a precise, synergistic role—not merely for flavor, but for texture, structure, temperature stability, and mouthfeel. Let’s explore them in depth:
- Cream Cheese (full-fat, brick-style, at room temperature): The backbone of the filling. Full-fat ensures richness and prevents graininess; room temperature guarantees smooth incorporation without overmixing (which can cause oil separation). Avoid whipped or low-fat versions—they lack the density and fat content needed for proper binding and creamy melt-in-your-mouth consistency.
- Natural Creamy Peanut Butter (unsweetened, no added oils or sugars): Choose a stir-style variety with just peanuts and salt. Its high oil content emulsifies beautifully with the cream cheese, while its deep roasted flavor anchors the entire profile. Avoid “no-stir” brands with hydrogenated oils—they can make the mixture greasy and prevent clean set-up.
- Powdered Sugar (confectioners’ sugar): Serves triple duty: sweetens, thickens, and lends a velvety fineness impossible to achieve with granulated sugar. The cornstarch in most powdered sugar also helps absorb excess moisture and stabilizes the mixture during chilling. For refined-sugar-free versions, maple sugar or coconut sugar blended into ultra-fine powder (sifted twice) works—but expect slightly denser, less glossy balls.
- Vanilla Extract (pure, not imitation): Adds aromatic complexity and rounds out the peanut’s earthiness. A splash of almond extract (¼ tsp) can be added alongside for subtle nuance—especially lovely with dark chocolate coating.
- Pinch of Fine Sea Salt: Not optional. Salt doesn’t just “enhance sweetness”—it heightens umami, balances fat, and makes the peanut butter taste *more like itself*. Use flaky Maldon or fine grey sea salt; avoid iodized table salt, which carries a metallic aftertaste.
- Optional Add-ins: A tablespoon of honey or brown rice syrup adds pliability and shine; 1–2 tbsp of finely ground toasted peanuts boosts crunch and aroma; a teaspoon of instant espresso powder deepens flavor without adding bitterness; a few drops of orange extract introduces a surprising, bright contrast.
For the coating:
- High-Quality Chocolate (semi-sweet, dark, or milk): Couverture chocolate is ideal—its higher cocoa butter content yields a crisp, snappy shell with professional sheen. If using standard chocolate chips, add ½ tsp coconut oil per ½ cup melted chocolate to improve fluidity and gloss. White chocolate? Yes—but use high-cocoa-butter varieties (like Ghirardelli Classic White) to prevent softening.
- Coconut Oil (refined or unrefined): Used sparingly (¼–½ tsp per ½ cup chocolate) to thin the coating for easy dipping and faster setting. Refined is neutral; unrefined imparts a subtle tropical note that pairs surprisingly well with peanut.
- Garnishes: Flaky sea salt, crushed roasted peanuts, toasted coconut flakes, cacao nibs, freeze-dried strawberry powder, or even edible gold dust for special occasions.
Step-by-Step Recipe
- Prepare Your Workspace: Line a baking sheet with parchment paper or a silicone mat. Set out two medium bowls—one for mixing, one for chilling tools (like a small cookie scoop or melon baller). Place your cream cheese on the counter 1–2 hours ahead to soften fully (do not microwave—it causes water separation).
- Whip the Base: In the mixing bowl, beat the softened cream cheese with an electric hand mixer (or sturdy spatula) on medium speed for 45 seconds until completely smooth and lump-free. Scrape down sides thoroughly.
- Incorporate Peanut Butter: Add the natural peanut butter in two additions, beating 20 seconds after each until fully homogenized and glossy—about 1 minute total. The mixture should pull away slightly from the bowl’s edge.
- Sweeten & Season: Sift in the powdered sugar in three batches, beating on low speed for 15 seconds after each addition to avoid clouding your kitchen with sugar dust. Once fully incorporated, add vanilla and salt. Beat 30 seconds more on medium-low until airy and cohesive. Do not overbeat—this can introduce air bubbles or cause oil weeping.
- Chill the Filling: Transfer mixture to a shallow dish (like a pie plate), smooth the top, and refrigerate uncovered for *at least 90 minutes*, preferably 2 hours. This step is non-negotiable: cold filling holds shape, resists smearing, and ensures clean, round balls.
- Form the Balls: Using a 1-tsp or 1.5-tsp cookie scoop (or a melon baller), portion chilled mixture. Roll quickly between lightly greased palms—damp hands work better than dry ones. Aim for uniform 1-inch spheres (about 12–14g each). Place on prepared sheet. Freeze for 20 minutes—this “flash freeze” prevents melting during dipping.
- Melt the Chocolate: Chop chocolate finely. Use a double boiler (heatproof bowl over simmering—not boiling—water) or microwave in 20-second bursts, stirring vigorously between intervals, until 85% melted. Stir until fully smooth—residual heat will finish melting remaining bits. Stir in coconut oil until fully emulsified.
- Dip with Precision: Working with 3–4 frozen balls at a time, use a fork or dipping tool to submerge each ball completely. Tap gently against side of bowl to remove excess chocolate. Lift and let excess drip for 3–5 seconds. Place back on parchment. Immediately garnish (e.g., sprinkle with salt or peanuts) before chocolate sets.
- Set & Store: Refrigerate dipped balls for 15 minutes to harden chocolate. For longer shelf life and optimal texture, transfer to an airtight container layered with parchment and refrigerate up to 2 weeks—or freeze for up to 3 months (thaw 5 minutes before serving).
Tips
- Temperature is Everything: Cold filling + cool room (68–72°F) + tempered chocolate = flawless results. Warm kitchens cause chocolate to bloom or slide off. If your kitchen exceeds 75°F, chill your dipping tools and work in batches.
- Fix Sticky Hands: If mixture sticks while rolling, dip fingers in ice water, then pat *almost* dry—just a light film of moisture prevents adhesion without adding water to the mix.
- Prevent Chocolate Bloom: Avoid rapid temperature swings. Never refrigerate warm-dipped balls—always chill filling first, then dip, then chill again. Bloom (white streaks) is harmless but unattractive; it’s caused by cocoa butter recrystallizing due to uneven cooling.
- Get That Perfect Gloss: Add ¼ tsp shortening (not oil) to melted chocolate for extra shine and snap—or use a chocolate tempering thermometer to hold at 88–90°F during dipping.
- No Scoop? No Problem: Use a measuring teaspoon, level it, and press mixture firmly. Or pipe filling through a large star tip onto parchment—then freeze and dip.
- Rescue Separated Filling: If mixture looks oily or curdled, it’s likely too warm or overmixed. Chill 10 minutes, then stir vigorously with a spatula until re-emulsified. A tiny splash of cold heavy cream (½ tsp) can help bind it back together.
- Make-Ahead Magic: Prepare filling up to 3 days ahead and keep refrigerated in an airtight container. Roll and dip the day of serving for peak freshness and texture contrast.
Variations and Customizations
This recipe is a master canvas—endlessly adaptable to dietary needs, seasonal flavors, and creative whims. Here are 12 thoughtfully tested variations:
- Keto-Friendly: Swap powdered sugar for ⅓ cup powdered erythritol + 1 tsp xanthan gum (for binding); use sugar-free chocolate (Lily’s or ChocZero); add 1 tbsp MCT oil for satiety.
- Vegan: Replace cream cheese with Kite Hill Almond Milk Cream Cheese or homemade cashew cream cheese (soaked cashews + lemon + nutritional yeast); use natural peanut butter + 1 tsp apple cider vinegar for tang; coat in vegan dark chocolate.
- Protein-Packed: Fold in 2 scoops unflavored or peanut butter whey/collagen peptides (start with 1, add more if mixture remains moldable); reduce powdered sugar by 1 tbsp to compensate.
- Gluten-Free: Naturally GF—but verify all labels (some powdered sugar contains wheat starch; some peanut butter has gluten-containing additives).
- Flourless & Paleo: Omit powdered sugar entirely; sweeten with ¼ cup date paste + 2 tbsp maple syrup; bind with 1 tbsp almond flour; coat in 85% dark chocolate.
- Chocolate-PB Swirl: After rolling balls, press a small indentation and fill with melted dark chocolate; chill 10 min, then dip whole ball.
- Strawberry-Peanut Butter: Fold in 3 tbsp finely chopped freeze-dried strawberries + ½ tsp lemon zest before chilling.
- Maple-Bacon Crunch: Mix in 2 tbsp finely crumbled nitrate-free bacon + 1 tbsp real maple syrup; roll in crushed bacon + maple sugar.
- Matcha-Green Tea: Whisk 1 tsp ceremonial-grade matcha into powdered sugar before adding; dip in white chocolate and top with matcha powder.
- Spiced Chai: Add ½ tsp ground cinnamon, ¼ tsp cardamom, ⅛ tsp ginger, and a pinch of black pepper to dry ingredients.
- Cookie Dough Style: Fold in 2 tbsp mini chocolate chips + 1 tbsp finely chopped graham cracker; skip chocolate dip and roll in crushed Oreos.
- Lemon-Lavender: Replace vanilla with 1 tsp lemon extract + ¼ tsp culinary lavender buds (steeped in warm cream cheese for 5 min, then strained).
Health Considerations and Nutritional Value
While undeniably indulgent, these cheesecake balls can be part of a balanced lifestyle—especially when customized mindfully. Per standard 1-inch ball (approx. 14g, made with full-fat cream cheese, natural PB, powdered sugar, and 60% dark chocolate):
- Calories: ~95–110 kcal
- Total Fat: 6–7g (mostly unsaturated from peanuts; ~3g saturated from chocolate/cream cheese)
- Protein: 2.5–3g (a modest but meaningful boost from peanut butter and dairy)
- Carbohydrates: 8–10g (4–6g naturally occurring sugars; 2–4g added, depending on sweetener)
- Fiber: 0.5–1g (increases significantly with oat flour, flax, or chia additions)
- Vitamins & Minerals: Good source of niacin (B3), magnesium, and vitamin E from peanuts; calcium and vitamin A from dairy; antioxidants (flavanols) from dark chocolate.
Key Health Notes:
- Sugar Awareness: Traditional versions contain moderate added sugar. Opt for monk fruit-blended powdered sugar or date-based sweeteners to lower glycemic impact—ideal for prediabetics or those managing insulin resistance.
- Heart Health: Natural peanut butter provides heart-healthy monounsaturated fats and resveratrol-like compounds. Pairing with dark chocolate (>70% cacao) enhances endothelial function and lowers blood pressure in clinical studies.
- Digestive Wellness: The probiotic potential of raw, unpasteurized cream cheese is minimal, but adding 1 tsp inulin or acacia fiber supports gut microbiota without altering texture.
- Allergen Alert: Contains dairy and peanuts—strictly avoid if allergic. Sunflower seed butter + coconut cream cheese offer safe, delicious alternatives.
- Portion Control Powerhouse: Their built-in single-serving size discourages mindless eating—unlike cakes or bars that invite second slices. The fat-protein-fiber trifecta promotes satiety far beyond their size.
Ingredients
- 8 oz (227g) full-fat brick-style cream cheese, softened to room temperature
- ¾ cup (190g) natural creamy peanut butter (just peanuts + salt)
- 1 ½ cups (180g) powdered sugar, sifted
- 1 ½ tsp pure vanilla extract
- ¼ tsp fine sea salt (plus more for garnish)
- 8 oz (227g) high-quality semi-sweet or dark chocolate (60–70% cacao), finely chopped
- ½ tsp refined coconut oil (optional, for smoother chocolate coating)
- ¼ cup (35g) finely chopped roasted peanuts (for garnish)
Directions
- Beat softened cream cheese in a large bowl with an electric mixer on medium speed for 45 seconds until completely smooth.
- Add peanut butter in two additions, beating 20 seconds after each until fully blended and glossy.
- Sift powdered sugar in three batches, beating on low 15 seconds after each. Add vanilla and salt; beat 30 seconds on medium-low until cohesive.
- Scrape mixture into a shallow dish, smooth top, and refrigerate uncovered for 2 hours.
- Line a baking sheet with parchment. Use a 1-teaspoon cookie scoop to portion chilled mixture. Roll quickly into 1-inch balls; place on sheet. Freeze 20 minutes.
- Meanwhile, melt chocolate and coconut oil in a double boiler or microwave (20-sec bursts), stirring until smooth and glossy.
- Working with 3–4 frozen balls at a time, dip each completely in melted chocolate using a fork. Tap off excess, place on parchment, and immediately sprinkle with sea salt and chopped peanuts.
- Refrigerate dipped balls for 15 minutes to set. Store in an airtight container in the refrigerator for up to 2 weeks, or freeze for up to 3 months.
FAQ
- Can I use crunchy peanut butter?
- Yes—but expect slight textural variation. The peanut pieces may make rolling trickier and create minor gaps in chocolate coverage. For best results, pulse crunchy PB in a food processor for 5 seconds to break up larger chunks.
- Why did my balls crack when dipping?
- Too-cold filling causes thermal shock. Let frozen balls sit at room temp for 60–90 seconds before dipping—or ensure chocolate is warm enough (but not hot) to gently envelop them.
- Can I make these dairy-free without compromising texture?
- Absolutely. Use a cultured cashew cream cheese (blended soaked cashews + lemon juice + probiotic capsule, fermented 12 hrs) and certified dairy-free chocolate. Texture will be slightly softer but equally luxurious.
- How do I prevent chocolate from sliding off?
- Ensure balls are fully frozen before dipping, and chocolate is at ideal dipping temperature (~88–90°F). If chocolate is too cool, it seizes and won’t adhere; too warm, it melts the outer layer.
- Can I use honey instead of powdered sugar?
- Honey adds moisture and acidity that destabilizes the emulsion. Better alternatives: maple syrup (reduce other liquids) or powdered monk fruit. If determined, replace only ¼ cup sugar with 2 tbsp honey—and add 1 tbsp almond flour to absorb excess liquid.
- Do these need to be refrigerated?
- Yes—always. Due to dairy and high-fat content, they must be kept refrigerated below 40°F. They may soften at room temperature within 15 minutes, especially in warm climates.
- Can kids help make these?
- Perfect for little helpers! Assign tasks like sifting sugar, stirring filling (with supervision), rolling balls, or sprinkling toppings. It’s a safe, no-oven, sensory-rich cooking activity that teaches measurement, patience, and food science.
- What’s the best way to gift them?
- Layer in a decorative tin or clear apothecary jar, separated by parchment. Tie with twine and a sprig of dried lavender or mini chalkboard tag. Include storage instructions and “Keep Refrigerated” label.
Summary
No-Bake Peanut Butter Cheesecake Balls are the harmonious fusion of childhood nostalgia and adult sophistication—creamy, crunchy, salty, sweet, and impossibly easy to make.
With endless customization options, thoughtful nutrition insights, and foolproof techniques, they’re not just a dessert—they’re a versatile, joyful ritual you’ll return to again and again.