Introduction
Welcome to a decadent, no-fuss dessert experience: No-Bake Peanut Butter Cheesecake Balls — creamy, rich, nostalgic, and irresistibly easy. These bite-sized treats combine the velvety tang of classic cheesecake with the deep, nutty warmth of peanut butter, all wrapped in a luscious chocolate shell (or your favorite coating!). Perfect for last-minute gatherings, potlucks, holiday platters, or even mindful solo indulgence, they require zero oven time, minimal equipment, and deliver maximum flavor in every single bite. Whether you’re a seasoned baker or a complete novice — and whether you’re gluten-free, dairy-sensitive (with substitutions), or simply craving something sweet without the stress — this recipe is designed to be inclusive, adaptable, and deeply satisfying. Think of them as gourmet truffles meets childhood peanut butter cups, elevated with the sophistication of New York-style cheesecake — all in one palm-sized sphere.
The History
While the exact origin of “cheesecake balls” remains delightfully unchronicled in culinary archives, their emergence can be traced to the broader evolution of no-bake desserts in mid-20th-century American home kitchens. As refrigerators became standard household appliances and cream cheese gained widespread popularity (thanks in large part to Philadelphia Cream Cheese’s aggressive 1920s–1940s marketing), inventive home cooks began transforming traditional baked cheesecake fillings into chilled, scoopable formats — first as molded “cheesecake logs,” then as festive holiday “cheese balls” (often savory), and eventually into sweet, playful variations. The peanut butter twist likely gained traction alongside the cultural ubiquity of peanut butter in American pantries — from wartime rationing staples to beloved lunchbox mainstays. By the 1980s and ’90s, food magazines and community cookbooks began featuring “peanut butter cheesecake bites,” often rolled in crushed graham crackers or toasted nuts. Today’s version — refined, texture-optimized, and visually polished — reflects modern preferences for portion control, clean-label ingredients, and Instagram-worthy presentation, while honoring its humble, resourceful roots: a joyful fusion of pantry staples, refrigerator magic, and generational ingenuity.
Ingredients Breakdown
Every ingredient in this recipe serves a precise functional and sensory role — not just flavor, but structure, stability, mouthfeel, and shelf life. Let’s explore them in detail:
- Cream Cheese (full-fat, brick-style): The foundational base — provides richness, acidity, and body. Must be softened to room temperature (65–70°F) for seamless blending; cold cream cheese creates lumps and graininess. Avoid whipped or low-fat varieties — they contain stabilizers and excess moisture that compromise firmness and cause oil separation.
- Peanut Butter (creamy, natural or conventional): Opt for a no-stir, shelf-stable brand (like Jif or Skippy) for consistent viscosity and sugar content — critical for binding and sweetness balance. If using natural peanut butter (oil-separated), stir thoroughly and chill slightly before use; its higher oil content may require extra powdered sugar or chilling time to maintain shape. Crunchy peanut butter adds delightful texture but reduces smoothness — reserve it for the final ¼ cup folded in, not the full amount.
- Powdered Sugar (confectioners’ sugar): More than just sweetener — its fine granulation dissolves instantly, adds volume, absorbs excess moisture, and contributes to the dense-yet-creamy texture. Contains ~3% cornstarch, which aids in setting and prevents stickiness. Sift before measuring to avoid clumps that create gritty pockets.
- Vanilla Extract (pure, not imitation): Enhances depth and rounds out sharp notes. Real vanilla contains over 250 aromatic compounds — it harmonizes peanut butter’s earthiness and cream cheese’s tang, lending warmth and complexity.
- Pinch of Fine Sea Salt: A non-negotiable flavor amplifier. It heightens sweetness, balances fat, and mitigates any potential chalkiness from the cream cheese. Don’t skip — even ⅛ tsp makes a measurable difference.
- Coating Options (choose one or layer multiple):
- Semi-Sweet or Dark Chocolate (60–70% cacao): Tempered for shine and snap — high cocoa butter content ensures smooth melting and crisp set. Avoid chocolate chips (they contain wax inhibitors) unless specifically labeled “melting wafers.”
- White Chocolate (high-quality, couverture-grade): Adds elegant contrast and subtle sweetness — ensure it contains real cocoa butter, not palm oil.
- Crushed Graham Crackers / Digestive Biscuits: For rustic charm and textural crunch — pulse until fine but not dusty; coarse pieces provide grip and visual appeal.
- Toasted Chopped Peanuts: Elevates nuttiness and adds protein-rich crunch — toast raw peanuts in a dry skillet over medium-low heat for 5–7 minutes until fragrant and golden.
- Freeze-Dried Banana Powder or Crushed Strawberries: For fruity brightness and natural pink/gold hues — adds antioxidants and a surprising aromatic lift.
- Espresso Powder Dusting: A sophisticated finish — ½ tsp finely ground espresso enhances chocolate notes without adding bitterness.
Step-by-Step Recipe
- Prep & Chill All Equipment: Place mixing bowl, beaters (or paddle attachment), rubber spatula, and baking sheet lined with parchment or silicone mat into the freezer for 15 minutes. Cold tools prevent premature softening and improve emulsion stability.
- Soften Cream Cheese Properly: Remove cream cheese from foil wrapper and place on a plate. Let sit at room temperature (68–72°F) for 30–45 minutes — NOT longer. Test readiness by gently pressing a finger: it should yield with slight resistance, not sink in or feel greasy. Over-softened cheese weeps water and breaks the mixture.
- Cream Base Mixture: In chilled bowl, beat softened cream cheese on medium speed for 45 seconds until smooth and glossy. Scrape down sides. Add peanut butter and beat 60 seconds until fully homogenized and airy — no streaks or separation. Add vanilla and salt; beat 15 seconds to incorporate.
- Incorporate Powdered Sugar Gradually: With mixer on LOW, add powdered sugar ¼ cup at a time, beating 20 seconds after each addition. Pause to scrape bowl thoroughly. After final addition, beat 30 seconds until mixture is thick, cohesive, and pulls away cleanly from sides — it should hold a soft peak when lifted. Overbeating introduces air bubbles that cause cracking during chilling.
- Chill the Dough (Critical Step): Transfer mixture to parchment-lined loaf pan or shallow dish. Smooth top with offset spatula. Cover tightly with plastic wrap pressed directly onto surface (prevents skin formation). Refrigerate 2 hours minimum — ideally 3–4 hours — until firm enough to hold shape when scooped. For fastest results, freeze 45 minutes (but do not exceed 60 mins — partial freezing causes icy crystals).
- Scoop & Roll: Use a 1-tablespoon cookie scoop (or melon baller) for uniform 1-inch balls. Scoop, roll quickly between lightly oiled palms (a ½ tsp neutral oil like grapeseed prevents sticking without adding flavor), and place on chilled baking sheet. Work in batches — keep unused dough refrigerated. Aim for smooth, taut surfaces — any cracks will show through chocolate coating.
- Deep Chill Before Coating: Freeze shaped balls 20 minutes — this firms the exterior, preventing melting when dipped and ensuring clean chocolate release.
- Melt & Temper Chocolate (Optional but Recommended): Chop chocolate finely. Use double boiler (heatproof bowl over simmering — not boiling — water) or microwave (30-sec bursts at 50% power, stirring vigorously between). For tempering: heat to 115°F (dark) or 110°F (milk/white), cool to 82°F, reheat to 88–90°F. Stir constantly — never let water or steam contact chocolate. Test temper by spreading a smear on parchment; it should set shiny and hard within 3 minutes at room temp.
- Dip & Coat: Using two forks or dipping tools, submerge one ball at a time into melted chocolate. Tap fork gently against side of bowl to remove excess. Place on parchment-lined tray. Immediately apply toppings (e.g., sprinkle with sea salt, drizzle with contrasting chocolate, roll in crushed pretzels) before chocolate sets. Work quickly — chocolate begins setting in ~15 seconds.
- Final Set & Cure: Refrigerate coated balls 30 minutes to fully harden chocolate. For best texture and flavor development, transfer to airtight container and refrigerate 24 hours before serving — this allows flavors to meld and texture to mellow from “cold-firm” to “luxuriously creamy.”
Tips
- Measure by Weight for Precision: Use a digital kitchen scale — 1 cup powdered sugar = 120g, 1 cup peanut butter = 270g. Volume measurements vary wildly due to packing and air, leading to dry or oily batches.
- Fix Sticky Dough Instantly: If mixture sticks to hands despite oiling, add 1 tsp powdered sugar and chill 10 more minutes. Never add flour or cornstarch — they dull flavor and create pastiness.
- Prevent Chocolate Bloom: Store finished balls in single layer with parchment between tiers. Avoid temperature fluctuations — moving from fridge to warm room then back causes fat/sugar bloom (white streaks). Serve straight from fridge.
- Speed Up Chilling: Spread dough thinly on parchment-lined sheet pan before chilling — increases surface area for faster cooling. Re-roll once firm.
- Texture Rescue: If balls crumble during rolling, the mixture is too cold. Let sit at room temp 2–3 minutes, then try again. If too soft, return to freezer 5 minutes.
- Flavor Infusion Hack: Steep 1 tsp finely grated orange zest or ½ tsp cinnamon in warm peanut butter for 10 minutes before adding to cream cheese — strain solids for ultra-smooth result.
- Make-Ahead Mastery: Uncoated balls freeze beautifully for up to 3 months — place on tray, freeze solid, then transfer to freezer bag. Thaw 10 minutes before dipping. Coated balls keep refrigerated 2 weeks or frozen 1 month (wrap individually in parchment + foil).
- Consistent Sizing = Even Setting: Use a #100 scoop (¾ tsp) for petit fours, #40 (1.5 Tbsp) for party favors. Label scoops with masking tape for repeat batches.
- Chocolate Dipping Pro-Tip: Keep melted chocolate warm in a pre-warmed thermos (fill with hot water, empty, dry) — maintains ideal working temp for 45+ minutes without re-melting.
- Visual Polish: Before serving, wipe each ball with damp paper towel to remove fingerprints or dust — reveals true chocolate sheen.
Variations and Customizations
This recipe is a master canvas — infinitely customizable for dietary needs, seasonal themes, global flavors, and creative expression:
- Gluten-Free: Use GF-certified powdered sugar (some brands process in wheat facilities), GF graham cracker crumbs (like Schär), and ensure peanut butter has no malt flavoring. Substitute oat flour (toasted & cooled) for binding if needed.
- Vegan: Replace cream cheese with blended silken tofu (12 oz) + 3 Tbsp lemon juice + 2 Tbsp nutritional yeast + ¼ tsp xanthan gum (for elasticity). Use natural peanut butter + 1 Tbsp maple syrup for added binding. Coat with vegan dark chocolate (Enjoy Life or Hu Kitchen).
- Protein-Packed: Add 2 scoops unflavored or peanut butter whey/collagen protein powder (reduce powdered sugar by 3 Tbsp). Or fold in ¼ cup toasted soy nuts or roasted chickpeas for crunch.
- Decadent Luxe Edition: Swirl in 2 Tbsp salted caramel sauce before rolling. Top with edible gold leaf and flaky Maldon salt. Use Valrhona Guanaja 70% chocolate for unparalleled depth.
- Seasonal Twists:
- Fall: Add 1 tsp pumpkin pie spice + 2 Tbsp pure pumpkin purée (reduce peanut butter by 1 Tbsp); roll in spiced pepitas.
- Winter Holidays: Fold in ¼ cup finely chopped dried cranberries + 1 tsp orange extract; coat in white chocolate + crushed candy cane.
- Spring: Mix in 2 Tbsp freeze-dried strawberry powder + 1 tsp rosewater; dip in white chocolate + pistachio dust.
- Summer: Add 1 Tbsp honey + zest of 1 lime; roll in toasted coconut + lime sugar (zest + sugar, pulsed).
- Global Inspirations:
- Thai-Inspired: Add 1 tsp fish sauce (yes — umami boost!), ½ tsp lemongrass paste, and 1 Tbsp crushed roasted peanuts; coat in dark chocolate + crushed wasabi peas.
- Mexican Chocolate: Add 1 tsp ancho chili powder + ¼ tsp cinnamon + 1 Tbsp piloncillo syrup; top with cacao nibs.
- Japanese Matcha: Whisk 1 tsp ceremonial matcha into powdered sugar before adding; dip in white chocolate + black sesame.
- Kid-Friendly Fun: Press mini chocolate chips or colorful sprinkles into balls before chilling. Use fun-shaped molds (bears, stars) instead of rolling. Serve with “dip bar” of melted chocolate, yogurt drizzle, and toppings.
- Low-Sugar/Keto: Replace powdered sugar with 1 cup erythritol-based confectioners’ blend (like Swerve) + 1 tsp xanthan gum. Use sugar-free chocolate (Lily’s) and natural PB with no added sugar. Net carb count drops to ~2g per ball.
- Alcohol-Infused: Add 1 Tbsp bourbon, amaretto, or Bailey’s Irish Cream (reduce vanilla by ½ tsp). Let mixture rest 10 minutes before chilling to allow alcohol to integrate — enhances aroma without harshness.
Health Considerations and Nutritional Value
While undeniably indulgent, these No-Bake Peanut Butter Cheesecake Balls can be thoughtfully integrated into a balanced lifestyle — especially with mindful modifications. A standard 1-inch ball (recipe yields ~36) contains approximately:
- Calories: 110–135 kcal (varies by coating — chocolate adds 25–40 kcal, nuts add 15–20)
- Macronutrients: 6–8g fat (mostly unsaturated from PB), 2–3g protein, 10–14g total carbs (8–12g sugars), <1g fiber
- Vitamins & Minerals: Good source of niacin (B3), magnesium, phosphorus, and vitamin E — primarily from peanut butter. Calcium and vitamin A come from cream cheese.
Key Health Notes:
- Sugar Awareness: Traditional versions rely heavily on powdered sugar. For blood sugar management, use monk fruit/erythritol blends and pair with a protein/fat-rich snack (e.g., apple slices with almond butter) to slow glucose absorption.
- Saturated Fat Context: Cream cheese contributes ~3g sat fat per ball. Not inherently harmful in moderation — recent research emphasizes overall dietary pattern over isolated nutrients. Pair with omega-3-rich toppings (walnuts, chia seeds) for lipid balance.
- Allergen Transparency: Contains dairy, peanuts, and gluten (if using graham crackers). Always label clearly for guests. Sunflower seed butter or tahini offer safe, nutrient-dense alternatives.
- Gut-Friendly Option: Add 1 tsp inulin or acacia fiber to powdered sugar mix — boosts prebiotic content without altering taste or texture.
- Portion Psychology: Their small size supports intuitive eating — savoring slowly satisfies cravings faster than larger desserts. Studies show bite-sized treats reduce overall intake by up to 22% compared to slab-cut portions.
- Antioxidant Boost: Choosing dark chocolate (>70% cacao) adds flavanols linked to improved endothelial function and cognitive support. Pair with blueberry powder or pomegranate molasses drizzle for synergistic polyphenols.
Consult a registered dietitian for personalized guidance — especially with diabetes, IBS, or specific therapeutic diets (e.g., Mediterranean, DASH).
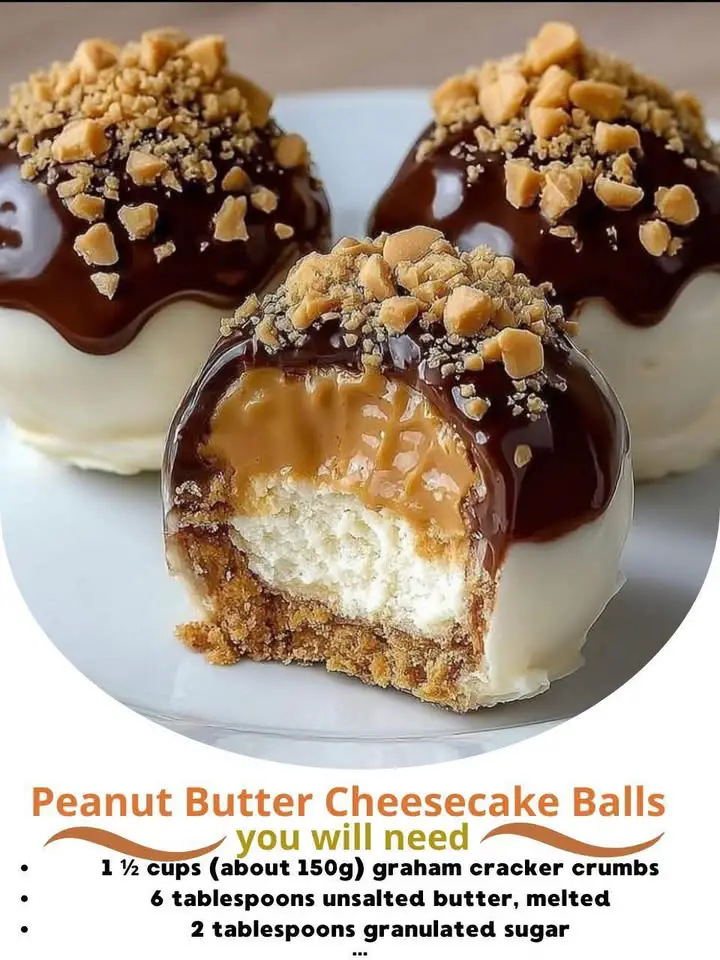
Ingredients
- 16 oz (2 bricks) full-fat cream cheese, softened to room temperature (65–70°F)
- 1 cup (250g) creamy, no-stir peanut butter (Jif, Skippy, or equivalent)
- 2 ½ cups (300g) powdered sugar, sifted
- 2 tsp pure vanilla extract
- ¼ tsp fine sea salt
- For Coating (choose one or combine):
- 12 oz high-quality semi-sweet or dark chocolate (60–70% cacao), finely chopped
- OR 1 cup crushed graham cracker crumbs (about 10 full sheets)
- OR ¾ cup finely chopped toasted peanuts
- OR 1 cup white chocolate, finely chopped
- Optional Garnishes: Flaky sea salt, espresso powder, freeze-dried fruit dust, edible glitter, mini chocolate chips
Directions
- Place mixing bowl, beaters, rubber spatula, and a parchment-lined baking sheet into freezer for 15 minutes.
- Let cream cheese sit at room temperature for 30–45 minutes until yielding but cool to touch. Do not microwave.
- In chilled bowl, beat cream cheese with electric mixer on medium for 45 seconds until smooth. Scrape bowl.
- Add peanut butter and beat 60 seconds until fully blended and creamy. Scrape bowl.
- Add vanilla and salt; beat 15 seconds.
- With mixer on LOW, gradually add powdered sugar ¼ cup at a time, beating 20 seconds after each addition. Scrape bowl thoroughly between additions.
- Beat final mixture 30 seconds until thick, smooth, and pulling away from bowl sides.
- Transfer to parchment-lined 8×4-inch loaf pan. Smooth top. Cover with plastic wrap pressed directly onto surface.
- Refrigerate 3–4 hours (or overnight) until very firm — should hold shape when pressed.
- Line baking sheet with fresh parchment. Use 1-Tbsp cookie scoop to portion dough. Roll quickly between lightly oiled palms into smooth 1-inch balls. Place on sheet.
- Freeze balls 20 minutes until exterior is firm.
- Melt chocolate using double boiler or microwave (30-sec bursts at 50% power, stirring between). Maintain at 88–90°F for best set.
- Dip each frozen ball into chocolate using two forks. Tap off excess. Place on parchment. Immediately add garnishes.
- Refrigerate 30 minutes to set chocolate completely.
- Store in airtight container in refrigerator for up to 2 weeks, or freeze for up to 3 months.
FAQ
- Can I make these ahead for a party?
- Absolutely! Uncoated balls freeze flawlessly for 3 months. Thaw 10 minutes before dipping. Coated balls keep refrigerated 14 days — ideal for holiday prep.
- Why did my mixture separate or look greasy?
- Most common causes: cream cheese was too warm (above 72°F), peanut butter was natural/oil-separated and not thoroughly stirred, or you overbeat after adding sugar. Next time, chill ingredients and beat only until combined.
- Can I use crunchy peanut butter for the whole batch?
- You can — but expect looser texture and less smooth rolling. For best results, use creamy for base and fold in ¼ cup crunchy PB at the end.
- My chocolate won’t harden — what went wrong?
- Either the balls weren’t cold enough before dipping (melting the chocolate’s structure), or the chocolate wasn’t tempered properly (causing soft, streaky set). Always freeze balls 20 minutes and use properly melted chocolate.
- How do I prevent cracks in the chocolate coating?
- Cold balls + room-temp chocolate + quick, confident dipping = crack-free finish. Also, avoid touching chocolate-coated balls until fully set — oils from skin disrupt crystallization.
- Are these safe for pregnant people or young children?
- Yes — all ingredients are pasteurized and no raw eggs are used. Just ensure peanut butter is age-appropriate (introduce after 6 months per pediatrician guidance).
- Can I make them nut-free?
- Easily! Substitute sunflower seed butter or soy nut butter (like Wowbutter) 1:1. Toast seeds before blending for deeper flavor. Confirm all labels are tree-nut-free.
- What if I don’t have a mixer?
- Use a sturdy silicone spatula and stand mixer bowl. Vigorously fold cream cheese and PB together until creamy (5–7 minutes), then gradually whisk in powdered sugar by hand. It’s arm-day worthy — but doable!
- Why do you recommend sifting powdered sugar?
- Clumps create gritty pockets and uneven sweetness. Sifting ensures smooth emulsion and prevents lumps that break the delicate fat matrix.
- Can I add mix-ins like chocolate chips or fruit?
- Yes — fold in up to ⅓ cup mini chocolate chips, finely diced dried fruit, or toasted coconut AFTER chilling the base mixture (so they don’t bleed color or melt). Avoid fresh fruit — excess moisture causes spoilage.
Summary
No-Bake Peanut Butter Cheesecake Balls are a triumph of simplicity meeting sophistication — creamy, tangy, nutty, and luxuriously textured, requiring no oven, no fuss, and delivering gourmet satisfaction in every bite.
With endless customization options, smart health-conscious adaptations, and make-ahead versatility, they’re not just a dessert — they’re a celebration of pantry ingenuity, seasonal creativity, and joyful, accessible baking for everyone.