No-Bake Peanut Butter Cheesecake Balls: A Decadent Delight You Can’t Resist
If you’re craving something rich, creamy, and utterly satisfying without spending hours in the kitchen, then No-Bake Peanut Butter Cheesecake Balls are your perfect go-to treat. These bite-sized delights combine the smoothness of cream cheese, the nutty richness of peanut butter, and a sweet chocolate coating to create a dessert that’s not only easy to make but also impossible to put down. Whether you’re hosting a party, preparing a quick snack for the kids, or simply treating yourself, these no-bake wonders are guaranteed to impress with minimal effort and maximum flavor.
The History of No-Bake Desserts and Peanut Butter Treats
No-bake desserts have long been a staple in American kitchens, especially during the hot summer months when turning on the oven feels like a crime against comfort. The concept dates back to the early 20th century when convenience foods like gelatin, condensed milk, and cream cheese became widely available. Recipes such as refrigerator cakes, icebox pies, and chilled puddings gained popularity because they required little more than mixing, chilling, and serving—perfect for busy homemakers and novice bakers alike.
Peanut butter, a beloved American staple since the late 1800s, found its way into countless dessert recipes due to its rich, savory-sweet profile and binding properties. From classic peanut butter cookies to fudge and energy balls, it’s a versatile ingredient that adds both flavor and texture. Combining peanut butter with cheesecake elements—like cream cheese and graham cracker crumbs—was a natural evolution, leading to modern favorites such as peanut butter cheesecake truffles and, of course, No-Bake Peanut Butter Cheesecake Balls. These treats pay homage to retro dessert culture while fitting perfectly into today’s fast-paced lifestyle and love for handheld snacks.
Ingredients Breakdown: What Makes This Recipe Shine
The magic of No-Bake Peanut Butter Cheesecake Balls lies in the harmony of simple yet powerful ingredients. Each component plays a crucial role in creating the perfect balance of flavor, texture, and structure:
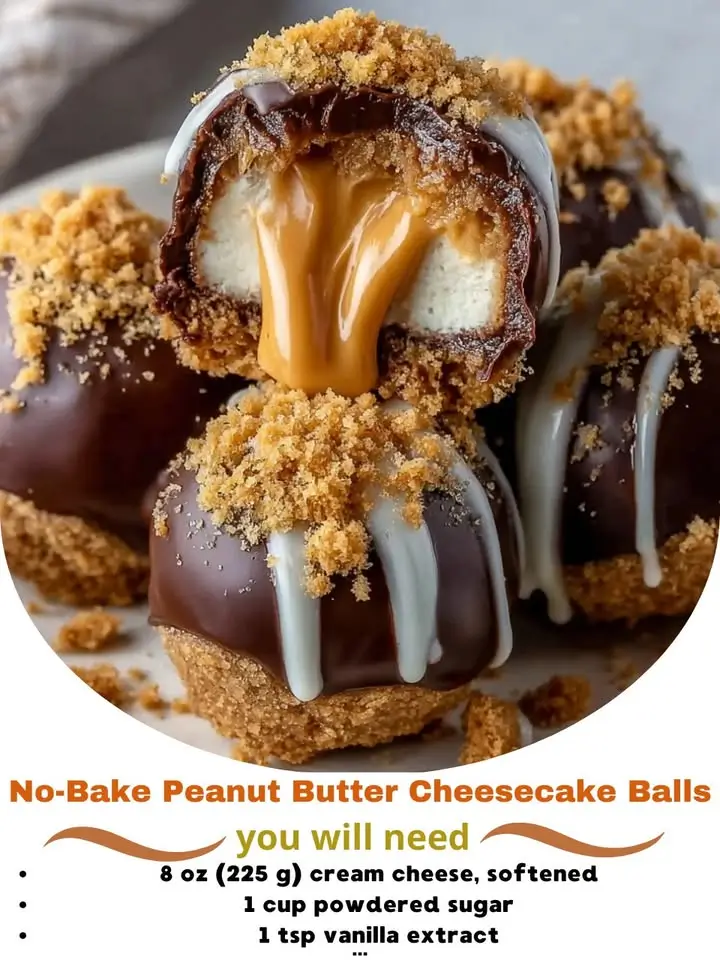
- Cream Cheese: Provides a rich, tangy base that mimics traditional cheesecake. It’s essential for that creamy mouthfeel and helps bind all ingredients together. Always use full-fat cream cheese for the best results—low-fat versions can make the mixture too soft or watery.
- Peanut Butter: Use smooth, natural peanut butter (unsweetened and unsalted) for a pure nutty flavor. Avoid overly oily varieties; if needed, drain excess oil before measuring. Crunchy peanut butter can be used for added texture, though smooth is recommended for uniformity.
- Powdered Sugar: Adds sweetness and helps firm up the mixture. Sift it first to avoid lumps and ensure a silky consistency.
- Vanilla Extract: Enhances overall flavor with warm, aromatic notes. Pure extract is preferred over imitation for depth and quality.
- Graham Cracker Crumbs: Contribute a subtle sweetness and slight crunch, replicating the crust of a real cheesecake. You can substitute with digestive biscuits, oatmeal cookies, or gluten-free crackers if needed.
- Chocolate Chips: Used for the outer coating. Semi-sweet, dark, or milk chocolate all work well depending on your preference. High-quality chocolate ensures a glossy finish and better snap when set.
- Coconut Oil or Shortening (optional): Mixed with melted chocolate to improve tempering and prevent cracking. Coconut oil adds a hint of tropical aroma, while vegetable shortening keeps the coating firm at room temperature.
- Sprinkles, Crushed Nuts, or Sea Salt (optional): For garnish and added sensory appeal. These toppings elevate presentation and offer bursts of contrasting texture and flavor.
All ingredients should be at room temperature where applicable (especially cream cheese and peanut butter) to ensure smooth blending and easy shaping.
Step-by-Step Recipe: How to Make No-Bake Peanut Butter Cheesecake Balls
Follow this detailed guide to create flawless, restaurant-quality peanut butter cheesecake balls from scratch—all without turning on your oven.
- Prepare Your Workspace: Line a large baking sheet or tray with parchment paper or a silicone mat. Place it in the freezer to chill. This will help the balls firm up quickly after rolling. Set aside another tray for the finished chocolate-dipped balls.
- Make the Filling Mixture: In a large mixing bowl, beat 8 oz of softened cream cheese using a hand mixer or spatula until smooth and fluffy (about 1–2 minutes). Add 1 cup of creamy peanut butter and mix until fully incorporated and no streaks remain.
- Add Sweetness and Flavor: Gradually add ¾ cup of sifted powdered sugar, mixing on low speed to avoid clouding your kitchen. Stir in 1 teaspoon of pure vanilla extract and blend until the mixture is homogeneous and slightly thickened.
- Incorporate the Crumbs: Fold in ½ cup of graham cracker crumbs using a spatula. Mix gently until evenly distributed. The mixture should be thick enough to hold its shape when pressed between fingers but still pliable. If too sticky, add an additional tablespoon of crumbs. If too dry, add a half-teaspoon of milk or extra peanut butter.
- Chill the Mixture: Cover the bowl with plastic wrap and refrigerate for at least 45 minutes (or up to 2 hours). Chilling makes the dough easier to roll and prevents spreading during handling.
- Form the Balls: Once chilled, scoop out level tablespoons of the mixture. Roll each portion between clean palms into smooth, round balls (about 1-inch diameter). Place them on the pre-chilled tray, spacing them evenly apart. Return the tray to the freezer for 15–20 minutes to firm up further—this step is crucial for clean dipping later.
- Melt the Chocolate Coating: While the balls are freezing, prepare the chocolate. In a microwave-safe bowl, combine 1½ cups of chocolate chips with 1 tablespoon of coconut oil or vegetable shortening. Microwave in 30-second intervals, stirring between each, until completely smooth and glossy. Alternatively, use a double boiler on the stove for more controlled melting.
- Dip the Balls: Remove the tray from the freezer. Using a fork or dipping tool, submerge one ball at a time into the melted chocolate, tapping off excess. Transfer it to the second tray. Work quickly to prevent the balls from softening.
- Decorate (Optional): Immediately after dipping, sprinkle with crushed peanuts, sea salt flakes, colored sprinkles, or drizzle with white chocolate for visual flair. Repeat with remaining balls.
- Final Chill: Place the coated balls in the refrigerator for 20–30 minutes to allow the chocolate to set completely. For longer storage, transfer them to the freezer briefly, then move to the fridge to avoid condensation.
- Serve or Store: Once set, serve chilled or at cool room temperature. Enjoy within 1–2 hours for optimal texture, or store properly for later.
Pro Tips for Perfect No-Bake Peanut Butter Cheesecake Balls
- Use Room Temperature Ingredients: Cold cream cheese won’t blend smoothly and may result in lumpy filling. Take it out of the fridge at least 30 minutes ahead.
- Don’t Skip the Double Chill: Refrigerating the mixture before rolling and freezing the formed balls before dipping ensures structural integrity and prevents collapse during coating.
- Wear Food-Safe Gloves: When rolling the balls, lightly grease your hands with non-stick spray or wear disposable gloves to minimize sticking.
- Prevent Chocolate Cracking: Adding a small amount of fat (coconut oil or shortening) to the chocolate improves flexibility and gives a professional sheen.
- Avoid Over-Melting: Chocolate can seize if overheated. Stir frequently and stop as soon as it’s melted. If it does seize, add a teaspoon of vegetable oil and stir vigorously to restore smoothness.
- Uniform Sizing: Use a small cookie scoop (about 1 tbsp capacity) for consistent size and even chilling/dipping.
- Work in Batches: Only remove a few balls from the freezer at a time to keep them cold during the dipping process.
- Label and Date: If storing long-term, label containers clearly to track freshness.
Variations and Customizations: Make It Your Own
One of the greatest advantages of this recipe is its adaptability. Try these creative twists to suit different tastes, dietary needs, or seasonal themes:
- Chocolate Lover’s Version: Add mini chocolate chips to the filling mixture for melty pockets in every bite.
- Reese’s-Inspired: Press a miniature peanut butter cup into the center of each ball before freezing for a surprise-filled treat.
- Gluten-Free Option: Replace graham cracker crumbs with certified gluten-free oats, crushed gluten-free cookies, or almond flour.
- Vegan Adaptation: Use dairy-free cream cheese (like Kite Hill or Miyoko’s), natural peanut butter without honey, and vegan chocolate chips. Ensure all ingredients are plant-based.
- Protein Boost: Mix in 1–2 scoops of unflavored or vanilla protein powder and adjust crumbs accordingly. Great for post-workout snacks.
- Low-Sugar or Keto-Friendly: Substitute powdered sugar with powdered erythritol or monk fruit sweetener. Use keto-compliant chocolate and low-carb nut flours instead of graham crackers.
- Fruit Infusion: Swirl in a spoonful of strawberry jam or banana puree for a fruity twist (note: moisture content may affect texture).
- Holiday Themes: Roll in red and green sprinkles for Christmas, pastel colors for Easter, or orange and black for Halloween.
- Savory-Sweet Option: Sprinkle with flaky sea salt or smoked paprika after dipping for a gourmet touch.
- Mini Truffle Style: Roll smaller (½-inch) balls and package them in mini cupcake liners for elegant party favors.
Health Considerations and Nutritional Value
While undeniably delicious, it’s important to enjoy No-Bake Peanut Butter Cheesecake Balls in moderation due to their calorie density and sugar content. However, they do offer some nutritional benefits when made with quality ingredients:
- Healthy Fats: Peanut butter contains monounsaturated and polyunsaturated fats, which support heart health when consumed in balance.
- Protein Content: Both peanut butter and cream cheese contribute moderate protein, helping with satiety.
- Calcium and Vitamin B12: Cream cheese provides small amounts of bone-supporting calcium and nerve-healthy B12.
- Energy-Dense Snack: Ideal for active individuals needing quick fuel, though not recommended for frequent consumption by those managing weight or blood sugar.
Nutrition Estimate (per ball, based on standard recipe, yields ~24 balls):
| Calories | 140–160 |
| Total Fat | 10–12g |
| Saturated Fat | 4–5g |
| Carbohydrates | 10–12g |
| Sugars | 7–9g |
| Fiber | 0.5–1g |
| Protein | 2–3g |
Note: Values vary based on specific brands, substitutions, and exact measurements. Those with allergies to dairy, peanuts, or gluten should carefully check labels or modify ingredients accordingly. Individuals with lactose intolerance may tolerate small portions, but lactose-free alternatives are safer.
Full Ingredient List
- 8 oz (225g) full-fat cream cheese, softened
- 1 cup (260g) creamy peanut butter (unsweetened, natural preferred)
- ¾ cup (90g) powdered sugar, sifted
- 1 teaspoon pure vanilla extract
- ½ cup (50g) graham cracker crumbs (or substitute of choice)
- 1½ cups (270g) semi-sweet or dark chocolate chips
- 1 tablespoon coconut oil or vegetable shortening
- Optional toppings: crushed peanuts, sprinkles, sea salt, white chocolate drizzle
Detailed Directions
To summarize the step-by-step method with precision:
- In a large bowl, beat softened cream cheese until smooth.
- Add peanut butter and mix until fully combined.
- Gradually incorporate sifted powdered sugar, followed by vanilla extract.
- Fold in graham cracker crumbs until mixture holds together.
- Chill mixture in refrigerator for 45 minutes.
- Roll into 1-inch balls and place on a chilled tray.
- Freeze balls for 15–20 minutes until firm.
- Melt chocolate and coconut oil in 30-second microwave intervals, stirring until smooth.
- Dip each ball in chocolate using a fork; tap off excess.
- Place on a clean tray and immediately decorate if desired.
- Refrigerate for 20–30 minutes until chocolate is fully set.
- Serve chilled and enjoy!
Frequently Asked Questions (FAQ)
Q: Can I make these ahead of time?
A: Absolutely! These balls can be made up to 1 week in advance. Store in an airtight container in the refrigerator or up to 1 month in the freezer.
Q: Why are my balls falling apart?
A: This usually happens if the mixture isn’t chilled enough or there’s too much peanut butter/oil. Ensure proper chilling and adjust crumb content as needed.
Q: Can I use crunchy peanut butter?
A: Yes, though the texture will be less uniform. Some prefer the added crunch—just be aware it may affect the smoothness of the final bite.
Q: How do I store leftovers?
A: Keep in an airtight container in the refrigerator for up to 1 week. Layer with parchment paper to prevent sticking. For longer storage, freeze for up to 1 month—thaw in the fridge before serving.
Q: Can I bake these?
A: No, this recipe is specifically designed to be no-bake. Baking would melt the chocolate and alter the texture entirely.
Q: Are these safe for kids?
A: Yes, but supervise young children due to choking hazard from small, firm balls. Consider making them slightly larger or flattening into truffle bites.
Q: Can I use milk chocolate instead?
A: Definitely. Milk chocolate offers a sweeter, milder coating. Just be aware it may soften faster at room temperature.
Q: Can I make them without chocolate?
A: Yes. Roll the balls in crushed graham crackers, cocoa powder, shredded coconut, or powdered sugar for a simpler version.
Summary
No-Bake Peanut Butter Cheesecake Balls are a heavenly fusion of creamy cheesecake, rich peanut butter, and silky chocolate—crafted without an oven and ready in under two hours. Easy to customize, perfect for sharing, and irresistibly delicious, they’re the ultimate no-fuss dessert for any occasion.